> ## Documentation Index
> Fetch the complete documentation index at: https://documentation.2cloudnine.com/llms.txt
> Use this file to discover all available pages before exploring further.
# Employee Payroll Onboarding (Utilities) - Administrator Guide
## Purpose
The purpose of this Administrator Guide is to provide information about packaged Utilities variations of
Employee Onboarding within the Community. The content in this guide is optional and may be utilised
during implementation, or even after a project has gone live. The intended audience for this document is
System Administrators.
## Overview
The Employee Onboarding Components within the Utilities Package provide Payees with an intuitive and
dynamic option of providing and updating their Payroll information as required to successfully onboard
and be paid via 2cloudnine Payroll.
## TFN Declaration
The Tax File Number Declaration Screen Flow provides an alternate option for completing a Tax File
Number Declaration within the Community. The Screen Flow is closely aligned to the ATO’s standard TFN
Declaration form. It can be used to replace the TFN Details tab within the packaged 2cloudnine Emp
Comm Profile Component, and will allow an Employee to both create and update their PAYG
Withholding details.
**Disable Updates to Personal Information**
The TFN Declaration Screen Flow contains a section for an Employee's Name and Birthdate to be shown,
which is enabled by default and contains the following fields:
* Title
* First Name
* Last Name
* Other Names
* Previous Family Name
* Birthdate
For Orgs that do not want Payees to update this information within the Community, this can be disabled
by following the steps below:
Go to **Setup** - **Custom Settings** - **2c9 - Utility Package Settings** - **Manage**
1. Check the setting **TFN Remove Personal Details** .
2. Select **Save** .
## Company Details
Like the TFN Declaration, the 2c9 Utilities - GST Withholding Screen Flow provides an alternate format for
Payees to create and update their GST Withholding details. The Screen Flow can replace the Company
Details tab available within the 2c9 Emp Comm Profile Component.
**Disable GST Registration Requirement**
By default, Contractor Payees must be registered for GST and create a GST Withholding. However, if your
Org engages Contractors who are not registered for GST, this requirement can be disabled by following
the steps below:
Go to **Setup** - **Custom Settings** - **2c9 - Utility Package Settings** - **Manage**
1. Check the setting **GST Registration Not Required** .
2. Select **Save** .
## Superannuation Choice
The Superannuation Choice Screen Flow provides an alternate option for Payees to create or update a
Superannuation Withholding record.
The Screen Flow can be used to replace the Super Details Tab currently available within the Emp Comm
Profile Component and provides options for adding an APRA, SMSF, or Client Default Super Fund. An
additional feature allows uploading of files for an APRA or SMSF to be made mandatory, preventing the
Payee from continuing without first uploading the required documents.
**Mandatory File Uploads**
The Flow provides the option to make file uploads mandatory for both APRA and SMSF funds. To enable
this feature:
Go to **Setup** - **Custom Settings** - **2c9 - Utility Package Settings** - **Manage**
1. Select the checkbox **Super SMSF File Mandatory** if required.
2. Select the checkbox for **Super Apra File Mandatory** if required.
3. Select **Save** .
To update the wording in the mandatory file upload, this is done within the Screen Flow itself. Please
contact the 2cloudnine Customer Success Team if you require assistance with this.
## Create Custom Settings
The Employee Payroll Onboarding utilises Custom Settings for defining specific features of the related
Screen Flows. To populate the Custom Settings:
Go to **Setup** - **Custom Settings** - **2c9 - Utility Package Settings** - **Manage**
1. Select the **New** button.
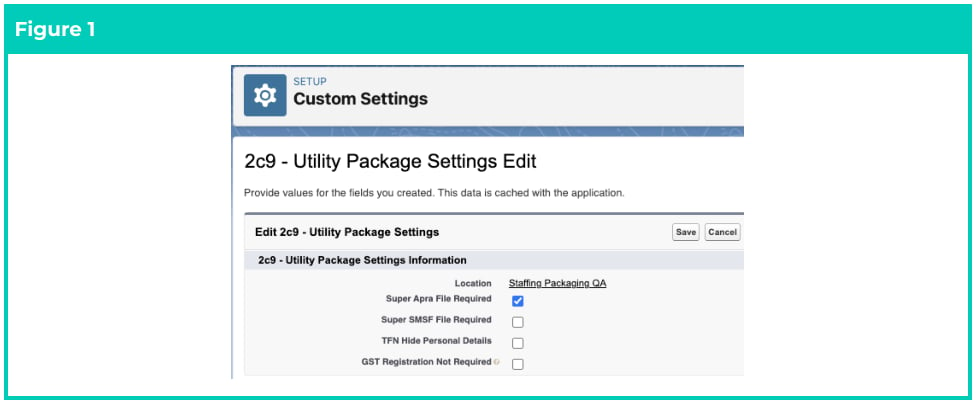
2. Select the checkboxes as required (see Figure 1).
3. Select **Save** .
 ## Activate Screen Flows
Before using the Employee Payroll Onboarding Screen Flows, they must be activated first. To activate the
Flows:
Go to **Setup** - **Flows**
1. Select **2c9 Utilities - Community Capture TFN** .
2. Select **Activate** .
3. Go back to the Flows and select **2c9 Utilities - Community Capture Superannuation Details** .
4. Select **Activate** .
5. Go back to the Flows and select **2c9 Utilities - Community Capture Payment Details** .
6. Select **Activate** .
7. Go back to the Flows and select **2c9 Utilities - Community Capture GST** .
8. Select **Activate** .
**Important Notes**
*(No GST Payees)*
*If the Payment Entities only employ PAYG Payees, you can skip activating the 2c9 Utilities -*
*Community Capture GST. You can also skip configuration steps related to separating PAYG and GST*
*Withholdings.*
## Payment Details
The Payment Details Screen Flow can be added to the Employee Community to provide an alternative for
Payees to create or update their Payment Details. The Screen Flow can be used to replace the Payment
Details tab on the Emp Comm Profile Component and provides the Payee with the ability to provide
Payment Details for multiple bank accounts, with different Distribution Types such as Fixed Amount or
Percentage.
## Insert Screen Flows into Community
These Employee Payroll Onboarding Screen Flows are only available for the Community and must be
added to a Community page within Community Builder. Whilst it is possible to configure the Community
as per a customer's requirement, we recommend the following as a baseline configuration for these
Flows:
Go to **Setup** - **All Sites > Builder** (for the Employee Community)
1. Navigate to the page you want the Flow to be put into (we recommend using a **My Profile** page).
2. Insert the **Tabs** Component and create 4 tabs for TFN Declaration, Company Details,
Superannuation Choice, and Payment Details.
3. Drag the Flow Component into the first TFN Declaration tab.
4. In the Flow Component window, select the Flow labelled **2c9 Utilities - Community Capture TFN Details** .
5. Drag the Flow Component into the second Company Details tab.
6. In the Flow Component window, select the Flow labelled **2c9 Utilities - Community Capture GST** .
7. Drag the Flow Component into the third Superannuation Choice tab.
8. In the Flow Component window, select the Flow labelled **2c9 Utilities - Community Capture Superannuation Details** .
9. Drag the Flow Component into the fourth Payment Details tab.
10. In the Flow Component window, select the Flow labelled **2c9 Utilities - Community Capture Payment Details** .
11. Select **Publish** .
**Important Notes**
*(Personal Details within Community)*
If you are using the Standard 2c9 ‘Emp Comm Profile’ Component for Employees to update their
Personal Information, we recommend you disable the TFN, Superannuation, and Payment Details from
within the Component. If you are not using this Component for Personal Information, then this
Component can be removed from your Community Experience.
**Audiences for PAYG & GST**
If your Customer employs both PAYG Payees and GST Withholding Contractors, Community Audiences
should be configured to streamline the User Experience by displaying only the relevant Tabs to each type
of User. The Company Details Tab should be hidden from PAYG Payees, and the TFN Declaration and
Superannuation Choice Tabs should be hidden from Contractors. To configure Audiences for PAYG and
GST Withholdings:
Go to **Setup** - **Digital Experiences** - **All Sites** - **Builder** (for the Employee Community)
1. Navigate to the **My Profile** page from the above step.
2. Select the **TFN Declaration** Tab and select **2c9 Utilities - Community Capture TFN Details** Flow.
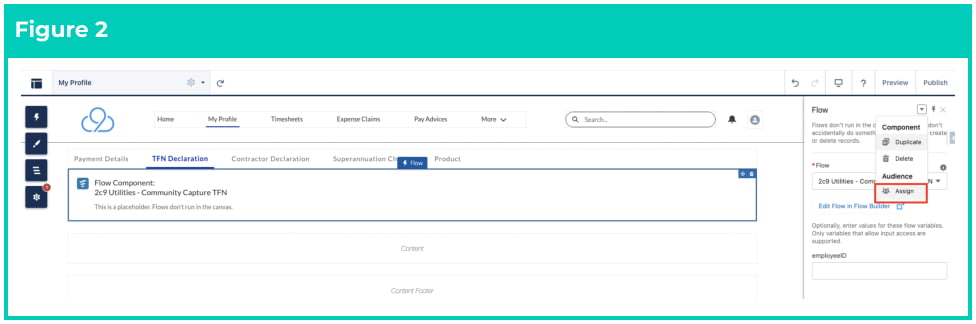
3. In the Flow menu, select the drop-down menu and then select **Assign** (see Figure 2).
## Activate Screen Flows
Before using the Employee Payroll Onboarding Screen Flows, they must be activated first. To activate the
Flows:
Go to **Setup** - **Flows**
1. Select **2c9 Utilities - Community Capture TFN** .
2. Select **Activate** .
3. Go back to the Flows and select **2c9 Utilities - Community Capture Superannuation Details** .
4. Select **Activate** .
5. Go back to the Flows and select **2c9 Utilities - Community Capture Payment Details** .
6. Select **Activate** .
7. Go back to the Flows and select **2c9 Utilities - Community Capture GST** .
8. Select **Activate** .
**Important Notes**
*(No GST Payees)*
*If the Payment Entities only employ PAYG Payees, you can skip activating the 2c9 Utilities -*
*Community Capture GST. You can also skip configuration steps related to separating PAYG and GST*
*Withholdings.*
## Payment Details
The Payment Details Screen Flow can be added to the Employee Community to provide an alternative for
Payees to create or update their Payment Details. The Screen Flow can be used to replace the Payment
Details tab on the Emp Comm Profile Component and provides the Payee with the ability to provide
Payment Details for multiple bank accounts, with different Distribution Types such as Fixed Amount or
Percentage.
## Insert Screen Flows into Community
These Employee Payroll Onboarding Screen Flows are only available for the Community and must be
added to a Community page within Community Builder. Whilst it is possible to configure the Community
as per a customer's requirement, we recommend the following as a baseline configuration for these
Flows:
Go to **Setup** - **All Sites > Builder** (for the Employee Community)
1. Navigate to the page you want the Flow to be put into (we recommend using a **My Profile** page).
2. Insert the **Tabs** Component and create 4 tabs for TFN Declaration, Company Details,
Superannuation Choice, and Payment Details.
3. Drag the Flow Component into the first TFN Declaration tab.
4. In the Flow Component window, select the Flow labelled **2c9 Utilities - Community Capture TFN Details** .
5. Drag the Flow Component into the second Company Details tab.
6. In the Flow Component window, select the Flow labelled **2c9 Utilities - Community Capture GST** .
7. Drag the Flow Component into the third Superannuation Choice tab.
8. In the Flow Component window, select the Flow labelled **2c9 Utilities - Community Capture Superannuation Details** .
9. Drag the Flow Component into the fourth Payment Details tab.
10. In the Flow Component window, select the Flow labelled **2c9 Utilities - Community Capture Payment Details** .
11. Select **Publish** .
**Important Notes**
*(Personal Details within Community)*
If you are using the Standard 2c9 ‘Emp Comm Profile’ Component for Employees to update their
Personal Information, we recommend you disable the TFN, Superannuation, and Payment Details from
within the Component. If you are not using this Component for Personal Information, then this
Component can be removed from your Community Experience.
**Audiences for PAYG & GST**
If your Customer employs both PAYG Payees and GST Withholding Contractors, Community Audiences
should be configured to streamline the User Experience by displaying only the relevant Tabs to each type
of User. The Company Details Tab should be hidden from PAYG Payees, and the TFN Declaration and
Superannuation Choice Tabs should be hidden from Contractors. To configure Audiences for PAYG and
GST Withholdings:
Go to **Setup** - **Digital Experiences** - **All Sites** - **Builder** (for the Employee Community)
1. Navigate to the **My Profile** page from the above step.
2. Select the **TFN Declaration** Tab and select **2c9 Utilities - Community Capture TFN Details** Flow.
3. In the Flow menu, select the drop-down menu and then select **Assign** (see Figure 2).
 4. Select **New Audience** .
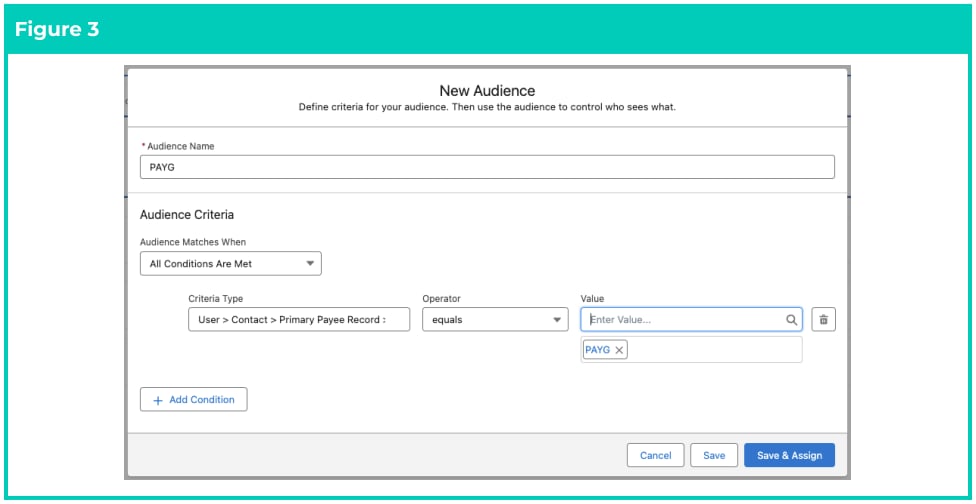
5. Enter the Audience Name **PAYG** (see Figure 3)
6. In the Audience Criteria, select the following:
* **Criteria Type** = User > Contact > Primary Payee Record > Earner Type
* **Operator** = Equals
* **Value** = PAYG
7. Select **Save & Assign** .
4. Select **New Audience** .
5. Enter the Audience Name **PAYG** (see Figure 3)
6. In the Audience Criteria, select the following:
* **Criteria Type** = User > Contact > Primary Payee Record > Earner Type
* **Operator** = Equals
* **Value** = PAYG
7. Select **Save & Assign** .
 8. Select the **Superannuation Choice** tab.
9. In the Flow menu, select the drop-down menu and then select **Assign** .
10. Select **PAYG** .
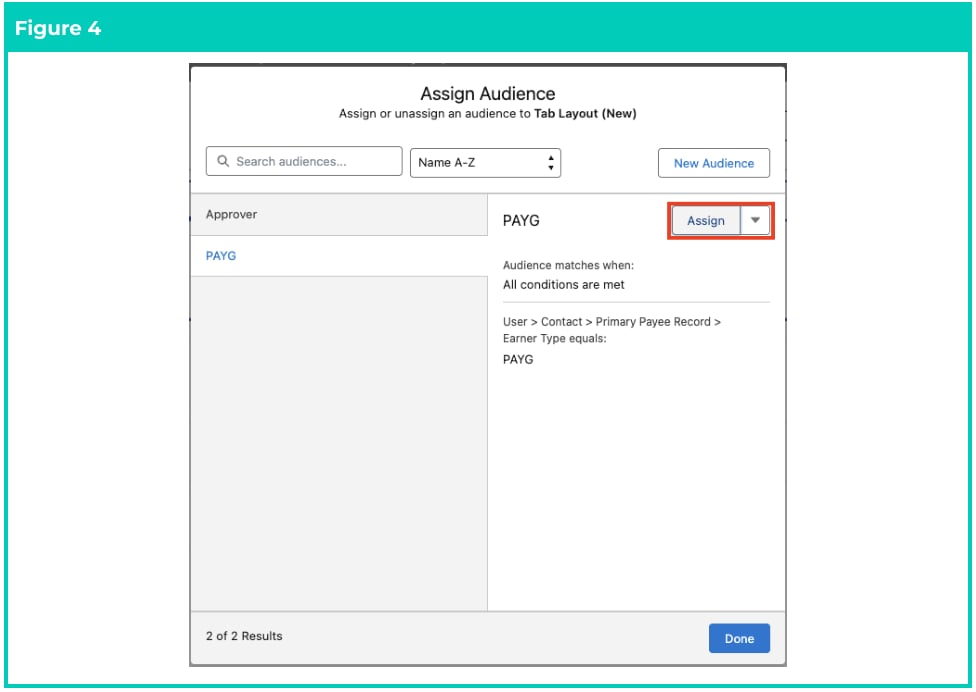
11. Select **Assign** (see Figure 4).
8. Select the **Superannuation Choice** tab.
9. In the Flow menu, select the drop-down menu and then select **Assign** .
10. Select **PAYG** .
11. Select **Assign** (see Figure 4).
 12. Select the **Company Details** tab.
13. In the Flow menu, select the drop-down menu and then select **Assign** .
14. Select **New Audience** .
15. Enter the Audience Name **GST** .
16. In the Audience Criteria select the following (as per Figure 4 above):
* **Criteria Type** = User > Contact > Primary Payee Record > Earner Type
* **Operator** = does not equal
* **T2P Pay Transaction Override Setting** = PAYG
17. Select **Save** .
18. Select **Assign** and then select **Publish** .
**Alternative Audience Layout**
With the Tabs Component, it is not possible to hide individual Tabs for different Audiences. As a result,
while the individual Flows will not be displayed, the Tab Labels themselves will still appear.
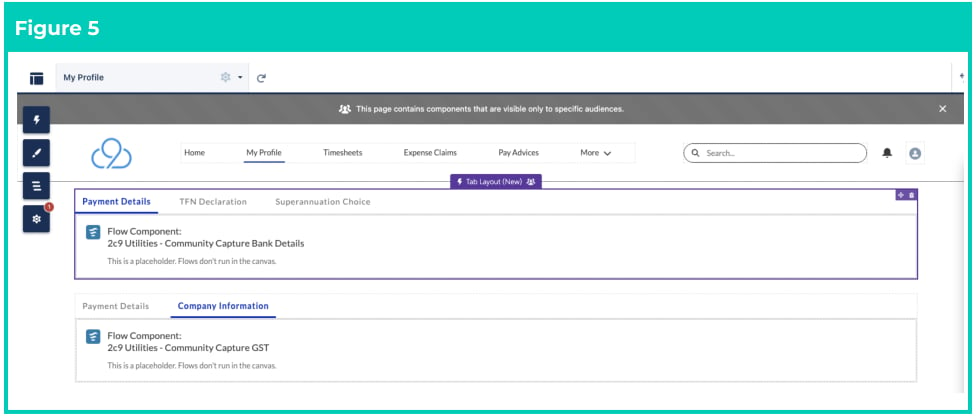
If you want to display only the relevant Tabs based on the PAYG or GST Audience, you can create separate
Tab Components, each containing only the relevant Flows. You can then apply the appropriate Audience
to each Tab’s Component — one for PAYG Flows and one for Contractor Flows (see Figure 5).
12. Select the **Company Details** tab.
13. In the Flow menu, select the drop-down menu and then select **Assign** .
14. Select **New Audience** .
15. Enter the Audience Name **GST** .
16. In the Audience Criteria select the following (as per Figure 4 above):
* **Criteria Type** = User > Contact > Primary Payee Record > Earner Type
* **Operator** = does not equal
* **T2P Pay Transaction Override Setting** = PAYG
17. Select **Save** .
18. Select **Assign** and then select **Publish** .
**Alternative Audience Layout**
With the Tabs Component, it is not possible to hide individual Tabs for different Audiences. As a result,
while the individual Flows will not be displayed, the Tab Labels themselves will still appear.
If you want to display only the relevant Tabs based on the PAYG or GST Audience, you can create separate
Tab Components, each containing only the relevant Flows. You can then apply the appropriate Audience
to each Tab’s Component — one for PAYG Flows and one for Contractor Flows (see Figure 5).
 ## Further Information
| Document | Document Type | Description |
| ----------------------------------------------- | ------------------- | ------------------------------------------------------------------- |
| Configuration Guide to 2cloudnine Payroll Suite | Configuration Guide | Configuration Guide for the implementation of 2cloudnine Payroll. |
| Configuration Guide To 2cloudnine Utilities | Configuration Guide | Configuration Guide for the implementation of 2cloudnine Utilities. |
## Further Information
| Document | Document Type | Description |
| ----------------------------------------------- | ------------------- | ------------------------------------------------------------------- |
| Configuration Guide to 2cloudnine Payroll Suite | Configuration Guide | Configuration Guide for the implementation of 2cloudnine Payroll. |
| Configuration Guide To 2cloudnine Utilities | Configuration Guide | Configuration Guide for the implementation of 2cloudnine Utilities. |