> ## Documentation Index
> Fetch the complete documentation index at: https://documentation.2cloudnine.com/llms.txt
> Use this file to discover all available pages before exploring further.
# Timesheet Adjustments (Utilities) - Administrator Guide
## Purpose
The purpose of this Administrator Guide is to provide information about Utilities packaged Timesheet
Adjustments. The intended audience for this document is System Administrators.
## Overview
Timesheet Adjustments is a powerful feature that provides Payroll Users with the ability to revert
previously processed Timesheets and Invoices, the option to reverse all Pay Transactions, and revert the
Timesheet to New.
Utilising the Timesheet Adjustment feature, Payroll Users can tag an Approved Timesheet for adjustment
with a Scheduled Job or invocable Apex Class triggering the Adjustment.
When Timesheets have been incorrectly paid or invoiced, reversal Pay Transactions will be created
automatically during the Adjustment to offset the original Pay Transactions. Payroll Users can then edit,
Re-Approve, and process the Timesheet again, and run a Pay Batch with both the reversal and newly
created Pay Transactions.
**How it Works**
Once configured, Payroll Users will be able to access and utilise the Timesheet Adjustment either
manually or via a scheduled job. To manually commence the Timesheet Adjustments, navigate to the
Screen Flow and follow the prompts. If scheduled, Timesheets will automatically be adjusted at the
Scheduled Time.
## Flagging Timesheets for Adjustments processing
To flag a Timesheet for Adjustments processing, the checkbox field on the Timesheet called
‘Scheduledjobprocessed’ must be set to TRUE. Both the Scheduled Job and Screen Flow will process any
Timesheets that have this value set, and once completed, will automatically uncheck this box so that it is
not processed again.
If a Timesheet is flagged for Adjustment with any Approval Status other than Approved, it will not be
processed and remain flagged until the Approval Status is updated to Approved.
**Important Notes**
*(Timesheet Adjustment determination)*
*There is no default automation in determining which Timesheets to adjust. Payroll Users must*
*manually flag a Timesheet, or a separate Custom process is required to check this box.*
**Adjustment Reason**
When triggering a Timesheet Adjustment, the User or an automated process can select a reason from
the ‘Adjustment Reason’ picklist. This selected reason will be applied to the Timesheet and related
reverse Pay Transactions. By utilising this information, Users can report on Timesheet Adjustment
reasons, which can support Payroll training and improve process efficiencies.
## Reverting the Status
When a Timesheet is reverted, the Approval Status of the Timesheet and the relevant approval flags on
the Timesheet Entries, Timesheet Items, and Expenses will, by default, automatically revert to ‘New’,
regardless of whether the Timesheet has been processed and related Pay Transactions have been
subsequently included in a Pay Batch or Invoiced.
To provide greater flexibility when determining the end Approval Status of an Adjusted Timesheet, a
picklist field ‘TS Adjustment Approval Status’ has been added to the Timesheet with the options of New
(default value), Submitted, and Approved.
When a Timesheet is adjusted, if ‘Submitted’ or ‘Approved’ is selected, the Timesheet and related
Timesheet Entries, Timesheet Items, and Expenses will be updated with a matching Status.
As an example, automation may be used to flag specific Timesheets for adjustment and at the same time
sets the ‘TS Adjustment Approval Status’ to ‘Approved’. Once the Timesheet is adjusted, it will be
automatically Re-Approved and then processed again by the Timesheet Interpretation Batch Job. This
means the Payroll User is not required to have any intervention in the adjustment.
Each time a Timesheet is processed using Timesheet Adjustments, the number field ‘Reversed Count’ will
increase by 1. This field can then be utilised in reporting to identify Timesheets that are continually being
processed for adjustments. This is particularly useful in adjustments triggered from front
office/scheduling integrations, in Customers where front office Users are able to trigger Timesheet
Adjustments.
## Pay Transaction Adjustments
Where a Timesheet has been ‘Approved’ and Pay Transactions have been Processed, the Timesheet
Adjustment will loop through the related Pay Transactions and check if any of them have been paid
and/or invoiced. If Pay Transactions have not been paid and/or invoiced, they will be deleted, and with the
Timesheet reverted to ‘New’, can be processed again through Interpretation.
If Pay Transactions have been paid and/or invoiced, they cannot be deleted due to data integrity and are
instead unrelated from the Timesheet. These Pay Transactions are cloned and updated with a negative
quantity and are unrelated to the Pay Batch and/or Invoice Item of the original Pay Transaction.
Both the cloned Pay Transactions and original Pay Transactions are unrelated to the Timesheet lookup,
however are related back to the Timesheet via a Custom Lookup ‘Reversed from Timesheet’. This can
then be added as a Related List to the Timesheet, so Users viewing a Timesheet can see all Pay
Transactions that have been reversed.
Once the Pay Transactions have been reversed, the Timesheet will be reverted to ‘New’ and will need to
be approved to be processed by the Interpretation Engine. When a new Pay Batch is created, or an
Invoice is generated, the reversed and newly created Pay Transactions will be available to be processed.
Jane Doh submitted her Timesheet for the week ending May 7th, which was Approved and
subsequently payrolled the following week.
The following week, Jane notified Payroll that her Pay Rates were incorrect and that she had not been
paid in line with her recent pay increase.
Jane received a Gross Pay of \$1,875 made up of 30 hours of Ordinary Time at \$50 per hour and 5 hours
of Overtime at \$75 per hour.
Her new Pay Rates were expected to be \$55 per hour for Ordinary Time and \$80 per hour for Overtime,
meaning her expected Gross Payment was \$2,050.
To resolve the underpayment, Payroll expired her existing Assignment Rates using the date before the
Effective Date, created new Assignment Rates with the Effective Date of her increase, and checked the
box ‘Scheduledjobprocessed’ on the Timesheet.
The Timesheet Adjustment process reviews the Timesheet and creates negative Pay Transactions
related to her original paid Pay Transactions with a total Gross value of -\$1,875. The Timesheet is then
reverted to New Status.
Payroll again Approves the Timesheet and processes it through the Interpretation Engine, this time
using the increased Assignment Rates. New Pay Transactions are created with the expected total Gross
of \$2,050.
Payroll creates a new Pay Batch for the week ending May 7th, which includes both the negative Pay
Transactions with a total Gross of -\$1,875 and the positive Pay Transactions of \$2,050 resulting in a
Gross total of \$175.
Payroll completes the Pay Batch and Jane is paid her adjusted pay.
Jane Doh submitted her Timesheet for the week ending May 7th, which was Approved and payrolled
the following week.
After her pay was received, her Approver identified that her hours were incorrect as she had taken
unpaid leave for 2 days.
Jane had been paid for 40 hours of Ordinary Time at \$50 per hour at a total Gross of \$2,000, however,
she only worked 24 hours and should have been paid \$1,200 Gross.
To resolve, Payroll checks the checkbox ‘Scheduledjobprocessed’ on the Timesheet. The Timesheet
Adjustment process picks up the Timesheet and automatically creates negative Pay Transactions
related to the original Pay Transactions with a total Gross of -\$2,000. The Timesheet is then reverted to
New Status.
Once reverted to New, Payroll edits the Timesheet Entries by removing the hours not worked. Payroll
then Approves and processes the Timesheet, which creates Pay Transactions for a total Gross of \$1,200.
Payroll creates a Pay Batch for the week ending May 7th, which includes both the negative Pay
Transactions with a total gross of -\$2,000 and the positive Pay Transactions of \$1,200, resulting in a
Gross total of -\$800. Payroll completes the Pay Batch by processing a wage overpayment deduction
and finalises the Pay Batch.
## Timesheet Item and Expense Adjustments
Timesheet Items and Expenses are updated by the Timesheet Adjustment to update all relevant fields
based upon the ‘TS Adjustment Approval Status’ field. This ensures that when the Timesheet is again
processed, all related Pay Transactions will be generated again.
The Pay Transactions generated from Timesheet Items are handled by the Pay Transaction Adjustment as
per above. In the event an Allowance or Expense was incorrect after being paid/Invoiced, the related
Timesheet Item or Expense can be updated/deleted (if applicable) after the Timesheet Adjustment, and
then processed again with the correct data.
## Leave Adjustments
The Timesheet Adjustment does not currently cater for adjustments to Payee Leave Events. Where a
Timesheet contains a processed Leave Event, the related Leave Pay Transaction will still be reversed. If
the Payee Leave Event has been processed via a Pay Batch, this will not be reversed to create a Leave
Credit and must be done by ‘voiding’ the Payee Leave Event.
## Navigating Reversed (Originally Incorrect) and Reversal Pay Transactions
Pay Transactions updated and created from Timesheet Adjustments are removed from their original
relationships to the Timesheet, Timesheet Entries, and Timesheet Items.
When this occurs, the Pay Transactions are related back to the original records via Custom Fields as per
the table below. Please note ‘Reversed’ refers to the original Pay Transaction that was paid/invoiced
where Reversal refers to the new Cloned Pay Transactions.
| Pay Transaction | Original Field | New Field | New Field Type |
| --------------- | ------------------------ | ------------------------ | ------------------------ |
| Reversed | Timesheet | Reversed from Timesheet | Lookup (Timesheet) |
| Reversed | Timesheet Entry | OriginalTSEID | Text (18) |
| Reversed | Timesheet Item | OriginalTSIID | Text (18) |
| Reversal | Timesheet | Reversed from Timesheet | Lookup (Timesheet) |
| Reversal | Record ID of Reversal PT | Original Pay Transaction | Lookup (Pay Transaction) |
| Reversal | Timesheet Entry | OriginalTSEID | Text (18) |
| Reversal | Timesheet Item | OriginalTSIID | Text (18) |
**Important Notes**
*(Timesheet Entry and Timesheet Item fields)*
*Due to Salesforce limits, the Timesheet Entry and Timesheet Item are text fields on the Pay*
*Transaction and not lookups. This means cross-object formulas and reporting are limited. The ID*
*records can, however, be used in custom declarative and code solutions.*
## Debug Logs
If a Timesheet Adjustment fails, a Debug Log will be created and any Reversal Pay Transactions created
will be deleted.
The Debug Logs will detail information related to the failure, which is typically related to the running User
having insufficient permissions to update the reversed Pay Transactions.
## Setup Scheduled Job
The following configuration will schedule the Timesheet Adjustment to automatically run every 10
minutes. If Users will only be manually running the Timesheet Adjustment, this step can be ignored.
To schedule the job using the script:
1. Copy the block of script to be run.
2. Select **Setup > Developer Console** .
3. **Debug > Open Execute Anonymous Window** .
4. Delete or comment out any code that is in the window.
5. Paste in the copied script from below.
6. Click the **Execute** button.
**Script for Pay Advice PDF Creation & Email**
```apex Script theme={null}
//script for timesheet adjustment batch
System.schedule('TimesheetAdjustmentBatch 00', '0 00 * * * ?', new
TimesheetAdjustmentBatch());
System.schedule('TimesheetAdjustmentBatch 10', '0 10 * * * ?', new
TimesheetAdjustmentBatch());
System.schedule('TimesheetAdjustmentBatch 20', '0 20 * * * ?', new
TimesheetAdjustmentBatch());
System.schedule('TimesheetAdjustmentBatch 30', '0 30 * * * ?', new
TimesheetAdjustmentBatch());
System.schedule('TimesheetAdjustmentBatch 40', '0 40 * * * ?', new
TimesheetAdjustmentBatch());
System.schedule('TimesheetAdjustmentBatch 50', '0 50 * * * ?', new
TimesheetAdjustmentBatch());
```
The Apex Jobs will now be scheduled. Please confirm they are set up correctly by going to **Setup** **Scheduled Jobs** .
## Activate Screen Flow and add to Utility Bar
The Timesheet Adjustment also includes a Screen Flow for manually running the process. The Screen
Flow can be used in addition to the Scheduled Job for quick ad hoc adjustments, or instead of the
Scheduled Job if Payroll would prefer to choose when the process is run.
**Activate Flow**
The Flow must be Activated before it can be run. To Activate the flow:
Go to **Setup** - **Flows** - **Process Timesheet Adjustments**
1. Select **Activate** .
**Add Screen Flow to Utility Bar**
Whilst it is possible to run Screen Flows from multiple pages within Salesforce, we recommend making it
available in the Users Utility Bar.
To add the ‘Process Timesheet Adjustments’ Flow to the Utility bar:
Go to **Setup** - **App Manager**
1. Select your desired app and select ‘Edit’ using the drop-down.
2. Select **Utility Items** .
3. Select **Add Utility Item** .
4. Search for and select **Flow** .
5. Complete all fields and ensure in the Flow lookup you select **Process Timesheet Adjustments** .
6. Select **Save** .
**Important Notes**
*(Flow within Utility Bar)*
*If using a Managed Package App, it is not possible to add a Utility Bar. You must either create a new*
*App or utilise an App Record Page to host the ‘Process Timesheet Adjustments’ Flow.*
## Create Custom Settings
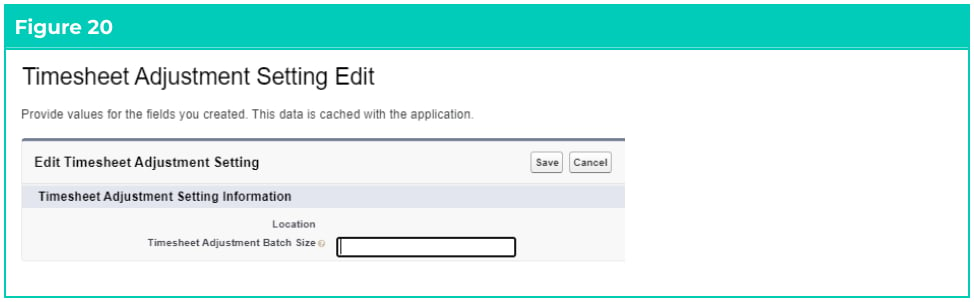
The Timesheet Adjustments uses the 2c9 -Timesheet Adjustment Settings Custom Settings for
determining the Batch Size for processing Timesheets. Reducing the batch size enables the processing of
Adjustments to be more successful in Orgs with high volume processing.
To populate the Custom Setting:
Go to **Setup** - **Custom Settings** - **Timesheet Adjustment Setting** - **Manage**
1. Select the **New** button.
2. Enter a batch size or leave blank to use the default of 5.
3. Select **Save** .
 ## Further Information
| Document | Document Type | Description |
| ----------------------------------------------- | ------------------- | ------------------------------------------------------------------------------------------------------------------------------------------------------------------------------------------------------------------------------------------------------------------------------------------------ |
| Configuration Guide to 2cloudnine Payroll Suite | Configuration Guide | Configuration Guide for the implementation of 2cloudnine Payroll. |
| Configuration Guide To 2cloudnine Utilities | Configuration Guide | Configuration Guide for the implementation of 2cloudnine Utilities. |
| QRG Create a New Pay Batch | Task Instructions | How to create a new Pay Batch through the Pay Batch Manager. |
| QRG Review a Pay Batch | Task Instructions | How to Review the Pay Batch on a Pay Batch level and an individual Payee Pay Batch level, as well as the steps required to use the Remove Pay Transaction, Remove Individual Payee Pay Batch records, Bulk Remove, Bulk Add, and Manual Adjustment functionalities within the Pay Batch Manager. |
| QRG Calculate a Pay Batch | Task Instructions | How to Part Calculate and Calculate All a Pay Batch as well as the steps to View and Resolve / Acknowledge Flags through the Pay Batch Manager. |
| QRG Finalise a Pay Batch | Task Instructions | How to Finalise a Pay Batch, Unfinalise a Pay Batch, Create and Distribute Pay Advice documents, and Create and Release Payment Files through the Pay Batch Manager. |
| QRG Enter Timesheets as Payroll User | Task Instructions | How to enter Timesheets as a Payroll User |
## Further Information
| Document | Document Type | Description |
| ----------------------------------------------- | ------------------- | ------------------------------------------------------------------------------------------------------------------------------------------------------------------------------------------------------------------------------------------------------------------------------------------------ |
| Configuration Guide to 2cloudnine Payroll Suite | Configuration Guide | Configuration Guide for the implementation of 2cloudnine Payroll. |
| Configuration Guide To 2cloudnine Utilities | Configuration Guide | Configuration Guide for the implementation of 2cloudnine Utilities. |
| QRG Create a New Pay Batch | Task Instructions | How to create a new Pay Batch through the Pay Batch Manager. |
| QRG Review a Pay Batch | Task Instructions | How to Review the Pay Batch on a Pay Batch level and an individual Payee Pay Batch level, as well as the steps required to use the Remove Pay Transaction, Remove Individual Payee Pay Batch records, Bulk Remove, Bulk Add, and Manual Adjustment functionalities within the Pay Batch Manager. |
| QRG Calculate a Pay Batch | Task Instructions | How to Part Calculate and Calculate All a Pay Batch as well as the steps to View and Resolve / Acknowledge Flags through the Pay Batch Manager. |
| QRG Finalise a Pay Batch | Task Instructions | How to Finalise a Pay Batch, Unfinalise a Pay Batch, Create and Distribute Pay Advice documents, and Create and Release Payment Files through the Pay Batch Manager. |
| QRG Enter Timesheets as Payroll User | Task Instructions | How to enter Timesheets as a Payroll User |