| Task | Requirement | Completed |
|---|---|---|
| Package Installation | ||
| Installing Packages | Compulsory | |
| Installation Process | Compulsory | |
| Salesforce Apex Settings (Setup) | ||
| Perform Synchronous Compile on Deploy | Compulsory | |
| Automations for Payroll & Leave Accrual Journals | ||
| Enable Apex Class Access | Compulsory | |
| Activate the General Ledger Flows | Compulsory | |
| Page Layout Assignments | ||
| Page Layout Assignments | Compulsory | |
| Activate Flows for Automation of Assignment Costs | ||
| Employment Cost Creation Flow | Optional | |
| Create General Ledger Records | ||
| Create General Ledger Records | Compulsory | |
| Detail Accounting System Setup in the Custom Settings | ||
| Check the Accounting System Setup | Compulsory | |
| Define the Accounting/Finance system for General Ledger |
Compulsory | |
| Populating the “GL Customer ID” | ||
| Only for Invoicing Clients |
Conditionally Compulsory | |
| Creation of Assignment Departments | ||
| Automatic assignment of the Accounting Assignment Departments |
Optional | |
| Review Pay Code OnCost Calculations | ||
| Enable OnCost Calculations/Reporting for Pay Codes |
Compulsory | |
| Testing the GL Cost of Payroll and Leave Journals | ||
| Testing the GL Cost of Payroll and Leave Journals |
Compulsory | |
| Regenerate a Payroll Journal | ||
| Regenerate a Payroll Journal | Compulsory | |
| Test Accounting Invoices (only for Invoicing Orgs) | ||
| Test Accounting Invoices (only for Invoicing Orgs) | Conditionally Compulsory | |
| Create Export Reports | ||
| Create Export Reports | Optional | |
| Payroll OnCost Reports | ||
| Payroll OnCost Reports | Compulsory | |
| Using Assignment Departments to split Default posting Accounts (Alternative Customisations) | ||
| Step 1: Create all State and Department combinations as Department Accounting Segment Values |
Optional | |
| Step 2: Add formula fields to the Accounting Segment Object |
Optional | |
| Step 3: Further refinements | Optional | |
| Cost Code Splits | ||
| Cost Code Splits | Conditionally Compulsory | |
| Add Picklist Values and Update Assignment record | ||
| Add new Industry and Risk Classification Picklist Values |
Compulsory | |
| Update the Assignment record | Compulsory | |
| Alternate GL Payroll Journal processing options (Optional Customisations) | ||
| Option 1 - Align Accounting Departments to Assignments and use the standard Payroll Journal creation process (14 hours work) |
Optional | |
| Option 2 - Customer manually extracts source Pay Transaction Data and creates their Payroll Journals outside of 2cloudnine Payroll (8 - 12 Hours) |
Optional | |
| Option 3 - Customer extracts source Pay Transaction Data using Custom integration and creates their Journals outside of Payroll (12 - 18 Hours) |
Optional | |
| Creating AU Oncost Distribution Records | ||
| AU Payroll Costs Distribution Records and Reporting |
Optional |
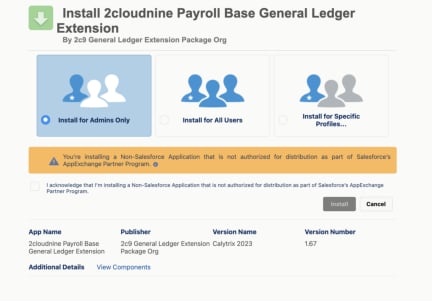
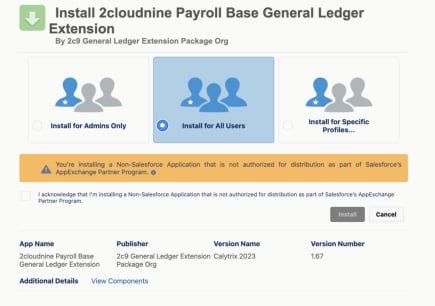 To proceed further, you must tick the checkbox ‘I acknowledge that I’m installing a Non-Salesforce
Application that is not authorised for distribution as part of Salesforce’s AppExchange Partner Program.’
After this, you will need to select the **Upgrade** button, which will commence the installation of the
package.
Salesforce will begin to install the package. If you are presented with dialogue informing you that the
installation is taking a while, you can accept, and this will return you to the Installed Packages page.
Salesforce will send an email advising when the installation has been completed, and the package will be
listed if you refresh the page.
## 4. Salesforce Apex Settings (Setup)
### **Perform Synchronous Compile on Deploy**
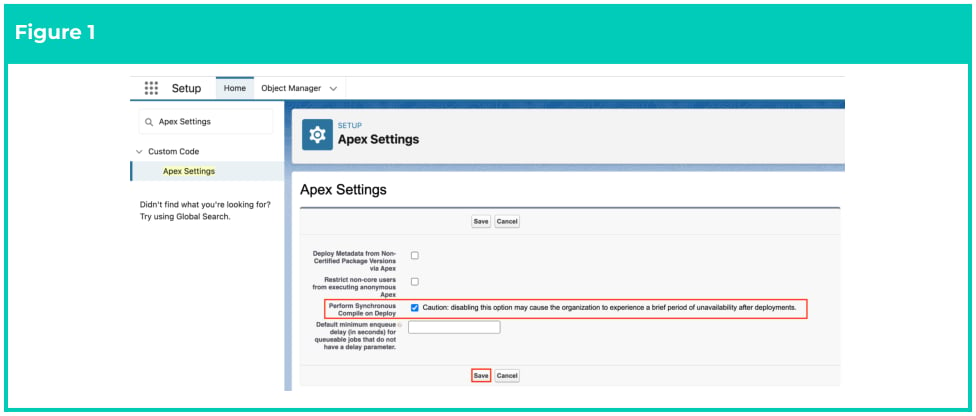
To enable the above setting in the Org:
Go to **Setup > Apex Settings >**
1. Tick **Perform Synchronous Compile on Deploy** (see Figure 1).
2. Click **Save** .
To proceed further, you must tick the checkbox ‘I acknowledge that I’m installing a Non-Salesforce
Application that is not authorised for distribution as part of Salesforce’s AppExchange Partner Program.’
After this, you will need to select the **Upgrade** button, which will commence the installation of the
package.
Salesforce will begin to install the package. If you are presented with dialogue informing you that the
installation is taking a while, you can accept, and this will return you to the Installed Packages page.
Salesforce will send an email advising when the installation has been completed, and the package will be
listed if you refresh the page.
## 4. Salesforce Apex Settings (Setup)
### **Perform Synchronous Compile on Deploy**
To enable the above setting in the Org:
Go to **Setup > Apex Settings >**
1. Tick **Perform Synchronous Compile on Deploy** (see Figure 1).
2. Click **Save** .
 ## 5. Automations for Payroll & Leave Accrual Journals
### **Enable Apex Class Access**
1. Go to **Setup > Developer Console** .
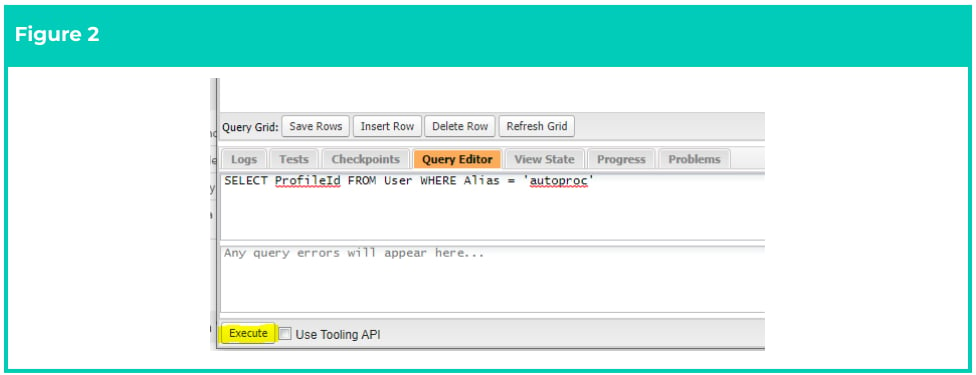
2. Select **Query Editor** and paste the following text (see Figure 2):
* SELECT ProfileId FROM User WHERE Alias = 'autoproc'
3. Click the **Execute** button.
## 5. Automations for Payroll & Leave Accrual Journals
### **Enable Apex Class Access**
1. Go to **Setup > Developer Console** .
2. Select **Query Editor** and paste the following text (see Figure 2):
* SELECT ProfileId FROM User WHERE Alias = 'autoproc'
3. Click the **Execute** button.
 4. After the query runs, copy the Profile ID that appears in the results to another document.
5. In your Salesforce browser tab, clear the URL after .com
6. Paste this URL
/\_ui/system/user/ProfileApexClassPermissionEdit/e?profile\_id=00e2v000003cNu3AAE
7. Update the Profile ID listed above in red to be the one you copied earlier from Step 4.
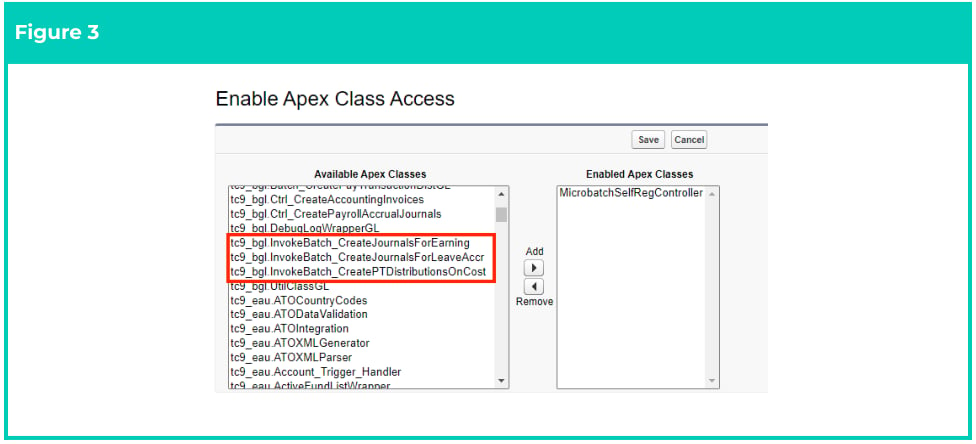
8. Push across the following Available Apex Classes to Enabled Apex Classes (see Figure 3).
9. Select **Save** .
4. After the query runs, copy the Profile ID that appears in the results to another document.
5. In your Salesforce browser tab, clear the URL after .com
6. Paste this URL
/\_ui/system/user/ProfileApexClassPermissionEdit/e?profile\_id=00e2v000003cNu3AAE
7. Update the Profile ID listed above in red to be the one you copied earlier from Step 4.
8. Push across the following Available Apex Classes to Enabled Apex Classes (see Figure 3).
9. Select **Save** .
 ### **Activate the General Ledger Flows**
As part of the automations within the General Ledger Extension package, there is a Flow that can be
activated to automatically create the Cost of Payroll Journals and Leave Accrual Journals after a Pay
Batch is progressed to a status of Payment File Released.
Go to **Setup > Flows**
1. Scroll through the list of Flows until you get to the following Flow:
* **GL - Create Cost of Payroll and Leave Accrual Journal**
2. Open the Flow mentioned above.
3. Click the **Activate** button.
4. Once activated, Journals will automatically get created after a Pay Batch has reached the status
of ‘Payment File Released'.
**IMPORTANT:** For Leave Accrual Journals to populate correctly, the following must occur:
1. The Leave Liability Rate on the Payee Leave Rule must be populated with an appropriate hourly
rate (see Figure 4).
### **Activate the General Ledger Flows**
As part of the automations within the General Ledger Extension package, there is a Flow that can be
activated to automatically create the Cost of Payroll Journals and Leave Accrual Journals after a Pay
Batch is progressed to a status of Payment File Released.
Go to **Setup > Flows**
1. Scroll through the list of Flows until you get to the following Flow:
* **GL - Create Cost of Payroll and Leave Accrual Journal**
2. Open the Flow mentioned above.
3. Click the **Activate** button.
4. Once activated, Journals will automatically get created after a Pay Batch has reached the status
of ‘Payment File Released'.
**IMPORTANT:** For Leave Accrual Journals to populate correctly, the following must occur:
1. The Leave Liability Rate on the Payee Leave Rule must be populated with an appropriate hourly
rate (see Figure 4).
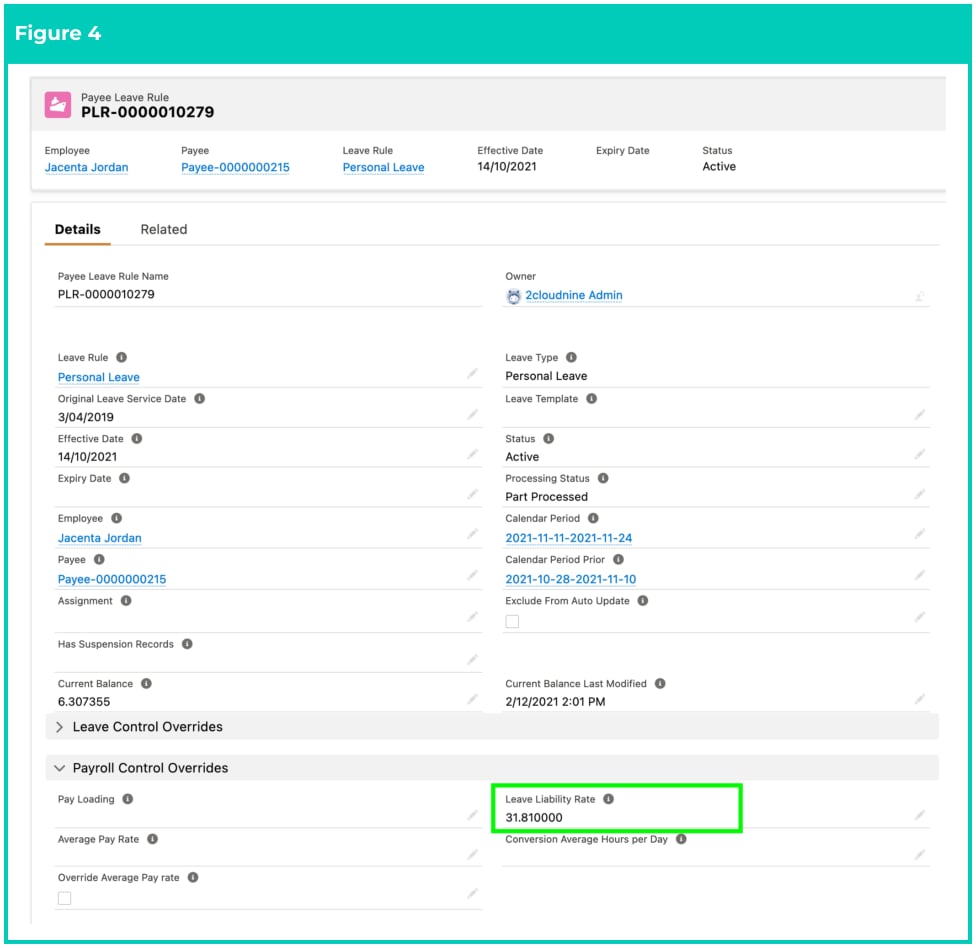 2. Once populated, all future Leave Accrual Pay Transactions will use this rate within the Leave
Liability Rate field. The Leave Liability Total field will also now reference the Leave Liability Rate x
Leave Accrual.
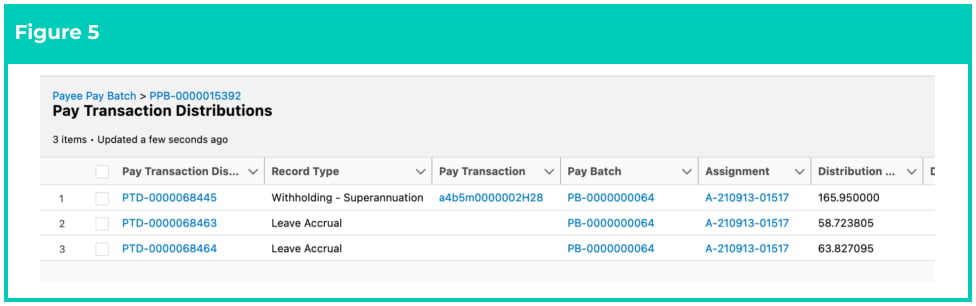
3. After the Pay Batch has reached the status of Payment File Released, the Total Leave Accrual
values on the Leave Accrual Pay Transactions will be allocated across the Payment Pay
Transactions. See the following example of Pay Transaction Distribution records against a Payee
Pay Batch (see Figure 5).
2. Once populated, all future Leave Accrual Pay Transactions will use this rate within the Leave
Liability Rate field. The Leave Liability Total field will also now reference the Leave Liability Rate x
Leave Accrual.
3. After the Pay Batch has reached the status of Payment File Released, the Total Leave Accrual
values on the Leave Accrual Pay Transactions will be allocated across the Payment Pay
Transactions. See the following example of Pay Transaction Distribution records against a Payee
Pay Batch (see Figure 5).
 ## 6. Page Layout Assignments
The following updates to Page Layout Assignments are required in your Org. These Page Layouts do not
come automatically assigned in the Package. As a minimum, the following Profiles require updates:
* System Administrator Profile
* 2cloudnine Payroll User Profile
* Any other custom profiles created for ‘back office’ users.
Go to **Setup** - **Object Manager** - **Pay Transaction Distribution** - **Page Layouts** - **Page Layout**
### **Assignment**
1. Click the **Edit Assignment** button.
2. Using the table below, for each Record Type detailed, assign the listed Page Layout Name.
3. When complete, select the **Save** button.
| Record Type | Layout Name |
| ---------------------------- | -------------------------------------------------- |
| AU Payroll Costs | TC9PR On-Costs Pay Transaction Distribution Layout |
| Custom Code 1, 2, 3, 4 | TC9BGL Pay Transaction Distributions - Cost Code |
| Withholding - Superannuation | TC9BGL Pay Transaction Distributions - Cost Code |
## 7. Activate Flows for Automation of Assignment Costs
To enable the automatic creation of Assignment Costs, you need to activate the two Flows that are
included within the General Ledger Extension package.
### **Employment Cost Creation Flow**
This configuration is optional and is only necessary to allow Employment Cost Template Groups to be
used in an Org for the automatic creation and population of Assignment Cost records against Temp
Assignments.
Once enabled, this Flow will auto-fill Assignment Cost records that are generated when using the
Employment Cost Template Group to auto-create and relate Assignment Cost records within Temp
Assignment records. Also, if the Employment Cost Template Group is updated in the Assignment record,
this Flow will ensure that the existing related Assignment Cost records aren't deleted, but instead set to
Inactive. This allows any existing OnCost Transactions that have been created to retain the link to the
original Assignment Cost records.
Go to **Setup > Flows**
1. Open the Flow labelled **GL - Set/Update Assignment Cost Records** (this Flow Template is
included in the General Ledger Package).
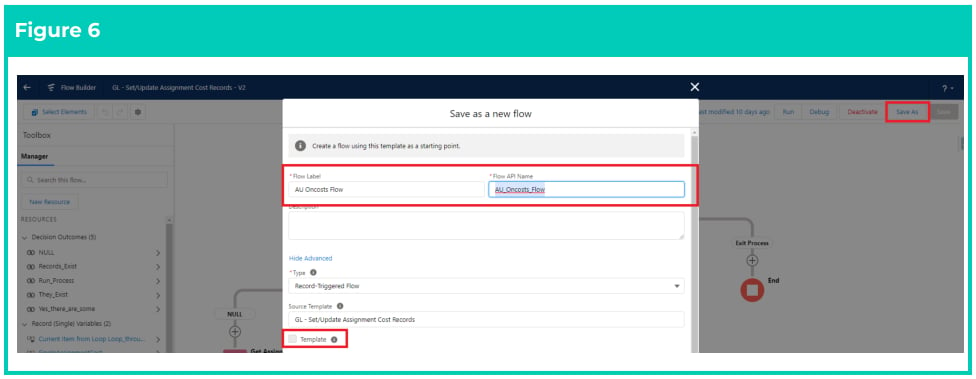
2. Select **Save As** .
3. From the Save As pop-up window, complete the following fields:
1. Enter a name for the new Flow in **Field Label** (i.e. GL - Set and Update Assignment Cost
Records) (see Figure 6).
2. The **Flow API Name** field will auto-populate based on the value entered into the Field
Label.
3. Select the Show Advanced link below the Description field.
4. Ensure the **Type** selected is ‘Record-triggered flow’.
5. Ensure the checkbox for **Template** is not ticked (see Figure 6).
4. Click **Save** .
## 6. Page Layout Assignments
The following updates to Page Layout Assignments are required in your Org. These Page Layouts do not
come automatically assigned in the Package. As a minimum, the following Profiles require updates:
* System Administrator Profile
* 2cloudnine Payroll User Profile
* Any other custom profiles created for ‘back office’ users.
Go to **Setup** - **Object Manager** - **Pay Transaction Distribution** - **Page Layouts** - **Page Layout**
### **Assignment**
1. Click the **Edit Assignment** button.
2. Using the table below, for each Record Type detailed, assign the listed Page Layout Name.
3. When complete, select the **Save** button.
| Record Type | Layout Name |
| ---------------------------- | -------------------------------------------------- |
| AU Payroll Costs | TC9PR On-Costs Pay Transaction Distribution Layout |
| Custom Code 1, 2, 3, 4 | TC9BGL Pay Transaction Distributions - Cost Code |
| Withholding - Superannuation | TC9BGL Pay Transaction Distributions - Cost Code |
## 7. Activate Flows for Automation of Assignment Costs
To enable the automatic creation of Assignment Costs, you need to activate the two Flows that are
included within the General Ledger Extension package.
### **Employment Cost Creation Flow**
This configuration is optional and is only necessary to allow Employment Cost Template Groups to be
used in an Org for the automatic creation and population of Assignment Cost records against Temp
Assignments.
Once enabled, this Flow will auto-fill Assignment Cost records that are generated when using the
Employment Cost Template Group to auto-create and relate Assignment Cost records within Temp
Assignment records. Also, if the Employment Cost Template Group is updated in the Assignment record,
this Flow will ensure that the existing related Assignment Cost records aren't deleted, but instead set to
Inactive. This allows any existing OnCost Transactions that have been created to retain the link to the
original Assignment Cost records.
Go to **Setup > Flows**
1. Open the Flow labelled **GL - Set/Update Assignment Cost Records** (this Flow Template is
included in the General Ledger Package).
2. Select **Save As** .
3. From the Save As pop-up window, complete the following fields:
1. Enter a name for the new Flow in **Field Label** (i.e. GL - Set and Update Assignment Cost
Records) (see Figure 6).
2. The **Flow API Name** field will auto-populate based on the value entered into the Field
Label.
3. Select the Show Advanced link below the Description field.
4. Ensure the **Type** selected is ‘Record-triggered flow’.
5. Ensure the checkbox for **Template** is not ticked (see Figure 6).
4. Click **Save** .
 5. Once saved, and returned back to the Flow Builder page, select the **Activate** button in the top
right-hand corner to enable the Flow.
Whenever the Employment Cost Template is changed within an Assignment record, this Flow will
correctly take the Assignment Cost records from the Template and relate them to the Assignment record.
## 8. Create General Ledger Records
The next step is to create various records that represent your General Ledger within 2c9 Payroll. The
creation of these General Ledger records may take a while and must be done before proceeding further
to the next section. If there is a large number of records to be created, it is recommended to create these
records with the use of a data load tool.
To assist with the creation of the General Ledger records, you can review the information provided in the
General Ledger Key Information document. Please refer to the [QRG General Ledger - Key Information.](https://drive.google.com/file/d/1MEFS2goNYlcm5Yz7dJ9tvzd6PnTNLQ-1/view?usp=sharing)
5. Once saved, and returned back to the Flow Builder page, select the **Activate** button in the top
right-hand corner to enable the Flow.
Whenever the Employment Cost Template is changed within an Assignment record, this Flow will
correctly take the Assignment Cost records from the Template and relate them to the Assignment record.
## 8. Create General Ledger Records
The next step is to create various records that represent your General Ledger within 2c9 Payroll. The
creation of these General Ledger records may take a while and must be done before proceeding further
to the next section. If there is a large number of records to be created, it is recommended to create these
records with the use of a data load tool.
To assist with the creation of the General Ledger records, you can review the information provided in the
General Ledger Key Information document. Please refer to the [QRG General Ledger - Key Information.](https://drive.google.com/file/d/1MEFS2goNYlcm5Yz7dJ9tvzd6PnTNLQ-1/view?usp=sharing)
 ### **Step 2: Add formula fields to the Accounting Segment Object**
Add 3 custom formula fields onto the Accounting Segment Object. Below are the steps and screenshots
of an example field to assist with this process.
Go to **Setup > Object Manager >** **Accounting Segment >** **Fields & Relationships**
1. Select the **New** button.
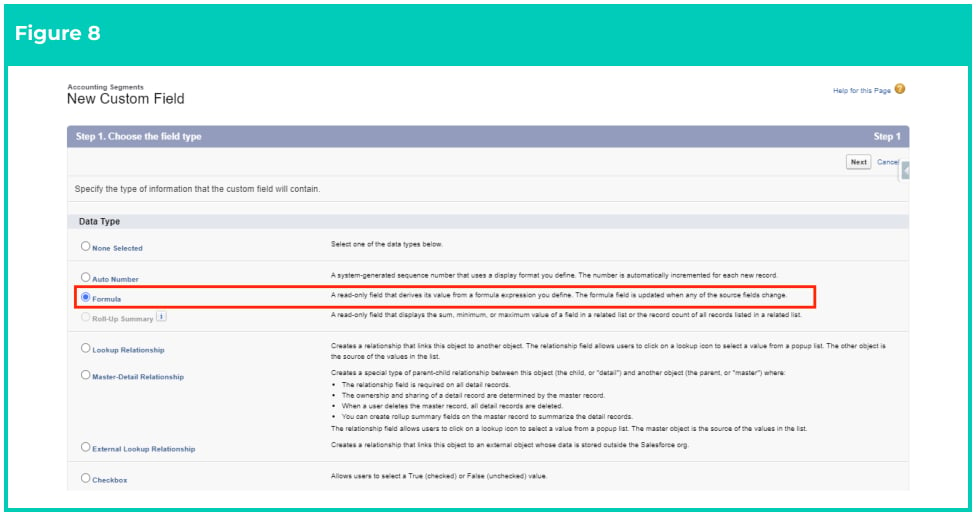
2. Choose **Formula** and select the **Next** button (see Figure 8).
### **Step 2: Add formula fields to the Accounting Segment Object**
Add 3 custom formula fields onto the Accounting Segment Object. Below are the steps and screenshots
of an example field to assist with this process.
Go to **Setup > Object Manager >** **Accounting Segment >** **Fields & Relationships**
1. Select the **New** button.
2. Choose **Formula** and select the **Next** button (see Figure 8).
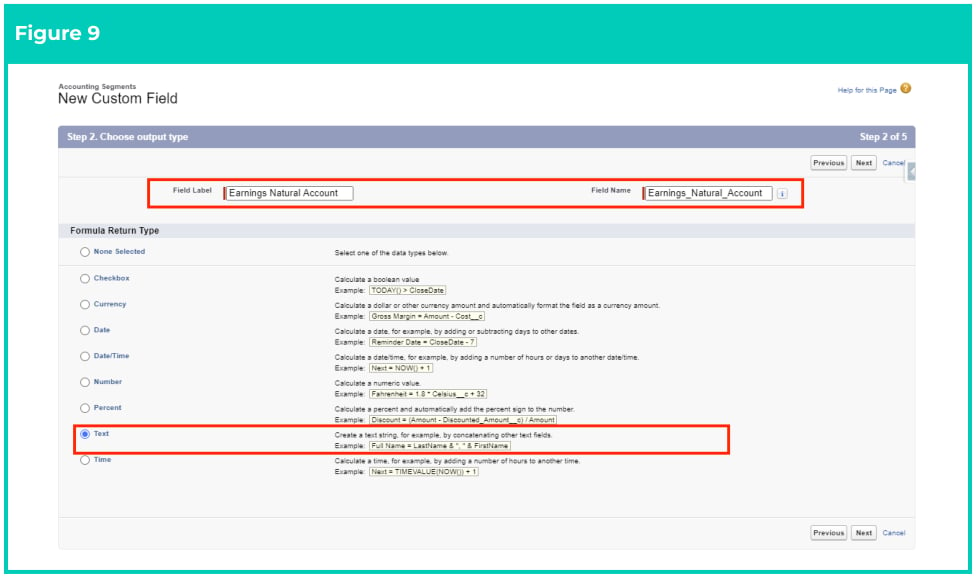
 3. Provide a Field Label, which will auto-populate a Field Name, and choose Formula Return Type of
**Text** (see Figure 9) and select the **Next** button.
3. Provide a Field Label, which will auto-populate a Field Name, and choose Formula Return Type of
**Text** (see Figure 9) and select the **Next** button.
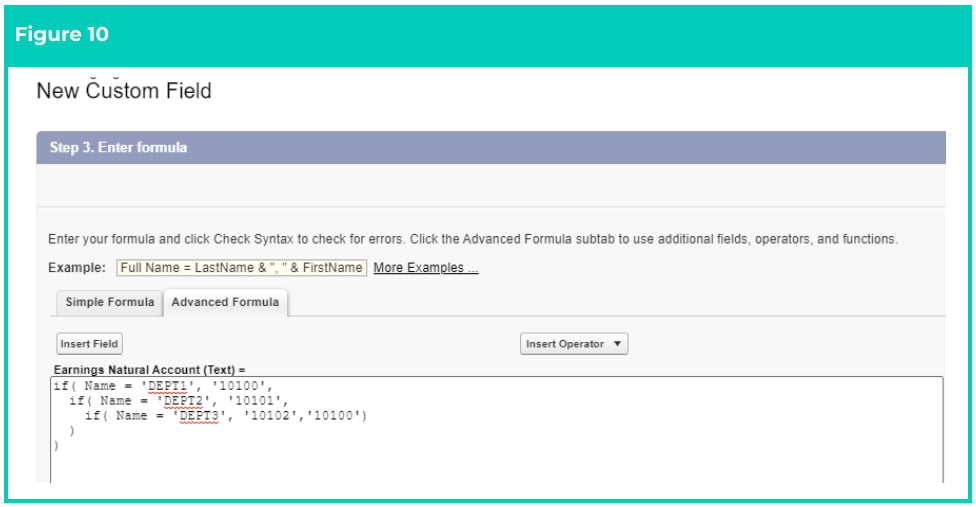
 4. Create a formula that outputs the Earnings Natural Account number for the specific Accounting
Segment Value (see Figure 10). Please note that the Segment Value field is the Primary field in
the object, and in Salesforce, this Primary field has an API reference of ‘Name’.
4. Create a formula that outputs the Earnings Natural Account number for the specific Accounting
Segment Value (see Figure 10). Please note that the Segment Value field is the Primary field in
the object, and in Salesforce, this Primary field has an API reference of ‘Name’.
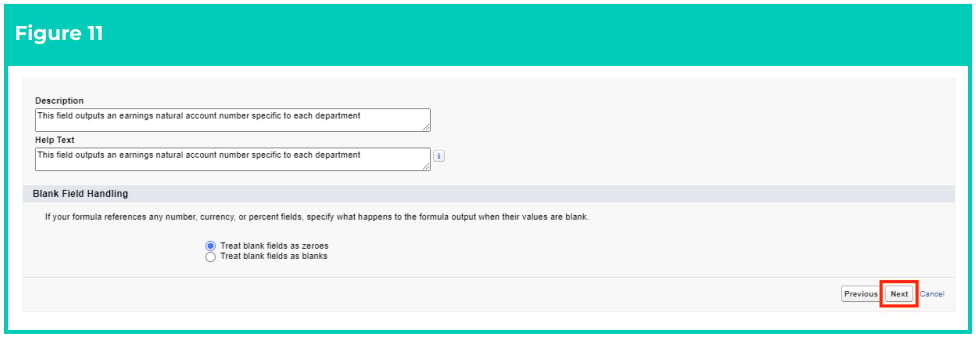
 5. Populate the following optional fields (see Figure 11):
* Description
* Help Text
6. Tick one of the radio buttons under Blank Field Handling as per your requirement.
7. Click Next.
5. Populate the following optional fields (see Figure 11):
* Description
* Help Text
6. Tick one of the radio buttons under Blank Field Handling as per your requirement.
7. Click Next.
 8. Determine which Profiles require access to this field and access to all values in this field. Users
need to determine if you want to add this new formula field onto your existing Page Layouts
(recommended). This provides visibility of the results of this formula field when viewing a record.
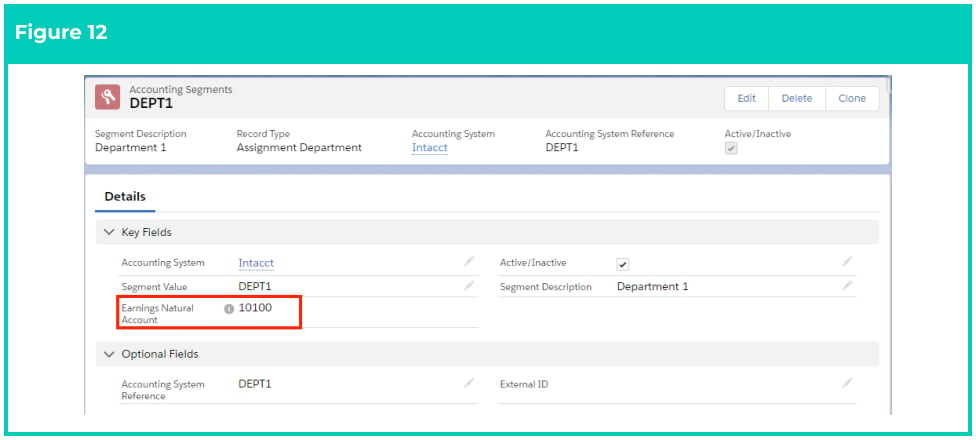
Here is what an Accounting Segment Record should now look like with this added customisation
(see Figure 12).
8. Determine which Profiles require access to this field and access to all values in this field. Users
need to determine if you want to add this new formula field onto your existing Page Layouts
(recommended). This provides visibility of the results of this formula field when viewing a record.
Here is what an Accounting Segment Record should now look like with this added customisation
(see Figure 12).
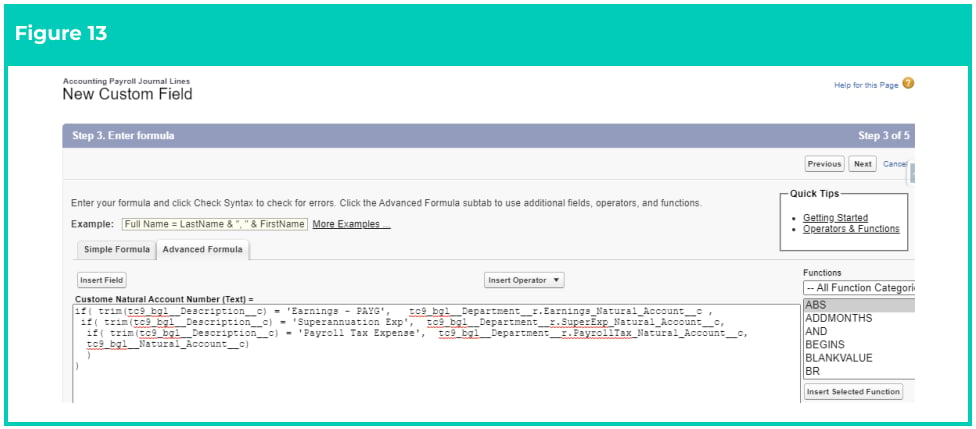
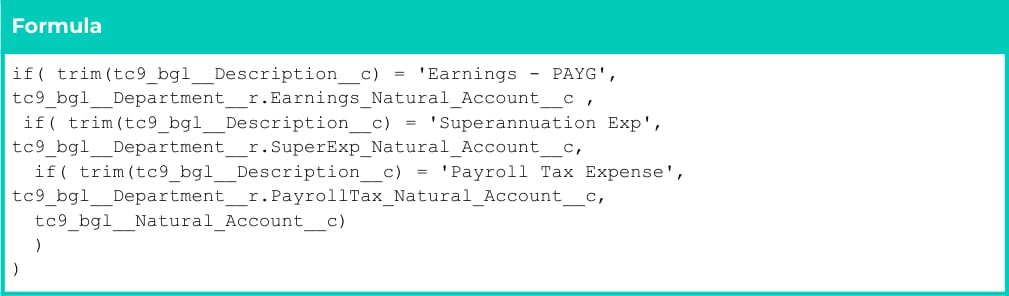
 9. Repeat steps 1-7 to create the additional 2 formula fields for Superannuation and Payroll Tax as
required and outlined in the Example Customer requirement table above, as well as any
additional formula fields required.
### **Step 3: Further refinements**
Now that you have completed this step, you will be able to reference these new fields in Reports.
9. Repeat steps 1-7 to create the additional 2 formula fields for Superannuation and Payroll Tax as
required and outlined in the Example Customer requirement table above, as well as any
additional formula fields required.
### **Step 3: Further refinements**
Now that you have completed this step, you will be able to reference these new fields in Reports.
 ## 19. Cost Code Splits
Earlier in this document, we created Accounting Segment records including Assignment Department
and Cost Code records. It is important to note that Assignment Departments are used to split the costs
related to an Assignment record (as mentioned earlier), whereas Cost Codes are used to split the costs
detailed on Timesheet records.
Cost Codes are most commonly populated automatically through third-party scheduling software. They
are added to the Timesheet Item records. As an example, when Timesheets are sent from the external
scheduling software to 2cloudnine, they are sent in the form of Timesheet Items and Cost Codes Splits,
where 20% of the Timesheet Entries can belong to Cost Code 7000, 20% to Cost Code 5000, and the
remaining to Cost Code 2000.
## 20. Add Picklist Values and Update Assignment record
### **Add new Industry and Risk Classification Picklist Values**
The Industry and Risk Classification picklists by default contain only a few values. This is because each
client's requirements around managing industry and risk classifications are different.
To add a new Industry:
Go to **Setup** - **Object Manager** - **Employment Cost Item** - **Fields & Relationships** - **Industry**
1. Select the button **View Industry Picklist Value Set** .
2. Select the **New** button.
3. Input the new values required, ensuring you press enter between each value.
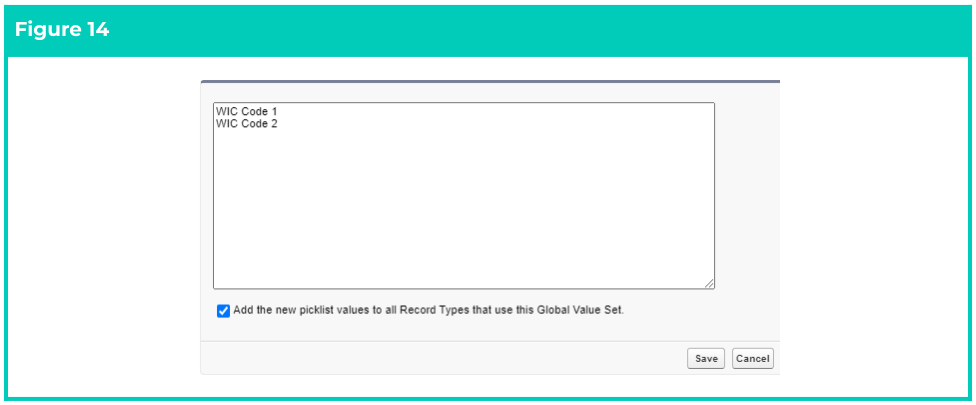
4. Select the checkbox **Add the new picklist values to all Record Types that use this Global Value**
**Set** and then select **Save** (See Figure 14).
To add a new Risk Classification:
Go to **Setup** - **Object Manager** - **Employment Cost Item** - **Fields & Relationships** - **Risk Classification**
1. Select the button **View Risk Classification Picklist Value Set** .
2. Select the **New** button.
3. Input the new values required, ensuring you press enter between each value.
4. Select the checkbox **Add the new picklist values to all Record Types that use this Global Value**
**Set** and then select **Save** (See Figure 14).
## 19. Cost Code Splits
Earlier in this document, we created Accounting Segment records including Assignment Department
and Cost Code records. It is important to note that Assignment Departments are used to split the costs
related to an Assignment record (as mentioned earlier), whereas Cost Codes are used to split the costs
detailed on Timesheet records.
Cost Codes are most commonly populated automatically through third-party scheduling software. They
are added to the Timesheet Item records. As an example, when Timesheets are sent from the external
scheduling software to 2cloudnine, they are sent in the form of Timesheet Items and Cost Codes Splits,
where 20% of the Timesheet Entries can belong to Cost Code 7000, 20% to Cost Code 5000, and the
remaining to Cost Code 2000.
## 20. Add Picklist Values and Update Assignment record
### **Add new Industry and Risk Classification Picklist Values**
The Industry and Risk Classification picklists by default contain only a few values. This is because each
client's requirements around managing industry and risk classifications are different.
To add a new Industry:
Go to **Setup** - **Object Manager** - **Employment Cost Item** - **Fields & Relationships** - **Industry**
1. Select the button **View Industry Picklist Value Set** .
2. Select the **New** button.
3. Input the new values required, ensuring you press enter between each value.
4. Select the checkbox **Add the new picklist values to all Record Types that use this Global Value**
**Set** and then select **Save** (See Figure 14).
To add a new Risk Classification:
Go to **Setup** - **Object Manager** - **Employment Cost Item** - **Fields & Relationships** - **Risk Classification**
1. Select the button **View Risk Classification Picklist Value Set** .
2. Select the **New** button.
3. Input the new values required, ensuring you press enter between each value.
4. Select the checkbox **Add the new picklist values to all Record Types that use this Global Value**
**Set** and then select **Save** (See Figure 14).
 ### **Update the Assignment**
Go to the **Assignment** record and complete the steps below:
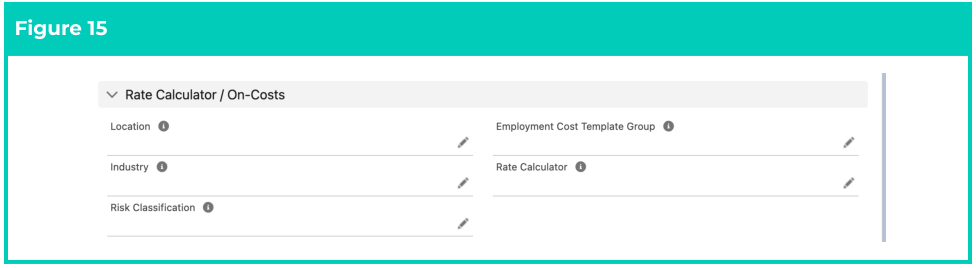
1. Populate the following fields (see Figure 15):
1. **Location**
2. **Industry**
3. **Risk Classification**
4. **Employment Cost Template Group**
2. Click **Save** .
### **Update the Assignment**
Go to the **Assignment** record and complete the steps below:
1. Populate the following fields (see Figure 15):
1. **Location**
2. **Industry**
3. **Risk Classification**
4. **Employment Cost Template Group**
2. Click **Save** .
 ## 21. Alternate GL Payroll Journal processing options (Optional Customisations)
This customisation is often suitable where a Client wants to break down their Cost Of Payroll Journals at a
lower level than the Accounting Department, based on data related to the Assignment, Employee or
Client.
**IMPORTANT** : The estimates provided here do not include the time it takes to complete the core General
Ledger Integration Setup.
### **Option 1 - Align Accounting Departments to Assignments and use the standard Payroll**
### **Journal creation process (14 hours work)**
Note: this method supports splits by Cost Code as well as by Assignment.
1. Add a new field on the Accounting Segment Object which is a lookup to the Assignment.
2. Every time a new Assignment is created, insert a new Accounting Segment (Record Type =
Department) record for this Assignment. (Would suggest completing this requirement with the
creation of a Custom Flow).
3. Once Step 2 is complete, create a new Accounting Assignment Department record linked to the
Accounting Segment just created with a Split of 100% (would suggest completing this
requirement with the creation of another Custom Flow).
4. Ensure the Accounting System Setup is configured to split the journals by Department.
5. Include Formula fields on the Accounting Payroll Journal Line object that provide lookups to the
values related to the Assignment record that the customer is looking to break their journals into
(e.g. Employee, Client, etc).
### **Option 2 - Customer manually extracts source Pay Transaction Data and creates their**
### **Payroll Journals outside of 2cloudnine Payroll (8 - 12 Hours)**
1. Create Custom Report Types that support the data to be extracted as required by the Client. If
there are breakdowns that they want to achieve that you are unable to support using a single
Report Type, then extract the source data for them using separate reports (e.g. Cost Code
breakdowns).
2. Create a series of reports using these Custom Report Types allowing a Client to manually extract
this data. It will be the responsibility of the customer to ensure that they have a process to ensure
the data they are extracting is not missed or duplicated. We would suggest that this should be
done using the Pay Batch (with a status of Payment File Released) as a filter for the exports.
### **Option 3 - Customer extracts source Pay Transaction Data using custom integration and**
### **creates their journals outside of Payroll (12 - 18 Hours)**
1. Assuming that the customer has purchased a custom integration, then an integration process
can be created that automates the extraction of the detailed Pay Transaction data on a scheduled
basis as CSV files. If this data is to be extracted to a structured external data source, then an
additional fee would be charged to cover the cost of the additional work to be completed.
2. As each extract is completed, a field on the Pay Transaction would be updated to mark that it had
been successfully exported which provides a greater degree of control over Option 2. The process
would also be automated and not require a User to process it.
## 22. Creating AU Oncost Distribution Records
In order to create AU Oncost Distribution Records, the On-Cost must be defined on the Assignment
before processing it in a Pay Batch. The creation of the AU Oncost Distribution records is an automatic
process that occurs once a Pay Batch Status reaches the status of Payment File Released. This triggers a
Platform Event to run and create Pay Transaction Distribution records autonomously with a Record Type
of ‘AU Payroll Costs’ (See Figure 16).
A Pay Transaction Distribution record will be created for every applicable Pay Transaction where the
related Pay Code is either AU Payroll Tax Reportable or WorkCover Reportable. Pay Transaction
Distributions are related to both the Pay Batch and Assignment records.
## 21. Alternate GL Payroll Journal processing options (Optional Customisations)
This customisation is often suitable where a Client wants to break down their Cost Of Payroll Journals at a
lower level than the Accounting Department, based on data related to the Assignment, Employee or
Client.
**IMPORTANT** : The estimates provided here do not include the time it takes to complete the core General
Ledger Integration Setup.
### **Option 1 - Align Accounting Departments to Assignments and use the standard Payroll**
### **Journal creation process (14 hours work)**
Note: this method supports splits by Cost Code as well as by Assignment.
1. Add a new field on the Accounting Segment Object which is a lookup to the Assignment.
2. Every time a new Assignment is created, insert a new Accounting Segment (Record Type =
Department) record for this Assignment. (Would suggest completing this requirement with the
creation of a Custom Flow).
3. Once Step 2 is complete, create a new Accounting Assignment Department record linked to the
Accounting Segment just created with a Split of 100% (would suggest completing this
requirement with the creation of another Custom Flow).
4. Ensure the Accounting System Setup is configured to split the journals by Department.
5. Include Formula fields on the Accounting Payroll Journal Line object that provide lookups to the
values related to the Assignment record that the customer is looking to break their journals into
(e.g. Employee, Client, etc).
### **Option 2 - Customer manually extracts source Pay Transaction Data and creates their**
### **Payroll Journals outside of 2cloudnine Payroll (8 - 12 Hours)**
1. Create Custom Report Types that support the data to be extracted as required by the Client. If
there are breakdowns that they want to achieve that you are unable to support using a single
Report Type, then extract the source data for them using separate reports (e.g. Cost Code
breakdowns).
2. Create a series of reports using these Custom Report Types allowing a Client to manually extract
this data. It will be the responsibility of the customer to ensure that they have a process to ensure
the data they are extracting is not missed or duplicated. We would suggest that this should be
done using the Pay Batch (with a status of Payment File Released) as a filter for the exports.
### **Option 3 - Customer extracts source Pay Transaction Data using custom integration and**
### **creates their journals outside of Payroll (12 - 18 Hours)**
1. Assuming that the customer has purchased a custom integration, then an integration process
can be created that automates the extraction of the detailed Pay Transaction data on a scheduled
basis as CSV files. If this data is to be extracted to a structured external data source, then an
additional fee would be charged to cover the cost of the additional work to be completed.
2. As each extract is completed, a field on the Pay Transaction would be updated to mark that it had
been successfully exported which provides a greater degree of control over Option 2. The process
would also be automated and not require a User to process it.
## 22. Creating AU Oncost Distribution Records
In order to create AU Oncost Distribution Records, the On-Cost must be defined on the Assignment
before processing it in a Pay Batch. The creation of the AU Oncost Distribution records is an automatic
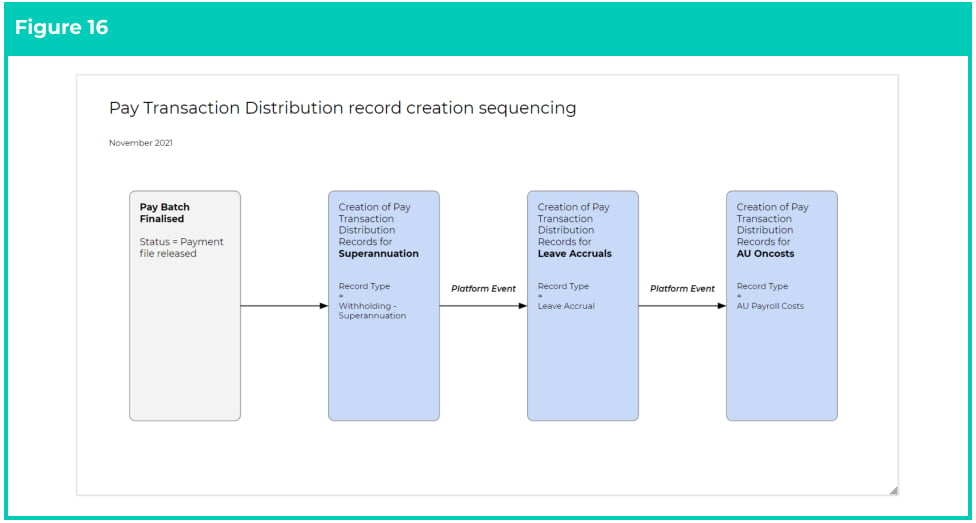
process that occurs once a Pay Batch Status reaches the status of Payment File Released. This triggers a
Platform Event to run and create Pay Transaction Distribution records autonomously with a Record Type
of ‘AU Payroll Costs’ (See Figure 16).
A Pay Transaction Distribution record will be created for every applicable Pay Transaction where the
related Pay Code is either AU Payroll Tax Reportable or WorkCover Reportable. Pay Transaction
Distributions are related to both the Pay Batch and Assignment records.
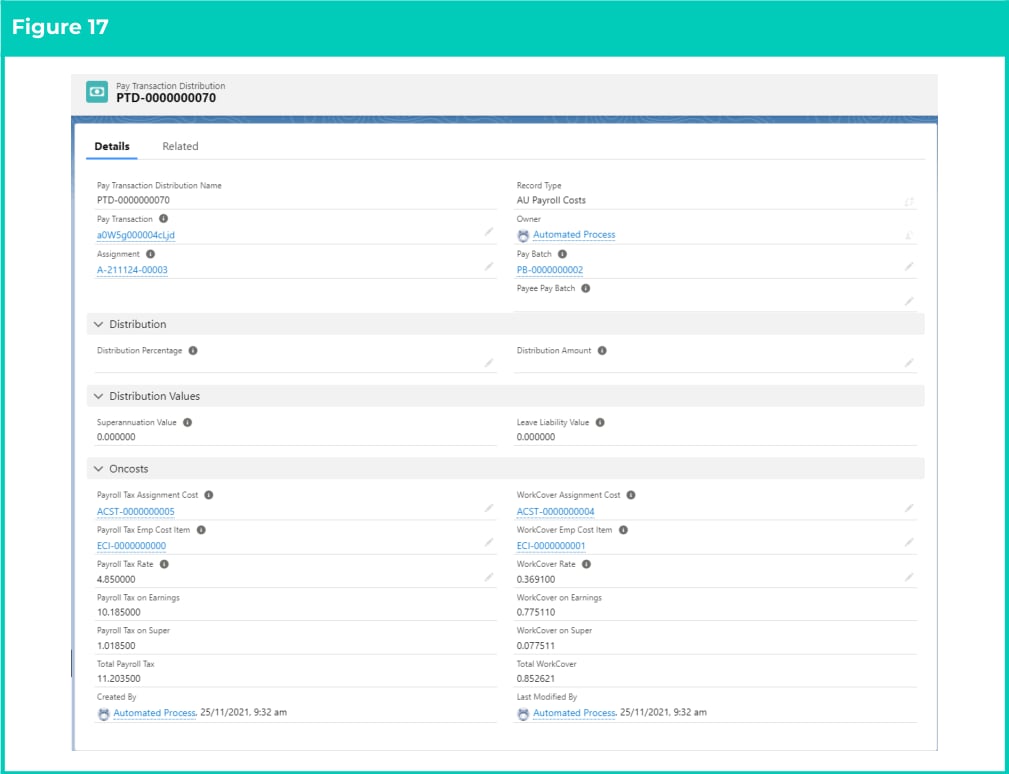
 ### **AU Payroll Costs Distribution Records and Reporting**
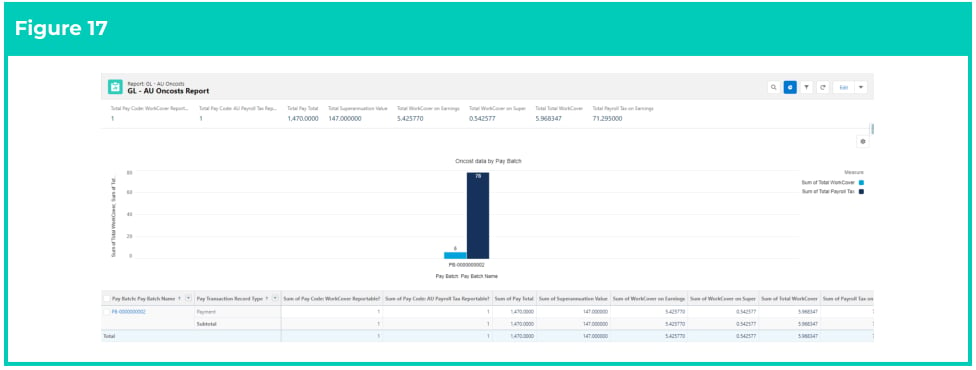
The following screenshot (See Figure 17) shows the Pay Transaction Distribution record and the level of
detail available for reporting purposes.
### **AU Payroll Costs Distribution Records and Reporting**
The following screenshot (See Figure 17) shows the Pay Transaction Distribution record and the level of
detail available for reporting purposes.
 Included in the 2cloudnine General Ledger Package is the **GL - AU Oncosts Report** (See Figure 17), which
can be drilled down to provide very low level reporting data of the Oncost Distribution records.
Included in the 2cloudnine General Ledger Package is the **GL - AU Oncosts Report** (See Figure 17), which
can be drilled down to provide very low level reporting data of the Oncost Distribution records.