> ## Documentation Index
> Fetch the complete documentation index at: https://documentation.2cloudnine.com/llms.txt
> Use this file to discover all available pages before exploring further.
# Configuration Guide To 2cloudnine Payroll Suite v1.13
| Most Recent Release: |
Grevillea ’26 |
| Most Recent Version: |
1.248 |
| Published Date: |
14 April 2026 |
### Packages Included in 2cloudnine Payroll
This Configuration Guide for the 2cloudnine Payroll Suite will cover the following packages, and they
must be installed only after you have completed the entire Pre-Installation checklist.
| Package | Version | Latest Release Date |
| --------------------------------------------- | ------- | ------------------- |
| 2cloudnine Payroll | 1.248 | 30/03/2026 |
| 2cloudnine Time2Pay Extension | 1.233 | 30/3/2026 |
| 2cloudnine Communities / Experience Extension | 1.84 | 27/3/2026 |
| 2cloudnine Data Creation Extension | 1.82 | 02/4/2026 |
| 2cloudnine Payroll Reconciliation Extension | 1.31 | 02/4/2026 |
| 2cloudnine Payroll Aus Lodgement Extension | 1.109 | 30/3/2026 |
### Add On Packages
The installation of the following packages is optional for use with 2cloudnine Payroll. The installation and
configuration instructions for these packages are held separately. Add On Packages should be installed
and configured AFTER the installation of 2cloudnine Payroll and 2cloudnine Payroll Time2Pay Extension
is completed.
| Package | Version | Latest Release Date |
| -------------------------------- | ------- | ------------------- |
| 2cloudnine General Ledger | 1.73 | 30/3/2026 |
| 2cloudnine Import Tool Extension | 1.63 | 14/2/2026 |
## Important Information
Only your authorised Salesforce System Administrator or Partner should be actioning any installation,
configuration items, and tasks.
All the Packages included in the 2cloudnine Payroll listed above must be installed. There may be
compulsory and optional configuration items and tasks that need to be completed pre and
post-installation of the Packages. These will be highlighted in the below checklists, with further details
given within this document.
If you intend to use any of the add-on Packages listed above, it is highly recommended that you
complete the installation and configuration of the main 2cloudnine Payroll Packages before attempting
to install the add-on Packages. This will ensure that any prerequisite/base configuration needed for the
add-on Packages has also been completed.
The installer will be responsible for ensuring all these configuration items and tasks are completed within
a reasonable timeframe of the Packages being installed. Please familiarise yourself with all of the
requirements before installing the Packages and ensure you have sufficient time and resources available.
Failing to do so can negatively impact the User experience and stability of 2cloudnine Payroll.
This guide should always be accessed and used via your web browser. This will confirm you are viewing
the most recent version of the document. Further, downloading the document and opening it with
desktop programs, such as Adobe, has been found to cause errors when copying and using the scripts
provided for data updates. These errors do not occur when viewed through a browser.
## Read First: How to Use this Configuration Guide
### What is covered by this Configuration Guide?
This Configuration Guide outlines the ‘out of the box’ setup of 2cloudnine Payroll, including built-in
customisations to the customer-required processes and data. Where customisation is built into the
Package, we will cover how to install and configure it correctly.
Where, during the sales process and discovery, it is identified that further customisations outside of those
built and contained within 2cloudnine Payroll will be required, this will not be covered by the
Configuration Guide.
### Discovery Workbook and Configuration Guide
This Configuration Guide is meant to be used in conjunction with the Discovery Workbook. Through
Discovery, you will assess the customer needs and identify what 2cloudnine Payroll requirements and
functionality are required to meet those needs. Once the Workbook Requirements have been
established, then you can use the Configuration Guide to establish what configuration needs to be
completed.
### Task Types
* General Salesforce Setup
* Custom Settings, Metadata Types, and Setting Configuration
* Wizards and Scripts
* Schedule Jobs
* Page Layouts and Other User Interfaces
* Base Data / Records Set Up
* Baseline Testing
* Security Set Up
* Data Migration
### Task Classifications
This Configuration Guide is made up of a series of tasks that are either **Compulsory, Conditionally**
**Compulsory** or **Optional** that must be completed to successfully utilise 2cloudnine Payroll. Each task is
allocated 1 of 3 possible classifications, which are:
* **Compulsory** must be completed regardless of whether the organisation will use the related
functionality.
Example: It is a Compulsory task to set up at least one Profile, with a License Type of ‘Salesforce
Platform’ to use with 2cloudnine Payroll.
* **Conditionally Compulsory** must be completed if the organisation is choosing to use a specific
functionality within 2cloudnine Payroll. When a task is Conditionally Compulsory, we will detail
the condition(s) that makes it compulsory.
Example: If the organisation is going to use the 2cloudnine Payroll functionality to generate and
submit their STP reporting to the ATO, it is a Conditionally Compulsory task to create Authorised
Contacts for all Payment Entities that they will be using the functionality to lodge for.
If the organisation does not use the functionality, the Users will not have to complete the task.
* **Optional** tasks will only need to be completed to use an optional feature of 2cloudnine Payroll. In
these cases, there is often a Default behaviour(s) built into 2cloudnine Payroll and if the
organisation wishes to use the Default behaviour(s), they don’t have to do anything else. Where
an organisation is not going to use the Default behaviour(s), an optional task will be set.
## 1. Pre-Installation
### Installation and Configuration Checklist
The 2cloudnine Payroll Config Guide Checklist summarises the tasks that are to be performed to install
and configure 2cloudnine Payroll. Each task should be completed in the sequence given in this
document and in the checklist to ensure seamless installation and configuration of the packages.
Please note that the installation and configuration process may take longer than one working day to
complete. It is highly recommended to make a copy of the checklist and use it to keep track of the
progress being made.
**IMPORTANT:** [Before continuing with the installation and configuration, please use the 2cloudnine Payroll](https://docs.google.com/spreadsheets/u/0/d/1rPyGCQwgm-ydOQlB820yMDOl1D-XM91bROk01rS8nFs/edit)
[Config Guide Checklist, make a copy of it and make sure that you keep it up to date with areas](https://docs.google.com/spreadsheets/u/0/d/1rPyGCQwgm-ydOQlB820yMDOl1D-XM91bROk01rS8nFs/edit)
completed.
### Setup Custom Profile
If you are not going to be using an existing Salesforce profile, or it’s a brand new Salesforce org, you MUST
first create a custom profile with a license type of ‘Salesforce Platform’. This requirement is to be
completed if the Org doesn't already have sufficient (at least 1) Custom Profiles with a License Type of
‘Salesforce Platform’. If the Org already has this and doesn’t require any others to be created, this item
can be skipped.
Go to **Setup > Users > Profiles**
1. On the Profiles list, find the profile named **Standard Platform User** .
2. Click on the **Clone** button.
3. Enter **Profile Name** : 2cloudnine Payroll User.
4. Click the **Save** button.
**Important Notes**
*(Profile)*
*If the Profile named Standard Platform User is missing, please contact the 2cloudnine Product Team*
*before proceeding further with the configuration of the Org.*
### Creation of 2cloudnine Admin Users
The following steps need to be completed to ensure the required Users are created and available. Please
note the steps are slightly different for 2cloudnine Consultants and Partner Consultants:
**For 2cloudnine Consultants:** If you are a 2cloudnine Consultant, then this step needs to be applied
against the User that you have currently accessed the Org with. You will need to:
Go to **Setup > Users**
1. Select the current User record, and select the **Edit** button.
2. Populate the following fields:
* **First Name:** 2cloudnine
* **Last Name:** Support
* **Alias:** defaults after First Name and Last Name are populated
* **Email:** [usercredentialsinternal@2cloudnine.com](mailto:usercredentialsinternal@2cloudnine.com)
* **Username:** defaults to email entered, so replace “usercredentialsinternal” with
Orgname.support (e.g. [ABCNursing.support@2cloudnine.com](mailto:ABCNursing.support@2cloudnine.com))
* **License:** Salesforce
* **Profile:** System Administrator
3. Click the **Save** button.
### For 2cloudnine Partners:
If you are however a 2cloudnine Partner, an additional User must be created for 2cloudnine, in addition to
any other Admin Users accessed by you.
Go to **Setup > Users**
1. Select the **New User** button.
2. Populate the following fields:
1. **First Name:** 2cloudnine
2. **Last Name:** Support
3. **Alias:** defaults after First Name and Last Name are populated
4. **Email:** [usercredentialsinternal@2cloudnine.com](mailto:usercredentialsinternal@2cloudnine.com)
5. **Username:** defaults to email entered, so replace “usercredentialsinternal” with
Orgname.support (e.g. [ABCNursing.support@2cloudnine.com](mailto:ABCNursing.support@2cloudnine.com))
6. **License:** Salesforce
7. **Profile:** System Administrator
3. Click the **Save** button.
### Integration User Creation
The 2cloudnine Tech Services then proceed with the creation of the remaining 2 required Users (detailed
below) once the 2cloudnine Support User has been added to the 1Password vault of 2cloudnine .
* [clientname.services@2cloudnine.com](mailto:clientname.services@2cloudnine.com) - 2c9 Services Team Admin User
* [clientname.integration@2cloudnine.com](mailto:clientname.integration@2cloudnine.com) - Integration License User
The Integration License User is a free Licence on Salesforce, and the two System Administrator Salesforce
Licenses are provisioned to cover the Support and Services Admin Users, with this cost paid by
2cloudnine. These Users must remain active 24/7, 365 days a year, and remain assigned to a 2cloudnine
email address.
As part of the 2cloudnine MSA, it is a requirement for each Org to have a 2cloudnine Integrations User in
addition to the 2cloudnine Admin User, regardless of any software Integrations created. This User is
managed by the 2cloudnine Tech Services Team to review and manage payment of Licenced Users each
month, any Integrated Import Tool processing, and any other imports that are needed into or out of the
2cloudnine Payroll Software. Clients and Partners can review the 2cloudnine MSA for further information
on the requirements for the above Users to be provisioned.
### Automation of Adding Credentials to 1Password (2cloudnine only)
This step is only for 2cloudnine Consultants. Consultants from 2cloudnine Partners can ignore and
proceed to the next step. All three (3) 2cloudnine Users will automatically be added to 1Password within
24 hours. If you require immediate access to the Org, you can proceed with adding the initial User to
1Password only. This automation will also perform the task of Reset Security Token.
### My Domain (Custom Domain)
You must ensure that a ‘My Domain’ has been set up from the org creation. This is needed for the ability
to utilise LWC pages, which are required throughout numerous functions within 2cloudnine Payroll.
This requirement MUST be completed if the Org doesn't already have a My Domain (Custom Domain)
setup, that can be used by 2cloudnine Payroll. If this is already setup, this step can be skipped.
Go to **Setup > Company Settings > My Domain**
1. Confirm the My Domain Details section has data populated.
2. If not, please populate the details.
**Important Notes**
*(My Domain)*
*If you search for Domain, you will see multiple search results. Please ensure you select the correct one*
*called My Domain.*
### Submit a case to Salesforce for changes to My Domain (Conditionally Compulsory)
This requirement needs only to be completed if changes to My Domain are required. If not, this item can
be skipped. If this Org was created via a Trial Org from a TSO Template, a default ‘My Domain’ may have
already been set up for your Org. If this has occurred, and you wish to change the domain name and site
URL that was allocated to your Org, you will need to submit a case to Salesforce via the Salesforce Partner
Community. When you are logging the case with the Salesforce Partner Community, you will need to
provide the following details:
1. Organisation ID
2. Current Domain Name
3. Requested New Domain Name
4. Justification for Unique Site Subdomain Change
Cases of this nature can be submitted via 'Deployment' or 'Setup & Customisation'.
### Enabling Chatter
You need to ensure you enable ‘Chatter’ to provide the ability to chatter on records and to ensure that
you don’t get an error when installing packages or when deploying metadata. To enable Chatter:
Go to **Setup > Chatter Settings**
1. Select the **Edit** button.
2. Select the checkbox **Enable** to true within the top section Chatter Settings.
3. Select the **Save** button.
If you have not enabled Chatter, and continue to proceed with installing Packages and
required configuration, you will receive this error message: “The ActionId specified was
invalid for ActionType QuickAction".
### Enabling Notes
You need to ensure that you have the Enabled Notes field populated so that all the required functionality
will perform correctly after the packages are installed.
Go to **Setup > Notes Settings**
1. Tick the **Enable Notes** checkbox.
2. Click the **Save** button.
If you have not enabled Notes, and continue to proceed with installing packages and
required configuration, you will receive this error message ‘The ActionId specified was
invalid for ActionType QuickAction’.
### Community Licences Provision Check
Community Licences need to be provisioned in the Production Org before the Community Package is
installed. You might also require a licence refresh if you're installing into a Sandbox where the sandbox
was created before the Community Licences were provisioned.
Go to **Setup > Company Information**
1. Scroll down to ‘User Licence’.
2. Review if ‘Customer Community’ is listed and the number provisioned, used, and remaining.
### Administrators Can Log in as Any User
Go to **Setup >** **Login Access Policies**
1. Tick the Enabled checkbox for ‘Administrators Can Log in as Any User’.
2. Click the **Save** button.
### Enable Digital Experiences
**IMPORTANT:** To install the Communities Package and use Digital Experiences, you must first enable it
and select a domain. If Enhanced Domains are enabled, your org's My Domain name is the sub-domain
for any site you create.
If you try to install Communities without enabling ‘Digital Experience’ you will receive
this error message: “ *This package can’t be installed. There are problems that prevent*
*this package from being installed. Missing Organization Feature: CommonPortal* ”.
Go to **Setup > Digital Experiences > Settings**
1. Tick the checkbox ‘ **Enable Digital Experiences’** .
2. If you have Enhanced Domains enabled (under **Setup > My Domain** ), you can select **Save**, and
proceed to step 4 below.
3. If you do not have Enhanced Domains enabled, enter a suitable URL for the Community that is
available to use as per the client’s preference. Please consult with the client before selecting this
URL to ensure it doesn’t conflict with their websites. Once done, please select the **Save** button
and wait as this may take a few moments. You will then be taken to the All Sites page.
Users need to return to **Setup > Digital Experiences > Settings**
4. Find the checkbox ‘ **Let customer users access notes and attachments** ’ and ensure that it is
ticked.
5. Find the checkbox ‘ **Allow using standard external profiles for self-registration, user creation,**
**and login** ’ and tick it.
6. Please acknowledge the additional pop-up window so this can be saved.
7. Click **Save** .
### Manage External Users (System Administrator Profile)
You will need to check if the actions (buttons) required for managing External Users are on the Contact
Page Layout. To do so, follow the below steps:
Go to **Setup > Object Manager > Contact > Page Layouts**
1. Select the **Contact Layout.**
2. Review the buttons appearing on the Page Layout, and confirm the buttons Enable Customer
User, Disable Customer User, and Log in to Experience as User are all appearing under 'Salesforce
Mobile and Lightning Experience Actions.'
3. If there are additional layouts, determine which of those also need these buttons, and repeat for
every Contact layout required.
If the buttons are not found, go back to Enable Digital Experiences on the previous page and resolve
before proceeding.
You will need to check that the permission called Manage External Users is enabled. Depending on the
user interface settings, you can check the permission status using one of two methods listed below:
Go to **Setup > Users > Profiles > System Administrator**
1. If Enhanced Profile User Interface is enabled:
* Select ‘App Permissions’ then find 'Manage External Users' in the Partner Relationship
Management section, and ensure the checkbox is **True** .
2. If Enhanced Profile User Interface is NOT enabled:
* Select 'Manage External Users' in the 'Administrative Permissions' section, and ensure the
checkbox is True.
To check whether the Enhanced Profile User Interface is enabled or not, you can view it from **Setup** **User Management Settings** .
**Important Notes**
*(Manage External Users)*
*If it’s no longer a Trial Org and Manage External Users is still not available, then log a case with*
*[Salesforce via the Partner Community Users. For more details on this, refer to the following link.](https://help.salesforce.com/articleView?id=000338375\&type=1\&mode=1)*
If the above steps aren't completed, you may receive a failure message when
attempting to install the Community Package ‘Missing Organization Feature:
CommonPortal null’.
### Setup ‘Roles’
To create Community Users, you need to enable Salesforce ‘Roles’. You will need to create a Role(s) and
then assign User(s) to the Role(s) created.
Go to **Setup >** **Users > Roles**
1. Choose a suitable Sample Role Hierarchy.
2. Create a Role(s) and choose a suitable name (i.e. Administrator or Payroll)
3. Assign the Role to your User, as well as to any other Users who will be required to create Users
(i.e. Community Users, Payroll Users, System Administrator, etc.).
Below is the recommended setup to avoid overriding Sharing Settings IF role hierarchy is not being set
up for this Org:
1. Create a Role ‘Do Not Use’ at the top of the Role Hierarchy - ensure no User is assigned to this
Role
2. Create a subordinate Role with a generic title such as ‘Staff’ or ‘Employees’
3. Ensure this Role is assigned to all internal Users.
**Important Notes**
*(Private Sharing Model)*
If the Org will be using a Private Sharing Model, it is very important that you take consideration and
time to ensure that you set up the Roles in a way that will not override the Private Sharing Model.
If you do not create a Role and assign it to the System Admin User who runs the Create Timesheets
job, then you will not be able to create any Timesheets.
### Organization-Wide Email Addresses
Each Org requires a minimum of two Org-wide email addresses to be set up for use by specific
processes, and some may be only available for certain Profiles to access, whereas others may be
required to be used by all Profiles. The two Org-Wide email addresses have the following purpose:
* The first email address is to receive email replies that can be used as a system default.
* The second email address is a send email address only and does not receive replies, which
can be used as a system default.
In order to set up an Organisation-Wide Email Address, you will need to follow the steps below:
Go to **Setup > Organization-Wide Addresses**
1. Click on the **Add** button.
2. Populate the Display Name.
3. Populate the Email Address.
4. Populate the Purpose.
1. Populate either:
1. Allow All Profiles to Use this From Address; or
2. Allow Only Selected Profiles to Use the From Address and then multi-select the
individual **Profiles** to have access to this email address.
2. If you selected Purpose as Default No-Reply Address, you will NOT need to select the
above options.
5. Click **Save** . You will receive a verification email. Follow the steps in the email to complete the task.
This MUST be a client email and must not be hosted by Gmail, due to the recent DMARC Policy Adoption.
[See this article for more information: (https://help.salesforce.com/s/articleView?id=000387977\&type=1)](https://help.salesforce.com/s/articleView?id=000387977\&type=1)
### DKIM Setup (Email Authentication for Salesforce)
DKIM is a standard email authentication method that adds a digital signature to outgoing messages.
Receiving mail servers that get messages signed with DKIM can verify messages actually came from the
sender, and not someone impersonating the sender.
DKIM is an improvement over SPF (Sender Policy Framework) in terms of tamper-proofing emails. You
MUST have access to the following in order to proceed further:
1. Setting up DKIM involves configuring the DNS settings of your Domain. If you lack access to your
DNS settings, you should seek the assistance of your IT department.
2. You will need to have Salesforce Administrator access and access to your DNS server where your
Domain is hosted.
All customers who have a custom Domain associated with their emails (i.e. @2cloudnine.com,
@abcconsulting.com.au, etc) will need to set up a DKIM Key for the above Org-wide email addresses that
have been created (page 8), to authorise the Domain to send emails from Salesforce. Without this, emails
will fail to be received or will be sent to junk or SPAM folders. This is very different from the previously
suggested configuration, where you could have a 2cloudnine email address that would satisfy this
requirement. As the 2cloudnine email domain is managed by Google, this is no longer possible. If,
however, they have an email address that is not associated with a custom domain (i.e. [test@gmail.com](mailto:test@gmail.com),
etc) then this requirement to set up a DKIM Key is not required.
If you have enabled DMARC on your Domain/email, it is essential to follow the instructions below to
ensure that your Salesforce Org can send emails without any issues. To set up a DKIM key:
Go to **Setup > Email > DKIM Keys**
1. Check if there is a DKIM Key listed and is active.
2. If there is no DKIM Key then please follow the article [Create a DKIM Key](https://help.salesforce.com/s/articleView?id=sf.emailadmin_create_secure_dkim.htm\&type=5) to create one.
3. Please review the additional articles below to set up and configure your DKIM.
Useful Articles:
* [Salesforce Email Deliverability Tips: BCC Email, SPF, DKIM, DMARC ](https://www.salesforceben.com/salesforce-email-deliverability/)
* [Best practices to setup DKIM](https://help.salesforce.com/s/articleView?id=000381186\&type=1)
* [Salesforce Email Authentication for Salesforce ](https://www.salesforceben.com/email-authentication-for-pardot-salesforce-and-marketing-cloud/)
## 2. Installing Packages
### Main Packages
Please make sure to install the required packages now before completing any further configuration. The
configuration for required packages is covered in this guide. You must:
* proceed further only once all the required packages have been installed.
* install the following packages in the suggested sequence below:
| Package | Version | Installation Link |
| --------------------------------------------- | ------- | ------------------------------------------------------------ |
| 2cloudnine Payroll | 1.248 | packaging/installPackage.apexp?p0=04tIS0000 004vQM |
| 2cloudnine Time2Pay Extension | 1.233 | packaging/installPackage.apexp?p0=04tGB000 003FjSN |
| 2cloudnine Communities / Experience Extension | 1.84 | packaging/installPackage.apexp?p0=04tGC000 007H2xg |
| 2cloudnine Data Creation Extension | 1.82 | packaging/installPackage.apexp?p0=04tIg0000 00osJA\&isdtp=p1 |
| 2cloudnine Payroll Reconciliation Extension | 1.31 | packaging/installPackage.apexp?p0=04tf60000 00Brtp |
| 2cloudnine Payroll Aus Lodgement Extension | 1.109 | packaging/installPackage.apexp?p0=04tIS0000 00gfZ |
\###**Add On Packages**
The Installation of the following packages is optional. The configuration for add on packages is NOT
covered in this guide. Therefore, if installing these packages, users will need to refer to their respective
Configuration Guides:
| Package | Version | Installation and Configuration Documentation |
| ---------------------------------- | ------------ | ------------------------------------------------------------------------- |
| 2cloudnine General Ledger | 1.73 | 2cloudnine General Ledger - Configuration and Implementation Guide |
| 2cloudnine Import Tool Extension | 1.63 | 2cloudnine Integrated Import Tool Configuration & Implementation Guide |
| 2cloudnine Field Service Extension | 1.26 | 2cloudnine Field Service Extension Configuration and Implementation Guide |
| 2cloudnine Agreements | 0.6.0.2 Beta | Please contact your Administrator |
### Installation Process
When you install a Managed Package, you need to select the correct option of either a, b or c below, to
ensure access to the Package is provided to the Profiles as needed:
**IMPORTANT:** Please note that you must choose the required option carefully as this step can not be
repeated.
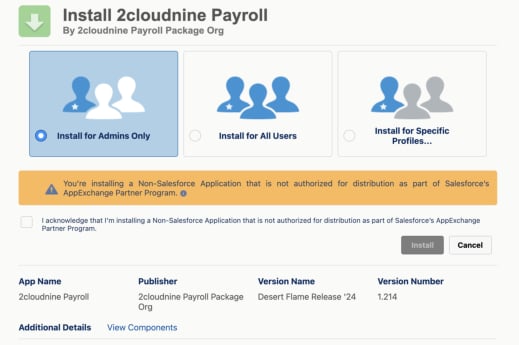 1. Install for Admins Only
2. Install for All Users
3. Install for Specific Profiles - To manually select which Profiles you will be applying the security to.
1. Install for Admins Only
2. Install for All Users
3. Install for Specific Profiles - To manually select which Profiles you will be applying the security to.
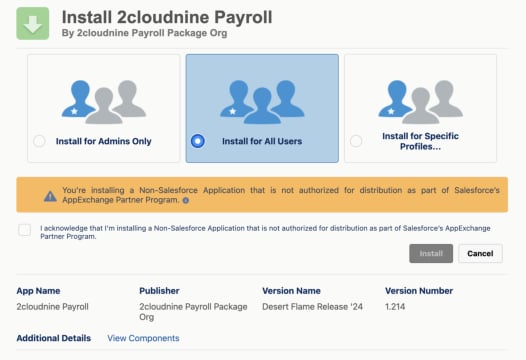 To proceed further, you must tick the checkbox ‘I acknowledge that I’m installing a Non-Salesforce
Application that is not authorized for distribution as part of Salesforce’s AppExchange Partner Program.’
After this, you will need to select the **Install** button, which will commence the installation of the Package.
To proceed further, you must tick the checkbox ‘I acknowledge that I’m installing a Non-Salesforce
Application that is not authorized for distribution as part of Salesforce’s AppExchange Partner Program.’
After this, you will need to select the **Install** button, which will commence the installation of the Package.
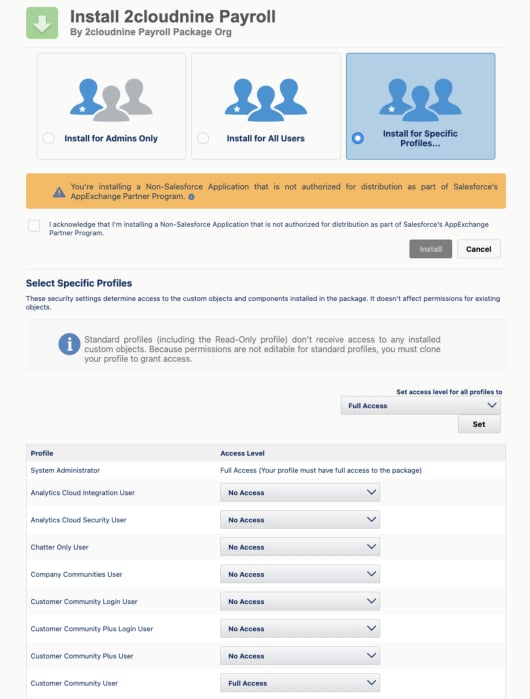 Salesforce will begin to install the Package. If you are presented with dialogue informing you the
installation is taking a while, you can accept and this will return you to the Installed Packages page.
Salesforce will send an email advising when the installation has been completed and the Package will be
listed if you refresh the page.
## 3. Data Creation Setup
**IMPORTANT:** Please note the Setup Payroll and Setup Time2Pay can not be completed until the latest
version of the Data Creation Package is installed. You will need to install the 2cloudnine Payroll and
Time2Pay Packages first (including any Pre-Installation Steps) and then install the Data Creation
Package, and only then will the required Setup Objects & Tabs be available to select, and the flows
available to create the records required.
### Setup Payroll (Wizard)
Navigate to the **App Launcher >** **2c9 Bulk Data Creation** app > **Setup Payroll** tab. You’ll be presented
with a screen flow that will walk you through the following steps that are to be created if you require
them. Select the **Next** button to commence the steps required.
Salesforce will begin to install the Package. If you are presented with dialogue informing you the
installation is taking a while, you can accept and this will return you to the Installed Packages page.
Salesforce will send an email advising when the installation has been completed and the Package will be
listed if you refresh the page.
## 3. Data Creation Setup
**IMPORTANT:** Please note the Setup Payroll and Setup Time2Pay can not be completed until the latest
version of the Data Creation Package is installed. You will need to install the 2cloudnine Payroll and
Time2Pay Packages first (including any Pre-Installation Steps) and then install the Data Creation
Package, and only then will the required Setup Objects & Tabs be available to select, and the flows
available to create the records required.
### Setup Payroll (Wizard)
Navigate to the **App Launcher >** **2c9 Bulk Data Creation** app > **Setup Payroll** tab. You’ll be presented
with a screen flow that will walk you through the following steps that are to be created if you require
them. Select the **Next** button to commence the steps required.
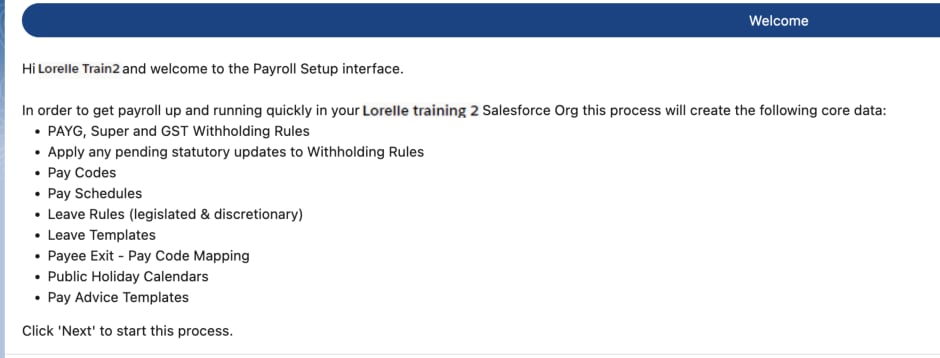 1. The next screen will confirm the first records to be created will be the PAYG Withholding Rules. It will display the text below:
By clicking 'Next' **PAYG Withholding Rule** records will be created.
Click **Next** to proceed to the step below.
2. By clicking 'Next' **Superannuation Withholding Rule** records will be created.
Click **Next** to proceed to the step below.
3. By clicking 'Next' **GST Withholding Rule** records will be created.
Click **Next** to proceed to the step below.
4. By clicking 'Next' the **July 1st 2020** updated STSL, Lump Sum D, ETP and Superannuation rates
will be applied.
Click **Next** to proceed to the step below.
5. By clicking 'Next' the **October 2020** updated PAYG rates will be applied.
Click **Next** to proceed to the step below.
6. By clicking 'Next' the **July 2021** updated PAYG & Superannuation rates will be applied.
Click **Next** to proceed to the step below.
7. By clicking 'Next' the **July 2022** updated PAYG & Superannuation rates will be applied.
Click **Next** to proceed to the step below.
8. By clicking ‘Next’ the **July 2023** updated PAYG & Superannuation rates will be applied.
Click **Next** to proceed to the step below.
9. By clicking ‘Next’ the **July 2024** updated PAYG & Superannuation rates will be applied.
Click **Next** to proceed to the step below.
10. By clicking 'Next' the **July 2025** updated PAYG & Superannuation rates will be applied.
Click **Next** to proceed to the step below.
11. By clicking 'Next' the **September 2025** updated STSL rates will be applied.
Click **Next** to proceed to the step below.
The next stages of the Flow will ask you a series of questions to determine if you want the system to
create the standard records in line with legislative requirements, or if you would like to ignore and create them manually at a later time. Further details of the specific records that are created for Pay Codes can be found in the Discovery Workbook.
12. By clicking 'Next' the default group of **Payment** Pay Codes will be created.
### Create Pay Codes?
Click **Yes** and **Next** to proceed to the step below.
**Important Notes**
*(Pay Codes)*
*If you select No for any of the questions 12 - 18, you will need to create the Pay Codes manually*
*[afterward. This can be done by following the Pay Code QRGs, similar to this one - Create Pay Codes -](https://drive.google.com/file/d/1UIrl65tnWGCPxdBl28ov7aK8gQcQq-nA/view?usp=sharing)*
*[Payment Pay Codes](https://drive.google.com/file/d/1UIrl65tnWGCPxdBl28ov7aK8gQcQq-nA/view?usp=sharing)* .
*If you select No for Payment, ETP, or Lump Sum Pay Codes, then there will also be issues with the*
*creation of Leave Rule and/or the Payee Exit mapping.*
13. By clicking 'Next' the default group of **Deduction** Pay Codes will be created.
**Create Pay Codes?**
Click **Yes** and **Next** to proceed to the step below.
14. By clicking 'Next' the default group of **Allowance** Pay Codes will be created.
**Create Pay Codes?**
Click **Yes** and **Next** to proceed to the step below.
15. By clicking 'Next' the default group of **Expense** Pay Codes will be created.
**Create Pay Codes?**
Click **Yes** and **Next** to proceed to the step below.
16. By clicking 'Next' the default group of **ETP** Pay Codes will be created.
**Create Pay Codes?**
Click **Yes** and **Next** to proceed to the step below.
17. By clicking 'Next' the default group of **Lump Sum** Pay Codes will be created.
**Create Pay Codes?**
Click **Yes** and **Next** to proceed to the step below.
18. By clicking 'Next' the default group of **FBT** Pay Codes will be created.
**Create Pay Codes?**
Click **Yes** and **Next** to proceed to the step below.
19. You will now be advised the next steps relate to Pay Schedules, however will be given an
opportunity to create an Organization-Wide Email Addresses if not already created from the
previous request in this guide. If you have not created one yet, you will need to click the link
provided in the screen to create one before proceeding with the Next button.
If you click the provided link in the screen, a new window opens which takes you to the Setup
screen for Organization-Wide Email Addresses. You can create them here (if you didn’t create
them previously during Pre-Installation) so they can be referenced when you proceed to create
your Pay Schedules (next step). These Organization-Wide Email Addresses will need to be client
email addresses, and they must not be managed through Gmail due to the DMARC policy
changes. Salesforce will also require verification of all email addresses added here. When
satisfied, return to the previous browser screen and select **Next** .
**Important Notes**
*(Pay Schedules)*
If you change the selection to No for any of the questions 20 - 25, you will NOT need to populate any of
the mentioned fields, and the Pay Schedule record will not be created after you click Next.
20. Users will now be asked if they would like to create a default **Weekly** Pay Schedule.
### Create Pay Schedule?
If required, click **Yes** and review the values that are auto populated in the fields below:
* **Schedule Name**
* **Earliest Payroll Calculation Date**
* **Send Pay Advices From (Org-Wide Email Address)** (no default provided)
* **Create One Pay Advice per**
* **Create Minimum and Maximum Warnings?** (If yes, more fields display requiring values)
* **Create Auto Pay Defaults?** (If yes, more fields display requiring values)
Click **Next** to create the Pay Schedule and proceed to the step below.
21. Users will now be asked if they would like to create a default **Fortnightly** Pay Schedule.
**Create Pay Schedule?**
If required, click **Yes** and populate the fields below:
* **Schedule Name**
* **Earliest Payroll Calculation Date**
* **Send Pay Advices From (Org-Wide Email Address)** (no default provided)
* **Create One Pay Advice per**
* **Create Minimum and Maximum Warnings?** (If yes, more fields display requiring values)
* **Create Auto Pay Defaults?** (If yes, more fields display requiring values)
Click **Next** to create the Pay Schedule and proceed to the step below.
22. Users will now be asked if they would like to create a default **Monthly** Pay Schedule.
**Create Pay Schedule?**
If required, click **Yes** and populate the fields below:
* **Schedule Name**
* **Earliest Payroll Calculation Date**
* **Send Pay Advices From (Org-Wide Email Address)** (no default provided)
* **Create One Pay Advice per**
* **Create Minimum and Maximum Warnings?** (If yes, more fields display requiring values)
* **Create Auto Pay Defaults?** (If yes, more fields display requiring values)
Click **Next** to create the Pay Schedule and proceed to the step below.
23. Users will now be asked if they would like to create a default **Bi-Monthly** Pay Schedule.
**Create Pay Schedule?**
If required, click **Yes** and populate the fields below:
* **Schedule Name**
* **Earliest Payroll Calculation Date**
* **Send Pay Advices From (Org-Wide Email Address)** (no default provided)
* **Create One Pay Advice per**
* **Create Minimum and Maximum Warnings?** (If yes, more fields display requiring values)
* **Create Auto Pay Defaults?** (If yes, more fields display requiring values)
Click **Next** to create the Pay Schedule and proceed to the step below.
24. Users will now be asked if they would like to create a default **4-Weekly** Pay Schedule.
**Create Pay Schedule?**
If required, click **Yes** and populate the fields below:
* **Schedule Name**
* **Earliest Payroll Calculation Date**
* **Send Pay Advices From (Org-Wide Email Address)** (no default provided)
* **Create One Pay Advice per**
* **Create Minimum and Maximum Warnings?** (If yes, more fields display requiring values)
* **Create Auto Pay Defaults?** (If yes, more fields display requiring values)
Click **Next** to create the Pay Schedule and proceed to the step below.
25. Users will now be asked if they would like to create a default **Daily** Pay Schedule.
**Create Pay Schedule?**
If required, click **Yes** and populate the fields below:
* **Schedule Name**
* **Earliest Payroll Calculation Date**
* **Send Pay Advices From (Org-Wide Email Address)** (no default provided)
* **Create One Pay Advice per**
* **Create Minimum and Maximum Warnings?** (If yes, more fields display requiring values)
* **Create Auto Pay Defaults?** (If yes, more fields display requiring values)
Click **Next** to create the Pay Schedule and proceed to the step below.
26. By clicking 'Next' the following **Leave Rules** will be created in accordance with Fair Work Australia
NES entitlements:
* Annual Leave (4 weeks)
* Personal Leave (10 days)
* Long Service Leave (all States & Territories)
* Compassionate Leave (paid)
* Family & Domestic Violence Leave (unpaid)
* Parental Leave (unpaid)
* Unpaid Leave
### Create NES Leave Rules?
Click **Yes** to create the Leave Rules, or
Click **No** to not create any Leave Rules
Click **Next** to proceed to the step below.
27. Please select from the list below which discretionary Leave Rules you would like to create:
* [ ] Annual Leave 5 Weeks
* [x] Purchased Leave 1 Week (1/52)
* [x] Rostered Day Off (Accrued @ 0.05)
* [ ] Time Off in Lieu
Click **Next** to proceed to the step below.
**IMPORTANT:** Please make sure to select **Annual Leave 5 weeks** for Health industry clients.
28. Do you wish to create Leave Templates?
If not, please slide toggle to No and skip to the next step that appears in the Setup Wizard,
otherwise continue here.
Please select the Leave Template types you wish to create:
* [ ] Casual
* [ ] Permanent
* [ ] Permanent (Shift)
Click **Next** to proceed to the step below.
29. If you selected the **Casual** option in the previous step, then please select the **Casual** Leave
Templates you wish to create from the table below:
* [ ] ACT Casual NES Leave Rules
* [ ] NSW Casual NES Leave Rules
* [ ] NT Casual NES Leave Rules
* [ ] QLD Casual NES Leave Rules
* [ ] SA Casual NES Leave Rules
* [ ] TAS Casual NES Leave Rules
* [ ] VIC Casual NES Leave Rules
* [ ] WA Casual NES Leave Rules
Click **Next** to proceed to the step below.
30. If you selected the **Permanent** option in step 27, then please select the **Permanent** Leave
Templates you wish to create from the table below:
* [ ] ACT Permanent NES Leave Rules
* [ ] NSW Permanent NES Leave Rules
* [ ] NT Permanent NES Leave Rules
* [ ] QLD Permanent NES Leave Rules
* [ ] SA Permanent NES Leave Rules
* [ ] TAS Permanent NES Leave Rules
* [ ] VIC Permanent NES Leave Rules
* [ ] WA Permanent NES Leave Rules
Click **Next** to proceed to the step below.
31. If you selected the **Permanent (Shift)** option in step 27, then please select the **Permanent (Shift)**
Leave Templates you wish to create from the table below:
* [ ] ACT Permanent Shift NES Leave Rules
* [ ] NSW Permanent Shift NES Leave Rules
* [ ] NT Permanent Shift NES Leave Rules
* [ ] QLD Permanent Shift NES Leave Rules
* [ ] SA Permanent Shift NES Leave Rules
* [ ] TAS Permanent Shift NES Leave Rules
* [ ] VIC Permanent Shift NES Leave Rules
* [ ] WA Permanent Shift NES Leave Rules
Click **Next** to proceed to the step below.
32. This step of the process will setup the mapping of Pay Codes for Payee Exit Calculations. This
process is run in two steps.
**Step 1** - creation of leave related pay code mappings.
Click **Next** to proceed to the step below.
33. This step of the process will setup the mapping of Pay Codes for Payee Exit Calculations. This
process is run in two steps.
**Step 2** - Pay Code mapping for ETPs and Lump Sum D.
Click **Next** to proceed to the step below.
34. Please select from the multi-select picklist which state-wide public holiday Calendars you wish to
be created.
Note: Only public holidays for the capital city of each State/Territory will be created. Use the
standard Calendar and Calendar Period records to amend these calendars for specific regions.
**Select** all the relevant Public Holiday Calendars you would like to be created for the years 2024 2026, based on the capital city only. Any regional Public Holiday Calendars will need to be created
manually.
* [ ] ACT Public Holidays
* [ ] NSW Public Holidays
* [ ] NT Public Holidays
* [ ] QLD Public Holidays
* [ ] SA Public Holidays
* [ ] TAS Public Holidays
* [ ] VIC Public Holidays
* [ ] WA Public Holidays
Click **Next** to proceed to the step below.
35. For each state that was chosen from the previous screen, Users will be required to click Next as
each screen confirms the Calendars being created and the years being created.
Click **Next** to add the Calendar Periods for this Public Holiday Calendar - where confirmed.
Public Holidays will be created for:
* 2024
* 2025
* 2026
Repeat this step by clicking **Next** for each screen until you are taken to the screen for Pay Advice
Template creation.
36. By clicking 'Next' users will be taken to the default Pay Advice Template creation stage. Please
indicate which types of payees you will be paying below.
* [ ] PAYG
* [ ] RCTI
Click **Next** to proceed to the step below.
37. You will be presented with a confirmation screen now, confirming the date and time all the core
1. The next screen will confirm the first records to be created will be the PAYG Withholding Rules. It will display the text below:
By clicking 'Next' **PAYG Withholding Rule** records will be created.
Click **Next** to proceed to the step below.
2. By clicking 'Next' **Superannuation Withholding Rule** records will be created.
Click **Next** to proceed to the step below.
3. By clicking 'Next' **GST Withholding Rule** records will be created.
Click **Next** to proceed to the step below.
4. By clicking 'Next' the **July 1st 2020** updated STSL, Lump Sum D, ETP and Superannuation rates
will be applied.
Click **Next** to proceed to the step below.
5. By clicking 'Next' the **October 2020** updated PAYG rates will be applied.
Click **Next** to proceed to the step below.
6. By clicking 'Next' the **July 2021** updated PAYG & Superannuation rates will be applied.
Click **Next** to proceed to the step below.
7. By clicking 'Next' the **July 2022** updated PAYG & Superannuation rates will be applied.
Click **Next** to proceed to the step below.
8. By clicking ‘Next’ the **July 2023** updated PAYG & Superannuation rates will be applied.
Click **Next** to proceed to the step below.
9. By clicking ‘Next’ the **July 2024** updated PAYG & Superannuation rates will be applied.
Click **Next** to proceed to the step below.
10. By clicking 'Next' the **July 2025** updated PAYG & Superannuation rates will be applied.
Click **Next** to proceed to the step below.
11. By clicking 'Next' the **September 2025** updated STSL rates will be applied.
Click **Next** to proceed to the step below.
The next stages of the Flow will ask you a series of questions to determine if you want the system to
create the standard records in line with legislative requirements, or if you would like to ignore and create them manually at a later time. Further details of the specific records that are created for Pay Codes can be found in the Discovery Workbook.
12. By clicking 'Next' the default group of **Payment** Pay Codes will be created.
### Create Pay Codes?
Click **Yes** and **Next** to proceed to the step below.
**Important Notes**
*(Pay Codes)*
*If you select No for any of the questions 12 - 18, you will need to create the Pay Codes manually*
*[afterward. This can be done by following the Pay Code QRGs, similar to this one - Create Pay Codes -](https://drive.google.com/file/d/1UIrl65tnWGCPxdBl28ov7aK8gQcQq-nA/view?usp=sharing)*
*[Payment Pay Codes](https://drive.google.com/file/d/1UIrl65tnWGCPxdBl28ov7aK8gQcQq-nA/view?usp=sharing)* .
*If you select No for Payment, ETP, or Lump Sum Pay Codes, then there will also be issues with the*
*creation of Leave Rule and/or the Payee Exit mapping.*
13. By clicking 'Next' the default group of **Deduction** Pay Codes will be created.
**Create Pay Codes?**
Click **Yes** and **Next** to proceed to the step below.
14. By clicking 'Next' the default group of **Allowance** Pay Codes will be created.
**Create Pay Codes?**
Click **Yes** and **Next** to proceed to the step below.
15. By clicking 'Next' the default group of **Expense** Pay Codes will be created.
**Create Pay Codes?**
Click **Yes** and **Next** to proceed to the step below.
16. By clicking 'Next' the default group of **ETP** Pay Codes will be created.
**Create Pay Codes?**
Click **Yes** and **Next** to proceed to the step below.
17. By clicking 'Next' the default group of **Lump Sum** Pay Codes will be created.
**Create Pay Codes?**
Click **Yes** and **Next** to proceed to the step below.
18. By clicking 'Next' the default group of **FBT** Pay Codes will be created.
**Create Pay Codes?**
Click **Yes** and **Next** to proceed to the step below.
19. You will now be advised the next steps relate to Pay Schedules, however will be given an
opportunity to create an Organization-Wide Email Addresses if not already created from the
previous request in this guide. If you have not created one yet, you will need to click the link
provided in the screen to create one before proceeding with the Next button.
If you click the provided link in the screen, a new window opens which takes you to the Setup
screen for Organization-Wide Email Addresses. You can create them here (if you didn’t create
them previously during Pre-Installation) so they can be referenced when you proceed to create
your Pay Schedules (next step). These Organization-Wide Email Addresses will need to be client
email addresses, and they must not be managed through Gmail due to the DMARC policy
changes. Salesforce will also require verification of all email addresses added here. When
satisfied, return to the previous browser screen and select **Next** .
**Important Notes**
*(Pay Schedules)*
If you change the selection to No for any of the questions 20 - 25, you will NOT need to populate any of
the mentioned fields, and the Pay Schedule record will not be created after you click Next.
20. Users will now be asked if they would like to create a default **Weekly** Pay Schedule.
### Create Pay Schedule?
If required, click **Yes** and review the values that are auto populated in the fields below:
* **Schedule Name**
* **Earliest Payroll Calculation Date**
* **Send Pay Advices From (Org-Wide Email Address)** (no default provided)
* **Create One Pay Advice per**
* **Create Minimum and Maximum Warnings?** (If yes, more fields display requiring values)
* **Create Auto Pay Defaults?** (If yes, more fields display requiring values)
Click **Next** to create the Pay Schedule and proceed to the step below.
21. Users will now be asked if they would like to create a default **Fortnightly** Pay Schedule.
**Create Pay Schedule?**
If required, click **Yes** and populate the fields below:
* **Schedule Name**
* **Earliest Payroll Calculation Date**
* **Send Pay Advices From (Org-Wide Email Address)** (no default provided)
* **Create One Pay Advice per**
* **Create Minimum and Maximum Warnings?** (If yes, more fields display requiring values)
* **Create Auto Pay Defaults?** (If yes, more fields display requiring values)
Click **Next** to create the Pay Schedule and proceed to the step below.
22. Users will now be asked if they would like to create a default **Monthly** Pay Schedule.
**Create Pay Schedule?**
If required, click **Yes** and populate the fields below:
* **Schedule Name**
* **Earliest Payroll Calculation Date**
* **Send Pay Advices From (Org-Wide Email Address)** (no default provided)
* **Create One Pay Advice per**
* **Create Minimum and Maximum Warnings?** (If yes, more fields display requiring values)
* **Create Auto Pay Defaults?** (If yes, more fields display requiring values)
Click **Next** to create the Pay Schedule and proceed to the step below.
23. Users will now be asked if they would like to create a default **Bi-Monthly** Pay Schedule.
**Create Pay Schedule?**
If required, click **Yes** and populate the fields below:
* **Schedule Name**
* **Earliest Payroll Calculation Date**
* **Send Pay Advices From (Org-Wide Email Address)** (no default provided)
* **Create One Pay Advice per**
* **Create Minimum and Maximum Warnings?** (If yes, more fields display requiring values)
* **Create Auto Pay Defaults?** (If yes, more fields display requiring values)
Click **Next** to create the Pay Schedule and proceed to the step below.
24. Users will now be asked if they would like to create a default **4-Weekly** Pay Schedule.
**Create Pay Schedule?**
If required, click **Yes** and populate the fields below:
* **Schedule Name**
* **Earliest Payroll Calculation Date**
* **Send Pay Advices From (Org-Wide Email Address)** (no default provided)
* **Create One Pay Advice per**
* **Create Minimum and Maximum Warnings?** (If yes, more fields display requiring values)
* **Create Auto Pay Defaults?** (If yes, more fields display requiring values)
Click **Next** to create the Pay Schedule and proceed to the step below.
25. Users will now be asked if they would like to create a default **Daily** Pay Schedule.
**Create Pay Schedule?**
If required, click **Yes** and populate the fields below:
* **Schedule Name**
* **Earliest Payroll Calculation Date**
* **Send Pay Advices From (Org-Wide Email Address)** (no default provided)
* **Create One Pay Advice per**
* **Create Minimum and Maximum Warnings?** (If yes, more fields display requiring values)
* **Create Auto Pay Defaults?** (If yes, more fields display requiring values)
Click **Next** to create the Pay Schedule and proceed to the step below.
26. By clicking 'Next' the following **Leave Rules** will be created in accordance with Fair Work Australia
NES entitlements:
* Annual Leave (4 weeks)
* Personal Leave (10 days)
* Long Service Leave (all States & Territories)
* Compassionate Leave (paid)
* Family & Domestic Violence Leave (unpaid)
* Parental Leave (unpaid)
* Unpaid Leave
### Create NES Leave Rules?
Click **Yes** to create the Leave Rules, or
Click **No** to not create any Leave Rules
Click **Next** to proceed to the step below.
27. Please select from the list below which discretionary Leave Rules you would like to create:
* [ ] Annual Leave 5 Weeks
* [x] Purchased Leave 1 Week (1/52)
* [x] Rostered Day Off (Accrued @ 0.05)
* [ ] Time Off in Lieu
Click **Next** to proceed to the step below.
**IMPORTANT:** Please make sure to select **Annual Leave 5 weeks** for Health industry clients.
28. Do you wish to create Leave Templates?
If not, please slide toggle to No and skip to the next step that appears in the Setup Wizard,
otherwise continue here.
Please select the Leave Template types you wish to create:
* [ ] Casual
* [ ] Permanent
* [ ] Permanent (Shift)
Click **Next** to proceed to the step below.
29. If you selected the **Casual** option in the previous step, then please select the **Casual** Leave
Templates you wish to create from the table below:
* [ ] ACT Casual NES Leave Rules
* [ ] NSW Casual NES Leave Rules
* [ ] NT Casual NES Leave Rules
* [ ] QLD Casual NES Leave Rules
* [ ] SA Casual NES Leave Rules
* [ ] TAS Casual NES Leave Rules
* [ ] VIC Casual NES Leave Rules
* [ ] WA Casual NES Leave Rules
Click **Next** to proceed to the step below.
30. If you selected the **Permanent** option in step 27, then please select the **Permanent** Leave
Templates you wish to create from the table below:
* [ ] ACT Permanent NES Leave Rules
* [ ] NSW Permanent NES Leave Rules
* [ ] NT Permanent NES Leave Rules
* [ ] QLD Permanent NES Leave Rules
* [ ] SA Permanent NES Leave Rules
* [ ] TAS Permanent NES Leave Rules
* [ ] VIC Permanent NES Leave Rules
* [ ] WA Permanent NES Leave Rules
Click **Next** to proceed to the step below.
31. If you selected the **Permanent (Shift)** option in step 27, then please select the **Permanent (Shift)**
Leave Templates you wish to create from the table below:
* [ ] ACT Permanent Shift NES Leave Rules
* [ ] NSW Permanent Shift NES Leave Rules
* [ ] NT Permanent Shift NES Leave Rules
* [ ] QLD Permanent Shift NES Leave Rules
* [ ] SA Permanent Shift NES Leave Rules
* [ ] TAS Permanent Shift NES Leave Rules
* [ ] VIC Permanent Shift NES Leave Rules
* [ ] WA Permanent Shift NES Leave Rules
Click **Next** to proceed to the step below.
32. This step of the process will setup the mapping of Pay Codes for Payee Exit Calculations. This
process is run in two steps.
**Step 1** - creation of leave related pay code mappings.
Click **Next** to proceed to the step below.
33. This step of the process will setup the mapping of Pay Codes for Payee Exit Calculations. This
process is run in two steps.
**Step 2** - Pay Code mapping for ETPs and Lump Sum D.
Click **Next** to proceed to the step below.
34. Please select from the multi-select picklist which state-wide public holiday Calendars you wish to
be created.
Note: Only public holidays for the capital city of each State/Territory will be created. Use the
standard Calendar and Calendar Period records to amend these calendars for specific regions.
**Select** all the relevant Public Holiday Calendars you would like to be created for the years 2024 2026, based on the capital city only. Any regional Public Holiday Calendars will need to be created
manually.
* [ ] ACT Public Holidays
* [ ] NSW Public Holidays
* [ ] NT Public Holidays
* [ ] QLD Public Holidays
* [ ] SA Public Holidays
* [ ] TAS Public Holidays
* [ ] VIC Public Holidays
* [ ] WA Public Holidays
Click **Next** to proceed to the step below.
35. For each state that was chosen from the previous screen, Users will be required to click Next as
each screen confirms the Calendars being created and the years being created.
Click **Next** to add the Calendar Periods for this Public Holiday Calendar - where confirmed.
Public Holidays will be created for:
* 2024
* 2025
* 2026
Repeat this step by clicking **Next** for each screen until you are taken to the screen for Pay Advice
Template creation.
36. By clicking 'Next' users will be taken to the default Pay Advice Template creation stage. Please
indicate which types of payees you will be paying below.
* [ ] PAYG
* [ ] RCTI
Click **Next** to proceed to the step below.
37. You will be presented with a confirmation screen now, confirming the date and time all the core
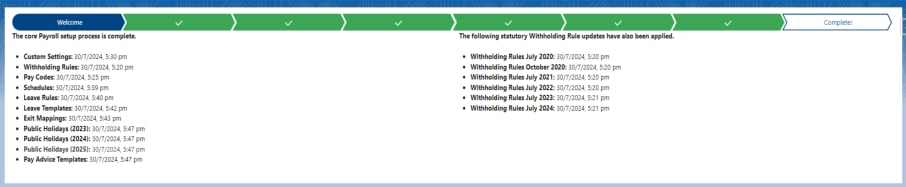 Payroll Setup processes have been completed.
These will also be recorded in a Custom Setting named Setup Core Data. If you want to view this:
### New Picklist Values
You must complete this step before proceeding to the next step (Setup Time2Pay). The packages come
installed with a default picklist value for the field ‘Send Invoice Emails From Email Picklists’ which is used
on both the Client Record and the Account Settings records. Users need to ensure they deactivate the
default value and create the new value needed.
Go to **Setup > Picklist Value Sets > Send Invoice Emails From Email Picklists > New**
1. Enter all email addresses that are to be included as possible values in this picklist, ensuring each value is on a new line. These must be verified Organization-Wide email addresses which the Client approves as being the email to send Invoices.
2. Ensure you tick the checkbox for **Add the new picklist values to all Record Types that use this Global Value Set** .
3. Click **Save** .
4. Click **Deactivate** next to ‘[Deactivate\_This\_Value@2cloudnine.com](mailto:Deactivate_This_Value@2cloudnine.com)’.
5. Select **OK** in the extra popup warning that the value is to be deactivated.
**Important Notes**
*(Deactivate not Delete)*
Please ensure you DO NOT Delete\_ \_the value [Deactivate\_This\_Value@2cloudnine.com](mailto:Deactivate_This_Value@2cloudnine.com), only deactivate
it. If this value is deleted, it will cause problems with future package installations.
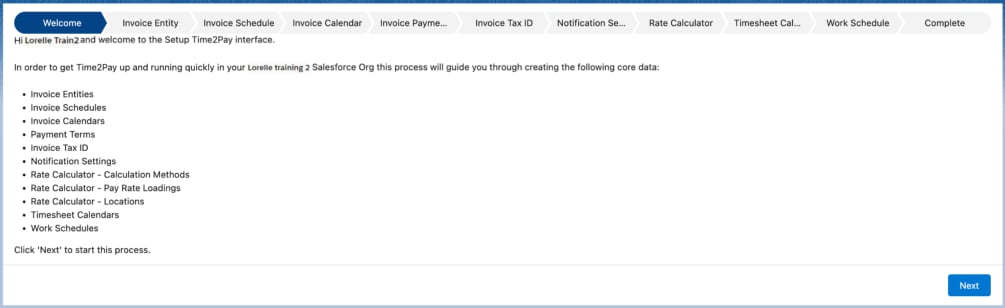
### Setup Time2Pay (Wizard)
The following configuration is Compulsory. Updates have been made to the Bulk Data Creation Package
in 2024 to include objects from the Time2Pay package in its own Setup Wizard, enabling core Time2Pay
records to be created using the Setup Time2Pay wizard. This feature enables Consultants and Partners to
create the Time2Pay records upfront using the Screen Flow, removing the need to create this data
manually via records as detailed in the individual QRGs. It is highly recommended to use this feature by
following the steps below:
* Navigate to the **App Launcher** - **2c9 Bulk Data Creation** app > **Setup Time2Pay** tab.
* You’ll be presented with a screen flow that will walk you through the following steps that are to be
* created if required. Select the **Next** button to commence the flow.
Payroll Setup processes have been completed.
These will also be recorded in a Custom Setting named Setup Core Data. If you want to view this:
### New Picklist Values
You must complete this step before proceeding to the next step (Setup Time2Pay). The packages come
installed with a default picklist value for the field ‘Send Invoice Emails From Email Picklists’ which is used
on both the Client Record and the Account Settings records. Users need to ensure they deactivate the
default value and create the new value needed.
Go to **Setup > Picklist Value Sets > Send Invoice Emails From Email Picklists > New**
1. Enter all email addresses that are to be included as possible values in this picklist, ensuring each value is on a new line. These must be verified Organization-Wide email addresses which the Client approves as being the email to send Invoices.
2. Ensure you tick the checkbox for **Add the new picklist values to all Record Types that use this Global Value Set** .
3. Click **Save** .
4. Click **Deactivate** next to ‘[Deactivate\_This\_Value@2cloudnine.com](mailto:Deactivate_This_Value@2cloudnine.com)’.
5. Select **OK** in the extra popup warning that the value is to be deactivated.
**Important Notes**
*(Deactivate not Delete)*
Please ensure you DO NOT Delete\_ \_the value [Deactivate\_This\_Value@2cloudnine.com](mailto:Deactivate_This_Value@2cloudnine.com), only deactivate
it. If this value is deleted, it will cause problems with future package installations.
### Setup Time2Pay (Wizard)
The following configuration is Compulsory. Updates have been made to the Bulk Data Creation Package
in 2024 to include objects from the Time2Pay package in its own Setup Wizard, enabling core Time2Pay
records to be created using the Setup Time2Pay wizard. This feature enables Consultants and Partners to
create the Time2Pay records upfront using the Screen Flow, removing the need to create this data
manually via records as detailed in the individual QRGs. It is highly recommended to use this feature by
following the steps below:
* Navigate to the **App Launcher** - **2c9 Bulk Data Creation** app > **Setup Time2Pay** tab.
* You’ll be presented with a screen flow that will walk you through the following steps that are to be
* created if required. Select the **Next** button to commence the flow.
 1. Create Invoice Entity?
Yes
1. Create Invoice Entity?
Yes
No
If required, click **Yes** and populate the fields below:
Please enter the following record details to create the Invoice Entity in the Salesforce org:
Record Type: Invoice Entity
### Account Name
### Phone
### Billing Address
### Billing Street
### Billing City
### Billing State/Province
### Billing Zip/Postal Code
### Billing Country
### Send Invoice Emails From Email
### Contact for Invoice Queries
### ABN
### Bank Account Name
### Bank Account Branch Code
### Bank Account Number
### Remittance Email
If you need to create an additional Invoice Entity, slide the toggle next to **Save and New** to the
right, but if you have no additional Invoice Entities to create, ignore this field.
Click **Next** to create the additional Invoice Entity(s) and/or proceed to the step below.
2. Create Invoice Schedules?
Yes
No
If required, click **Yes** and select the options below:
| Schedule | Split |
| ------------------- | ------------ |
| Daily Invoice | No Split |
| Fortnightly Invoice | No Split |
| Monthly Invoice | No Split |
| Weekly Invoice | Per Calendar |
Click **Next** to create the Invoice Schedules and proceed to the step below.
3. Create Invoice Calendar?
Yes
No
If required, click **Yes** and populate the fields below:
* **Select the Invoice Entity**
* **Select the Invoice Schedule**
* **Invoice Calendar Name**
* **Invoice Calendar Start Date**
* **Number of Days Invoice Date after Calendar Period End Date**
* If you need to create an additional Invoice Calendar, slide the toggle next to **Save and New** to the
* right, but if you have no additional Invoice Calendars to create, ignore this field.
Click **Next** to create the Invoice Calendar.
If created successfully, you will see the following message:
*Success! The ####### Invoice Calendar record has been created. Please use the link below to open the*
*Invoice Calendar record and check that the related Calendar Period records were created successfully.*
*Note: Your new Invoice Calendar record will open in a new tab - you may need to refresh the new record tab*
*until the automated Calendar Period creation job finishes running in the background.*
Select the link provided to review the Calendar (not compulsory but recommended).
Click **Next** to proceed to the step below
4. Create Payment Terms?
Yes
No
If you select Yes, the following Payment Terms will be created
| Payment Terms Description | Days From | Due From |
| ------------------------- | --------- | ------------ |
| 7 Days from Invoice Date | 7 | Invoice Date |
| 14 Days from Invoice Date | 14 | Invoice Date |
| 21 Days from Invoice Date | 21 | Invoice Date |
| 30 Days from Invoice Date | 30 | Invoice Date |
| 30 Days from End of Month | 30 | End of Month |
| 45 Days from Invoice Date | 45 | End of Month |
| 60 Days from Invoice Date | 60 | End of Month |
Click **Next** to proceed to the step below.
5. Create Invoice Tax ID records?
Yes
No
If you select Yes, the following Tax IDs will be created
| Name | Tax Rate |
| ------- | -------- |
| 0% GST | 0% |
| 10% GST | 10% |
| 15% GST | 15% |
Click **Next** to proceed to the step below.
6. Default Notification Settings records will be created for the following processes:
* Timesheets
* Expense Claims
* Leave
### Do you wish to create these records?
Yes
No
Click **Yes** and **Next** to proceed to the step below.
7. This part of the process will create default Rate Calculator and/or Agreements records in the
following object(s):
* Calculation Method
* Pay Rate Loading
* Location
**Do you wish to create these records?**
Yes
No
If you select Yes, you will proceed to the next step, however if you select No, the system will
bypass steps 8-11, and automatically proceed to step 12.
8. I want to create Calculation Methods for use in:
* [ ] Agreements Only
* [ ] Rate Calculator Only
* [ ] Both
* [ ] Neither
As you select the radio button above, the Calculation Methods that will create for that selection
will display in a table as shown below with just the values that will create for that selection.
The following Calculation Methods will be created:
| Calculation Method Name | Calculation Type | Calculation Unit | Calculation Based On |
| ---------------------------------- | ---------------- | ---------------- | ----------------------- |
| Base Pay from Charge | Margin | Percentage | Base Pay from Charge |
| Carry Over Value | Carry Over Value | | |
| Fixed Charge | | | Fixed Charge |
| Fixed Charge Multiplied | | | Fixed Charge Multiplied |
| Margin % | Margin | Percentage | |
| Markup \$ | Mark Up | Currency | |
| Markup % on Base Pay Rate | Mark Up | Percentage | Base Pay Rate |
| Markup % on Pay Rate | Mark Up | Percentage | Pay Rate |
| Markup % on Total Pay Rate + Costs | Mark Up | Percentage | Total Pay Rate + Costs |
Click **Next** to create the Calculation Methods and proceed to the step below.
9. The following Pay Rate Loadings will be created
| Label | Loading Rate | Loading Based On | Assignment Handling |
| -------------------------- | ------------ | ------------------ | ------------------- |
| Default 25% Casual Loading | 25 | % of Base Pay Rate | Rolling |
Click **Next** to create the Pay Rate Loadings and proceed to the step below.
10. The following Locations will be created:
| Location Name | State | Payroll Tax Locality | WorkCover Locality | WorkCover on Super Exempt |
| ---------------------------- | ----- | -------------------- | ------------------ | ------------------------- |
| All States | | | | |
| Australian Capital Territory | ACT | ACT | ACT | |
| New South Wales | NSW | NSW | NSW | |
| Northern Territory | NT | NT | NT | |
| Queensland | QLD | QLD Metro | QLD Metro | |
| South Australia | SA | SA | SA | |
| Tasmania | TAS | TAS | TAS | |
| Victoria | VIC | VIC Metro | VIC Metro | |
| Western Australia | WA | WA | WA | |
Click **Next** to create the Locations and proceed to the step below.
11. Create Timesheet Calendar?
Yes
No
If required, click **Yes** and populate the fields below:
Please enter the following details to create a Timesheet Calendar:
**Status** (needs to be active before this can be used to create Timesheets)
### Timesheet Calendar Name
### Timesheet Frequency
* **Weekly Start Day**
* **Fortnightly Start Date, or**
* **Monthly Start Date** (these fields display depending on the selection of Timesheet Frequency)
### Timesheet Entry Format
### Enable Paid Breaks
### Break Entry Format
### 4 Week Frequency Applies
### Split Timesheet Over Months (select checkbox if required)
### No. Days Future Timesheets Visible
Please select the days of the week timesheet entries should be created for and indicate whether
timesheet entries should be created for public holidays:
### Monday
### Tuesday
### Wednesday
### Thursday
### Friday
### Saturday
### Sunday
### Include Public Holidays?
Click **Next** to create the Calendar and proceed to the step below.
12. Calendar Created !!!
Your request has been processed successfully.
### Create another calendar ?
Yes
No
Select **Yes** to create another Calendar, otherwise Select **No.**
Click **Next** to proceed to the step below\..
13. Create Work Schedules?
Yes
No
### Available Work Schedules
| Schedule | Work Schedule First Day |
| ------------------------------------------------------------------------------------------ | ----------------------- |
| Monday - Friday 38 hours | Monday |
| Monday - Friday 40 Hours | Monday |
| Select the checkboxes of the required Work Schedules and click **Next** to create the Work | |
| Schedules. | |
14. If successful, and created the 38 hour Work Schedule, you will see the following message:
‘Success!! Monday - Friday 38 hours has been created.’
Please select whether you wish to Validate and Publish this Work Schedule below. If you select
Yes please click on the Work Schedule hyperlink and you will be redirected to the Work Schedule
Manager UI.
### Validate and Publish Work Schedule?
Yes
No
* [ ] Monday - Friday 38 hours
Click on the blue link “Monday - Friday 38 hours” if this is the Work Schedule you requested to
create. This will open the Work Schedule in a new tab. You can manually **Validate** and **Publish** the
Work Schedule in that tab, and you will not be able to proceed with **Yes** selected until this is
done. If you want to proceed without Validating and Publishing, please select **No** .
Click the **Next** button.
15. If successful, and created the 40 hour Work Schedule, you will see the following message:
‘Success!! Monday - Friday 40 Hours has been created.’
Please select whether you wish to Validate and Publish this Work Schedule below. If you select
Yes please click on the Work Schedule hyperlink and you will be redirected to the Work Schedule
Manager UI.
**Validate and Publish Work Schedule?**
Yes
No
* Monday - Friday 40 Hours
Click on the blue link “Monday - Friday 40 Hours” if this is the Work Schedule you requested to
create. This will open the Work Schedule in a new tab. You can manually Validate and Publish the
Work Schedule in that tab, and you will not be able to proceed with **Yes** selected until this is
done. If you want to proceed without Validating and Publishing, please select **No** .
Click the **Next** button.
16. If successful, you will see the following message:
**‘Congratulations!!** You have completed the default Work Schedule creation process.’
Click **Next** to complete the screen flow.
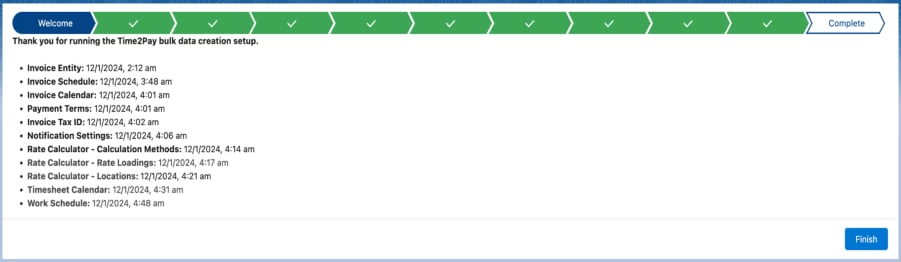 You will be presented with a confirmation screen now, confirming the date and time all the core
Time2PaySetup processes have been completed.
**Important Notes**
*(Additional Fields not populated by Wizard)*
*There may be additional fields that are not populated when records are created using the*
*Setup Time2Pay wizard. Consultants should always allocate time as detailed later in this*
*document to review these records, and ensure all fields necessary for this Org are*
*completed.*
## 4. Required General Configuration
This section covers compulsory general configuration. Please make certain that all the configurations
outlined below are completed before proceeding to the subsequent sections.
### Process Automation Settings
The Process Automation Settings help Users to enable or disable features related to Flows, processes,
Workflow Rules, and approval processes. You must enable following setting in all 2cloudnine Payroll Orgs.
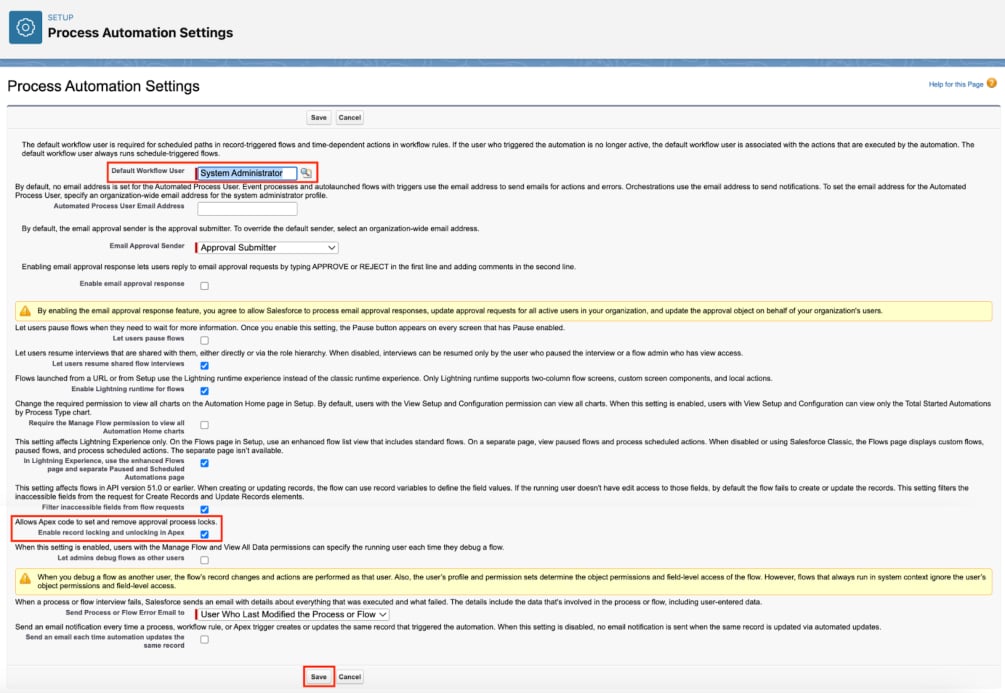
Go to **Setup > Process Automation Settings**
1. Default Workflow User = enter the user who should be the default used by automated processes.
This should be a User with System Administrator access, that the Client has set up with an
Org-wide Email address, so if there are failures, then it can successfully send the failure emails.
2. Allows Apex code to set and remove approval process locks. Enable record locking and unlocking
in Apex = TRUE.
3. Click **Save** .
You will be presented with a confirmation screen now, confirming the date and time all the core
Time2PaySetup processes have been completed.
**Important Notes**
*(Additional Fields not populated by Wizard)*
*There may be additional fields that are not populated when records are created using the*
*Setup Time2Pay wizard. Consultants should always allocate time as detailed later in this*
*document to review these records, and ensure all fields necessary for this Org are*
*completed.*
## 4. Required General Configuration
This section covers compulsory general configuration. Please make certain that all the configurations
outlined below are completed before proceeding to the subsequent sections.
### Process Automation Settings
The Process Automation Settings help Users to enable or disable features related to Flows, processes,
Workflow Rules, and approval processes. You must enable following setting in all 2cloudnine Payroll Orgs.
Go to **Setup > Process Automation Settings**
1. Default Workflow User = enter the user who should be the default used by automated processes.
This should be a User with System Administrator access, that the Client has set up with an
Org-wide Email address, so if there are failures, then it can successfully send the failure emails.
2. Allows Apex code to set and remove approval process locks. Enable record locking and unlocking
in Apex = TRUE.
3. Click **Save** .
 **Important Notes**
*(Allow Apex Code Locks)*
If the second setting isn’t enabled, you may receive the following error message preventing Users
from being able to proceed any further with that process: ‘Apex approval lock/unlock api preference
not enabled’.
### Remote Site Settings
### SuperChoice Site for STP
Go to **Setup > Remote Site Settings > New Remote Site**
1. Add the following 2 Remote sites separately
1. Site 1:
* Remote Site Name: STPTest
* [Remote Site URL: https://stp.test.superchoice.com.au](https://stp.test.superchoice.com.au)
* Disable Protocol Security: BLANK
* Description: Provides access to Superchoice to send and retrieve STP lodgments.
* Ensure the **Active** checkbox is True.
* Select **Save & New** .
1. Site 2:
* Remote Site Name: STP
* [Remote Site URL: https://stp.superchoice.com.au](https://stp.superchoice.com.au)
* Disable Protocol Security: BLANK
* Description: Provides access to Superchoice to send and retrieve STP lodgments.
* Ensure the **Active** checkbox is True.
* Select **Save** .
### Retrieve Active Superfunds from Superchoice
Go to **Setup > Remote Site Settings > New Remote Site**
1. Add the following details into the fields as required.
1. Remote Site Name: Superchoice\_Super\_Funds
2. [Remote Site URL: https://desktoppayrollprovider.superchoice.com.au](https://desktoppayrollprovider.superchoice.com.au)
3. Disable Protocol Security: BLANK
4. Description: Provides access to Superchoice to retrieve all active APRA superannuation
funds.
5. Ensure the **Active** checkbox is True.
6. Select **Save** .
### Withholding Rule and Withholding Rule Item Tabs
For each Profile in the Org, update the Withholding Rule and Withholding Rule Item tabs to be ‘Hidden’
after they have been created by the Payroll Setup flow. This can be done either of 2 ways, depending if
the Org has Enhanced Profiles enabled or not.
### Hide Tabs without Enhanced Profiles Enabled
Go to **Setup > Profiles > System Administrator > Edit**
1. Scroll down to the Custom Tab Settings section.
2. Find **View Withholding Rules** and ensure it’s **Default On** .
3. Find **Withholding Rules Items** and select **Tab Hidden** .
4. Find **Withholding Rule** and select **Tab Hidden** .
5. Click **Save** . Repeat steps 1-5 for **2cloudnine Payroll User** as well as any other users who will be
using 2cloudnine Payroll.
### Hide Tabs with Enhanced Profiles Enabled
Go to **Setup > Profiles > System Administrator > Object Settings**
1. Scroll down and select **View Withholding Rules.**
2. Select **Edit** and ensure Tabs Settings is showing **Default On** .
3. Return to the Object Settings, scroll down and select **Withholding Rules.**
4. Select **Edit** and ensure Tabs Settings is showing **Tab Hidden,** and select **Save** .
5. Return to the Object Settings, scroll down and select **Withholding Rule Items.**
6. Select **Edit** and ensure Tabs Settings is showing **Tab Hidden,** and select **Save** .
7. Repeat steps 1-6 for **2cloudnine Payroll User** as well as any other Users who will be using
2cloudnine Payroll.
### Send Invoice Emails With Attachments Over 3MB
The functionality to send Email Attachments over 3MB is optional and the below configuration steps
should only be completed if the functionality is required:
Go to **Setup > Email > Email Attachments**
1. Select the radio button for **Include as attachment up to Salesforce email size limit or as links if**
**more** to be True.
2. Click **Save** .
## 5. Apex Classes
### Retrieve Payroll Reporting Result
The following scheduled job will retrieve the STP results back from the ATO via Superchoice and update
the STP Lodgement AU records after the Lodgement record has been submitted to the ATO.
Go to **Setup > Apex Classes > Schedule Apex** button
1. Enter the following details:
* **Job Name:** Schedule\_RetrievePayrollReportingResult
* **Apex Class:** Schedule\_RetrievePayrollReportingResult
* **Frequency:** Weekly
* **Recurs every week on:** Select all
* **Start:** Keep the existing date.
* **End:** add 40 years to end i.e. 01/01/2066.
* **Preferred Start Time:** 2:00 am.
* Click **Save** .
**Important Notes**
*(Allow Apex Code Locks)*
If the second setting isn’t enabled, you may receive the following error message preventing Users
from being able to proceed any further with that process: ‘Apex approval lock/unlock api preference
not enabled’.
### Remote Site Settings
### SuperChoice Site for STP
Go to **Setup > Remote Site Settings > New Remote Site**
1. Add the following 2 Remote sites separately
1. Site 1:
* Remote Site Name: STPTest
* [Remote Site URL: https://stp.test.superchoice.com.au](https://stp.test.superchoice.com.au)
* Disable Protocol Security: BLANK
* Description: Provides access to Superchoice to send and retrieve STP lodgments.
* Ensure the **Active** checkbox is True.
* Select **Save & New** .
1. Site 2:
* Remote Site Name: STP
* [Remote Site URL: https://stp.superchoice.com.au](https://stp.superchoice.com.au)
* Disable Protocol Security: BLANK
* Description: Provides access to Superchoice to send and retrieve STP lodgments.
* Ensure the **Active** checkbox is True.
* Select **Save** .
### Retrieve Active Superfunds from Superchoice
Go to **Setup > Remote Site Settings > New Remote Site**
1. Add the following details into the fields as required.
1. Remote Site Name: Superchoice\_Super\_Funds
2. [Remote Site URL: https://desktoppayrollprovider.superchoice.com.au](https://desktoppayrollprovider.superchoice.com.au)
3. Disable Protocol Security: BLANK
4. Description: Provides access to Superchoice to retrieve all active APRA superannuation
funds.
5. Ensure the **Active** checkbox is True.
6. Select **Save** .
### Withholding Rule and Withholding Rule Item Tabs
For each Profile in the Org, update the Withholding Rule and Withholding Rule Item tabs to be ‘Hidden’
after they have been created by the Payroll Setup flow. This can be done either of 2 ways, depending if
the Org has Enhanced Profiles enabled or not.
### Hide Tabs without Enhanced Profiles Enabled
Go to **Setup > Profiles > System Administrator > Edit**
1. Scroll down to the Custom Tab Settings section.
2. Find **View Withholding Rules** and ensure it’s **Default On** .
3. Find **Withholding Rules Items** and select **Tab Hidden** .
4. Find **Withholding Rule** and select **Tab Hidden** .
5. Click **Save** . Repeat steps 1-5 for **2cloudnine Payroll User** as well as any other users who will be
using 2cloudnine Payroll.
### Hide Tabs with Enhanced Profiles Enabled
Go to **Setup > Profiles > System Administrator > Object Settings**
1. Scroll down and select **View Withholding Rules.**
2. Select **Edit** and ensure Tabs Settings is showing **Default On** .
3. Return to the Object Settings, scroll down and select **Withholding Rules.**
4. Select **Edit** and ensure Tabs Settings is showing **Tab Hidden,** and select **Save** .
5. Return to the Object Settings, scroll down and select **Withholding Rule Items.**
6. Select **Edit** and ensure Tabs Settings is showing **Tab Hidden,** and select **Save** .
7. Repeat steps 1-6 for **2cloudnine Payroll User** as well as any other Users who will be using
2cloudnine Payroll.
### Send Invoice Emails With Attachments Over 3MB
The functionality to send Email Attachments over 3MB is optional and the below configuration steps
should only be completed if the functionality is required:
Go to **Setup > Email > Email Attachments**
1. Select the radio button for **Include as attachment up to Salesforce email size limit or as links if**
**more** to be True.
2. Click **Save** .
## 5. Apex Classes
### Retrieve Payroll Reporting Result
The following scheduled job will retrieve the STP results back from the ATO via Superchoice and update
the STP Lodgement AU records after the Lodgement record has been submitted to the ATO.
Go to **Setup > Apex Classes > Schedule Apex** button
1. Enter the following details:
* **Job Name:** Schedule\_RetrievePayrollReportingResult
* **Apex Class:** Schedule\_RetrievePayrollReportingResult
* **Frequency:** Weekly
* **Recurs every week on:** Select all
* **Start:** Keep the existing date.
* **End:** add 40 years to end i.e. 01/01/2066.
* **Preferred Start Time:** 2:00 am.
* Click **Save** .
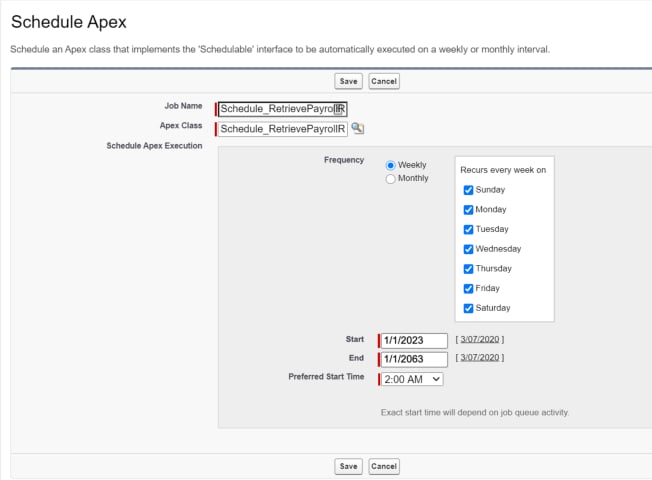 **Retrieve Active Superfunds from Superchoice**
A daily scheduled job is required to import APRA superannuation funds from the Superchoice server. All
APRA superannuation funds are managed and maintained on the Superchoice server, any SMSF will be
created manually by the Payroll Users.
Go to **Setup > Apex Classes > Schedule Apex** button
1. Enter the following details:
* **Job Name:** Schedule\_RetrieveActiveFunds
* **Apex Class:** Schedule\_RetrieveActiveFunds
* **Frequency:** Weekly
* **Recurs every week on:** Select all
* **Start:** keep the existing date
* **End:** add 40 years to end i.e. 01/01/2066
* **Preferred Start Time:** 7:00 am
2. Click **Save** .
## 6. Custom Settings
Within the 2cloudnine packages are a variety of Custom Settings which enable Users to have a smoother
experience of switching functionality on or off as required in an Org, or to provide required data as
needed for some components to work. Users will find that some of these Custom Settings are able to be
configured now, however, there will be some that can not be configured until later in this Configuration
Guide after other steps have been completed.
### Aus Extension Configuration
This Custom Setting determines which environment your STP Lodgements are being sent to. When you
are conducting testing or UAT with a Client, you will need to set it to the Test environment, and when
they are live, you set it to the Production environment. By default, the custom setting will be set to the
Test environment.
Go to **Setup > Custom Settings > Aus Extension Configuration > Manage > New** (the top button, not the
one below the line)
1. Set **Is ATO Integration Production?** to TRUE or FALSE.
2. Select the **Save** button. Please ensure you select save regardless of what you have selected.
Based on your choice of settings, the appropriate text will be displayed in the STP Manager header,
advising sending to Test or to Production:
* PRODUCTION STP WILL BE SENT TO TEST ATO
This logic is based on the comparison of whether you are sending from a Sandbox org to ATO Production,
or, sending from a Production org to ATO test. If you are sending from a Sandbox to ATO test, or
Production to ATO Production, you will not be prompted with this warning message.
### Automatic Status Update
This Custom Setting controls which objects are included to automatically update the Status field on
selected Objects based on their Effective Date, Expiry Date, and Today's Date. After completing the
Payroll Setup flow, this should already be configured for all checkboxes except Assignment Schedule and
Payee Withholding.
Go to **Setup > Custom Settings > Automatic Status Update > Manage > Edit**
The full list of objects that the System Admins may want to review includes:
* Assignment\_Rate\_\_c
* Assignment\_Schedule\_\_c
* Assignment\_\_c
* Calendar\_\_c
* Leave\_Rule\_\_c
* Leave\_Template\_\_c
* Payee\_Allowance\_Record\_\_c
* Payee\_Deduction\_Record\_\_c
* Payee\_Leave\_Rule\_\_c
* Payee\_Withholding\_\_c
* Payment\_Detail\_\_c
* Suspension\_\_c
* Withholding\_Rule\_\_c
* The following settings apply to **all the fields** listed above:
* Setting these checkboxes to TRUE will include the relevant object in the Scheduled Job. If
these are amended to be false, it means they will be ignored during this Scheduled Job.
* Please update the values of other fields in line with the requirements of this Org.
### Disable Assignment Record Type Validations (Optional)
If you have an integration within your Org which utilises Template Record Types, you may require the
validations disabled for the Assignments to save. If this is occurring within your Org, System
Administrators will be required to populate the new Custom Setting as detailed below:
* Go to **Setup** - **Custom Settings > Disable Assignment RecordType Validation > Manage > New** (the top
* button, not the one below the line)
1. Enter the Developer Name of the Assignment Record Type in the **Name** field.
2. Enter the Record Id of the Custom Record Type of Assignment for which 2cloudnine validations
are to be ignored.
3. Click **Save** .
Repeat the above process for each Custom Record Type of Assignment that is required to bypass the
validations, keeping in mind that this will not apply to any packaged 2cloudnine Record Types of
Assignments.
### Payroll Configuration
Go to **Setup > Custom Settings > Payroll Configuration > Manage > Edit**
Create a new org-wide record in the Payroll Configuration custom setting. The behaviour of each field in
the Custom Setting is as follows:
* **Assignment Pay Schedule from Payee**
* When TRUE, the Pay Schedule of an Assignment will be defaulted from the associated
Payee record
* When FALSE, the Pay Schedule of an Assignment will be defaulted from the associated
Client record
* **Disable FLS/CRUD Validation** (False recommended)
* When TRUE, the in-code field level security enforcement will be disabled and users can
bypass the rights of their associated profile
* When FALSE, all in-code field level security will be enforced thus ensuring standard
Salesforce profile access is adhered to
* **Enable Pay Batch Hard Delete**
* When TRUE, once data is deleted, it is not sent to the Recycle Bin, and therefore deleted
records cannot be restored.
* When FALSE, any Pay Batch Data that is deleted is sent to the Recycle Bin as per other
processes and therefore taking up further space within the Org.
* **Enforce Flag Validation**
* When TRUE, a user will not be able to finalise Pay Batches until they have acknowledged
all Payee Pay Batch flags
* When FALSE, a user can finalise Pay Batches even if they have not acknowledged all
Payee Pay Batch flags
* **Pay Batch Manager Funding Required**
* When TRUE, the funding requirement field is required when using the Pay Batch
Manager user interface.
* When FALSE, there is no need to populate the Funding Requirement field in the Pay
Batch Manager user interface.
* **Debug Retention Days**
* Can be customised by defining the required period before being deleted as part of the
automatic scheduled process.
* A Debug Log associated with a Debug Header with its ‘Do Not Delete’ as ‘True’ cannot be
deleted and also it cannot delete any debug log records that are less than 48 hours old)
* **Batch Log Retention Days**
* Can be customised by defining the required period before being deleted as part of the
automatic scheduled process.
* A Batch Log with its ‘Do Not Delete’ as ‘True’ cannot be deleted and also it cannot delete
any batch log records that are less than 48 hours old)
* **STP2 Apply Validations** (True by default)
* Indicates that STP 2 in-code validations should be applied when users create/update
records
* **STP2 Report Child Support** (True by default)
* Indicates that Child Support Deduction and Garnishee amounts will be included in STP
Phase 2 reporting
* **STP2 Reporting Active** (True by default)
* Indicates the first date that STP Reporting will be based on Phase 2 requirements
### Time2Pay Batch Size Overrides Custom Setting (Optional)
Users can control the number of Assignment Id’s that can be passed per batch for
Invoke\_RateCalcCreation via the Custom Setting ‘Time2Pay Batch Size Overrides’. If left blank, a default
setting Batch size of 5 will be applied. To update the Time2Pay Rate Calculator Batch Size Overrides
Custom Setting:
Go to **Setup > Custom Setting > Time2Pay Batch Size Overrides > Manage > New** (the top button)
1. Update the field **Invoke Rate Calc Creation Batch Size** with a number to reduce the size of the
batches.
2. Select the **Save** button.
It is recommended you review as required the other batch size settings which can also be reduced within
this same Custom Setting, to address any possible performance issues that may occur.
**Important Notes**
*(Reducing Batch Size)*
*Users are reminded that reducing the batch size can result in jobs taking longer to complete, but as*
*the batches are smaller in size it’s easier to identify where issues are if they occur.*
### Time2Pay Create Timesheet Record Types
This Custom Setting enables auto creation of Timesheets via the Scheduled Jobs for each Assignment
Record Type added into here. If not completed, the Scheduled Job will **NEVER** run. Repeat for all Record
Types of Assignments that need to use this functionality.
Go to **Setup > Custom Settings > Time2Pay Create Timesheet Record Types > Manage > New**
* Make the decision on the need for custom Record Types before setting this up. Complete in line
with the details provided here:
1. Enter a Name.
2. Enter the Record Type Developer Name of Assignments to have Timesheets created by
the Scheduled Job and select **Save** .
### Time2Pay Ext Main Settings
**Retrieve Active Superfunds from Superchoice**
A daily scheduled job is required to import APRA superannuation funds from the Superchoice server. All
APRA superannuation funds are managed and maintained on the Superchoice server, any SMSF will be
created manually by the Payroll Users.
Go to **Setup > Apex Classes > Schedule Apex** button
1. Enter the following details:
* **Job Name:** Schedule\_RetrieveActiveFunds
* **Apex Class:** Schedule\_RetrieveActiveFunds
* **Frequency:** Weekly
* **Recurs every week on:** Select all
* **Start:** keep the existing date
* **End:** add 40 years to end i.e. 01/01/2066
* **Preferred Start Time:** 7:00 am
2. Click **Save** .
## 6. Custom Settings
Within the 2cloudnine packages are a variety of Custom Settings which enable Users to have a smoother
experience of switching functionality on or off as required in an Org, or to provide required data as
needed for some components to work. Users will find that some of these Custom Settings are able to be
configured now, however, there will be some that can not be configured until later in this Configuration
Guide after other steps have been completed.
### Aus Extension Configuration
This Custom Setting determines which environment your STP Lodgements are being sent to. When you
are conducting testing or UAT with a Client, you will need to set it to the Test environment, and when
they are live, you set it to the Production environment. By default, the custom setting will be set to the
Test environment.
Go to **Setup > Custom Settings > Aus Extension Configuration > Manage > New** (the top button, not the
one below the line)
1. Set **Is ATO Integration Production?** to TRUE or FALSE.
2. Select the **Save** button. Please ensure you select save regardless of what you have selected.
Based on your choice of settings, the appropriate text will be displayed in the STP Manager header,
advising sending to Test or to Production:
* PRODUCTION STP WILL BE SENT TO TEST ATO
This logic is based on the comparison of whether you are sending from a Sandbox org to ATO Production,
or, sending from a Production org to ATO test. If you are sending from a Sandbox to ATO test, or
Production to ATO Production, you will not be prompted with this warning message.
### Automatic Status Update
This Custom Setting controls which objects are included to automatically update the Status field on
selected Objects based on their Effective Date, Expiry Date, and Today's Date. After completing the
Payroll Setup flow, this should already be configured for all checkboxes except Assignment Schedule and
Payee Withholding.
Go to **Setup > Custom Settings > Automatic Status Update > Manage > Edit**
The full list of objects that the System Admins may want to review includes:
* Assignment\_Rate\_\_c
* Assignment\_Schedule\_\_c
* Assignment\_\_c
* Calendar\_\_c
* Leave\_Rule\_\_c
* Leave\_Template\_\_c
* Payee\_Allowance\_Record\_\_c
* Payee\_Deduction\_Record\_\_c
* Payee\_Leave\_Rule\_\_c
* Payee\_Withholding\_\_c
* Payment\_Detail\_\_c
* Suspension\_\_c
* Withholding\_Rule\_\_c
* The following settings apply to **all the fields** listed above:
* Setting these checkboxes to TRUE will include the relevant object in the Scheduled Job. If
these are amended to be false, it means they will be ignored during this Scheduled Job.
* Please update the values of other fields in line with the requirements of this Org.
### Disable Assignment Record Type Validations (Optional)
If you have an integration within your Org which utilises Template Record Types, you may require the
validations disabled for the Assignments to save. If this is occurring within your Org, System
Administrators will be required to populate the new Custom Setting as detailed below:
* Go to **Setup** - **Custom Settings > Disable Assignment RecordType Validation > Manage > New** (the top
* button, not the one below the line)
1. Enter the Developer Name of the Assignment Record Type in the **Name** field.
2. Enter the Record Id of the Custom Record Type of Assignment for which 2cloudnine validations
are to be ignored.
3. Click **Save** .
Repeat the above process for each Custom Record Type of Assignment that is required to bypass the
validations, keeping in mind that this will not apply to any packaged 2cloudnine Record Types of
Assignments.
### Payroll Configuration
Go to **Setup > Custom Settings > Payroll Configuration > Manage > Edit**
Create a new org-wide record in the Payroll Configuration custom setting. The behaviour of each field in
the Custom Setting is as follows:
* **Assignment Pay Schedule from Payee**
* When TRUE, the Pay Schedule of an Assignment will be defaulted from the associated
Payee record
* When FALSE, the Pay Schedule of an Assignment will be defaulted from the associated
Client record
* **Disable FLS/CRUD Validation** (False recommended)
* When TRUE, the in-code field level security enforcement will be disabled and users can
bypass the rights of their associated profile
* When FALSE, all in-code field level security will be enforced thus ensuring standard
Salesforce profile access is adhered to
* **Enable Pay Batch Hard Delete**
* When TRUE, once data is deleted, it is not sent to the Recycle Bin, and therefore deleted
records cannot be restored.
* When FALSE, any Pay Batch Data that is deleted is sent to the Recycle Bin as per other
processes and therefore taking up further space within the Org.
* **Enforce Flag Validation**
* When TRUE, a user will not be able to finalise Pay Batches until they have acknowledged
all Payee Pay Batch flags
* When FALSE, a user can finalise Pay Batches even if they have not acknowledged all
Payee Pay Batch flags
* **Pay Batch Manager Funding Required**
* When TRUE, the funding requirement field is required when using the Pay Batch
Manager user interface.
* When FALSE, there is no need to populate the Funding Requirement field in the Pay
Batch Manager user interface.
* **Debug Retention Days**
* Can be customised by defining the required period before being deleted as part of the
automatic scheduled process.
* A Debug Log associated with a Debug Header with its ‘Do Not Delete’ as ‘True’ cannot be
deleted and also it cannot delete any debug log records that are less than 48 hours old)
* **Batch Log Retention Days**
* Can be customised by defining the required period before being deleted as part of the
automatic scheduled process.
* A Batch Log with its ‘Do Not Delete’ as ‘True’ cannot be deleted and also it cannot delete
any batch log records that are less than 48 hours old)
* **STP2 Apply Validations** (True by default)
* Indicates that STP 2 in-code validations should be applied when users create/update
records
* **STP2 Report Child Support** (True by default)
* Indicates that Child Support Deduction and Garnishee amounts will be included in STP
Phase 2 reporting
* **STP2 Reporting Active** (True by default)
* Indicates the first date that STP Reporting will be based on Phase 2 requirements
### Time2Pay Batch Size Overrides Custom Setting (Optional)
Users can control the number of Assignment Id’s that can be passed per batch for
Invoke\_RateCalcCreation via the Custom Setting ‘Time2Pay Batch Size Overrides’. If left blank, a default
setting Batch size of 5 will be applied. To update the Time2Pay Rate Calculator Batch Size Overrides
Custom Setting:
Go to **Setup > Custom Setting > Time2Pay Batch Size Overrides > Manage > New** (the top button)
1. Update the field **Invoke Rate Calc Creation Batch Size** with a number to reduce the size of the
batches.
2. Select the **Save** button.
It is recommended you review as required the other batch size settings which can also be reduced within
this same Custom Setting, to address any possible performance issues that may occur.
**Important Notes**
*(Reducing Batch Size)*
*Users are reminded that reducing the batch size can result in jobs taking longer to complete, but as*
*the batches are smaller in size it’s easier to identify where issues are if they occur.*
### Time2Pay Create Timesheet Record Types
This Custom Setting enables auto creation of Timesheets via the Scheduled Jobs for each Assignment
Record Type added into here. If not completed, the Scheduled Job will **NEVER** run. Repeat for all Record
Types of Assignments that need to use this functionality.
Go to **Setup > Custom Settings > Time2Pay Create Timesheet Record Types > Manage > New**
* Make the decision on the need for custom Record Types before setting this up. Complete in line
with the details provided here:
1. Enter a Name.
2. Enter the Record Type Developer Name of Assignments to have Timesheets created by
the Scheduled Job and select **Save** .
### Time2Pay Ext Main Settings
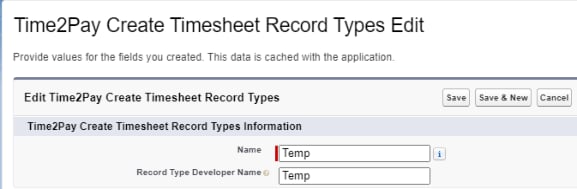 Go to **Setup** - **Custom Settings** - **Time2Pay Ext Main Settings** - **Manage** - **New** (the top button, not the
one below the line)
Select or deselect the various checkboxes as per your requirements for this Org, however, Generate
Transaction Start Date is required, or you will not have the Interpretation Rules process against
Timesheets:
* **Batch Failure Send Additional Email**
* This custom setting is now redundant and can be ignored. This is no longer referred to
within the 2cloudnine Packages.
* **Custom Notification ID**
* This field refers to the dummy Id provided for custom notifications.
* **Default Template Group MPR**
* Defaults the Assignment Rate Template Group and Payee Timesheet Allowance Template
Group based on the Interpretation Rule Name.
* This requirement only needs to be completed if the option to use the functionality is
taken. If not, this item can be skipped.
* **Default Transaction Filters Invoicing**
* Defines which type of Invoice Filters will be selected by default when the Invoice
Generation Manager page is first opened. If set to False, the page will open with Standard
Invoice Filters selected. If True, the page will open with Transaction Filters selected.
* **Display Break 2**
* Defines if a second set of 'Break' fields are active for use on Timesheets via the Timesheet
Manager, Employee Portal and Approver Pages. When FALSE, there will only be one set of
Break fields available on Timesheets.
* **Enable Custom Invoice Type Picklist**
* Defines if the custom Invoice Type values defined in the ‘Process Invoice - Invoice Types’
custom setting will be used for the Invoice Type picklist on the Process Invoice visualforce
page. When FALSE, the standard package picklist will be used.
* **Enable Project Codes**
* Defines if Project Codes are used within the Org. If True, Project Code fields will be
available in the Timesheet Manager, Expense Claim Manager, Employee Portal, Approver
Pages and Invoices.
* **Enforce Credit Note Reason**
* Defines if Users will be forced to select a credit note reason before they can create a
Credit Note. If TRUE, the User will be required to select a reason.
The following setting is **MANDATORY** :
* **Generate Transaction Start Date (Required)**
* Defines the earliest Timesheet Entry Date that will be picked up by the Scheduled Job to
Process Timesheets and Create Transactions. Timesheets with Entry Dates prior to this
date must be processed manually via the Timesheet Manager.
* You **MUST** enter a date in the field Generate Transaction Start Date, **otherwise** no
Transactions will generate from the Scheduled Job. Transactions will only be generated
from the date populated.
* **Hide Timesheet Manager Add Transaction**
* Defines if the ‘Add’ Transaction button in the Timesheet Manager is available for use. If
True it will be hidden. When hidden, specific Users can be given access to the button via
the 'Enable Timesheet Manager Add Transaction' field on the User object.
* **Hide Timesheet Manager Approve**
* Defines if the ‘Approve’ buttons in the Timesheet Manager are available for use. If True,
they will be hidden. When hidden, specific Users can be given access to use the buttons
via the 'Enable Timesheet Manager Approve' field on the User object.
* **Hide Timesheet Manager Reject**
* Defines if the ‘Reject’ buttons in the Timesheet Manager are available for use. If True, they
will be hidden. When hidden, specific Users can be given access to use the buttons via
the 'Enable Timesheet Manager Approve' field on the User object.
* **Hide Timesheet Manager Revert**
* Defines if the ‘Revert To New’ button in the Timesheet Manager is available for use. If
True, it will be hidden. When hidden, specific Users can be given access to use the button
via the 'Enable Timesheet Manager Revert' field on the User object **.**
* **Hide Timesheet Manager Submit**
* Defines if the ‘Submit’ button in the Timesheet Manager is available for use. If True, it will
be hidden. When hidden, specific Users can be given access to use the button via the
'Enable Timesheet Manager Submit' field on the User object.
* **Include Timesheet Manager Expenses**
* Defines if Expenses can be added via Timesheet Manager. When TRUE, Users can create
Expenses and apply them to a Timesheet via the Timesheet Manager.
* **Include Timesheet Manager Allowances**
* Defines if Allowances can be added via Timesheet Manager. When TRUE, Users can
create Allowances and apply them to a Timesheet via the Timesheet Manager. \*\*\*\*
* **Prevent Future Invoices**
* Defines if Non-System Admin Users are allowed to create Invoices with an Invoice Date
later than the current date. If True, Non-System Admin Users can not create Invoices for
future dates. System Admin will be allowed to create Invoices for all dates. \*\*\*\*
* **Record Owner Id**
* It is used if you would like to assign specific users as Pay Transaction record Owner, often
required if your Org is using a Private Sharing Model, and you can use Sharing Rules to
provide the required access.
* Default - When set to Default or the custom setting is left blank, the default Owner is set
as the user who created the Pay Transaction records.
* Client - When set to Client, the Owner is set as the Account Owner of the Client record
that is related to the Assignment. If the Client record Account Owner is blank, then the
Default Owner defined above will apply.
* Assignment - When set to an Assignment, the Owner is set as the Owner of the
Assignment record. If the Assignment record Owner is blank, then the Default Owner
defined above will apply.
* **Send Email To Approver**
* Defines if email notifications will be sent to Timesheet / Expense Claim Approvers. It
works in conjunction with the 2 sets of Approval Email - New Token and Approval Email Submit fields. If FALSE, all these fields are overridden and no emails are sent.
The following setting is **MANDATORY** :
* **Send Invoice Emails From Email**
* When the Account's Send Invoice Emails Setting defines the email source as 'Global
Email' the email address defined in this field will be used as the from / reply to email
when emailing Invoices. The email entered must be an Organization-Wide Address,
therefore this can not be a 2cloudnine email address.
* **Validated Transaction Total in TSM**
* Defines if validation will occur within the Timesheet Manager to ensure the sum of the
Quantity of Transactions with a Record Type of Timesheet Entry matches the Timesheets
Total Hours. When True, the validation will occur.
### Time2Pay Process Invoice - Invoice Types (Conditionally Compulsory)
2cloudnine Payroll suite has four standard Record Types for all Client Invoicing. If required, users can
create Custom Record Types. This Custom Setting is **ONLY** required to be completed if using ‘ **custom** ’
Invoice Record Types. This can be ignored if you are using the standard Invoice Record Types.
It enables Users to create the mapping required for any Custom Record Types for Assignments and
Invoices. If you have a Custom Assignment Record Type or Custom Invoiceable Fee Record Type, then you
need to set up the Invoice Record Type in this Custom Setting.
Go to **Setup > Custom Settings > Time2Pay Process Invoice - Invoice Types > Manage > New**
* Make the decision on whether they want custom Record Types before setting this up. Complete
in line with the details provided here:
1. Name = a suitable name to be easily identified
2. Assignment/Invoiceable Fee Record Types = the record type of Assignment or Invoiceable
Fee to be used
3. Invoice Record Type = the record type of the Invoice to be used.
### Time2Pay Rate Calculator Configurator (Conditionally Compulsory)
The Time2Pay Rate Calculator Configurator Custom Settings are used to control what Employment Costs
and fields are available in the Rate Calculator Builder and enforce if Location, Industry and Risk
Classification fields are mandatory.
Go to **Setup > Custom Settings > Time2Pay Rate Calculator Configurator > Manage > New**
Select or deselect the various checkboxes as per your requirements for this Org:
* **Enable Custom Cost 1/2/3/4 Employ Cost**
* These four fields define if Custom Cost 1/2/3/4 Employment Cost is enabled for the Rate
Calculator. If False, the custom employment cost cannot be used within Rate Calculators.
* **Enable Custom Post Cost 1/2/3/4 Employ Cost**
* These four fields define if Custom Post Cost 1/2/3/4 Employment Cost is enabled for the
Rate Calculator. If False, the custom employment cost cannot be used within the Rate
Calculators.
* **Enable Industry**
* Defines if Industries are enabled for the Rate Calculator. If False, fields relating to the
Industry will not be visible on the Rate Calculator and its related components.
* **Enable Insurance Employment Cost**
* Defines if Insurance Employment Cost is enabled for the Rate Calculator. If False, fields
relating to the cost will not be visible on the Rate Calculator and its related components.
* **Enable Invoice Tax**
* Defines if Invoice Tax is enabled for the Rate Calculator. If False, fields relating to the
Invoice Tax will not be visible on the Rate Calculator and its related components.
* **Enable Payroll Tax Employment Cost**
* Defines if Payroll Tax Employment Cost is enabled for the Rate Calculator. If False, fields
relating to the cost will not be visible on the Rate Calculator and its related components.
* **Enable Risk Classification**
* Defines if Risk Classifications are enabled for the Rate Calculator. If False, fields relating to
the Risk Classification will not be visible on the Rate Calculator and its related
components.
* **Enable Superannuation Employment Cost**
* Defines if Superannuation Employment Cost is enabled for the Rate Calculator. If False,
fields relating to Superannuation will not be visible on the Rate Calculator and its related
components.
* **Enable WHS Employment Cost**
* Defines if WHS Employment Cost is enabled for the Rate Calculator. If False, fields
relating to WHS will not be visible on the Rate Calculator and its related components.
* **Enable WorkCover Employment Cost**
* Defines if WorkCover Employment Cost is enabled for the Rate Calculator. If False, fields
relating to WorkCover cost will not be visible on the Rate Calculator and its related
components.
* **Enable add Mark Up / Margin function**
* Defines if the ability to add multiple Mark Up / Margin Rates to a Rate Calculator is
enabled. If False, there will only be 1 set of Mark Up / Margin Rates applied.
* **Enable location**
* To be used to enable Location.
* **Industry Required?**
* Defines if the Industry field on the Rate Calculator will be a mandatory field.
* **Location Required?**
* To be used to define if location is a mandatory field.
* **Risk Classification Required?**
* Defines if the Risk Classification field on the Rate Calculator is a mandatory field.
* **Enable Award Classification and Levels**
* Defines if the Award Classifications and Levels are configurable on a Rate Calculator org
wide.
* **Enable Custom Pay Rate 1/2**
* To be used for custom Rate Calculator calculations outside of the standard product.
### Time2Pay Update Rates Settings Custom Setting (Optional)
This requirement only needs to be completed if the option to lock and disable the Invoice Rates fields so
Users cannot edit them via the Update Rates functionality is required. If not, this item can be skipped.
Go to **Setup** - **Custom Setting > Time2Pay Update Rates Settings > Manage > New** (the top button)
1. Check the **Disable Invoice Rates** checkbox.
2. Click **Save** .
## 7. Page Layout Assignments
### Standard Page Layouts
The following updates to Page Layout Assignments are required in your Org. These Page Layouts do not
come automatically assigned in the Package.
Go to **Setup** - **Object Manager** - enter Object Name > **Page Layouts** - select **Page Layout Assignments**
button > **Edit Assignments**
1. Navigate to the Record Type as listed in the table below.
2. Select either the **Record Type** listed below if applying to all Profiles, or select the individual
**Profiles** to apply to underneath the specific Record Type list below\..
3. Select the **Layout Name** listed below.
4. Select **Save** .
These must be updated on the following Profiles as a minimum:
* System Administrator Profile
* 2cloudnine Payroll User Profile
* any other custom profiles created for ‘back office’ users.
If this Org is used in isolation for 2cloudnine Products, you can change all Profiles for the mentioned
record types, but be aware that there may be further changes advised in the next section specific for the
Employee or Community User Profiles.
| Object | Record Type | Layout Name |
| ------------------------- | ---------------------------- | ----------------------------------------------------------------------- |
| Account | Payment Entity | TC9EAU Account - Payment Entity |
| Employment Cost | Payroll Tax | Time2Pay Employment Cost - Non Superannuation |
| Employment Cost | Workcover | Time2Pay Employment Cost - Non Superannuation |
| Employment Cost Exception | Pay Code Custom Cost 1 | Pay Code Employment Cost Layout |
| Employment Cost Exception | Pay Code Custom Cost 2 | Pay Code Employment Cost Layout |
| Employment Cost Exception | Pay Code Custom Cost 3 | Pay Code Employment Cost Layout |
| Employment Cost Exception | Pay Code Custom Cost 4 | Pay Code Employment Cost Layout |
| Employment Cost Exception | Pay Code Insurance | Pay Code Employment Cost Layout |
| Employment Cost Exception | Pay Code Post Custom Cost 1 | Pay Code Employment Cost Layout |
| Employment Cost Exception | Pay Code Post Custom Cost 2 | Pay Code Employment Cost Layout |
| Employment Cost Exception | Pay Code Post Custom Cost 3 | Pay Code Employment Cost Layout |
| Employment Cost Exception | Pay Code Post Custom Cost 4 | Pay Code Employment Cost Layout |
| Employment Cost Exception | Pay Code Superannuation | Pay Code Employment Cost Layout |
| Employment Cost Exception | Pay Code WHS | Pay Code Employment Cost Layout |
| Employment Cost Exception | Pay Code WorkCover | Pay Code Employment Cost Layout |
| Employment Cost Item | Payroll Tax | Time2Pay Employment Cost Item |
| Employment Cost Item | Workcover | Time2Pay Employment Cost Item |
| Pay Code | Allowance | Time2Pay Pay Code - Allowance |
| Pay Code | Deduction | Time2Pay Pay Code - Deduction |
| Pay Code | ETP | Time2Pay Pay Code - ETP |
| Pay Code | Expense | Time2Pay Pay Code - Expense |
| Pay Code | FBT | Time2Pay Pay Code - FBT |
| Pay Code | Lump Sum | Time2Pay Pay Code - Lump Sum |
| Pay Code | Payment | Time2Pay Pay Code - Payment |
| Pay Transaction | Allowance | Time2Pay Pay Transaction - Payment |
| Pay Transaction | Deduction | Time2Pay Pay Transaction - Deduction |
| Pay Transaction | ETP | Time2Pay Pay Transaction - Lump Sum, ETP and FBT |
| Pay Transaction | Expense | Time2Pay Pay Transaction - Expense |
| Pay Transaction | FBT | Time2Pay Pay Transaction - Lump Sum, ETP and FBT |
| Pay Transaction | FEE | Time2Pay Pay Transaction - Invoiceable Fee - Perm and Temp to Perm Fees |
| Pay Transaction | Leave Accrual | Time2Pay Pay Transaction - Leave Accrual |
| Pay Transaction | Lump Sum | Time2Pay Pay Transaction - Lump Sum, ETP and FBT |
| Pay Transaction | Payment | Time2Pay Pay Transaction - Payment |
| Pay Transaction | Timesheet Entry | Time2Pay Pay Transaction - Payment |
| Pay Transaction | Withholding - ETP PAYG | Time2Pay Pay Transaction - Withholding - PAYG, ETP PAYG, HELP and SFSS |
| Pay Transaction | Withholding - GST | Time2Pay Pay Transaction - Withholding - PAYG, ETP PAYG, HELP and SFSS |
| Pay Transaction | Withholding - PAYG | Time2Pay Pay Transaction - Withholding - PAYG, ETP PAYG, HELP and SFSS |
| Pay Transaction | Withholding - STSL | Time2Pay Pay Transaction - Withholding - PAYG, ETP PAYG, HELP and SFSS |
| Pay Transaction | Withholding - Superannuation | Time2Pay Pay Transaction - Withholding - Superannuation |
| Schedule | Pay Schedule | TC9ET Pay Schedule Layout |
| Superannuation Fund | APRA and RSA Funds | TC9EAU APRA and RSA Fund Layout |
| Superannuation Fund | Self Managed | TC9EAU Self Managed Superannuation Fund Layout |
| Template Group | Assignment Rates | Time2Pay Template Group - Timesheet Assignment Rates Templates |
| Template Group | Invoice Settings | Time2Pay Template Group - Invoice Settings |
**IMPORTANT:** Please make sure to delete the following Page Layouts that are installed as standard (if an
existing Org or an Org has ‘on Platform’ programs, ensure they are not in use before deleting.)
| Object | Record Type |
| ------- | -------------- |
| Account | Account Layout |
| Contact | Contact Layout |
### Employee Community Page Layouts
The following are the objects that are required to have the page layout assigned to the Community
Profile and/or whatever Profile the client is using for their Community. In general, this will be the
‘Customer Community User’.
| Object | Record Type | Layout Name |
| ------------------- | ------------------------ | --------------------------------------------- |
| Payee Withholding | AU GST | TC9EC AU GST Payee Withholding Layout |
| Payee Withholding | AU PAYG | TC9EC AU PAYG Payee Withholding Layout |
| Payee Withholding | AU Super | TC9EC AU SUPER Payee Withholding Layout |
| Payment Detail | Payee Australian Bank | TC9EC Payment Detail Payee AUS Bank Layout |
| Payment Detail | Payee Cash | TC9EC Payment Detail Payee Cash Layout |
| Payment Detail | Payee Cheque | TC9EC Payment Detail Payee Cheque Layout |
| Payment Detail | Payee International Bank | TC9EC Payment Detail Payee INTL Bank Layout |
| Contact | Employee | TC9ET Employee Layout |
| Contact | Client | TC9ET Client Layout |
| Expense Claim | All | TC9EC Expense Claim |
| Superannuation Fund | APRA and RSA Funds | TC9EC APRA and RSA Fund Layout |
| Superannuation Fund | Self Managed | TC9EC Self Managed Superannuation Fund Layout |
| Payee Leave Event | Leave Cash Out | TC9EC Payee Leave Event Layout |
| Payee Leave Event | Leave Credit | TC9EC Payee Leave Event Layout |
| Payee Leave Event | Leave Take | TC9EC Payee Leave Event Layout |
| Pay Advice | Contractor Invoice | TC9EC Pay Advice Layout |
| Pay Advice | Pay Advice | TC9EC Pay Advice Layout |
### Compact Layouts
The following are the Compact Layout Assignments that should be manually assigned to ensure the
Time2Pay fields are available in the Compact Layouts.
Go to each **Object > Compact Layouts > Compact Layout Assignment >** **Edit Assignment**, from here you
need to select the compact layout required to be assigned per record type, and then select **Save** .
| Object | Record Type | Layout Name |
| ----------------- | ---------------------- | ------------------------ |
| Account | Payment Entity | Account - Payment Entity |
| Contact | Employee | TC9PR Employee Layout |
| Payee Leave Event | Primary Compact Layout | TC9P Payee Leave Event |
| Payee Leave Event | Leave Cash Out | TC9P Payee Leave Event |
### Search Layouts & List View Button Layouts
### Employment Cost Item
Go to **Setup > Object Manager > Employment Cost Item > List View Button Layout**
1. Select **Edit**, and untick the checkbox **New \[New]** .
2. Click **Save** .
### Invoice (Conditionally Compulsory)
The following Search Layout needs to be manually updated to add some helpful buttons to the List
Views. Please note any custom buttons added by this method will NOT be visible from the ‘Recently
Viewed’ List View. They will ONLY display when using any of the other List Views.
Go to **Setup > Object Manager** **> Invoice > Search Layouts**
1. On the **Default Layout**, select the drop-down in the far right and select **Edit** .
2. In the Custom Buttons, highlight the **Create Invoice PDF, Delete Invoices** and the **Send Invoice**
**Email** underneath the Available Buttons.
3. Select the **Add >** button, so they appear in the Selected Buttons list and click **Save** .
Go to **Setup > Object Manager > Invoice > List View Button Layout > List View**
1. Select the down arrow in the far right and select > **Edit**
2. In the Available Buttons, highlight the **Create Invoice PDF**, **Send Invoice Email** and the **Delete**
**Invoices** underneath the Available Buttons.
3. Select the **Add >** button, so they appear in the Selected Buttons list.
4. Click **Save** .
### Lodgements
A List View button is available on the Lodgement AU List View which allows Users to multi-select STP
Lodgements from the List View and check/retrieve the ATO-processing Status for the selected records,
simultaneously. To complete this configuration, follow the steps below:
Go to **Setup > Object Manager > Lodgement AU > List View Button Layout**
1. In the List View, select the dropdown arrow at the far right and select **Edit** .
2. Add the new Get STP Response (Bulk) button to the right hand colum.
3. Select the **Save** button.
### Timesheet
To send notifications in bulk to Employees or Approvers based on their Timesheets being of the same
status, this can be done using the Notifications Manager button available in the Timesheets Search:
Go to **Setup > Object Manager** - **Timesheet > Search Layouts**
1. On the **Default Layout,** select the drop-down in the far right and select > **Edit**
2. Move the 2 Available Buttons **Update Failed to Ready** and **Notification Manager** to the Selected
Buttons column.
3. Click **Save** .
Go to **Setup > Object Manager > Timesheet > List View Button Layout > List View**
1. Select the down arrow in the far right and select > **Edit**
2. Move the 2 Available Buttons **Updated Failed to Ready** and **Notification Manager** to the Selected
Buttons column.
3. Click **Save** .
### Minimum Pay Rate
Go To **Setup > Object Manager >** **Minimum Pay Rate** **> Search Layouts**
1. On the **Default Layout,** select the drop arrow down in the far right and select > **Edit**
2. In the Custom Buttons section, move the **Update Rates** button to the Selected Buttons list.
3. Click **Save** .
### Template Group
Go To **Setup > Object Manager >** **Template Group** **> Search Layouts**
1. On the **Default Layout,** select the drop arrow down in the far right and select > **Edit**
2. In the Custom Buttons section, move the **Update Rates** button to the Selected Buttons list
3. Click **Save** .
Go to **Setup > Object Manager > Template Group > List View Button Layout > List View**
1. Select the down arrow in the far right and select > **Edit**
2. In the Available Buttons, highlight the **Update Rates** underneath the Available Buttons.
3. Select the **Add >** button, so it appears in the Selected Buttons list.
4. Click **Save** .
### Lightning Record Pages
### Family & Domestic Violence Leave
Users are required to create a Clone of the existing Lightning page that you can modify. You cannot edit
Lightning Pages included in the package directly.
Go to **Setup > User Interface > Lightning App Builder > TC9PR Payee Lightning Record Page > Clone**
1. When the page has fully loaded, browse to the Leave Tab and maximise into the sub-tabs.
2. After the View Balances sub-tab, insert a new Sub-tab by clicking on the **Add Tab** link in the far
right underneath the existing tabs listed.
3. Select the new Details sub-tab on the far right, update the Tab Label picklist by selecting **Custom**,
and then populate the Custom Label to **F\&DV Leave**, and select the **Done** button.
4. Click on the empty space within the newly added page, and then where it says Add
Component(s) here, click on it.
5. Now click on **Flow** under Components on the left-hand side.
6. A Page > Flow section would open up to the right of the screen.
7. Select **FMDV Leave** in the field called Flow on the page.
8. On it, you will be asked to enter the Flow Variables.
9. Select the ‘pass record ID into this variable’ checkbox to automatically populate the Variable with
\{!Record.Id}.
10. Click **Save** and click **Activate.**
11. Ensure to assign the page as the Org Default page.
### Assignment
With the Work Schedule functionality, a new Lighting Web Component showing the Work Schedule
Calendar on an Assignment has been provided.
Go To **Setup > Object Manager > Assignment > Lightning Record Pages**
1. Select the Assignment Master Lightning Record Page and click the **Clone** button, which opens
up the Lightning App Builder.
2. Move the following Lightning Web Component onto the page from the section of **Custom - Managed**
* Assignment Work Schedule Calendar (tc9\_pr.Assignment\_Work\_Schedule\_Calendar)
3. Apply any component visibility settings / filters required and click **Save** .
4. In the popup, click **Activate** to ensure the page will be used.
5. Ensure to assign the page as the Default page by scrolling down and clicking on the **Assign as**
**Org Default** button.
### Account
To ensure the most suitable related lists are being displayed on Account records, Users should ensure the
correct Account Lightning Record Page is assigned:
1. Go to **Accounts** Object.
2. Select any Account Record.
3. Go to **Cogs > Edit Page** .
4. Select the **Pages** tab, then select **Open Page**, and select **Confirm** in the Leave Page confirmation
screen.
5. Select the radio button for **Account Master Lightning Record Page**, and select the **Open** button.
6. Click the **Activation** button, and then select the **Assign as Org Default** button.
7. Select **Desktop and phone** radio button, select **Next**, and then select **Save** .
8. Select the **left arrow** to return to the Account record to see the new Lightning page assigned.
### Contact
To ensure the most suitable related lists are being displayed on the Contact Lightning Page, Users should
ensure the correct Contact Lightning Record Page is assigned as an Org Default:
1. Go to **Contacts** Object.
2. Select and Contact Record.
3. Go to **Cogs > Edit Page** .
4. Select the **Pages** tab, then select **Open Page**, and select **Confirm** in the Leave Page confirmation
screen.
5. Select the radio button for **Contact Master Lightning Record Page**, and select the **Open** button.
6. Click the **Activation** button, and then select the **Assign as Org Default** button.
7. Select **Desktop and phone** radio button, select **Next**, and then select **Save** .
8. Select the **left arrow** to return to the Contact record to see the new Lightning page assigned.
## 8. Update Buttons, Links and Actions
### Interpretation Rule
The New, Edit, and Clone buttons used on the Interpretation Rule object are configured to open the
Interpretation Builder. Follow the below instructions to ensure the correct configuration is applied.
Go To **Setup > Object Manager > Interpretation Rule** **> Buttons, Links and Actions**
1. Navigate to the **New** button and select **Edit** .
2. Ensure that the following values are defined:
* Salesforce Classic Override = No override (use default)
* Lightning Experience Override = Lighting Component **tc9\_et:AwardBuilder**
* Mobile Override = Lighting Component **tc9\_et:AwardBuilder**
* Skip record type selection page = False
3. Click the **Save** button.
4. Navigate to **Buttons, Links and Actions >** **Edit** button and select **Edit** .
5. Ensure that the following values are defined:
* Salesforce Classic Override = No override (use default)
* Lightning Experience Override = Lighting Component **tc9\_et:AwardBuilder**
* Mobile Override = Lighting Component **tc9\_et:AwardBuilder**
6. Click the **Save** button.
7. Navigate to **Buttons, Links and Actions >** **Clone** button and select **Edit** .
8. Ensure that the following values are defined:
* Salesforce Classic Override = Visualforce page **CloneInterpretations**
### \[tc9\_et:CloneInterpretation]
9. Click **Save** .
## 9. Update Standard Page Layouts
To add or remove fields and to make other updates to the Page Layouts, you can use the steps provided
in this section. If you see Page Layouts with similar names and are not sure about which Page Layout is
assigned to a particular Record Type, you can click on the Page Layout Assignment button to see the
Page Layouts that are assigned to different Record Types.
### Account (Invoice Entity)
Go to **Setup > Object Manager > Account** **> Page Layouts**
1. Select a Page Layout that is used for the Invoice Entity record type.
2. Add the following field to the Page Layout:
1. ABN Lookup
3. Click **Save** .
### Account (Payment Entity)
Go to **Setup > Object Manager > Account** **> Page Layouts**
1. Select the Page Layout used for the Payment Entity Record Type.
2. Add the following fields to the Page Layout:
1. Include PAYG in Payment Files?
2. PAYG Payment Reference Number (PRN)
3. PAYG Bank Branch Code
4. PAYG Bank Account Number
5. PAYG Bank Account Name
3. Click Save.
### Assignment (Conditionally Compulsory)
This requirement only needs to be completed if the option to use the functionality is taken. If not, this
item can be skipped.
Go to **Setup > Object Manager > Assignment > Page Layouts**
1. Select the Page Layout that is used for Temp record types.
2. Remove the following button(s) from the page layout:
1. Create Timesheets (Custom Button).
3. Add the following fields to the Page Layout:
1. Assignment Rate Template Group Pay Rate
2. Assignment Rate Template Group Invoice Rate
3. Assignment Rate Matching Mode
4. Add the following Lightning Action Link/Button (under Mobile & Lightning Actions) to the page
layout:
1. Create Timesheets (Quick Action)
5. Click **Save** .
6. Select the Page Layout named TC9PR Assignment Layout.
7. Add the following fields to the Page Layout:
1. Expense Claim Receipts Mandatory
2. Public Holiday Calendar
8. Click **Save** .
### Assignment (Optional)
To use the Invoice Setting Template Groups functionality, the below fields below must be added to
existing Page Layouts:
Go to **Setup > Object Manager > Assignment > Page Layouts > Page Layout Assignment**
1. Select the Page Layout used for the Temp Record Type.
2. Add the following fields to the Page Layout:
1. Invoice Settings Template Group
3. Click **Save** .
4. Repeat the above updates for the Perm Record Type.
**Contact**
Go to **Setup > Object Manager > Contact > Page Layouts**
1. Select a page layout that is used for any Employee record type.
2. Add the following field to the Page Layout:
* Primary Payee Record
3. Click **Save** .
4. Repeat for the remaining page layouts used by the Employee record types.
### Leave Rule (Optional)
Go to **Setup** - **Object Manager** - **Leave Rule** - **Page Layouts**
1. Select **TC9PR Leave Rule Layout** .
2. Add the following fields to the Page Layout:
1. Public Holiday Not Worked Leave Rule
3. Click **Save** .
4. Repeat steps 2-3 for any other Custom Page Layouts used in your Org.
### Invoice Settings (Optional)
To use the Invoice Setting Template Groups functionality, the below fields below must be added to
existing Page Layouts:
Go to **Setup** - **Object Manager** - **Invoice Setting** - **Page Layouts** - **Page Layout Assignment**
1. Select the Page Layout used for the Payroll Items Record Type.
2. Add the following fields to the Page Layout:
1. Template Group
2. Invoice Group By
3. Click **Save** .
4. Repeat the above updates to the Page Layouts used for all remaining Record Types.
### Interpretation Breakpoint
Go to **Setup** - **Object Manager** - **Interpretation Breakpoint** - **Page Layouts** - **Page Layout Assignments**
1. Select the Page Layout used for the Allowance Breakpoint Record Type.
2. Add the following fields to the Page Layout under the Pay Code field:
1. Saturday Pay Code
2. Sunday Pay Code
3. Click **Save** .
4. Go to **Record Types > Allowance Breakpoint** .
5. Select **Edit** next to Start Threshold Type.
6. Select Standard Hours in Available Values, and select the **Add >** button to move it to the Selected
Values section.
7. Click **Save** .
### Payee
Go to **Setup > Object Manager > Payee > Page Layouts**
1. Select any page layout that is used for the Payee record type.
2. Add the following button to the Page Layout (available from the Mobile & Lightning Actions
section):
1. Super Stapling (tc9\_eau\_Super\_Stapling\_\_c).
(Actions from the Mobile & Lightning Actions section can only be added under the
Salesforce Mobile and Lightning Experience Actions heading.)
3. Click **Save** .
### Payee Leave Event (Optional)
Go to **Setup** - **Object Manager** - **Payee Leave Event** - **Page Layouts** - **Page Layout Assignments**
1. Select the Page Layout assigned to the Record Type of Leave Takes.
2. Add the following fields to the Page Layout for all Users:
1. Start Time
2. End Time
3. Timesheet Entry Last Updated
4. Timesheet Entry Creation Status
5. Source Leave Event
3. Click **Save** .
4. Repeat steps 2 and 3 for any remaining Page Layouts assigned to the Leave Takes Record Type.
### Rate Calculator
Go to **Setup** - **Object Manager >** **Rate Calculator** - **Page Layouts**
1. Select any Page Layout used for the Employee Specific or No Employee Record Types.
2. Add the following field(s) to the Page Layout:
1. Account
2. Previous Assignment Award Level
3. Previous Assignment Industry
4. Previous Assignment Location
5. Previous Assignment Rate Calculator ID
6. Previous Assignment Risk Classification
3. Click **Save** .
4. Repeat steps for all page layouts that are used for the Employee Specific and No Employee record
types.
### Schedule
Go to **Setup > Object Manager > Schedule > Page Layouts > Page Layout Assignments**
1. Select the Page Layout assigned to the Pay Schedule Record Type.
2. Add the following fields to the Page Layout, at the bottom right of the Contact Information
section:
1. Maximum Earlier Pay Calendar Periods
3. Click **Save** .
### Timesheet Entry
Go to **Setup > Object Manager > Timesheet Entry > Page Layouts**
1. Select **Time2Pay Timesheet Entry** .
2. Add the following fields to the Page Layout under the field Payee Leave Event:
1. Source Leave Event
3. Click **Save** .
### User
Go to **Setup > Object Manager > User** - **User Page Layouts**
1. Select **User Layout** .
2. Add the following field to the Page Layout:
1. Enable Rate Calc Overriding
2. Enable Rate Calc Line Rounding
3. Click **Save.**
## 10. Field History Tracking
Field History Tracking provides a detailed history of specified fields on each object, when they are initially
populated or amended, providing the time/date the change was made and which User made the change.
This is an imperative stage of the configuration of an Org, as it only starts tracking the individual fields
once defined for those fields. Therefore, if you realise you want to start reviewing the history of a field, it
only commences reporting from that point in time and does not provide any retrospective tracking prior
to the field being set.
**Account**
Go to **Setup > Object Manager > Account > Fields & Relationships**
1. You will then be presented with 2 columns of all fields within the Account object that can be set
to True to commence the Field History Tracking on them.
2. Please select up to 60 different fields as you would like to have tracked on all Account records.
3. When satisfied, please select the **Save** button.
**Important Notes**
*(All Record Types)*
*This covers all Record Types per object (i.e. Payment Entity, Invoice Entity, and Client, as well as any*
*Custom Record Types you might have). Users should set these to assist with any UAT issues that*
*might occur, as well as to provide as much information as possible to provide history when issues*
*need resolving by the Customer Success Team.*
**Contact**
Go to **Setup > Object Manager > Contact > Fields & Relationships**
1. Select the Set History Tracking button.
2. Select the Enable Contact History checkbox to True.
You will then be presented with 2 columns of all fields within the Contact object that can be set to True to
commence the Field History Tracking on them.
3. Please select up to 60 different field checkboxes as you would like to have tracked on all Account
records.
4. When satisfied, please select the Save button.
### Updating ALL remaining 2cloudnine Objects
Field History Tracking is something that comes packaged on all the 2cloudnine Custom Packaged
objects (i.e. Payee, Assignment, Pay Batch, Lodgements, etc). It is however encouraged to always review
the Field History Tracking that is applied to each Object upon installation to ensure all fields benefit from
tracking to assist with possible issues in the future.
It is also recommended whenever you create new Custom Fields, you also update the Field History
Tracking to include any changes made to the new field moving forward. To update additional fields on
any Object to commence Field History Tracking, follow the below steps:
Go to **Setup > Object Manager**
1. Select the object that you wish to update the Fields to be tracked (i.e. Payee Pay Batch).
2. Select **Fields & Relationships** .
3. Select the **Set History Tracking** button.
4. Select the individual checkboxes to true for the fields that you wish to commence tracking the
field history of.
5. When you have selected all the fields that you require, select **Save** .
It is often better to track more fields than necessary, than fewer fields, so if you have 40 fields on an
Object but you are only tracking 25, it is recommended you include all to ensure if there are automations
that are impacting the behaviour of this Object, you’ll be able to see when this is occurring.
**Important Notes**
*(Field History Tracking)*
*If you require more than the allocated 60 fields to be tracked on any object, please contact the*
*2cloudnine Product Team, and they will advise if this can be changed.*
## 11. Creation of Custom Permission Sets
Permission Sets enable users to be on various Profiles and to manage their access via the Permission
Sets, instead of directly on their Profile. Access provided by a Profile is applied to all Users on that Profile.
By using a Permission Set, it allows flexibility for the permission to be opened up at various times when a
specific User requires access.
### Standard Objects Permission Set (Compulsory)
This step provides access to the standard Salesforce objects which are unable to be included in the
2cloudnine packaged Permission Sets. To resolve the issue, it is required System Administrators create a
new Permission Set, which we suggest is called 2cloudnine Standard Objects Permission Set.
Go To **Setup > Permission Sets**
1. Click the **New** button.
2. Enter a suitable name in the **Label** field, such as 2cloudnine Standard Objects Permission Set,
and select **Enter** to auto-populate the API Name.
3. If you want to enter a **Description** you can.
4. To ensure the Permission Set is available now, skip the checkbox **Session Activation Required** .
5. It is recommended to skip the step of assigning a Licence so this Permission Set can be assigned
to all 2cloudnine Users regardless of the Licence they are on. If the Permission Set is associated
with a specific License, it can only include the permission and settings entitled by that License.
6. Click the **Save** button.
7. Select **Object Settings** .
8. Select **Accounts**, and in the next screen select the **Edit** button.
9. Enable the **Read** and **Edit** checkboxes in the Objects Permissions section.
10. Click the **Save** button.
11. Return to the **Object Settings**, select **Contacts**, and in the next screen select the **Edit** button.
12. Enable the **Read**, **Create**, and **Edit** checkboxes in the Objects Permissions section.
13. Click the **Save** button.
14. Return to the **Object Setting**, select **Documents**, and in the next screen select the **Edit** button.
15. Enable the **Read** checkboxes in the Object Permissions section.
16. Click the **Save** button.
17. Go to the **Cogs** (where Setup is located) > **Developer Console**, select **Query Editor**, paste the
following text without any hard returns, etc:
### SELECT Id, Name, PermissionsEmailTemplateManagement FROM PermissionSet WHERE Name
### = 'X2cloudnine\_Standard\_Objects\_Permission\_Set'
18. Click the **Execute** button.
19. Within the Dev Console query results, double-click on the data column for
**PermissionsEmailTemplateManagement** .
20. Tick the box that appears to set the value to **True** .
21. Click the **Save Rows** button at the bottom of the dev console screen.
**IMPORTANT:** This Permission Set should be assigned to 2cloudnine Payroll Users and to Employee
Community Users who have the Employee Community Permission Set assigned to them.
Due to the Edit access provided to Contacts, this Permission Set is not able to be assigned to Guest Site
Users. If Guest Site Users require other access provided within this Permission Set, System Administrators
are encouraged to Clone this Permission Set and remove the Edit access from the Contacts Object. Then
this new Cloned Permission Set can be assigned to Guest Users. Details of how to do this are provided
later within this Configuration Guide.
### 2cloudnine View Setup Permission Set (Compulsory)
With recent changes to security features introduced, it has been discovered there are times when a
non-System Admin User is unable to create an Invoice PDF, or issues with Pay Advice PDFs such as the
error “sObject type 'Apex page' is not supported”. To get around this, we have a temporary solution to
provide access to View Setup and Configuration in a Permission Set.
Go To **Setup > Permission Sets**
1. Click the **New** button.
2. Enter a suitable name in the Label field, such as **2cloudnine View Setup Permission Set**, and
select **Enter** to auto-populate the API Name.
3. If you want to enter a **Description** you can.
4. To ensure the Permission Set is available now, skip the checkbox **Session Activation Required** .
5. Skip the step of assigning a Licence to this Permission Set so it can be assigned to Users
regardless of the Licence they are on. If it’s associated with a specific License, it can only include
the permission and settings entitled by that License.
6. Click on the **Save** button.
7. Select **System Permissions** .
8. Select the Edit button, and scroll down to select the checkbox **View Setup and Configuration**
(this may also tick the checkbox for View Roles and Role Hierarchy) .
9. Click the **Save** button.
When assigning this Permission Set, it can not be assigned to anyone with the Customer Community
Licence.
### Pay Transactions Permission Set (Compulsory)
With recent changes to security features introduced in this release, Pay Batch processing will NOT be
completed successfully without providing the 2cloudnine Payroll Users with access to the Pay
Transactions Object and all fields, including any custom fields created specifically within an Org. To
resolve the issue, it is required System Administrators create a new Permission Set, which we suggest is
called 2cloudnine Pay Transactions Permission Set.
Go To **Setup > Permission Sets**
1. Click the **New** button.
2. Enter a suitable name in the Label field, such as **2cloudnine Pay Transactions Permission Set**,
and select **Enter** to auto-populate the API Name.
3. If you want to enter a **Description** you can.
4. To ensure the Permission Set is available now, skip the checkbox **Session Activation Required** .
5. It is recommended to skip the step of assigning a Licence so this Permission Set can be assigned
to all 2cloudnine Users regardless of the Licence they are on. If the Permission Set is associated
with a specific License, it can only include the permission and settings entitled by that License.
6. Click on the **Save** button.
7. Select **Object Settings** .
8. Select **Pay Transactions**, and in the next screen select the **Edit** button.
9. Enable the **Read** checkbox in the Objects Permissions section.
10. Enable the **Read** Access checkbox in the Field Permission section, next to all the fields.
11. Click the **Save** button.
**IMPORTANT:** System Administrators are reminded when you create any new Custom Fields on the Pay
Transactions object, these fields require Read Access added to this new 2cloudnine Pay Transactions
Permission Set, to ensure Users required to calculate Pay Batches are able to continue to do so.
### Rate Calculator Permission Set (Conditionally Compulsory)
This configuration is only Required for those Orgs where Rate Calculator functionality is being used. A
new Object called Account to Rate Calculator Junction has been recently introduced within the Rate
Calculator functionality, and as this has a Master-Detail relationship, the Permission Set is unable to
provide the required access to this within the packaged Rate Calculator Permission Set. To resolve this,
System Administrators are recommended to clone the Permission Set and provide the extra access to the
cloned Permission Set.
Go To **Setup > Permission Sets**
1. Open the Permission Set called **2cloudnine Rate Calculator** .
2. Click on the **Clone** button.
3. Update the name in the **Label** field to include “Clone” or “V2” at the end.
4. Click on the **Save** button.
5. Open the cloned Permission Set created above (i.e. **2cloudnine Rate Calculator Clone)** .
6. Select **Object Settings** .
7. Select **Account to Rate Calculator Junction**, and in the next screen select the **Edit** button.
8. Enable the **Modify All** checkbox in the Objects Permissions section.
9. Enable the **Modify All** checkbox in the Field Permission section, next to all the fields.
10. Click the **Save** button.
### Online URL Invoices (Conditionally Compulsory)
### Permission Sets to view online URL invoices
This provides READ access to the Objects, Fields, and Record Types needed to view the online Invoices via
the online url (used for External Users). 2cloudnine will maintain this Permission Set to provide required
access when using the Packaged Invoice Templates.
**Important Notes**
*(Invoice Templates)*
*This is the minimum requirement for the packaged Invoice Templates. If an Org is using custom*
*Visualforce pages, any additional access will need to be added specifically in that Org.*
Go to **Setup > Permission Sets**
1. Select the **2cloudnine Time2Pay Standard Online Invoice Permission Set** and click **Clone** .
2. You will need to rename it ‘2cloudnine Time2Pay Standard Online Invoice2’ (or Clone, or
something similar), and then select **Save** .
3. Select **Object Settings**, and select **Documents** .
4. Select the **Edit** button and then select the **Read** checkbox in the Object Permissions Settings.
5. Select the **Save** button.
6. Select **Object Settings**, and select **Accounts** .
7. Select the **Edit** button and then select the **Read** checkbox.
8. Scroll down to the Fields section, then select the following fields:
1. **Billing Address**
2. **Fax (optional)**
3. **Phone**
9. Select the **Save** button.
10. Select **Object Settings**, and select **Contacts** .
11. Select the **Edit** button, and then select the **Read** checkbox in the Object Permissions Settings.
12. Scroll down to the Fields section, then select the following field:
13. **Mailing Address**
14. Select the **Save** button.
The newly created Permission Set will need to be applied to the Guest User account when the Invoice
Site gets created, which has been covered later in this document.
### 2cloudnine Front Office User Permission Set (Conditionally Compulsory)
With recent changes to security features introduced, when there is Front Office software that creates
Contacts, issues are experienced without access to our fields and triggers when saving a Contact,
Account, etc. To resolve the issue, it is required to create a new Permission Set, which we suggest is called
2cloudnine Front Office User Permission Set (or Non 2c9 User Permission Set).
Go To **Setup > Permission Sets**
1. Click the **New** button.
2. Enter a suitable name in the Label field, such as **2cloudnine Front Office User Permission Set**,
and select **Enter** to auto-populate the API Name.
3. If you want to enter a **Description** you can.
4. To ensure the Permission Set is available now, skip the checkbox **Session Activation Required** .
5. It is recommended to skip the step of assigning a Licence so this Permission Set can be assigned
to all 2cloudnine Users regardless of the Licence they are on. If the Permission Set is associated
with a specific License, it can only include the permission and settings entitled by that License.
6. Click on the **Save** button.
7. Select **Custom Metadata Types** .
8. Select **Edit**, and in the Available Custom Metadata Types select the **tc9\_pr.Community Settings** .
9. Click the **Save** button.
## 12. Employee Community Plus Permission Set (only if using Community Plus Licences)
This configuration is only Required for those Orgs where the Licences for Community Users are
Community Plus Licences and the below configuration steps should only be completed if the Licences
match. The Community package now includes a new Community Plus Permission Set available for use
exclusively with Users assigned to Community Plus Licences. More details are provided below.
### Clone the Permission Set
You must clone this Permission Set to assign permission to Account, Contact Objects, and also to
Documents. To clone this Permission Set, follow the steps below:
Go To **Setup > Permission Sets**
1. Open the new Permission Set called **2cloudnine Employee Community Plus Permission Set** .
2. Click on the **Clone** button.
3. Update the name in the **Label** field to include “Clone” or “V2” at the end.
4. Click on the **Save** button.
### Update Permission Set
On the Cloned Permission Set, please amend the Object Settings to have **Read** access to the following
objects:
* Accounts
* Documents
Please amend the Object Settings to have **Read**, **Create,** and **Edit** access to the following objects:
* Contacts
### Update Permission Set assignments
The next step is to assign these two Permission Sets (original and cloned) to all the required Community
Plus Licence Users. If the Users are already created you can assign the Permissions Sets individually to
the Users. If you have Community Users being created automatically from the Payee or the creation of
Timesheets, ensure you have the suitable automation to apply these 2 Permission Sets to the required
Users upon creation of their records.
### Create Public Group and Sharing Rules
The 2cloudnine Employee Plus Permission Set will also require Sharing Rules configured within the Org,
which will be the responsibility of the Implementation Consultant. 2cloudnine will NOT be providing
these instructions at present. This is required as this Licence type does not allow the use of Modify All and
View All at an Object Level, the use of Public Groups and Sharing Rules will be required to achieve this.
For more information, please refer to this Salesforce article on setting up Public Groups and Sharing
Rules:
[https://help.salesforce.com/s/articleView?id=sf.managing\_the\_sharing\_model.htm\&language=en\_US\&typ](https://help.salesforce.com/s/articleView?id=sf.managing_the_sharing_model.htm\&language=en_US\&type=5)
[e=5](https://help.salesforce.com/s/articleView?id=sf.managing_the_sharing_model.htm\&language=en_US\&type=5)
**IMPORTANT:** The use of Community Plus Licences is not encouraged for widespread use within
2cloudnine Payroll as the current design of the 2cloudnine Community Components is based on a
Customer Community Licence only at this stage.
## 13. Scheduled Jobs
### Schedule Job Scripts - Packaged
Below are the different scripts required to set up the various scheduled jobs. To run scripts:
1. Copy the block of scripts to be run.
2. Select **Setup > Developer Console**
3. **Debug > Open Execute Anonymous Window**
4. Delete or comment out any code that is in the window
5. Paste in the copied script from below.
6. Click the **Execute** button.
7. Repeat the above steps until the last script.
### Script for Pay Advice PDF Creation & Email
Go to **Setup** - **Custom Settings** - **Time2Pay Ext Main Settings** - **Manage** - **New** (the top button, not the
one below the line)
Select or deselect the various checkboxes as per your requirements for this Org, however, Generate
Transaction Start Date is required, or you will not have the Interpretation Rules process against
Timesheets:
* **Batch Failure Send Additional Email**
* This custom setting is now redundant and can be ignored. This is no longer referred to
within the 2cloudnine Packages.
* **Custom Notification ID**
* This field refers to the dummy Id provided for custom notifications.
* **Default Template Group MPR**
* Defaults the Assignment Rate Template Group and Payee Timesheet Allowance Template
Group based on the Interpretation Rule Name.
* This requirement only needs to be completed if the option to use the functionality is
taken. If not, this item can be skipped.
* **Default Transaction Filters Invoicing**
* Defines which type of Invoice Filters will be selected by default when the Invoice
Generation Manager page is first opened. If set to False, the page will open with Standard
Invoice Filters selected. If True, the page will open with Transaction Filters selected.
* **Display Break 2**
* Defines if a second set of 'Break' fields are active for use on Timesheets via the Timesheet
Manager, Employee Portal and Approver Pages. When FALSE, there will only be one set of
Break fields available on Timesheets.
* **Enable Custom Invoice Type Picklist**
* Defines if the custom Invoice Type values defined in the ‘Process Invoice - Invoice Types’
custom setting will be used for the Invoice Type picklist on the Process Invoice visualforce
page. When FALSE, the standard package picklist will be used.
* **Enable Project Codes**
* Defines if Project Codes are used within the Org. If True, Project Code fields will be
available in the Timesheet Manager, Expense Claim Manager, Employee Portal, Approver
Pages and Invoices.
* **Enforce Credit Note Reason**
* Defines if Users will be forced to select a credit note reason before they can create a
Credit Note. If TRUE, the User will be required to select a reason.
The following setting is **MANDATORY** :
* **Generate Transaction Start Date (Required)**
* Defines the earliest Timesheet Entry Date that will be picked up by the Scheduled Job to
Process Timesheets and Create Transactions. Timesheets with Entry Dates prior to this
date must be processed manually via the Timesheet Manager.
* You **MUST** enter a date in the field Generate Transaction Start Date, **otherwise** no
Transactions will generate from the Scheduled Job. Transactions will only be generated
from the date populated.
* **Hide Timesheet Manager Add Transaction**
* Defines if the ‘Add’ Transaction button in the Timesheet Manager is available for use. If
True it will be hidden. When hidden, specific Users can be given access to the button via
the 'Enable Timesheet Manager Add Transaction' field on the User object.
* **Hide Timesheet Manager Approve**
* Defines if the ‘Approve’ buttons in the Timesheet Manager are available for use. If True,
they will be hidden. When hidden, specific Users can be given access to use the buttons
via the 'Enable Timesheet Manager Approve' field on the User object.
* **Hide Timesheet Manager Reject**
* Defines if the ‘Reject’ buttons in the Timesheet Manager are available for use. If True, they
will be hidden. When hidden, specific Users can be given access to use the buttons via
the 'Enable Timesheet Manager Approve' field on the User object.
* **Hide Timesheet Manager Revert**
* Defines if the ‘Revert To New’ button in the Timesheet Manager is available for use. If
True, it will be hidden. When hidden, specific Users can be given access to use the button
via the 'Enable Timesheet Manager Revert' field on the User object **.**
* **Hide Timesheet Manager Submit**
* Defines if the ‘Submit’ button in the Timesheet Manager is available for use. If True, it will
be hidden. When hidden, specific Users can be given access to use the button via the
'Enable Timesheet Manager Submit' field on the User object.
* **Include Timesheet Manager Expenses**
* Defines if Expenses can be added via Timesheet Manager. When TRUE, Users can create
Expenses and apply them to a Timesheet via the Timesheet Manager.
* **Include Timesheet Manager Allowances**
* Defines if Allowances can be added via Timesheet Manager. When TRUE, Users can
create Allowances and apply them to a Timesheet via the Timesheet Manager. \*\*\*\*
* **Prevent Future Invoices**
* Defines if Non-System Admin Users are allowed to create Invoices with an Invoice Date
later than the current date. If True, Non-System Admin Users can not create Invoices for
future dates. System Admin will be allowed to create Invoices for all dates. \*\*\*\*
* **Record Owner Id**
* It is used if you would like to assign specific users as Pay Transaction record Owner, often
required if your Org is using a Private Sharing Model, and you can use Sharing Rules to
provide the required access.
* Default - When set to Default or the custom setting is left blank, the default Owner is set
as the user who created the Pay Transaction records.
* Client - When set to Client, the Owner is set as the Account Owner of the Client record
that is related to the Assignment. If the Client record Account Owner is blank, then the
Default Owner defined above will apply.
* Assignment - When set to an Assignment, the Owner is set as the Owner of the
Assignment record. If the Assignment record Owner is blank, then the Default Owner
defined above will apply.
* **Send Email To Approver**
* Defines if email notifications will be sent to Timesheet / Expense Claim Approvers. It
works in conjunction with the 2 sets of Approval Email - New Token and Approval Email Submit fields. If FALSE, all these fields are overridden and no emails are sent.
The following setting is **MANDATORY** :
* **Send Invoice Emails From Email**
* When the Account's Send Invoice Emails Setting defines the email source as 'Global
Email' the email address defined in this field will be used as the from / reply to email
when emailing Invoices. The email entered must be an Organization-Wide Address,
therefore this can not be a 2cloudnine email address.
* **Validated Transaction Total in TSM**
* Defines if validation will occur within the Timesheet Manager to ensure the sum of the
Quantity of Transactions with a Record Type of Timesheet Entry matches the Timesheets
Total Hours. When True, the validation will occur.
### Time2Pay Process Invoice - Invoice Types (Conditionally Compulsory)
2cloudnine Payroll suite has four standard Record Types for all Client Invoicing. If required, users can
create Custom Record Types. This Custom Setting is **ONLY** required to be completed if using ‘ **custom** ’
Invoice Record Types. This can be ignored if you are using the standard Invoice Record Types.
It enables Users to create the mapping required for any Custom Record Types for Assignments and
Invoices. If you have a Custom Assignment Record Type or Custom Invoiceable Fee Record Type, then you
need to set up the Invoice Record Type in this Custom Setting.
Go to **Setup > Custom Settings > Time2Pay Process Invoice - Invoice Types > Manage > New**
* Make the decision on whether they want custom Record Types before setting this up. Complete
in line with the details provided here:
1. Name = a suitable name to be easily identified
2. Assignment/Invoiceable Fee Record Types = the record type of Assignment or Invoiceable
Fee to be used
3. Invoice Record Type = the record type of the Invoice to be used.
### Time2Pay Rate Calculator Configurator (Conditionally Compulsory)
The Time2Pay Rate Calculator Configurator Custom Settings are used to control what Employment Costs
and fields are available in the Rate Calculator Builder and enforce if Location, Industry and Risk
Classification fields are mandatory.
Go to **Setup > Custom Settings > Time2Pay Rate Calculator Configurator > Manage > New**
Select or deselect the various checkboxes as per your requirements for this Org:
* **Enable Custom Cost 1/2/3/4 Employ Cost**
* These four fields define if Custom Cost 1/2/3/4 Employment Cost is enabled for the Rate
Calculator. If False, the custom employment cost cannot be used within Rate Calculators.
* **Enable Custom Post Cost 1/2/3/4 Employ Cost**
* These four fields define if Custom Post Cost 1/2/3/4 Employment Cost is enabled for the
Rate Calculator. If False, the custom employment cost cannot be used within the Rate
Calculators.
* **Enable Industry**
* Defines if Industries are enabled for the Rate Calculator. If False, fields relating to the
Industry will not be visible on the Rate Calculator and its related components.
* **Enable Insurance Employment Cost**
* Defines if Insurance Employment Cost is enabled for the Rate Calculator. If False, fields
relating to the cost will not be visible on the Rate Calculator and its related components.
* **Enable Invoice Tax**
* Defines if Invoice Tax is enabled for the Rate Calculator. If False, fields relating to the
Invoice Tax will not be visible on the Rate Calculator and its related components.
* **Enable Payroll Tax Employment Cost**
* Defines if Payroll Tax Employment Cost is enabled for the Rate Calculator. If False, fields
relating to the cost will not be visible on the Rate Calculator and its related components.
* **Enable Risk Classification**
* Defines if Risk Classifications are enabled for the Rate Calculator. If False, fields relating to
the Risk Classification will not be visible on the Rate Calculator and its related
components.
* **Enable Superannuation Employment Cost**
* Defines if Superannuation Employment Cost is enabled for the Rate Calculator. If False,
fields relating to Superannuation will not be visible on the Rate Calculator and its related
components.
* **Enable WHS Employment Cost**
* Defines if WHS Employment Cost is enabled for the Rate Calculator. If False, fields
relating to WHS will not be visible on the Rate Calculator and its related components.
* **Enable WorkCover Employment Cost**
* Defines if WorkCover Employment Cost is enabled for the Rate Calculator. If False, fields
relating to WorkCover cost will not be visible on the Rate Calculator and its related
components.
* **Enable add Mark Up / Margin function**
* Defines if the ability to add multiple Mark Up / Margin Rates to a Rate Calculator is
enabled. If False, there will only be 1 set of Mark Up / Margin Rates applied.
* **Enable location**
* To be used to enable Location.
* **Industry Required?**
* Defines if the Industry field on the Rate Calculator will be a mandatory field.
* **Location Required?**
* To be used to define if location is a mandatory field.
* **Risk Classification Required?**
* Defines if the Risk Classification field on the Rate Calculator is a mandatory field.
* **Enable Award Classification and Levels**
* Defines if the Award Classifications and Levels are configurable on a Rate Calculator org
wide.
* **Enable Custom Pay Rate 1/2**
* To be used for custom Rate Calculator calculations outside of the standard product.
### Time2Pay Update Rates Settings Custom Setting (Optional)
This requirement only needs to be completed if the option to lock and disable the Invoice Rates fields so
Users cannot edit them via the Update Rates functionality is required. If not, this item can be skipped.
Go to **Setup** - **Custom Setting > Time2Pay Update Rates Settings > Manage > New** (the top button)
1. Check the **Disable Invoice Rates** checkbox.
2. Click **Save** .
## 7. Page Layout Assignments
### Standard Page Layouts
The following updates to Page Layout Assignments are required in your Org. These Page Layouts do not
come automatically assigned in the Package.
Go to **Setup** - **Object Manager** - enter Object Name > **Page Layouts** - select **Page Layout Assignments**
button > **Edit Assignments**
1. Navigate to the Record Type as listed in the table below.
2. Select either the **Record Type** listed below if applying to all Profiles, or select the individual
**Profiles** to apply to underneath the specific Record Type list below\..
3. Select the **Layout Name** listed below.
4. Select **Save** .
These must be updated on the following Profiles as a minimum:
* System Administrator Profile
* 2cloudnine Payroll User Profile
* any other custom profiles created for ‘back office’ users.
If this Org is used in isolation for 2cloudnine Products, you can change all Profiles for the mentioned
record types, but be aware that there may be further changes advised in the next section specific for the
Employee or Community User Profiles.
| Object | Record Type | Layout Name |
| ------------------------- | ---------------------------- | ----------------------------------------------------------------------- |
| Account | Payment Entity | TC9EAU Account - Payment Entity |
| Employment Cost | Payroll Tax | Time2Pay Employment Cost - Non Superannuation |
| Employment Cost | Workcover | Time2Pay Employment Cost - Non Superannuation |
| Employment Cost Exception | Pay Code Custom Cost 1 | Pay Code Employment Cost Layout |
| Employment Cost Exception | Pay Code Custom Cost 2 | Pay Code Employment Cost Layout |
| Employment Cost Exception | Pay Code Custom Cost 3 | Pay Code Employment Cost Layout |
| Employment Cost Exception | Pay Code Custom Cost 4 | Pay Code Employment Cost Layout |
| Employment Cost Exception | Pay Code Insurance | Pay Code Employment Cost Layout |
| Employment Cost Exception | Pay Code Post Custom Cost 1 | Pay Code Employment Cost Layout |
| Employment Cost Exception | Pay Code Post Custom Cost 2 | Pay Code Employment Cost Layout |
| Employment Cost Exception | Pay Code Post Custom Cost 3 | Pay Code Employment Cost Layout |
| Employment Cost Exception | Pay Code Post Custom Cost 4 | Pay Code Employment Cost Layout |
| Employment Cost Exception | Pay Code Superannuation | Pay Code Employment Cost Layout |
| Employment Cost Exception | Pay Code WHS | Pay Code Employment Cost Layout |
| Employment Cost Exception | Pay Code WorkCover | Pay Code Employment Cost Layout |
| Employment Cost Item | Payroll Tax | Time2Pay Employment Cost Item |
| Employment Cost Item | Workcover | Time2Pay Employment Cost Item |
| Pay Code | Allowance | Time2Pay Pay Code - Allowance |
| Pay Code | Deduction | Time2Pay Pay Code - Deduction |
| Pay Code | ETP | Time2Pay Pay Code - ETP |
| Pay Code | Expense | Time2Pay Pay Code - Expense |
| Pay Code | FBT | Time2Pay Pay Code - FBT |
| Pay Code | Lump Sum | Time2Pay Pay Code - Lump Sum |
| Pay Code | Payment | Time2Pay Pay Code - Payment |
| Pay Transaction | Allowance | Time2Pay Pay Transaction - Payment |
| Pay Transaction | Deduction | Time2Pay Pay Transaction - Deduction |
| Pay Transaction | ETP | Time2Pay Pay Transaction - Lump Sum, ETP and FBT |
| Pay Transaction | Expense | Time2Pay Pay Transaction - Expense |
| Pay Transaction | FBT | Time2Pay Pay Transaction - Lump Sum, ETP and FBT |
| Pay Transaction | FEE | Time2Pay Pay Transaction - Invoiceable Fee - Perm and Temp to Perm Fees |
| Pay Transaction | Leave Accrual | Time2Pay Pay Transaction - Leave Accrual |
| Pay Transaction | Lump Sum | Time2Pay Pay Transaction - Lump Sum, ETP and FBT |
| Pay Transaction | Payment | Time2Pay Pay Transaction - Payment |
| Pay Transaction | Timesheet Entry | Time2Pay Pay Transaction - Payment |
| Pay Transaction | Withholding - ETP PAYG | Time2Pay Pay Transaction - Withholding - PAYG, ETP PAYG, HELP and SFSS |
| Pay Transaction | Withholding - GST | Time2Pay Pay Transaction - Withholding - PAYG, ETP PAYG, HELP and SFSS |
| Pay Transaction | Withholding - PAYG | Time2Pay Pay Transaction - Withholding - PAYG, ETP PAYG, HELP and SFSS |
| Pay Transaction | Withholding - STSL | Time2Pay Pay Transaction - Withholding - PAYG, ETP PAYG, HELP and SFSS |
| Pay Transaction | Withholding - Superannuation | Time2Pay Pay Transaction - Withholding - Superannuation |
| Schedule | Pay Schedule | TC9ET Pay Schedule Layout |
| Superannuation Fund | APRA and RSA Funds | TC9EAU APRA and RSA Fund Layout |
| Superannuation Fund | Self Managed | TC9EAU Self Managed Superannuation Fund Layout |
| Template Group | Assignment Rates | Time2Pay Template Group - Timesheet Assignment Rates Templates |
| Template Group | Invoice Settings | Time2Pay Template Group - Invoice Settings |
**IMPORTANT:** Please make sure to delete the following Page Layouts that are installed as standard (if an
existing Org or an Org has ‘on Platform’ programs, ensure they are not in use before deleting.)
| Object | Record Type |
| ------- | -------------- |
| Account | Account Layout |
| Contact | Contact Layout |
### Employee Community Page Layouts
The following are the objects that are required to have the page layout assigned to the Community
Profile and/or whatever Profile the client is using for their Community. In general, this will be the
‘Customer Community User’.
| Object | Record Type | Layout Name |
| ------------------- | ------------------------ | --------------------------------------------- |
| Payee Withholding | AU GST | TC9EC AU GST Payee Withholding Layout |
| Payee Withholding | AU PAYG | TC9EC AU PAYG Payee Withholding Layout |
| Payee Withholding | AU Super | TC9EC AU SUPER Payee Withholding Layout |
| Payment Detail | Payee Australian Bank | TC9EC Payment Detail Payee AUS Bank Layout |
| Payment Detail | Payee Cash | TC9EC Payment Detail Payee Cash Layout |
| Payment Detail | Payee Cheque | TC9EC Payment Detail Payee Cheque Layout |
| Payment Detail | Payee International Bank | TC9EC Payment Detail Payee INTL Bank Layout |
| Contact | Employee | TC9ET Employee Layout |
| Contact | Client | TC9ET Client Layout |
| Expense Claim | All | TC9EC Expense Claim |
| Superannuation Fund | APRA and RSA Funds | TC9EC APRA and RSA Fund Layout |
| Superannuation Fund | Self Managed | TC9EC Self Managed Superannuation Fund Layout |
| Payee Leave Event | Leave Cash Out | TC9EC Payee Leave Event Layout |
| Payee Leave Event | Leave Credit | TC9EC Payee Leave Event Layout |
| Payee Leave Event | Leave Take | TC9EC Payee Leave Event Layout |
| Pay Advice | Contractor Invoice | TC9EC Pay Advice Layout |
| Pay Advice | Pay Advice | TC9EC Pay Advice Layout |
### Compact Layouts
The following are the Compact Layout Assignments that should be manually assigned to ensure the
Time2Pay fields are available in the Compact Layouts.
Go to each **Object > Compact Layouts > Compact Layout Assignment >** **Edit Assignment**, from here you
need to select the compact layout required to be assigned per record type, and then select **Save** .
| Object | Record Type | Layout Name |
| ----------------- | ---------------------- | ------------------------ |
| Account | Payment Entity | Account - Payment Entity |
| Contact | Employee | TC9PR Employee Layout |
| Payee Leave Event | Primary Compact Layout | TC9P Payee Leave Event |
| Payee Leave Event | Leave Cash Out | TC9P Payee Leave Event |
### Search Layouts & List View Button Layouts
### Employment Cost Item
Go to **Setup > Object Manager > Employment Cost Item > List View Button Layout**
1. Select **Edit**, and untick the checkbox **New \[New]** .
2. Click **Save** .
### Invoice (Conditionally Compulsory)
The following Search Layout needs to be manually updated to add some helpful buttons to the List
Views. Please note any custom buttons added by this method will NOT be visible from the ‘Recently
Viewed’ List View. They will ONLY display when using any of the other List Views.
Go to **Setup > Object Manager** **> Invoice > Search Layouts**
1. On the **Default Layout**, select the drop-down in the far right and select **Edit** .
2. In the Custom Buttons, highlight the **Create Invoice PDF, Delete Invoices** and the **Send Invoice**
**Email** underneath the Available Buttons.
3. Select the **Add >** button, so they appear in the Selected Buttons list and click **Save** .
Go to **Setup > Object Manager > Invoice > List View Button Layout > List View**
1. Select the down arrow in the far right and select > **Edit**
2. In the Available Buttons, highlight the **Create Invoice PDF**, **Send Invoice Email** and the **Delete**
**Invoices** underneath the Available Buttons.
3. Select the **Add >** button, so they appear in the Selected Buttons list.
4. Click **Save** .
### Lodgements
A List View button is available on the Lodgement AU List View which allows Users to multi-select STP
Lodgements from the List View and check/retrieve the ATO-processing Status for the selected records,
simultaneously. To complete this configuration, follow the steps below:
Go to **Setup > Object Manager > Lodgement AU > List View Button Layout**
1. In the List View, select the dropdown arrow at the far right and select **Edit** .
2. Add the new Get STP Response (Bulk) button to the right hand colum.
3. Select the **Save** button.
### Timesheet
To send notifications in bulk to Employees or Approvers based on their Timesheets being of the same
status, this can be done using the Notifications Manager button available in the Timesheets Search:
Go to **Setup > Object Manager** - **Timesheet > Search Layouts**
1. On the **Default Layout,** select the drop-down in the far right and select > **Edit**
2. Move the 2 Available Buttons **Update Failed to Ready** and **Notification Manager** to the Selected
Buttons column.
3. Click **Save** .
Go to **Setup > Object Manager > Timesheet > List View Button Layout > List View**
1. Select the down arrow in the far right and select > **Edit**
2. Move the 2 Available Buttons **Updated Failed to Ready** and **Notification Manager** to the Selected
Buttons column.
3. Click **Save** .
### Minimum Pay Rate
Go To **Setup > Object Manager >** **Minimum Pay Rate** **> Search Layouts**
1. On the **Default Layout,** select the drop arrow down in the far right and select > **Edit**
2. In the Custom Buttons section, move the **Update Rates** button to the Selected Buttons list.
3. Click **Save** .
### Template Group
Go To **Setup > Object Manager >** **Template Group** **> Search Layouts**
1. On the **Default Layout,** select the drop arrow down in the far right and select > **Edit**
2. In the Custom Buttons section, move the **Update Rates** button to the Selected Buttons list
3. Click **Save** .
Go to **Setup > Object Manager > Template Group > List View Button Layout > List View**
1. Select the down arrow in the far right and select > **Edit**
2. In the Available Buttons, highlight the **Update Rates** underneath the Available Buttons.
3. Select the **Add >** button, so it appears in the Selected Buttons list.
4. Click **Save** .
### Lightning Record Pages
### Family & Domestic Violence Leave
Users are required to create a Clone of the existing Lightning page that you can modify. You cannot edit
Lightning Pages included in the package directly.
Go to **Setup > User Interface > Lightning App Builder > TC9PR Payee Lightning Record Page > Clone**
1. When the page has fully loaded, browse to the Leave Tab and maximise into the sub-tabs.
2. After the View Balances sub-tab, insert a new Sub-tab by clicking on the **Add Tab** link in the far
right underneath the existing tabs listed.
3. Select the new Details sub-tab on the far right, update the Tab Label picklist by selecting **Custom**,
and then populate the Custom Label to **F\&DV Leave**, and select the **Done** button.
4. Click on the empty space within the newly added page, and then where it says Add
Component(s) here, click on it.
5. Now click on **Flow** under Components on the left-hand side.
6. A Page > Flow section would open up to the right of the screen.
7. Select **FMDV Leave** in the field called Flow on the page.
8. On it, you will be asked to enter the Flow Variables.
9. Select the ‘pass record ID into this variable’ checkbox to automatically populate the Variable with
\{!Record.Id}.
10. Click **Save** and click **Activate.**
11. Ensure to assign the page as the Org Default page.
### Assignment
With the Work Schedule functionality, a new Lighting Web Component showing the Work Schedule
Calendar on an Assignment has been provided.
Go To **Setup > Object Manager > Assignment > Lightning Record Pages**
1. Select the Assignment Master Lightning Record Page and click the **Clone** button, which opens
up the Lightning App Builder.
2. Move the following Lightning Web Component onto the page from the section of **Custom - Managed**
* Assignment Work Schedule Calendar (tc9\_pr.Assignment\_Work\_Schedule\_Calendar)
3. Apply any component visibility settings / filters required and click **Save** .
4. In the popup, click **Activate** to ensure the page will be used.
5. Ensure to assign the page as the Default page by scrolling down and clicking on the **Assign as**
**Org Default** button.
### Account
To ensure the most suitable related lists are being displayed on Account records, Users should ensure the
correct Account Lightning Record Page is assigned:
1. Go to **Accounts** Object.
2. Select any Account Record.
3. Go to **Cogs > Edit Page** .
4. Select the **Pages** tab, then select **Open Page**, and select **Confirm** in the Leave Page confirmation
screen.
5. Select the radio button for **Account Master Lightning Record Page**, and select the **Open** button.
6. Click the **Activation** button, and then select the **Assign as Org Default** button.
7. Select **Desktop and phone** radio button, select **Next**, and then select **Save** .
8. Select the **left arrow** to return to the Account record to see the new Lightning page assigned.
### Contact
To ensure the most suitable related lists are being displayed on the Contact Lightning Page, Users should
ensure the correct Contact Lightning Record Page is assigned as an Org Default:
1. Go to **Contacts** Object.
2. Select and Contact Record.
3. Go to **Cogs > Edit Page** .
4. Select the **Pages** tab, then select **Open Page**, and select **Confirm** in the Leave Page confirmation
screen.
5. Select the radio button for **Contact Master Lightning Record Page**, and select the **Open** button.
6. Click the **Activation** button, and then select the **Assign as Org Default** button.
7. Select **Desktop and phone** radio button, select **Next**, and then select **Save** .
8. Select the **left arrow** to return to the Contact record to see the new Lightning page assigned.
## 8. Update Buttons, Links and Actions
### Interpretation Rule
The New, Edit, and Clone buttons used on the Interpretation Rule object are configured to open the
Interpretation Builder. Follow the below instructions to ensure the correct configuration is applied.
Go To **Setup > Object Manager > Interpretation Rule** **> Buttons, Links and Actions**
1. Navigate to the **New** button and select **Edit** .
2. Ensure that the following values are defined:
* Salesforce Classic Override = No override (use default)
* Lightning Experience Override = Lighting Component **tc9\_et:AwardBuilder**
* Mobile Override = Lighting Component **tc9\_et:AwardBuilder**
* Skip record type selection page = False
3. Click the **Save** button.
4. Navigate to **Buttons, Links and Actions >** **Edit** button and select **Edit** .
5. Ensure that the following values are defined:
* Salesforce Classic Override = No override (use default)
* Lightning Experience Override = Lighting Component **tc9\_et:AwardBuilder**
* Mobile Override = Lighting Component **tc9\_et:AwardBuilder**
6. Click the **Save** button.
7. Navigate to **Buttons, Links and Actions >** **Clone** button and select **Edit** .
8. Ensure that the following values are defined:
* Salesforce Classic Override = Visualforce page **CloneInterpretations**
### \[tc9\_et:CloneInterpretation]
9. Click **Save** .
## 9. Update Standard Page Layouts
To add or remove fields and to make other updates to the Page Layouts, you can use the steps provided
in this section. If you see Page Layouts with similar names and are not sure about which Page Layout is
assigned to a particular Record Type, you can click on the Page Layout Assignment button to see the
Page Layouts that are assigned to different Record Types.
### Account (Invoice Entity)
Go to **Setup > Object Manager > Account** **> Page Layouts**
1. Select a Page Layout that is used for the Invoice Entity record type.
2. Add the following field to the Page Layout:
1. ABN Lookup
3. Click **Save** .
### Account (Payment Entity)
Go to **Setup > Object Manager > Account** **> Page Layouts**
1. Select the Page Layout used for the Payment Entity Record Type.
2. Add the following fields to the Page Layout:
1. Include PAYG in Payment Files?
2. PAYG Payment Reference Number (PRN)
3. PAYG Bank Branch Code
4. PAYG Bank Account Number
5. PAYG Bank Account Name
3. Click Save.
### Assignment (Conditionally Compulsory)
This requirement only needs to be completed if the option to use the functionality is taken. If not, this
item can be skipped.
Go to **Setup > Object Manager > Assignment > Page Layouts**
1. Select the Page Layout that is used for Temp record types.
2. Remove the following button(s) from the page layout:
1. Create Timesheets (Custom Button).
3. Add the following fields to the Page Layout:
1. Assignment Rate Template Group Pay Rate
2. Assignment Rate Template Group Invoice Rate
3. Assignment Rate Matching Mode
4. Add the following Lightning Action Link/Button (under Mobile & Lightning Actions) to the page
layout:
1. Create Timesheets (Quick Action)
5. Click **Save** .
6. Select the Page Layout named TC9PR Assignment Layout.
7. Add the following fields to the Page Layout:
1. Expense Claim Receipts Mandatory
2. Public Holiday Calendar
8. Click **Save** .
### Assignment (Optional)
To use the Invoice Setting Template Groups functionality, the below fields below must be added to
existing Page Layouts:
Go to **Setup > Object Manager > Assignment > Page Layouts > Page Layout Assignment**
1. Select the Page Layout used for the Temp Record Type.
2. Add the following fields to the Page Layout:
1. Invoice Settings Template Group
3. Click **Save** .
4. Repeat the above updates for the Perm Record Type.
**Contact**
Go to **Setup > Object Manager > Contact > Page Layouts**
1. Select a page layout that is used for any Employee record type.
2. Add the following field to the Page Layout:
* Primary Payee Record
3. Click **Save** .
4. Repeat for the remaining page layouts used by the Employee record types.
### Leave Rule (Optional)
Go to **Setup** - **Object Manager** - **Leave Rule** - **Page Layouts**
1. Select **TC9PR Leave Rule Layout** .
2. Add the following fields to the Page Layout:
1. Public Holiday Not Worked Leave Rule
3. Click **Save** .
4. Repeat steps 2-3 for any other Custom Page Layouts used in your Org.
### Invoice Settings (Optional)
To use the Invoice Setting Template Groups functionality, the below fields below must be added to
existing Page Layouts:
Go to **Setup** - **Object Manager** - **Invoice Setting** - **Page Layouts** - **Page Layout Assignment**
1. Select the Page Layout used for the Payroll Items Record Type.
2. Add the following fields to the Page Layout:
1. Template Group
2. Invoice Group By
3. Click **Save** .
4. Repeat the above updates to the Page Layouts used for all remaining Record Types.
### Interpretation Breakpoint
Go to **Setup** - **Object Manager** - **Interpretation Breakpoint** - **Page Layouts** - **Page Layout Assignments**
1. Select the Page Layout used for the Allowance Breakpoint Record Type.
2. Add the following fields to the Page Layout under the Pay Code field:
1. Saturday Pay Code
2. Sunday Pay Code
3. Click **Save** .
4. Go to **Record Types > Allowance Breakpoint** .
5. Select **Edit** next to Start Threshold Type.
6. Select Standard Hours in Available Values, and select the **Add >** button to move it to the Selected
Values section.
7. Click **Save** .
### Payee
Go to **Setup > Object Manager > Payee > Page Layouts**
1. Select any page layout that is used for the Payee record type.
2. Add the following button to the Page Layout (available from the Mobile & Lightning Actions
section):
1. Super Stapling (tc9\_eau\_Super\_Stapling\_\_c).
(Actions from the Mobile & Lightning Actions section can only be added under the
Salesforce Mobile and Lightning Experience Actions heading.)
3. Click **Save** .
### Payee Leave Event (Optional)
Go to **Setup** - **Object Manager** - **Payee Leave Event** - **Page Layouts** - **Page Layout Assignments**
1. Select the Page Layout assigned to the Record Type of Leave Takes.
2. Add the following fields to the Page Layout for all Users:
1. Start Time
2. End Time
3. Timesheet Entry Last Updated
4. Timesheet Entry Creation Status
5. Source Leave Event
3. Click **Save** .
4. Repeat steps 2 and 3 for any remaining Page Layouts assigned to the Leave Takes Record Type.
### Rate Calculator
Go to **Setup** - **Object Manager >** **Rate Calculator** - **Page Layouts**
1. Select any Page Layout used for the Employee Specific or No Employee Record Types.
2. Add the following field(s) to the Page Layout:
1. Account
2. Previous Assignment Award Level
3. Previous Assignment Industry
4. Previous Assignment Location
5. Previous Assignment Rate Calculator ID
6. Previous Assignment Risk Classification
3. Click **Save** .
4. Repeat steps for all page layouts that are used for the Employee Specific and No Employee record
types.
### Schedule
Go to **Setup > Object Manager > Schedule > Page Layouts > Page Layout Assignments**
1. Select the Page Layout assigned to the Pay Schedule Record Type.
2. Add the following fields to the Page Layout, at the bottom right of the Contact Information
section:
1. Maximum Earlier Pay Calendar Periods
3. Click **Save** .
### Timesheet Entry
Go to **Setup > Object Manager > Timesheet Entry > Page Layouts**
1. Select **Time2Pay Timesheet Entry** .
2. Add the following fields to the Page Layout under the field Payee Leave Event:
1. Source Leave Event
3. Click **Save** .
### User
Go to **Setup > Object Manager > User** - **User Page Layouts**
1. Select **User Layout** .
2. Add the following field to the Page Layout:
1. Enable Rate Calc Overriding
2. Enable Rate Calc Line Rounding
3. Click **Save.**
## 10. Field History Tracking
Field History Tracking provides a detailed history of specified fields on each object, when they are initially
populated or amended, providing the time/date the change was made and which User made the change.
This is an imperative stage of the configuration of an Org, as it only starts tracking the individual fields
once defined for those fields. Therefore, if you realise you want to start reviewing the history of a field, it
only commences reporting from that point in time and does not provide any retrospective tracking prior
to the field being set.
**Account**
Go to **Setup > Object Manager > Account > Fields & Relationships**
1. You will then be presented with 2 columns of all fields within the Account object that can be set
to True to commence the Field History Tracking on them.
2. Please select up to 60 different fields as you would like to have tracked on all Account records.
3. When satisfied, please select the **Save** button.
**Important Notes**
*(All Record Types)*
*This covers all Record Types per object (i.e. Payment Entity, Invoice Entity, and Client, as well as any*
*Custom Record Types you might have). Users should set these to assist with any UAT issues that*
*might occur, as well as to provide as much information as possible to provide history when issues*
*need resolving by the Customer Success Team.*
**Contact**
Go to **Setup > Object Manager > Contact > Fields & Relationships**
1. Select the Set History Tracking button.
2. Select the Enable Contact History checkbox to True.
You will then be presented with 2 columns of all fields within the Contact object that can be set to True to
commence the Field History Tracking on them.
3. Please select up to 60 different field checkboxes as you would like to have tracked on all Account
records.
4. When satisfied, please select the Save button.
### Updating ALL remaining 2cloudnine Objects
Field History Tracking is something that comes packaged on all the 2cloudnine Custom Packaged
objects (i.e. Payee, Assignment, Pay Batch, Lodgements, etc). It is however encouraged to always review
the Field History Tracking that is applied to each Object upon installation to ensure all fields benefit from
tracking to assist with possible issues in the future.
It is also recommended whenever you create new Custom Fields, you also update the Field History
Tracking to include any changes made to the new field moving forward. To update additional fields on
any Object to commence Field History Tracking, follow the below steps:
Go to **Setup > Object Manager**
1. Select the object that you wish to update the Fields to be tracked (i.e. Payee Pay Batch).
2. Select **Fields & Relationships** .
3. Select the **Set History Tracking** button.
4. Select the individual checkboxes to true for the fields that you wish to commence tracking the
field history of.
5. When you have selected all the fields that you require, select **Save** .
It is often better to track more fields than necessary, than fewer fields, so if you have 40 fields on an
Object but you are only tracking 25, it is recommended you include all to ensure if there are automations
that are impacting the behaviour of this Object, you’ll be able to see when this is occurring.
**Important Notes**
*(Field History Tracking)*
*If you require more than the allocated 60 fields to be tracked on any object, please contact the*
*2cloudnine Product Team, and they will advise if this can be changed.*
## 11. Creation of Custom Permission Sets
Permission Sets enable users to be on various Profiles and to manage their access via the Permission
Sets, instead of directly on their Profile. Access provided by a Profile is applied to all Users on that Profile.
By using a Permission Set, it allows flexibility for the permission to be opened up at various times when a
specific User requires access.
### Standard Objects Permission Set (Compulsory)
This step provides access to the standard Salesforce objects which are unable to be included in the
2cloudnine packaged Permission Sets. To resolve the issue, it is required System Administrators create a
new Permission Set, which we suggest is called 2cloudnine Standard Objects Permission Set.
Go To **Setup > Permission Sets**
1. Click the **New** button.
2. Enter a suitable name in the **Label** field, such as 2cloudnine Standard Objects Permission Set,
and select **Enter** to auto-populate the API Name.
3. If you want to enter a **Description** you can.
4. To ensure the Permission Set is available now, skip the checkbox **Session Activation Required** .
5. It is recommended to skip the step of assigning a Licence so this Permission Set can be assigned
to all 2cloudnine Users regardless of the Licence they are on. If the Permission Set is associated
with a specific License, it can only include the permission and settings entitled by that License.
6. Click the **Save** button.
7. Select **Object Settings** .
8. Select **Accounts**, and in the next screen select the **Edit** button.
9. Enable the **Read** and **Edit** checkboxes in the Objects Permissions section.
10. Click the **Save** button.
11. Return to the **Object Settings**, select **Contacts**, and in the next screen select the **Edit** button.
12. Enable the **Read**, **Create**, and **Edit** checkboxes in the Objects Permissions section.
13. Click the **Save** button.
14. Return to the **Object Setting**, select **Documents**, and in the next screen select the **Edit** button.
15. Enable the **Read** checkboxes in the Object Permissions section.
16. Click the **Save** button.
17. Go to the **Cogs** (where Setup is located) > **Developer Console**, select **Query Editor**, paste the
following text without any hard returns, etc:
### SELECT Id, Name, PermissionsEmailTemplateManagement FROM PermissionSet WHERE Name
### = 'X2cloudnine\_Standard\_Objects\_Permission\_Set'
18. Click the **Execute** button.
19. Within the Dev Console query results, double-click on the data column for
**PermissionsEmailTemplateManagement** .
20. Tick the box that appears to set the value to **True** .
21. Click the **Save Rows** button at the bottom of the dev console screen.
**IMPORTANT:** This Permission Set should be assigned to 2cloudnine Payroll Users and to Employee
Community Users who have the Employee Community Permission Set assigned to them.
Due to the Edit access provided to Contacts, this Permission Set is not able to be assigned to Guest Site
Users. If Guest Site Users require other access provided within this Permission Set, System Administrators
are encouraged to Clone this Permission Set and remove the Edit access from the Contacts Object. Then
this new Cloned Permission Set can be assigned to Guest Users. Details of how to do this are provided
later within this Configuration Guide.
### 2cloudnine View Setup Permission Set (Compulsory)
With recent changes to security features introduced, it has been discovered there are times when a
non-System Admin User is unable to create an Invoice PDF, or issues with Pay Advice PDFs such as the
error “sObject type 'Apex page' is not supported”. To get around this, we have a temporary solution to
provide access to View Setup and Configuration in a Permission Set.
Go To **Setup > Permission Sets**
1. Click the **New** button.
2. Enter a suitable name in the Label field, such as **2cloudnine View Setup Permission Set**, and
select **Enter** to auto-populate the API Name.
3. If you want to enter a **Description** you can.
4. To ensure the Permission Set is available now, skip the checkbox **Session Activation Required** .
5. Skip the step of assigning a Licence to this Permission Set so it can be assigned to Users
regardless of the Licence they are on. If it’s associated with a specific License, it can only include
the permission and settings entitled by that License.
6. Click on the **Save** button.
7. Select **System Permissions** .
8. Select the Edit button, and scroll down to select the checkbox **View Setup and Configuration**
(this may also tick the checkbox for View Roles and Role Hierarchy) .
9. Click the **Save** button.
When assigning this Permission Set, it can not be assigned to anyone with the Customer Community
Licence.
### Pay Transactions Permission Set (Compulsory)
With recent changes to security features introduced in this release, Pay Batch processing will NOT be
completed successfully without providing the 2cloudnine Payroll Users with access to the Pay
Transactions Object and all fields, including any custom fields created specifically within an Org. To
resolve the issue, it is required System Administrators create a new Permission Set, which we suggest is
called 2cloudnine Pay Transactions Permission Set.
Go To **Setup > Permission Sets**
1. Click the **New** button.
2. Enter a suitable name in the Label field, such as **2cloudnine Pay Transactions Permission Set**,
and select **Enter** to auto-populate the API Name.
3. If you want to enter a **Description** you can.
4. To ensure the Permission Set is available now, skip the checkbox **Session Activation Required** .
5. It is recommended to skip the step of assigning a Licence so this Permission Set can be assigned
to all 2cloudnine Users regardless of the Licence they are on. If the Permission Set is associated
with a specific License, it can only include the permission and settings entitled by that License.
6. Click on the **Save** button.
7. Select **Object Settings** .
8. Select **Pay Transactions**, and in the next screen select the **Edit** button.
9. Enable the **Read** checkbox in the Objects Permissions section.
10. Enable the **Read** Access checkbox in the Field Permission section, next to all the fields.
11. Click the **Save** button.
**IMPORTANT:** System Administrators are reminded when you create any new Custom Fields on the Pay
Transactions object, these fields require Read Access added to this new 2cloudnine Pay Transactions
Permission Set, to ensure Users required to calculate Pay Batches are able to continue to do so.
### Rate Calculator Permission Set (Conditionally Compulsory)
This configuration is only Required for those Orgs where Rate Calculator functionality is being used. A
new Object called Account to Rate Calculator Junction has been recently introduced within the Rate
Calculator functionality, and as this has a Master-Detail relationship, the Permission Set is unable to
provide the required access to this within the packaged Rate Calculator Permission Set. To resolve this,
System Administrators are recommended to clone the Permission Set and provide the extra access to the
cloned Permission Set.
Go To **Setup > Permission Sets**
1. Open the Permission Set called **2cloudnine Rate Calculator** .
2. Click on the **Clone** button.
3. Update the name in the **Label** field to include “Clone” or “V2” at the end.
4. Click on the **Save** button.
5. Open the cloned Permission Set created above (i.e. **2cloudnine Rate Calculator Clone)** .
6. Select **Object Settings** .
7. Select **Account to Rate Calculator Junction**, and in the next screen select the **Edit** button.
8. Enable the **Modify All** checkbox in the Objects Permissions section.
9. Enable the **Modify All** checkbox in the Field Permission section, next to all the fields.
10. Click the **Save** button.
### Online URL Invoices (Conditionally Compulsory)
### Permission Sets to view online URL invoices
This provides READ access to the Objects, Fields, and Record Types needed to view the online Invoices via
the online url (used for External Users). 2cloudnine will maintain this Permission Set to provide required
access when using the Packaged Invoice Templates.
**Important Notes**
*(Invoice Templates)*
*This is the minimum requirement for the packaged Invoice Templates. If an Org is using custom*
*Visualforce pages, any additional access will need to be added specifically in that Org.*
Go to **Setup > Permission Sets**
1. Select the **2cloudnine Time2Pay Standard Online Invoice Permission Set** and click **Clone** .
2. You will need to rename it ‘2cloudnine Time2Pay Standard Online Invoice2’ (or Clone, or
something similar), and then select **Save** .
3. Select **Object Settings**, and select **Documents** .
4. Select the **Edit** button and then select the **Read** checkbox in the Object Permissions Settings.
5. Select the **Save** button.
6. Select **Object Settings**, and select **Accounts** .
7. Select the **Edit** button and then select the **Read** checkbox.
8. Scroll down to the Fields section, then select the following fields:
1. **Billing Address**
2. **Fax (optional)**
3. **Phone**
9. Select the **Save** button.
10. Select **Object Settings**, and select **Contacts** .
11. Select the **Edit** button, and then select the **Read** checkbox in the Object Permissions Settings.
12. Scroll down to the Fields section, then select the following field:
13. **Mailing Address**
14. Select the **Save** button.
The newly created Permission Set will need to be applied to the Guest User account when the Invoice
Site gets created, which has been covered later in this document.
### 2cloudnine Front Office User Permission Set (Conditionally Compulsory)
With recent changes to security features introduced, when there is Front Office software that creates
Contacts, issues are experienced without access to our fields and triggers when saving a Contact,
Account, etc. To resolve the issue, it is required to create a new Permission Set, which we suggest is called
2cloudnine Front Office User Permission Set (or Non 2c9 User Permission Set).
Go To **Setup > Permission Sets**
1. Click the **New** button.
2. Enter a suitable name in the Label field, such as **2cloudnine Front Office User Permission Set**,
and select **Enter** to auto-populate the API Name.
3. If you want to enter a **Description** you can.
4. To ensure the Permission Set is available now, skip the checkbox **Session Activation Required** .
5. It is recommended to skip the step of assigning a Licence so this Permission Set can be assigned
to all 2cloudnine Users regardless of the Licence they are on. If the Permission Set is associated
with a specific License, it can only include the permission and settings entitled by that License.
6. Click on the **Save** button.
7. Select **Custom Metadata Types** .
8. Select **Edit**, and in the Available Custom Metadata Types select the **tc9\_pr.Community Settings** .
9. Click the **Save** button.
## 12. Employee Community Plus Permission Set (only if using Community Plus Licences)
This configuration is only Required for those Orgs where the Licences for Community Users are
Community Plus Licences and the below configuration steps should only be completed if the Licences
match. The Community package now includes a new Community Plus Permission Set available for use
exclusively with Users assigned to Community Plus Licences. More details are provided below.
### Clone the Permission Set
You must clone this Permission Set to assign permission to Account, Contact Objects, and also to
Documents. To clone this Permission Set, follow the steps below:
Go To **Setup > Permission Sets**
1. Open the new Permission Set called **2cloudnine Employee Community Plus Permission Set** .
2. Click on the **Clone** button.
3. Update the name in the **Label** field to include “Clone” or “V2” at the end.
4. Click on the **Save** button.
### Update Permission Set
On the Cloned Permission Set, please amend the Object Settings to have **Read** access to the following
objects:
* Accounts
* Documents
Please amend the Object Settings to have **Read**, **Create,** and **Edit** access to the following objects:
* Contacts
### Update Permission Set assignments
The next step is to assign these two Permission Sets (original and cloned) to all the required Community
Plus Licence Users. If the Users are already created you can assign the Permissions Sets individually to
the Users. If you have Community Users being created automatically from the Payee or the creation of
Timesheets, ensure you have the suitable automation to apply these 2 Permission Sets to the required
Users upon creation of their records.
### Create Public Group and Sharing Rules
The 2cloudnine Employee Plus Permission Set will also require Sharing Rules configured within the Org,
which will be the responsibility of the Implementation Consultant. 2cloudnine will NOT be providing
these instructions at present. This is required as this Licence type does not allow the use of Modify All and
View All at an Object Level, the use of Public Groups and Sharing Rules will be required to achieve this.
For more information, please refer to this Salesforce article on setting up Public Groups and Sharing
Rules:
[https://help.salesforce.com/s/articleView?id=sf.managing\_the\_sharing\_model.htm\&language=en\_US\&typ](https://help.salesforce.com/s/articleView?id=sf.managing_the_sharing_model.htm\&language=en_US\&type=5)
[e=5](https://help.salesforce.com/s/articleView?id=sf.managing_the_sharing_model.htm\&language=en_US\&type=5)
**IMPORTANT:** The use of Community Plus Licences is not encouraged for widespread use within
2cloudnine Payroll as the current design of the 2cloudnine Community Components is based on a
Customer Community Licence only at this stage.
## 13. Scheduled Jobs
### Schedule Job Scripts - Packaged
Below are the different scripts required to set up the various scheduled jobs. To run scripts:
1. Copy the block of scripts to be run.
2. Select **Setup > Developer Console**
3. **Debug > Open Execute Anonymous Window**
4. Delete or comment out any code that is in the window
5. Paste in the copied script from below.
6. Click the **Execute** button.
7. Repeat the above steps until the last script.
### Script for Pay Advice PDF Creation & Email
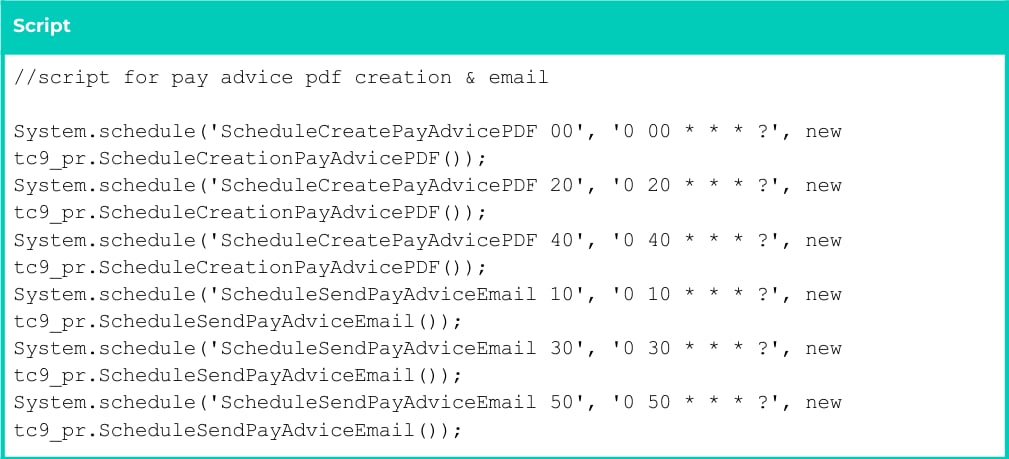 ### Script for Transaction Processing
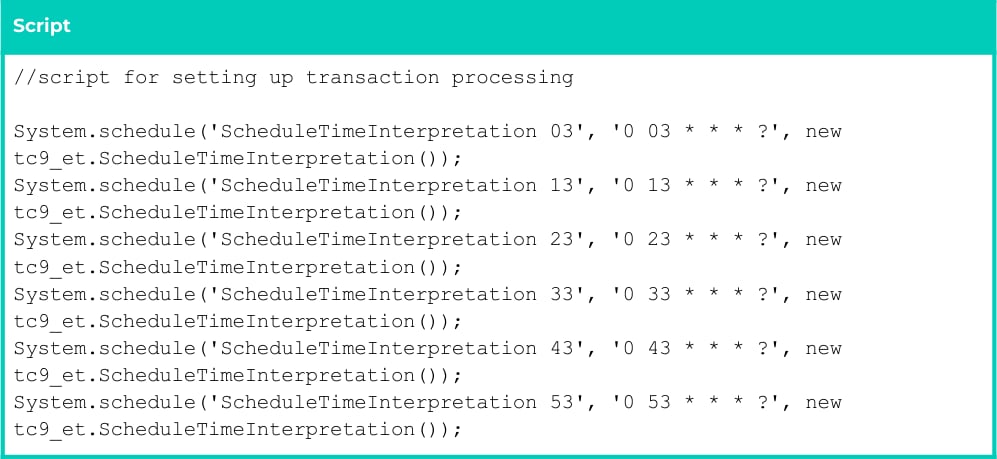 ### Script for Invoice attachment creation
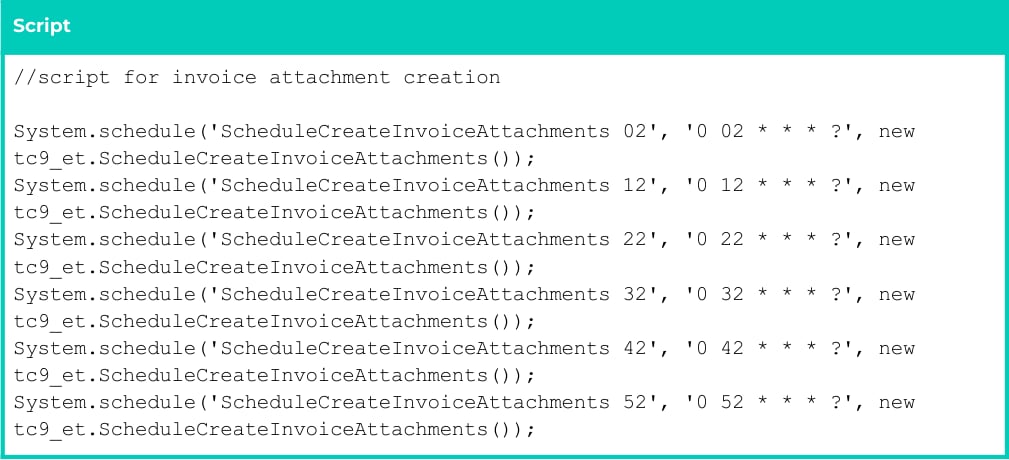 ### Script for Timesheet creation
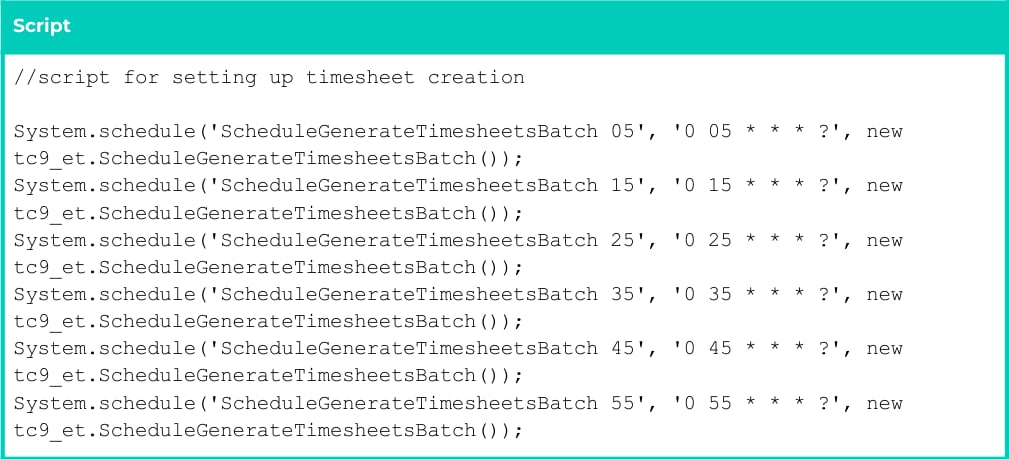 ### Script for MPR Automation
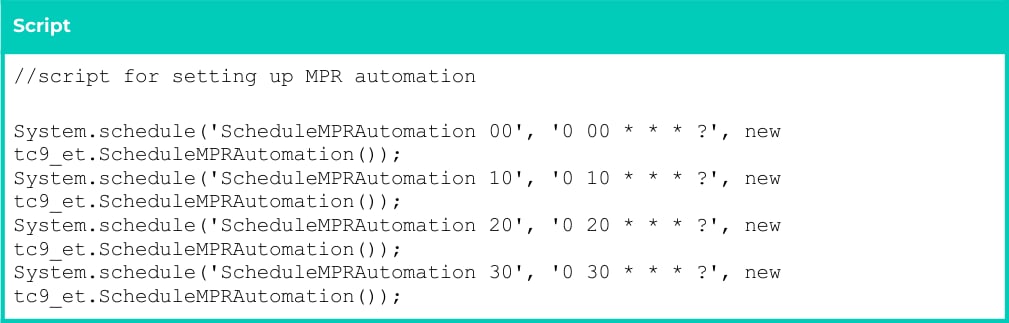 ```
System.schedule('ScheduleMPRAutomation 40', '0 40 * * * ?', new
tc9_et.ScheduleMPRAutomation());
System.schedule('ScheduleMPRAutomation 50', '0 50 * * * ?', new
tc9_et.ScheduleMPRAutomation());
```
### Script for Auto Community User creation from Payee object
Please note that this script is ONLY required if the Org is being configured for the Auto Creation of
Community Users from the Payee Object. If the Org requires the Payees to be created from the creation
of Timesheets against the first Temp Assignment, then this scheduled job is not required.
```
System.schedule('ScheduleMPRAutomation 40', '0 40 * * * ?', new
tc9_et.ScheduleMPRAutomation());
System.schedule('ScheduleMPRAutomation 50', '0 50 * * * ?', new
tc9_et.ScheduleMPRAutomation());
```
### Script for Auto Community User creation from Payee object
Please note that this script is ONLY required if the Org is being configured for the Auto Creation of
Community Users from the Payee Object. If the Org requires the Payees to be created from the creation
of Timesheets against the first Temp Assignment, then this scheduled job is not required.
 ### Script to enable automated generation of Rate Calculator Lines
Please note that this script is ONLY required if the Org is being configured for Rate Calculator. If Rate
Calculators are not being used, then this scheduled job is not required.
### Script to enable automated generation of Rate Calculator Lines
Please note that this script is ONLY required if the Org is being configured for Rate Calculator. If Rate
Calculators are not being used, then this scheduled job is not required.
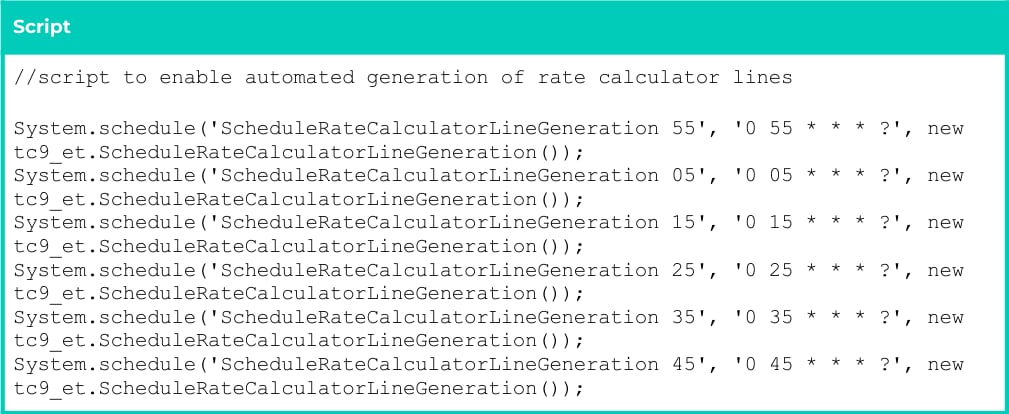 You can also manually enforce the bulk job to run once by using the following script. This will force the
job to run a single time only and should only be used for scenarios that warrant the job being run outside
of the standard schedule.
### Script to enable Automatic Status Update
This scheduled job works in combination with the Custom Setting called Automatic Status Update, to
determine which objects should have the statuses updated, and is required in ALL Orgs. This also
performs the additional task of reviewing any Override TC9P Validation checkboxes that are checked, and
will uncheck them so all validations will resume to launch as per the standard Product design.
The following table shows how the system decides which Status will be applicable:
| Condition | Status | | |
| ----------------------------------------------------------------------- | -------- | --------------------- | ------ |
| Effective Date > TODAY && Status != On Hold | Pending | | |
| Effective Date \<= TODAY && Status != On Hold && ( Expiry Date = null | | Expiry Date > TODAY ) | Active |
| Effective Date \<= Today && Expiry Date \< TODAY && Status != ‘On Hold’ | Inactive | | |
| Status = ‘On Hold’ | On Hold | | |
### Delete Payroll Logs (Debug and Batch)
The Apex Class to delete Payroll Logs is not done by a script, but is done by allowing users to set it at the
best times for each particular Org, taking into account other processes that are running at certain times:
Go to **Setup** - **Apex Classes**
1. Click **Schedule Apex** button
2. Enter the following details:
* **Job Name:** ScheduleDeletePayrollLogs
* **Apex Class:** ScheduleDeletePayrollLogs
* **Frequency:** Weekly
* **Recurs every week on:** Wednesday (can be any day of the week)
* **Start:** Keep existing date
* **End:** Add 40 years to end i.e. 01/01/2064
* **Preferred Start Time:** Can be anytime of the day
3. Click **Save** .
If the scheduled job is hitting any Salesforce limits, the number of records that are deleted with every
execution of the Scheduled Apex Job can be further tailored down by updating the ‘Payroll Batch Size’
setting:
Go to **Setup > Custom Metadata Types >** select **Manage Records** next to Payroll Batch Size custom
Metadata record and the Batch Size Setting
1. View the sizes of the batch size, and determine if any need reducing.
2. Click **Edit** next to the Payroll Batch size record you wish to amend.
**Note**
* It is recommended not to schedule the ‘Delete Payroll logs’ job to run on weekends as it can
result in losing records which might not have been reviewed yet.
* If the ‘Debug Retention Days’ field in the Payroll Configuration Custom Setting is left BLANK, a
debug header is created for the scheduled job with the description:
*‘Debug Retention Days value is not defined in the Payroll Configuration custom setting’.*
* If the ‘Batch Log Retention Days’ field in the Payroll Configuration Custom Setting is left BLANK, a
debug header is created for the scheduled job with the description:
*‘Batch Log Retention Days value is not defined in the Payroll Configuration custom setting.’*
### Verify the scripts are scheduled correctly
To confirm the Apex Jobs are set up correctly:
Go to **Setup** - **Scheduled Jobs** .
You can also manually enforce the bulk job to run once by using the following script. This will force the
job to run a single time only and should only be used for scenarios that warrant the job being run outside
of the standard schedule.
### Script to enable Automatic Status Update
This scheduled job works in combination with the Custom Setting called Automatic Status Update, to
determine which objects should have the statuses updated, and is required in ALL Orgs. This also
performs the additional task of reviewing any Override TC9P Validation checkboxes that are checked, and
will uncheck them so all validations will resume to launch as per the standard Product design.
The following table shows how the system decides which Status will be applicable:
| Condition | Status | | |
| ----------------------------------------------------------------------- | -------- | --------------------- | ------ |
| Effective Date > TODAY && Status != On Hold | Pending | | |
| Effective Date \<= TODAY && Status != On Hold && ( Expiry Date = null | | Expiry Date > TODAY ) | Active |
| Effective Date \<= Today && Expiry Date \< TODAY && Status != ‘On Hold’ | Inactive | | |
| Status = ‘On Hold’ | On Hold | | |
### Delete Payroll Logs (Debug and Batch)
The Apex Class to delete Payroll Logs is not done by a script, but is done by allowing users to set it at the
best times for each particular Org, taking into account other processes that are running at certain times:
Go to **Setup** - **Apex Classes**
1. Click **Schedule Apex** button
2. Enter the following details:
* **Job Name:** ScheduleDeletePayrollLogs
* **Apex Class:** ScheduleDeletePayrollLogs
* **Frequency:** Weekly
* **Recurs every week on:** Wednesday (can be any day of the week)
* **Start:** Keep existing date
* **End:** Add 40 years to end i.e. 01/01/2064
* **Preferred Start Time:** Can be anytime of the day
3. Click **Save** .
If the scheduled job is hitting any Salesforce limits, the number of records that are deleted with every
execution of the Scheduled Apex Job can be further tailored down by updating the ‘Payroll Batch Size’
setting:
Go to **Setup > Custom Metadata Types >** select **Manage Records** next to Payroll Batch Size custom
Metadata record and the Batch Size Setting
1. View the sizes of the batch size, and determine if any need reducing.
2. Click **Edit** next to the Payroll Batch size record you wish to amend.
**Note**
* It is recommended not to schedule the ‘Delete Payroll logs’ job to run on weekends as it can
result in losing records which might not have been reviewed yet.
* If the ‘Debug Retention Days’ field in the Payroll Configuration Custom Setting is left BLANK, a
debug header is created for the scheduled job with the description:
*‘Debug Retention Days value is not defined in the Payroll Configuration custom setting’.*
* If the ‘Batch Log Retention Days’ field in the Payroll Configuration Custom Setting is left BLANK, a
debug header is created for the scheduled job with the description:
*‘Batch Log Retention Days value is not defined in the Payroll Configuration custom setting.’*
### Verify the scripts are scheduled correctly
To confirm the Apex Jobs are set up correctly:
Go to **Setup** - **Scheduled Jobs** .
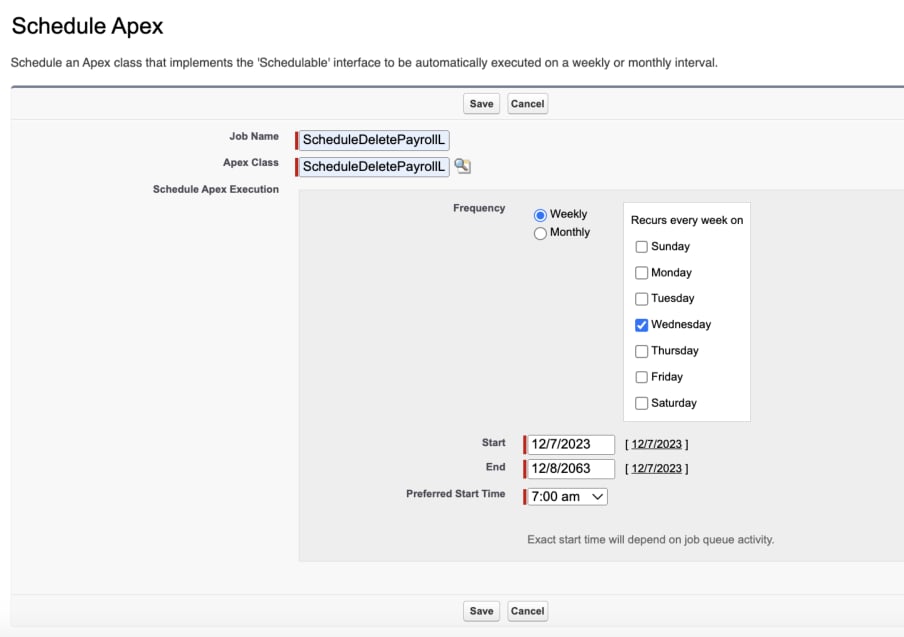 ## 14. Employee Community Builder
### Creating the Experience
Experience Builder and Community Templates for self-service let you create, brand, and publish a custom
Community that looks great on any mobile device. Choose a template to quickly start your Community,
and then style the pages to match the Client’s branding. For more information on the Salesforce
[Community Builder, click here](https://help.salesforce.com/articleView?id=community_designer_overview.htm\&type=5) and read through the help guides from Salesforce.
## 14. Employee Community Builder
### Creating the Experience
Experience Builder and Community Templates for self-service let you create, brand, and publish a custom
Community that looks great on any mobile device. Choose a template to quickly start your Community,
and then style the pages to match the Client’s branding. For more information on the Salesforce
[Community Builder, click here](https://help.salesforce.com/articleView?id=community_designer_overview.htm\&type=5) and read through the help guides from Salesforce.
 Go to **Setup > Digital Experiences > All Sites**
5. Select the **New** button.
6. Scroll down and select the Build Your Own (Aura) template.
7. Select the **Get Started** button.
8. Enter a **Name** for the community (it can be changed later), then select the **Create** button.
**IMPORTANT:** Please be patient as Salesforce creates the Experience in line with the selections made for
the Template, etc. Do not proceed to the next step until the screen stops and takes you to the
Workspaces page, where you can select the **Builder** and **Administrator** widgets to continue with the
configuration of the Community.
Go to **Setup > Digital Experiences > All Sites**
5. Select the **New** button.
6. Scroll down and select the Build Your Own (Aura) template.
7. Select the **Get Started** button.
8. Enter a **Name** for the community (it can be changed later), then select the **Create** button.
**IMPORTANT:** Please be patient as Salesforce creates the Experience in line with the selections made for
the Template, etc. Do not proceed to the next step until the screen stops and takes you to the
Workspaces page, where you can select the **Builder** and **Administrator** widgets to continue with the
configuration of the Community.
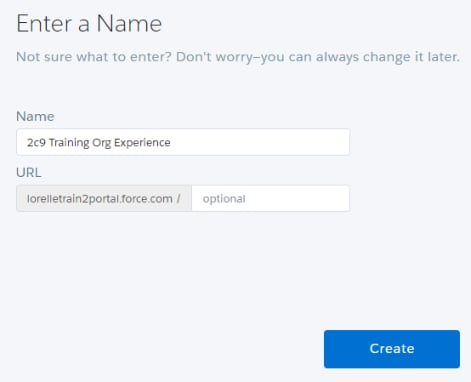 ### Activate the Community
Access the Community
Go to **Setup > Digital Experiences > All Sites > Workspaces** (next to the relevant Community site) **>**
**Administration** **> Settings**
1. Click **Activate Community** .
2. Click **OK** in the pop-up message.
### Community General Security Settings
Go To **Setup > Digital Experiences > All Sites > Workspaces > Administration > Preferences**
* Show nicknames = FALSE
* Optimize cached images for guest users on all devices = TRUE
* Give guest users access to public Chatter API requests = FALSE
* Let guest users view asset files and CMS content available to the site = FALSE
* Enable direct messages = FALSE
* Allow discussion threads = FALSE
* See other members of this site = TRUE
* If this is unable to be set to true, you will need to enable Site User Visibility in your
org's sharing settings. (Go to **Setup > Security > Sharing Settings >** Click **Edit** in
the Organization-Wide Defaults area and scroll down to the bottom **>** select the
checkbox for **Site User Visibility.** )
* Let guest users see other members of this site = TRUE
* Use a profile-based layout for Lightning Knowledge search results = FALSE
* Allow topic filtering for Lightning Knowledge search results = FALSE
* Gather Customer Insights data = FALSE
* Use Custom Visualforce error pages = TRUE
* (\*\* this is the most important setting. It eliminates the risk of users being able to
hack through the error message to access the back end of the product \*\*)
* Show all settings in Workspaces = FALSE
1. Click **Save** .
2. Click on the ‘wrench’ icon and select **Builder.**
3. Select the Settings icon (Cogs wheel) on the left panel.
4. On the **General >** Please ensure under **Public Access**, the checkbox for **Guest users can see and interact with the site without logging in = False.**
### Enable Community Security Members
Employee Community Permission Set & Customer Community User profile need to be added to the
Community Members to enable the security of this Permission Set.
Go to **Setup > Digital Experiences > All Sites > Workspaces > Administration > Members**
1. Under **Select Profiles,** change the picklist to **Customer,** select and add the **Customer**
**Community User** to the right.
2. Under **Select Permission Sets,** select and add **Employee Community Permission Set** to the
right.
3. Click **Save** .
**Note:** Please ensure all Users who should have access to use the **Login to Experience as User** from the
Contact record are actioned above, including the System Administrator Profile and the 2cloudnine Payroll
User Profile. However, please be aware they will be sent the standard ‘Welcome to Experience: login’
email instead of the default Salesforce one. To ensure they receive the correct email, you could
temporarily turn off the Send Welcome Email as shown below, create the user, and then after they have
been created, you could then turn this on again.
Go to **Setup > Digital Experiences > All Sites > Workspaces > Administration > Emails**
### Activate the Community
Access the Community
Go to **Setup > Digital Experiences > All Sites > Workspaces** (next to the relevant Community site) **>**
**Administration** **> Settings**
1. Click **Activate Community** .
2. Click **OK** in the pop-up message.
### Community General Security Settings
Go To **Setup > Digital Experiences > All Sites > Workspaces > Administration > Preferences**
* Show nicknames = FALSE
* Optimize cached images for guest users on all devices = TRUE
* Give guest users access to public Chatter API requests = FALSE
* Let guest users view asset files and CMS content available to the site = FALSE
* Enable direct messages = FALSE
* Allow discussion threads = FALSE
* See other members of this site = TRUE
* If this is unable to be set to true, you will need to enable Site User Visibility in your
org's sharing settings. (Go to **Setup > Security > Sharing Settings >** Click **Edit** in
the Organization-Wide Defaults area and scroll down to the bottom **>** select the
checkbox for **Site User Visibility.** )
* Let guest users see other members of this site = TRUE
* Use a profile-based layout for Lightning Knowledge search results = FALSE
* Allow topic filtering for Lightning Knowledge search results = FALSE
* Gather Customer Insights data = FALSE
* Use Custom Visualforce error pages = TRUE
* (\*\* this is the most important setting. It eliminates the risk of users being able to
hack through the error message to access the back end of the product \*\*)
* Show all settings in Workspaces = FALSE
1. Click **Save** .
2. Click on the ‘wrench’ icon and select **Builder.**
3. Select the Settings icon (Cogs wheel) on the left panel.
4. On the **General >** Please ensure under **Public Access**, the checkbox for **Guest users can see and interact with the site without logging in = False.**
### Enable Community Security Members
Employee Community Permission Set & Customer Community User profile need to be added to the
Community Members to enable the security of this Permission Set.
Go to **Setup > Digital Experiences > All Sites > Workspaces > Administration > Members**
1. Under **Select Profiles,** change the picklist to **Customer,** select and add the **Customer**
**Community User** to the right.
2. Under **Select Permission Sets,** select and add **Employee Community Permission Set** to the
right.
3. Click **Save** .
**Note:** Please ensure all Users who should have access to use the **Login to Experience as User** from the
Contact record are actioned above, including the System Administrator Profile and the 2cloudnine Payroll
User Profile. However, please be aware they will be sent the standard ‘Welcome to Experience: login’
email instead of the default Salesforce one. To ensure they receive the correct email, you could
temporarily turn off the Send Welcome Email as shown below, create the user, and then after they have
been created, you could then turn this on again.
Go to **Setup > Digital Experiences > All Sites > Workspaces > Administration > Emails**
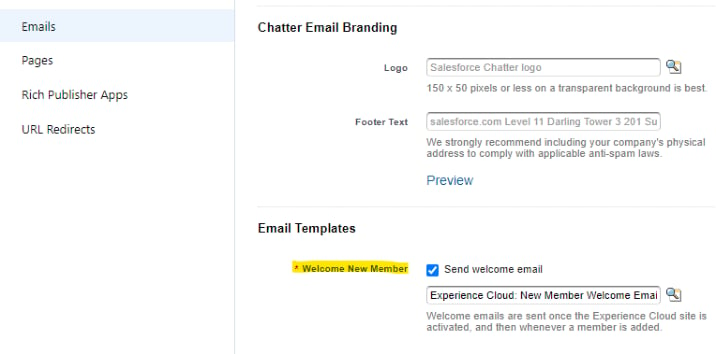 ### Community Login Page Branding/Styling
Go to **Setup > Digital Experiences > All Sites > Workspaces > Administration > Login & Registration**
1. Select Logo File and navigate to the image you want to use, as provided by the Client. Please
ensure the logo is 100 KB max, otherwise it will not be saved. Please also ensure it does not
exceed the maximum size of 250 pixels wide by 125 pixels high. If the logo exceeds those
dimensions, the logo will not save, and the default Salesforce logo will remain.
2. For **Background Colour**, populate with #FFFFFF (white) or another color if that suits the branding
better.
3. Click **Save** .
### Community Emails & Templates
### Email & Templates
This is where you can change the email sender name, email address, and email templates, however, the
defaults which are applied are normally suitable for all orgs. The below steps will advise how you can
amend the standard default configuration of emails to something else required:
Go to **Setup > Digital Experiences > All Sites > Workspaces > Administration > Emails**
1. Please ensure the **From Name** field is pre-populated. To change it to a different name, enter a
**From Name**, a name that the Client will determine.
2. Please ensure the **Email Address** field is populated with an Org-wide email address that is
verified and belongs to the Client and can NOT be a 2cloudnine email address.
3. Scroll down to the **Email Templates** section.
4. Please ensure the **Welcome New Member** is pre-selected and the Email Template is: **Experience**
**Cloud: New Member Welcome Email** (html).
If it’s not selected, click the magnifying glass icon. From the drop-down list, go to the folder
**Unfiled Public Classic Email Templates** . Select email template **Experience Cloud: New Member**
**Welcome Email** (html).
5. NOTE - you can also change the standard templates for **Forgot Password** and **Change Password**
following the same steps.
6. Click **Save** .
### Customise/Create Your Own Email Templates
You can create and modify custom email templates for standard community functions such as Welcome
Email, Forgot Password, and Change Password. This provides tailored branding and styling inline with the
client's branding and their icons. If using a custom template instead of editing an existing one, you must
follow the previous steps above to change the Administration Settings to use the new email template.
For more information on how to set up Email Templates, refer to this link regarding Salesforce Email
[Templates https://help.salesforce.com/s/articleView?id=sf.email\_templates\_lightning\_parent.htm\&type=5](https://help.salesforce.com/s/articleView?id=sf.email_templates_lightning_parent.htm\&type=5)
### Apply Theme, Colours, and Logo to the Community
Go to **Setup > Digital Experiences > All Sites > Builder**
### Set the Theme
1. Click the **paintbrush symbol** on the left-hand side
2. Click **Change Theme**
3. Select the **Theme =** Jepson (This is the recommended theme for 2cloudnine Experiences to work
correctly).
4. Click **Activate Theme** .
### Set the colour palette for the Theme
1. Click the **paintbrush symbol** on the left-hand side.
2. Click **Colours.**
3. At the bottom, click **Generate Palette from Image.**
4. Upload the client logo to set the colour theme.
5. To make any changes to the colour palette generated by the system automatically, select the
colour circle next to the labels in the General section, and then use the various colour options
available to change a specific colour as required.
6. To save the changes, Users can select the **X** to close, or **\<** to return to the previous setting menu.
### Add the Client logo
1. Click the **paintbrush symbol** on the left-hand side.
2. Click **Images** .
3. Click **Clear** under the Company Logo.
4. Click the space with the upload image to upload the Company Logo you wish to use.
5. To save the changes, Users can just select the X to close this setting, or the \< to return to the
previous setting menu.
Before exiting, to save the changes so far and to make them available in the Community, it is
recommended to select **Publish** in the top right hand corner, or you can do so after completing a future
step. A confirmation message will display confirming you wish to Publish the Community. Select the
**Publish** button and when the confirmation window pops up, select the **Got It** button.
### Creating Community Pages
Go to **Setup > Digital Experiences > All Sites** - **Builder**
### Create a Page
1. Select the drop-down arrow next to the cogs (Page Properties).
2. At the bottom, click the blue **+ New Page** button.
3. Select the **Standard Page** option.
4. Click the blue **+ New Blank Page** button.
5. Select 1 full-width column.
6. Click **Next** .
7. Enter a name for the Employee’s Personal Details page e.g. My Profile.
8. Click **Create** .
9. Click the **lightning symbol** on the left-hand panel **(Components)** .
10. Drag the **Emp Comm Profile** onto the Content section of the page.
11. Repeat Steps 1-6 above.
12. Enter a name for the Timesheet page e.g. Timesheets.
13. Click **Create** .
14. Click the **lightning symbol** on the left-hand panel **(Components)** .
15. Drag the **Emp Comm Timesheets** onto the Content section of the page
16. Repeat Steps 1-6 above.
17. Enter a name for the Expense page e.g. Expenses Claims.
18. Click **Create** .
19. Click the **lightning symbol** on the left-hand panel **(Components)** .
20. Drag the **Emp Comm Expenses** onto the Content section of the page.
21. Repeat Steps 1-6 above.
22. Enter a name for the Pay Advices page e.g. Pay Advices.
23. Click **Create** .
24. Click the **lightning symbol** on the left-hand panel **(Components)** .
25. Drag the **Emp Comm Pay Advice** onto the Content section of the page.
26. Repeat Steps 1-6 above.
27. Enter a name for the Leave page e.g. Leave.
28. Click **Create** .
29. Click the **lightning symbol** on the left-hand panel **(Components).**
30. Drag the **Emp Comm Leave** onto the Content section of the page.
**Important Notes**
*(Page Names)*
*Ensure the name of all pages are a minimum of 4 characters, to eliminate some known Salesforce*
*issues experienced with Community pages that are only 3 characters in length.*
Before exiting, to save the changes so far and to make them available in the Community, it is
recommended to select **Publish** in the top right-hand corner, or you can do so after completing a future
step. A confirmation message will display confirming you wish to Publish the Community. Select the
**Publish** button and when the confirmation window pops up select the **Got It** button.
### Community Navigation Menu
Add your pages to the navigation Menu:
1. Click the **Theme Navigation Menu** next to the logo (will be the box at the top that currently only
displays Home).
2. The Theme Navigation menu will pop up to the right.
3. Slide the **Max Items to Display** to be increased, recommended 9 items or more.
4. Click the **Edit Default Navigation** button.
5. Click **+ Add Menu Item** button.
6. Enter the Name for this tab (i.e. My Profile).
7. Type = **Site Page**
8. Page = **My Profile**
9. Click **+ Add Menu Item** button.
10. Enter the Name for the tab (i.e. Timesheets).
11. Type = **Site Page**
12. Page = **Timesheets**
13. Click **+ Add Menu Item** button.
14. Enter the Name for the tab(i.e. Expense Claims).
15. Type = **Site Page**
16. Page = **Expense Claims**
17. Click **+ Add Menu Item** button.
18. Enter the Name for this tab (i.e. Pay Advices).
19. Type = **Site Page**
20. Page = **Pay Advices**
21. Click **+ Add Menu Item** button.
22. Enter the Name for the tab (i.e. Leave).
23. Type = **Site Page**
24. Page = **Leave**
25. Review the order of the tabs to ensure they are as needed (top to bottom appears left to right)
and click and drag the left individual blocks to the preferred order.
26. Click **Save Menu.**
step. A confirmation message will display confirming you wish to Publish the Community. Select the
**Publish** button and when the confirmation window pops up, select the **Got It** button.
### Alternate Community Navigation Menu (Optional)
### Community Login Page Branding/Styling
Go to **Setup > Digital Experiences > All Sites > Workspaces > Administration > Login & Registration**
1. Select Logo File and navigate to the image you want to use, as provided by the Client. Please
ensure the logo is 100 KB max, otherwise it will not be saved. Please also ensure it does not
exceed the maximum size of 250 pixels wide by 125 pixels high. If the logo exceeds those
dimensions, the logo will not save, and the default Salesforce logo will remain.
2. For **Background Colour**, populate with #FFFFFF (white) or another color if that suits the branding
better.
3. Click **Save** .
### Community Emails & Templates
### Email & Templates
This is where you can change the email sender name, email address, and email templates, however, the
defaults which are applied are normally suitable for all orgs. The below steps will advise how you can
amend the standard default configuration of emails to something else required:
Go to **Setup > Digital Experiences > All Sites > Workspaces > Administration > Emails**
1. Please ensure the **From Name** field is pre-populated. To change it to a different name, enter a
**From Name**, a name that the Client will determine.
2. Please ensure the **Email Address** field is populated with an Org-wide email address that is
verified and belongs to the Client and can NOT be a 2cloudnine email address.
3. Scroll down to the **Email Templates** section.
4. Please ensure the **Welcome New Member** is pre-selected and the Email Template is: **Experience**
**Cloud: New Member Welcome Email** (html).
If it’s not selected, click the magnifying glass icon. From the drop-down list, go to the folder
**Unfiled Public Classic Email Templates** . Select email template **Experience Cloud: New Member**
**Welcome Email** (html).
5. NOTE - you can also change the standard templates for **Forgot Password** and **Change Password**
following the same steps.
6. Click **Save** .
### Customise/Create Your Own Email Templates
You can create and modify custom email templates for standard community functions such as Welcome
Email, Forgot Password, and Change Password. This provides tailored branding and styling inline with the
client's branding and their icons. If using a custom template instead of editing an existing one, you must
follow the previous steps above to change the Administration Settings to use the new email template.
For more information on how to set up Email Templates, refer to this link regarding Salesforce Email
[Templates https://help.salesforce.com/s/articleView?id=sf.email\_templates\_lightning\_parent.htm\&type=5](https://help.salesforce.com/s/articleView?id=sf.email_templates_lightning_parent.htm\&type=5)
### Apply Theme, Colours, and Logo to the Community
Go to **Setup > Digital Experiences > All Sites > Builder**
### Set the Theme
1. Click the **paintbrush symbol** on the left-hand side
2. Click **Change Theme**
3. Select the **Theme =** Jepson (This is the recommended theme for 2cloudnine Experiences to work
correctly).
4. Click **Activate Theme** .
### Set the colour palette for the Theme
1. Click the **paintbrush symbol** on the left-hand side.
2. Click **Colours.**
3. At the bottom, click **Generate Palette from Image.**
4. Upload the client logo to set the colour theme.
5. To make any changes to the colour palette generated by the system automatically, select the
colour circle next to the labels in the General section, and then use the various colour options
available to change a specific colour as required.
6. To save the changes, Users can select the **X** to close, or **\<** to return to the previous setting menu.
### Add the Client logo
1. Click the **paintbrush symbol** on the left-hand side.
2. Click **Images** .
3. Click **Clear** under the Company Logo.
4. Click the space with the upload image to upload the Company Logo you wish to use.
5. To save the changes, Users can just select the X to close this setting, or the \< to return to the
previous setting menu.
Before exiting, to save the changes so far and to make them available in the Community, it is
recommended to select **Publish** in the top right hand corner, or you can do so after completing a future
step. A confirmation message will display confirming you wish to Publish the Community. Select the
**Publish** button and when the confirmation window pops up, select the **Got It** button.
### Creating Community Pages
Go to **Setup > Digital Experiences > All Sites** - **Builder**
### Create a Page
1. Select the drop-down arrow next to the cogs (Page Properties).
2. At the bottom, click the blue **+ New Page** button.
3. Select the **Standard Page** option.
4. Click the blue **+ New Blank Page** button.
5. Select 1 full-width column.
6. Click **Next** .
7. Enter a name for the Employee’s Personal Details page e.g. My Profile.
8. Click **Create** .
9. Click the **lightning symbol** on the left-hand panel **(Components)** .
10. Drag the **Emp Comm Profile** onto the Content section of the page.
11. Repeat Steps 1-6 above.
12. Enter a name for the Timesheet page e.g. Timesheets.
13. Click **Create** .
14. Click the **lightning symbol** on the left-hand panel **(Components)** .
15. Drag the **Emp Comm Timesheets** onto the Content section of the page
16. Repeat Steps 1-6 above.
17. Enter a name for the Expense page e.g. Expenses Claims.
18. Click **Create** .
19. Click the **lightning symbol** on the left-hand panel **(Components)** .
20. Drag the **Emp Comm Expenses** onto the Content section of the page.
21. Repeat Steps 1-6 above.
22. Enter a name for the Pay Advices page e.g. Pay Advices.
23. Click **Create** .
24. Click the **lightning symbol** on the left-hand panel **(Components)** .
25. Drag the **Emp Comm Pay Advice** onto the Content section of the page.
26. Repeat Steps 1-6 above.
27. Enter a name for the Leave page e.g. Leave.
28. Click **Create** .
29. Click the **lightning symbol** on the left-hand panel **(Components).**
30. Drag the **Emp Comm Leave** onto the Content section of the page.
**Important Notes**
*(Page Names)*
*Ensure the name of all pages are a minimum of 4 characters, to eliminate some known Salesforce*
*issues experienced with Community pages that are only 3 characters in length.*
Before exiting, to save the changes so far and to make them available in the Community, it is
recommended to select **Publish** in the top right-hand corner, or you can do so after completing a future
step. A confirmation message will display confirming you wish to Publish the Community. Select the
**Publish** button and when the confirmation window pops up select the **Got It** button.
### Community Navigation Menu
Add your pages to the navigation Menu:
1. Click the **Theme Navigation Menu** next to the logo (will be the box at the top that currently only
displays Home).
2. The Theme Navigation menu will pop up to the right.
3. Slide the **Max Items to Display** to be increased, recommended 9 items or more.
4. Click the **Edit Default Navigation** button.
5. Click **+ Add Menu Item** button.
6. Enter the Name for this tab (i.e. My Profile).
7. Type = **Site Page**
8. Page = **My Profile**
9. Click **+ Add Menu Item** button.
10. Enter the Name for the tab (i.e. Timesheets).
11. Type = **Site Page**
12. Page = **Timesheets**
13. Click **+ Add Menu Item** button.
14. Enter the Name for the tab(i.e. Expense Claims).
15. Type = **Site Page**
16. Page = **Expense Claims**
17. Click **+ Add Menu Item** button.
18. Enter the Name for this tab (i.e. Pay Advices).
19. Type = **Site Page**
20. Page = **Pay Advices**
21. Click **+ Add Menu Item** button.
22. Enter the Name for the tab (i.e. Leave).
23. Type = **Site Page**
24. Page = **Leave**
25. Review the order of the tabs to ensure they are as needed (top to bottom appears left to right)
and click and drag the left individual blocks to the preferred order.
26. Click **Save Menu.**
step. A confirmation message will display confirming you wish to Publish the Community. Select the
**Publish** button and when the confirmation window pops up, select the **Got It** button.
### Alternate Community Navigation Menu (Optional)
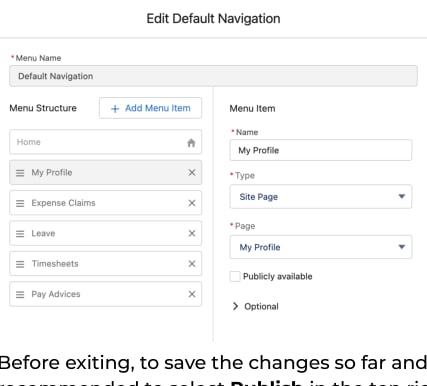 The following are OPTIONAL variations, they should NOT be used unless confirmed with the lead
Consultant or Product Team because you are moving away from the design and validations that have
been implemented in the ‘EMP COMM PROFILE’ LWC Component. You can group any of the menu items
into a drop down menu only for approved Communities. Again, please confirm with the Lead Consultant
or Product Team before creating a menu structure in line with the following:
1. Create a Header Menu Item under the Theme Navigation Menu > Edit Default Navigation.
1. Click **+ Add Menu Item** .
2. Enter the Name.
3. Type = Menu Label.
2. Drag the menu items you want in the drop down list underneath the new menu item.
Before exiting, to save the changes so far and to make them available in the Community, it is
recommended to select **Publish** in the top right hand corner, or you can do so after completing a future
step. A confirmation message will display confirming you wish to Publish the Community. Select the
**Publish** button and when the confirmation window pops up, select the **Got It** button.
The following are OPTIONAL variations, they should NOT be used unless confirmed with the lead
Consultant or Product Team because you are moving away from the design and validations that have
been implemented in the ‘EMP COMM PROFILE’ LWC Component. You can group any of the menu items
into a drop down menu only for approved Communities. Again, please confirm with the Lead Consultant
or Product Team before creating a menu structure in line with the following:
1. Create a Header Menu Item under the Theme Navigation Menu > Edit Default Navigation.
1. Click **+ Add Menu Item** .
2. Enter the Name.
3. Type = Menu Label.
2. Drag the menu items you want in the drop down list underneath the new menu item.
Before exiting, to save the changes so far and to make them available in the Community, it is
recommended to select **Publish** in the top right hand corner, or you can do so after completing a future
step. A confirmation message will display confirming you wish to Publish the Community. Select the
**Publish** button and when the confirmation window pops up, select the **Got It** button.
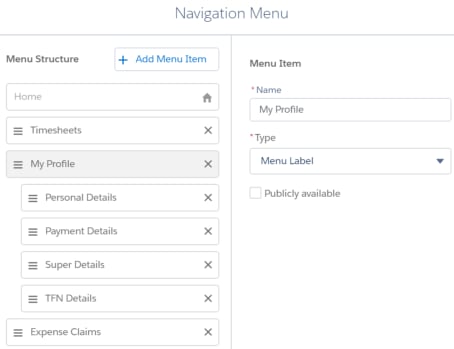 ### Activate Timesheet Leave Events, Expenses, and Allowances in Community (Optional)
It is important to remember to turn on Timesheet Leave Events, Timesheet Expenses, and Timesheet
Allowances in the Community if you require Employees to select these within a Timesheet.
### Activate Timesheet Leave Events, Expenses, and Allowances in Community (Optional)
It is important to remember to turn on Timesheet Leave Events, Timesheet Expenses, and Timesheet
Allowances in the Community if you require Employees to select these within a Timesheet.
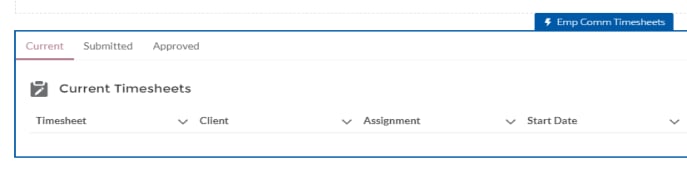 1. Select the **Timesheets** Tab within the Community Builder.
2. Select inside the LWC of Timesheets.
3. This will display a pop up window in the top right hand corner with picklist values of ‘Yes’ and ‘No’
for the following topics:
1. Enable Leave Events for a Timesheet?
2. Enable Expenses for a Timesheet?
3. Enable Timesheet Allowances for a Timesheet?
4. Select Yes or No for each field as per the Org requirements.
Before exiting, to save the changes so far and to make them available in the Community, it is
recommended to select **Publish** in the top right hand corner, or you can do so after completing a future
step. A confirmation message will display confirming you wish to Publish the Community. Select the
**Publish** button and when the confirmation window pops up, select the **Got It** button.
### Deactivate Leave Forecast and other Leave Components in the Community (Optional)
It is important to remember to turn off the Leave Forecast tab in Orgs where Clients have specifically
asked for the feature to not be available to Payees in the Community, along with any other components
that they don’t want Payees to access within there.
1. Select the **Leave** Tab within the Community Builder.
2. Select inside the LWC of Leave.
3. This will display a pop up window in the top right hand corner with picklist values of ‘Yes’ and ‘No’
for the following topics:
1. Enable Current Leave View Tab.
2. Enable Submitted Leave List View Tab.
3. Enable Approved Leave List View Tab.
4. Enable Rejected Leave List View Tab.
5. Enable Historical Leave List View Tab.
6. Enable Leave Balances Tab.
7. Enable Leave Forecast Tab.
4. Select Yes or No for each field as per the Org requirements.
Before exiting, to save the changes so far and to make them available in the Community, it is
recommended to select **Publish** in the top right hand corner, or you can do so after completing a future
step. A confirmation message will display confirming you wish to Publish the Community. Select the
**Publish** button and when the confirmation window pops up, select the **Got It** button.
### Deactivate Company Details and other Components in the Community (Optional)
It is important to remember to turn off the Company Details tab in Orgs where Clients have specifically
asked for the feature to not be available to Payees in the Community, along with any other components
that they don’t want Payees to access within there.
1. Select the **Profile** tab (the one where you added the Profile LWC).
2. Select inside the LWC of Profile.
3. This will display a pop up window in the top right hand corner with picklist values of ‘Yes’ and ‘No’
or the following topics.
1. Enable Personal Details Tab?
2. Enable Emergency Contacts Tab?
3. Enable Payment Details Tab?
4. Enable TFN Details Tab?
5. Enable Company Details Tab?
6. Enable Superannuation Details Tab?
4. Select Yes or No for each field as per the Org requirements.
Before exiting, to save the changes so far and to make them available in the Community, it is
recommended to select **Publish** in the top right hand corner, or you can do so after completing a future
step. A confirmation message will display confirming you wish to Publish the Community. Select the
**Publish** button and when the confirmation window pops up, select the **Got It** button.
### Community Logout Button - Removal & Addition
It is important that you remove the default Community Logout and Profile Drop-Down menus:
1. Click the top header around the logo and the tab header called **Compact Header,** but make sure
you don't click just the Theme Navigation Menu.
2. A drop-down menu will appear on the right-hand side called **Compact Header** .
3. Click the menu title **Layout** .
4. In the drop down that appears you will see several checkboxes, uncheck **Show User Profile**
**Menu**, **Show Notifications** and **Show Search** .
5. Close the **Compact Header** .
6. Click the **Theme Navigation Menu** bar.
7. A drop down menu will appear on the right hand side called **Theme Navigation Menu.**
8. Click the **Edit Default Navigation** button.
9. Click **+ Add Menu Item** .
1. Enter a name: i.e. Logout
2. Select: External URL (Available in Setup > All Sites > and the URL should be listed)
3. URL: community URL + **/secur/logout.jsp** for example see below:
[https://lorelletrain2.force.my.site.com/secur/logout.jsp](https://dfpportal.force.com/candidatecommunity/secur/logout.jsp)
1. Open link in the same tab = TRUE
2. Click **Save Menu** .
3. By following these steps, the Logout button gets added only on the Homepage.
4. Steps 1-10 need to be repeated for all of the additional pages within the Community (i.e. Header,
My Profile, Timesheets, etc.), and that second change will apply to them all.
Before exiting, to save the changes so far and to make them available in the Community, it is
recommended to select **Publish** in the top right hand corner, or you can do so after completing a future
step. A confirmation message will display confirming you wish to Publish the Community. Select the
**Publish** button and when the confirmation window pops up select the **Got It** button.
### Dynamic Branding/Styling for different Audiences (Optional)
If you require different branding to be applied to various areas of the Org (i.e. by Payment Entity, Pay
Schedule, or other different points) you can review this section as to how to set up Dynamic
Branding/Styling to reflect that Payment Entity or Pay Schedule as required. If this is not needed, you can
proceed to the next step.
1. Select the paintbrush symbol at the top left of the page.
2. At the top of the box that appears select the **down arrow** .
3. Select **Manage Branding Sets** .
4. Click the **+New Branding Set** button.
5. Name your branding set.
6. Click on the down arrow within the branding set and select **Edit** .
7. Set your theme, colour pallete and logo as the previous instructions for **Community Pages** on the
box to the left.
8. You can switch between default and the branding set by selecting the relevant box and make all
the changes you need to either one.
9. Return to **Manage Branding Sets** .
10. Click the **people icon** .
11. Click the **New Audience** button.
12. Name the Audience.
13. Add the criteria for this audience.
14. Click **Save** .
15. Click the **drop down arrow** on your branding set and select **Assign** .
16. Select the **Audience** and select the **Assign** button.
17. Click **done** .
You will need to repeat this process for all the branding sets you want to assign to certain audiences, if
you have already set the default branding, you can duplicate it via the drop down arrow on it and then
assign an audience to it.
Before exiting, to save the changes so far and to make them available in the Community, it is
recommended to select **Publish** in the top right hand corner, or you can do so after completing a future
step. A confirmation message will display confirming you wish to Publish the Community. Select the
**Publish** button and when the confirmation window pops up select the **Got It** button.
### Enable Community Sharing Set (Conditionally Compulsory)
If you DO NOT have a private sharing model, then you can ignore this step and proceed to the next step.
Many Salesforce Orgs already actively used by Clients will have a private sharing model, which means
that for any Objects used by 2c9 Payroll (such as Contact, Assignment, Payee, etc) will need a ‘Community
Sharing Set’ created to ensure Employees have access to the Objects and records needed within the
Employee Community Portal.
Go to **Setup > Digital Experiences > Settings**
1. Under the Role and User Settings heading ensure that **Let customer users access notes and**
**attachments** is ticked and **Allow using standard external profiles for self-registration user**
**creation, and login** is ticked.
2. Then scroll down to the **Sharing Sets** related list.
3. Click **New** .
4. In the field **Label,** enter Community Sharing Set, and as you navigate to the next field it should
auto populate.
5. Enter a Description (optional)
6. Select **Customer Community User** under the **Select Profiles** section, and select the Add > button.
7. Under the **Select Objects** section, only objects that are set to ‘Private’ for external users will
appear in the list. Choose the following objects in the **Select Objects** section;
1. Contact
2. Payee
3. Assignment
8. Under the **Configure Access** section, select the **Set Up** link on the Contact line
9. In the pop up window, ensure the User picklist is set to **Contact** .
10. Select **Id** in the Target Contact picklist field.
11. For Access Level picklist select **Read/Write.**
12. Click **Update.**
13. If you need to provide any more updates for the Community Sharing Set, action by following the
same steps as detailed above, and then select **Save** .
14. The following shows how these Sharing Sets should now display:
For Payees to view and save Timesheets in Community:
Go to **Setup > Sharing Settings**
1. Select the **Timesheets** Tab within the Community Builder.
2. Select inside the LWC of Timesheets.
3. This will display a pop up window in the top right hand corner with picklist values of ‘Yes’ and ‘No’
for the following topics:
1. Enable Leave Events for a Timesheet?
2. Enable Expenses for a Timesheet?
3. Enable Timesheet Allowances for a Timesheet?
4. Select Yes or No for each field as per the Org requirements.
Before exiting, to save the changes so far and to make them available in the Community, it is
recommended to select **Publish** in the top right hand corner, or you can do so after completing a future
step. A confirmation message will display confirming you wish to Publish the Community. Select the
**Publish** button and when the confirmation window pops up, select the **Got It** button.
### Deactivate Leave Forecast and other Leave Components in the Community (Optional)
It is important to remember to turn off the Leave Forecast tab in Orgs where Clients have specifically
asked for the feature to not be available to Payees in the Community, along with any other components
that they don’t want Payees to access within there.
1. Select the **Leave** Tab within the Community Builder.
2. Select inside the LWC of Leave.
3. This will display a pop up window in the top right hand corner with picklist values of ‘Yes’ and ‘No’
for the following topics:
1. Enable Current Leave View Tab.
2. Enable Submitted Leave List View Tab.
3. Enable Approved Leave List View Tab.
4. Enable Rejected Leave List View Tab.
5. Enable Historical Leave List View Tab.
6. Enable Leave Balances Tab.
7. Enable Leave Forecast Tab.
4. Select Yes or No for each field as per the Org requirements.
Before exiting, to save the changes so far and to make them available in the Community, it is
recommended to select **Publish** in the top right hand corner, or you can do so after completing a future
step. A confirmation message will display confirming you wish to Publish the Community. Select the
**Publish** button and when the confirmation window pops up, select the **Got It** button.
### Deactivate Company Details and other Components in the Community (Optional)
It is important to remember to turn off the Company Details tab in Orgs where Clients have specifically
asked for the feature to not be available to Payees in the Community, along with any other components
that they don’t want Payees to access within there.
1. Select the **Profile** tab (the one where you added the Profile LWC).
2. Select inside the LWC of Profile.
3. This will display a pop up window in the top right hand corner with picklist values of ‘Yes’ and ‘No’
or the following topics.
1. Enable Personal Details Tab?
2. Enable Emergency Contacts Tab?
3. Enable Payment Details Tab?
4. Enable TFN Details Tab?
5. Enable Company Details Tab?
6. Enable Superannuation Details Tab?
4. Select Yes or No for each field as per the Org requirements.
Before exiting, to save the changes so far and to make them available in the Community, it is
recommended to select **Publish** in the top right hand corner, or you can do so after completing a future
step. A confirmation message will display confirming you wish to Publish the Community. Select the
**Publish** button and when the confirmation window pops up, select the **Got It** button.
### Community Logout Button - Removal & Addition
It is important that you remove the default Community Logout and Profile Drop-Down menus:
1. Click the top header around the logo and the tab header called **Compact Header,** but make sure
you don't click just the Theme Navigation Menu.
2. A drop-down menu will appear on the right-hand side called **Compact Header** .
3. Click the menu title **Layout** .
4. In the drop down that appears you will see several checkboxes, uncheck **Show User Profile**
**Menu**, **Show Notifications** and **Show Search** .
5. Close the **Compact Header** .
6. Click the **Theme Navigation Menu** bar.
7. A drop down menu will appear on the right hand side called **Theme Navigation Menu.**
8. Click the **Edit Default Navigation** button.
9. Click **+ Add Menu Item** .
1. Enter a name: i.e. Logout
2. Select: External URL (Available in Setup > All Sites > and the URL should be listed)
3. URL: community URL + **/secur/logout.jsp** for example see below:
[https://lorelletrain2.force.my.site.com/secur/logout.jsp](https://dfpportal.force.com/candidatecommunity/secur/logout.jsp)
1. Open link in the same tab = TRUE
2. Click **Save Menu** .
3. By following these steps, the Logout button gets added only on the Homepage.
4. Steps 1-10 need to be repeated for all of the additional pages within the Community (i.e. Header,
My Profile, Timesheets, etc.), and that second change will apply to them all.
Before exiting, to save the changes so far and to make them available in the Community, it is
recommended to select **Publish** in the top right hand corner, or you can do so after completing a future
step. A confirmation message will display confirming you wish to Publish the Community. Select the
**Publish** button and when the confirmation window pops up select the **Got It** button.
### Dynamic Branding/Styling for different Audiences (Optional)
If you require different branding to be applied to various areas of the Org (i.e. by Payment Entity, Pay
Schedule, or other different points) you can review this section as to how to set up Dynamic
Branding/Styling to reflect that Payment Entity or Pay Schedule as required. If this is not needed, you can
proceed to the next step.
1. Select the paintbrush symbol at the top left of the page.
2. At the top of the box that appears select the **down arrow** .
3. Select **Manage Branding Sets** .
4. Click the **+New Branding Set** button.
5. Name your branding set.
6. Click on the down arrow within the branding set and select **Edit** .
7. Set your theme, colour pallete and logo as the previous instructions for **Community Pages** on the
box to the left.
8. You can switch between default and the branding set by selecting the relevant box and make all
the changes you need to either one.
9. Return to **Manage Branding Sets** .
10. Click the **people icon** .
11. Click the **New Audience** button.
12. Name the Audience.
13. Add the criteria for this audience.
14. Click **Save** .
15. Click the **drop down arrow** on your branding set and select **Assign** .
16. Select the **Audience** and select the **Assign** button.
17. Click **done** .
You will need to repeat this process for all the branding sets you want to assign to certain audiences, if
you have already set the default branding, you can duplicate it via the drop down arrow on it and then
assign an audience to it.
Before exiting, to save the changes so far and to make them available in the Community, it is
recommended to select **Publish** in the top right hand corner, or you can do so after completing a future
step. A confirmation message will display confirming you wish to Publish the Community. Select the
**Publish** button and when the confirmation window pops up select the **Got It** button.
### Enable Community Sharing Set (Conditionally Compulsory)
If you DO NOT have a private sharing model, then you can ignore this step and proceed to the next step.
Many Salesforce Orgs already actively used by Clients will have a private sharing model, which means
that for any Objects used by 2c9 Payroll (such as Contact, Assignment, Payee, etc) will need a ‘Community
Sharing Set’ created to ensure Employees have access to the Objects and records needed within the
Employee Community Portal.
Go to **Setup > Digital Experiences > Settings**
1. Under the Role and User Settings heading ensure that **Let customer users access notes and**
**attachments** is ticked and **Allow using standard external profiles for self-registration user**
**creation, and login** is ticked.
2. Then scroll down to the **Sharing Sets** related list.
3. Click **New** .
4. In the field **Label,** enter Community Sharing Set, and as you navigate to the next field it should
auto populate.
5. Enter a Description (optional)
6. Select **Customer Community User** under the **Select Profiles** section, and select the Add > button.
7. Under the **Select Objects** section, only objects that are set to ‘Private’ for external users will
appear in the list. Choose the following objects in the **Select Objects** section;
1. Contact
2. Payee
3. Assignment
8. Under the **Configure Access** section, select the **Set Up** link on the Contact line
9. In the pop up window, ensure the User picklist is set to **Contact** .
10. Select **Id** in the Target Contact picklist field.
11. For Access Level picklist select **Read/Write.**
12. Click **Update.**
13. If you need to provide any more updates for the Community Sharing Set, action by following the
same steps as detailed above, and then select **Save** .
14. The following shows how these Sharing Sets should now display:
For Payees to view and save Timesheets in Community:
Go to **Setup > Sharing Settings**
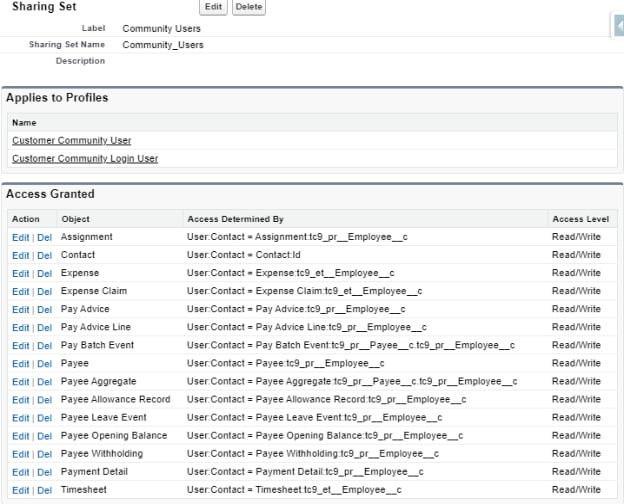 1. Under Organization-Wide Defaults, select **Edit**
2. Scroll down to **Payee**, and in the column for Default External Access, select **Public Read/Write** .
3. Scroll down to **Timesheet**, and in the column for Default External Access, ensure it is **Public Read/Write** .
**Important Notes**
*(Private Sharing Model)*
If you have a private sharing model on Account, the Available Payment Method(s) selected on the
Payment Entity will not be visible to the Community User and the Private Sharing model for Accounts
must be enabled to Public Read Only on External Users.
### Create Approver Identifier & Audience (Conditional Compulsory)
The preferred method of Approvers within the Community is for them to be an Authenticated User, and
very often they are a Payee as well as an Approver simultaneously. To make this possible, the need to
create a custom field on the Payee to identify them as an Approver is required, along with the use of
Audiences within the Community for the navigation and visibility of pages within the Community.
If you are using Approver Link Tokens, you can ignore this step and proceed to the next step.
### Creation of Approver field on Contact
Go to **Setup > Object Manager > Contact > Fields & Relationships**
1. Select the **New** button.
2. Select the **Checkbox** radio button, and select the **Next** button.
3. Label = Is Approver? (or Approver, or something else simple and easily understandable).
4. Determine if you want the **default** radio button unchecked (recommended).
5. Field Name = auto populates based on Label API name.
6. Description = enter one if you would like.
7. Help Text = Enter one so that Users can hover the mouse over the info icon next to the field label
to attain what it’s used for.
8. Auto add to custom report type = determine if this checkbox should remain checked or
unchecked, and select **Next** button.
9. Establish the Field Level Security by checking and unchecking the boxes against various profiles
for **Visible** and **Read Only** access, and select the **Next** button.
10. Ensure only the Page Layouts that are used for Approvers (including Employees who will also be
Approvers) are checked, and select **Save** .
Contacts who are Approvers will need this checkbox to be checked, either by integration, automation, or
manually.
### Creation of Approver page and Tab
Go to **Setup > Digital Experiences > All Sites > Builder** (next to the Employee Community you just
created)
1. Select the drop down arrow next to the cogs (Page Properties).
2. At the bottom, click the blue **+ New Page** button.
3. Select the **Standard Page** option.
4. Click the blue **+ New Blank Page** button.
5. Select **1 full-width column** .
6. Click **Next** .
7. Enter a name for the Approvals page e.g. Approvals.
8. Click **Create** .
9. Click the **lightning symbol** on the left hand panel (Components).
10. Drag the **Approver Portal** onto the Content section of the page (please note there will be a read
error message advising “This url and token is invalid, please contact support”. This can be ignored
as it will always display this in the Builder page.
11. Click the **Theme Navigation Menu** next to the logo (will be the box at the top which displays
Home, My Profile, Timesheets, etc).
12. The Theme Navigation menu will pop up to the right.
13. Click the **Edit Default Navigation** button.
14. Click **+ Add Menu Item** button.
15. Enter the Name for this tab (i.e Approvals).
16. Type = Site Page
17. Page = Approvals.
18. Review the tab created is in a suitable order in relation to the other tabs, and move them around
as required.
19. When complete, click the **Save Menu** button.
At this stage, the page is available to all Community Users, therefore you may need to proceed to the next
step to ensure only those users who should have access to the Approver pages can do so. If this is not
required, you should Publish the Community to save the changes, and then skip to the next step.
### Create Audience for Approvers
In this stage, we’ll discuss a few of the options available to change the navigation available and the pages
available to Approvers. If all Community Users should see the Approvers page, regardless of them being
an Approver, then you can skip this step and proceed to the next step.
Similar to the steps detailed earlier in Dynamic Branding/Styling (Optional), with the use of Audiences,
you are able to personalise the visibility and navigation within the Community, which can be especially
useful for the Approvals page.
Using the Is Approver? checkbox created earlier in this step, you can create an audience that will limit
access to pages based on an audience where the User > Contact > Is Approver? = true or false. The
Audience can be created by following these steps
1. Select the drop down arrow next to the cogs (Page Properties). Best to do this on the Approvals
page or other page that you want to have the audience function with.
2. Select the three dots to the right of the Approvals page listed in the list view.
3. Select the **Page Settings** .
4. Click on **Page Variations** .
5. Select the audience icon.
6. Select **New Audience** .
7. Enter an **Audience Name** .
8. Enter the criteria needed to make this audience identifiable by the software to limited access to
this page, this can be done by numerous methods, however the best to use is the use of the new
Is Approver? checkbox.
9. When completed select **Save** .
10. On the Page Variations page, select the drop down arrow next to the Unpublished Status.
11. Select **Edit Assignment** .
12. Select the Audience created from the left side, and select the **Assign** button.
13. Select **Done** .
14. Exit out of the pages menus using the close or back arrows in the pop up windows.
There is also functionality to target the navigation menu to particular audiences if required. This can be
done by:
1. Select the **Theme Navigation Box** .
2. From the Theme Navigation Menu that pops up, select **Personalize** at the bottom.
3. From here you can create an audience or use an existing audience to assign a specific navigation
menu that is targeted to certain users.
The use of this is not very widespread as yet, but feel free to expand your knowledge in this area and
share with the E\&T Team your learnings.
Before exiting, to save the changes so far and to make them available in the Community, it is
recommended to select **Publish** in the top right hand corner, or you can do so after completing a future
step.
A confirmation message will display confirming you wish to Publish the Community. Select the **Publish**
button and when the confirmation window pops up select the **Got It** button.
## 15. Invoice Site Setup
### Create a new Invoice Site (Conditional Compulsory)
You **ONLY** need to create a site for Invoices if the Org **DOES NOT** intend to have an Employee Community
Site. If there is an Employee Community Site, then this site instead should be referenced in “Additional
Custom Settings”, so that the one site will be marked as default and service both needs.
It is planned in an upcoming Invoicing Redesign, that we will provide a Community Experience that
allows Clients to log in and access all of their Invoices, etc, but at this stage this functionality is not
available.
To set up a site specific for Invoice PDF creation when no Community Site is required for the Org, follow
the below steps:
1. Under Organization-Wide Defaults, select **Edit**
2. Scroll down to **Payee**, and in the column for Default External Access, select **Public Read/Write** .
3. Scroll down to **Timesheet**, and in the column for Default External Access, ensure it is **Public Read/Write** .
**Important Notes**
*(Private Sharing Model)*
If you have a private sharing model on Account, the Available Payment Method(s) selected on the
Payment Entity will not be visible to the Community User and the Private Sharing model for Accounts
must be enabled to Public Read Only on External Users.
### Create Approver Identifier & Audience (Conditional Compulsory)
The preferred method of Approvers within the Community is for them to be an Authenticated User, and
very often they are a Payee as well as an Approver simultaneously. To make this possible, the need to
create a custom field on the Payee to identify them as an Approver is required, along with the use of
Audiences within the Community for the navigation and visibility of pages within the Community.
If you are using Approver Link Tokens, you can ignore this step and proceed to the next step.
### Creation of Approver field on Contact
Go to **Setup > Object Manager > Contact > Fields & Relationships**
1. Select the **New** button.
2. Select the **Checkbox** radio button, and select the **Next** button.
3. Label = Is Approver? (or Approver, or something else simple and easily understandable).
4. Determine if you want the **default** radio button unchecked (recommended).
5. Field Name = auto populates based on Label API name.
6. Description = enter one if you would like.
7. Help Text = Enter one so that Users can hover the mouse over the info icon next to the field label
to attain what it’s used for.
8. Auto add to custom report type = determine if this checkbox should remain checked or
unchecked, and select **Next** button.
9. Establish the Field Level Security by checking and unchecking the boxes against various profiles
for **Visible** and **Read Only** access, and select the **Next** button.
10. Ensure only the Page Layouts that are used for Approvers (including Employees who will also be
Approvers) are checked, and select **Save** .
Contacts who are Approvers will need this checkbox to be checked, either by integration, automation, or
manually.
### Creation of Approver page and Tab
Go to **Setup > Digital Experiences > All Sites > Builder** (next to the Employee Community you just
created)
1. Select the drop down arrow next to the cogs (Page Properties).
2. At the bottom, click the blue **+ New Page** button.
3. Select the **Standard Page** option.
4. Click the blue **+ New Blank Page** button.
5. Select **1 full-width column** .
6. Click **Next** .
7. Enter a name for the Approvals page e.g. Approvals.
8. Click **Create** .
9. Click the **lightning symbol** on the left hand panel (Components).
10. Drag the **Approver Portal** onto the Content section of the page (please note there will be a read
error message advising “This url and token is invalid, please contact support”. This can be ignored
as it will always display this in the Builder page.
11. Click the **Theme Navigation Menu** next to the logo (will be the box at the top which displays
Home, My Profile, Timesheets, etc).
12. The Theme Navigation menu will pop up to the right.
13. Click the **Edit Default Navigation** button.
14. Click **+ Add Menu Item** button.
15. Enter the Name for this tab (i.e Approvals).
16. Type = Site Page
17. Page = Approvals.
18. Review the tab created is in a suitable order in relation to the other tabs, and move them around
as required.
19. When complete, click the **Save Menu** button.
At this stage, the page is available to all Community Users, therefore you may need to proceed to the next
step to ensure only those users who should have access to the Approver pages can do so. If this is not
required, you should Publish the Community to save the changes, and then skip to the next step.
### Create Audience for Approvers
In this stage, we’ll discuss a few of the options available to change the navigation available and the pages
available to Approvers. If all Community Users should see the Approvers page, regardless of them being
an Approver, then you can skip this step and proceed to the next step.
Similar to the steps detailed earlier in Dynamic Branding/Styling (Optional), with the use of Audiences,
you are able to personalise the visibility and navigation within the Community, which can be especially
useful for the Approvals page.
Using the Is Approver? checkbox created earlier in this step, you can create an audience that will limit
access to pages based on an audience where the User > Contact > Is Approver? = true or false. The
Audience can be created by following these steps
1. Select the drop down arrow next to the cogs (Page Properties). Best to do this on the Approvals
page or other page that you want to have the audience function with.
2. Select the three dots to the right of the Approvals page listed in the list view.
3. Select the **Page Settings** .
4. Click on **Page Variations** .
5. Select the audience icon.
6. Select **New Audience** .
7. Enter an **Audience Name** .
8. Enter the criteria needed to make this audience identifiable by the software to limited access to
this page, this can be done by numerous methods, however the best to use is the use of the new
Is Approver? checkbox.
9. When completed select **Save** .
10. On the Page Variations page, select the drop down arrow next to the Unpublished Status.
11. Select **Edit Assignment** .
12. Select the Audience created from the left side, and select the **Assign** button.
13. Select **Done** .
14. Exit out of the pages menus using the close or back arrows in the pop up windows.
There is also functionality to target the navigation menu to particular audiences if required. This can be
done by:
1. Select the **Theme Navigation Box** .
2. From the Theme Navigation Menu that pops up, select **Personalize** at the bottom.
3. From here you can create an audience or use an existing audience to assign a specific navigation
menu that is targeted to certain users.
The use of this is not very widespread as yet, but feel free to expand your knowledge in this area and
share with the E\&T Team your learnings.
Before exiting, to save the changes so far and to make them available in the Community, it is
recommended to select **Publish** in the top right hand corner, or you can do so after completing a future
step.
A confirmation message will display confirming you wish to Publish the Community. Select the **Publish**
button and when the confirmation window pops up select the **Got It** button.
## 15. Invoice Site Setup
### Create a new Invoice Site (Conditional Compulsory)
You **ONLY** need to create a site for Invoices if the Org **DOES NOT** intend to have an Employee Community
Site. If there is an Employee Community Site, then this site instead should be referenced in “Additional
Custom Settings”, so that the one site will be marked as default and service both needs.
It is planned in an upcoming Invoicing Redesign, that we will provide a Community Experience that
allows Clients to log in and access all of their Invoices, etc, but at this stage this functionality is not
available.
To set up a site specific for Invoice PDF creation when no Community Site is required for the Org, follow
the below steps:
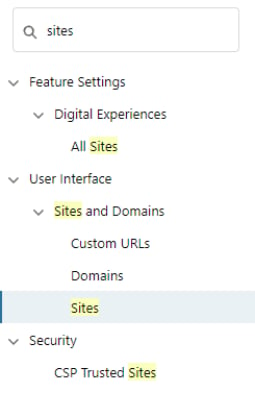 1. Go to **Setup** - **Sites**
2. You will see a message saying ‘I have read and accepted the Salesforce Sites Terms of Use.’
3. Tick the checkbox and click **Register My Salesforce Site Domain** button.
4. You’ll be presented with another pop up message that says ‘Once you register, you will not be
able to modify your Salesforce site domain name. Are you sure?’ Press **Ok** .
5. Scroll down below Settings and click on **New** .
6. Action the following fields only:
* Site Label = Invoice Portal (required)
* Site Name = Invoice\_Portal (required, auto-populates from Site Label)
* Site Description = Site used for invoicing pages
* Site Contact = 2cloudnine Admin User or equivalent (required)
* Default Record Owner = 2cloudnine Admin User or equivalent (required)
* Default Web Address = ClientPortal or ClientInvoice
* Active = TRUE
* Active Site Home Page = SiteLogin (required)
* Inactive Site = InMaintenance (this will auto-populate)
* Site Template = SiteTemplate (this will auto-populate)
* Clickjack Protection Level = Allow framing by the same origin only (Recommended)
* Lightning Features for Guest Users = TRUE
* Enable Content Sniffing Protection = TRUE
* Enable Browser Cross Site Scripting Protection = TRUE
* Referrer URL Protection = TRUE
* Allow only required cookies for this site = False
* Redirect to custom domain = False (THIS **MUST** BE CHANGED)
* Cache public Visualforce pages = TRUE
* Guest Access to the Payments API = False
* Guest Access to the Support API = False
7. Click **Save** .
1. Go to **Setup** - **Sites**
2. You will see a message saying ‘I have read and accepted the Salesforce Sites Terms of Use.’
3. Tick the checkbox and click **Register My Salesforce Site Domain** button.
4. You’ll be presented with another pop up message that says ‘Once you register, you will not be
able to modify your Salesforce site domain name. Are you sure?’ Press **Ok** .
5. Scroll down below Settings and click on **New** .
6. Action the following fields only:
* Site Label = Invoice Portal (required)
* Site Name = Invoice\_Portal (required, auto-populates from Site Label)
* Site Description = Site used for invoicing pages
* Site Contact = 2cloudnine Admin User or equivalent (required)
* Default Record Owner = 2cloudnine Admin User or equivalent (required)
* Default Web Address = ClientPortal or ClientInvoice
* Active = TRUE
* Active Site Home Page = SiteLogin (required)
* Inactive Site = InMaintenance (this will auto-populate)
* Site Template = SiteTemplate (this will auto-populate)
* Clickjack Protection Level = Allow framing by the same origin only (Recommended)
* Lightning Features for Guest Users = TRUE
* Enable Content Sniffing Protection = TRUE
* Enable Browser Cross Site Scripting Protection = TRUE
* Referrer URL Protection = TRUE
* Allow only required cookies for this site = False
* Redirect to custom domain = False (THIS **MUST** BE CHANGED)
* Cache public Visualforce pages = TRUE
* Guest Access to the Payments API = False
* Guest Access to the Support API = False
7. Click **Save** .
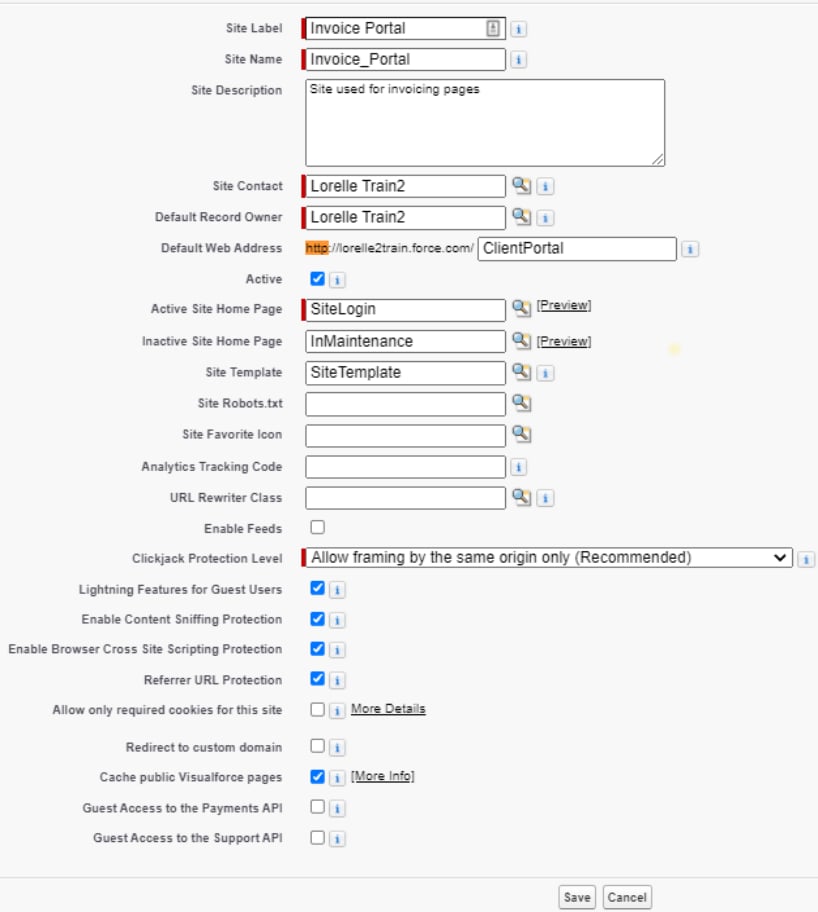
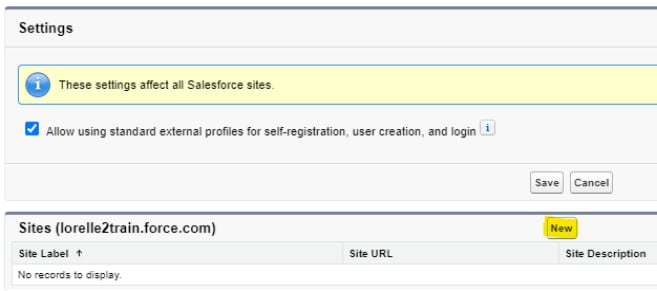 ### Assign the Online Invoice Permission Sets
Both Permission Sets relating to Online Invoices now need to be assigned to the Guest Site User specific
for the Invoice Site.
Go to **Setup > Sites >** Click the **site name** used for Client invoicing in the site label column > **Public**
**Access Settings** - **View Users**
1. Select the **Guest User** .
2. Select **Edit Assignments** in the Permission Set Assignments related list.
3. Select the 2cloudnine Time2Pay Standard Online Invoice and 2cloudnine Time2Pay Standard
Online Invoice2 (or Clone as per the name you gave to the 2nd Permission Set), select the **Add +**
button, and it should move to the Enabled Permission Sets.
4. Select **Save** .
## 16. Additional Custom Settings and Configuration
### Time2Pay Portal Specific Settings
### Employee Community
This Custom Setting is always required, even if you are not configuring a Community within the Org, and
provides the details of an Employee Community, including if the Community Users can be auto-created
when a Payee is created or their first Timesheet is created. If this Org doesn’t have a 2cloudnine
Employee Community, users can proceed to the next step. If this is not created, when trying to create
Timesheets, you will encounter an issue which says:
*“Portal User Creation : : List has no rows for assignment to SObject”*
Go to **Setup** - **Custom Settings** - **Time2Pay Portal Specific Settings > Manage > New**
1. Complete in line with the details provided here:
1. Name: Community User
2. Auto Create Portal User: True (auto create when Payee is created, refer to Permission Sets
section for more details)
3. Default: True.
4. Enable Community User from Payee: Only to be TRUE if this is the point they are to be
created as a Community User.
5. Portal Profile Name: Customer Community User.
6. Site URL = Copy and paste the URL from the Site created in the earlier step for **Employee**
**Community Builder** (i.e. [http://lorelletrain2.my.salesforce-sites.com/EmployeePortal](http://lorelletrain2.my.salesforce-sites.com/EmployeePortal))).
7. Site ID: \*\*\*\*\*\* (To attain, go to the Cogs (where you would normally locate Setup) > Developer Console\*\*, select **Query Editor**, paste the following text
### Select id,name from site
Then select the **Execute** button).
1. Copy the Site ID from the Id column of the Employee Community and paste into the **Site**
**ID** field.
2. Site Label: (must be the Community Name located in Setup > All Sites)
3. Click **Save** .
**IMPORTANT:** The Employee Community URL will need to be populated even if it is not used. Please note
that in the scenario where some clients don't use the Employee Community, if the URL of the Employee
Community is not populated, the invoicing button will not work.
### Assign the Online Invoice Permission Sets
Both Permission Sets relating to Online Invoices now need to be assigned to the Guest Site User specific
for the Invoice Site.
Go to **Setup > Sites >** Click the **site name** used for Client invoicing in the site label column > **Public**
**Access Settings** - **View Users**
1. Select the **Guest User** .
2. Select **Edit Assignments** in the Permission Set Assignments related list.
3. Select the 2cloudnine Time2Pay Standard Online Invoice and 2cloudnine Time2Pay Standard
Online Invoice2 (or Clone as per the name you gave to the 2nd Permission Set), select the **Add +**
button, and it should move to the Enabled Permission Sets.
4. Select **Save** .
## 16. Additional Custom Settings and Configuration
### Time2Pay Portal Specific Settings
### Employee Community
This Custom Setting is always required, even if you are not configuring a Community within the Org, and
provides the details of an Employee Community, including if the Community Users can be auto-created
when a Payee is created or their first Timesheet is created. If this Org doesn’t have a 2cloudnine
Employee Community, users can proceed to the next step. If this is not created, when trying to create
Timesheets, you will encounter an issue which says:
*“Portal User Creation : : List has no rows for assignment to SObject”*
Go to **Setup** - **Custom Settings** - **Time2Pay Portal Specific Settings > Manage > New**
1. Complete in line with the details provided here:
1. Name: Community User
2. Auto Create Portal User: True (auto create when Payee is created, refer to Permission Sets
section for more details)
3. Default: True.
4. Enable Community User from Payee: Only to be TRUE if this is the point they are to be
created as a Community User.
5. Portal Profile Name: Customer Community User.
6. Site URL = Copy and paste the URL from the Site created in the earlier step for **Employee**
**Community Builder** (i.e. [http://lorelletrain2.my.salesforce-sites.com/EmployeePortal](http://lorelletrain2.my.salesforce-sites.com/EmployeePortal))).
7. Site ID: \*\*\*\*\*\* (To attain, go to the Cogs (where you would normally locate Setup) > Developer Console\*\*, select **Query Editor**, paste the following text
### Select id,name from site
Then select the **Execute** button).
1. Copy the Site ID from the Id column of the Employee Community and paste into the **Site**
**ID** field.
2. Site Label: (must be the Community Name located in Setup > All Sites)
3. Click **Save** .
**IMPORTANT:** The Employee Community URL will need to be populated even if it is not used. Please note
that in the scenario where some clients don't use the Employee Community, if the URL of the Employee
Community is not populated, the invoicing button will not work.
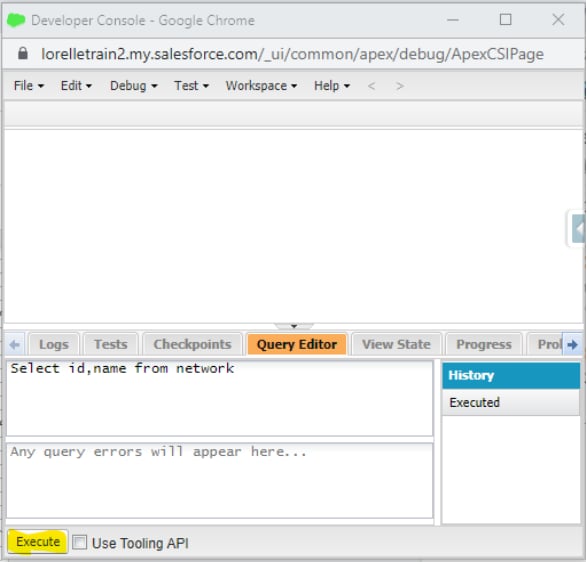
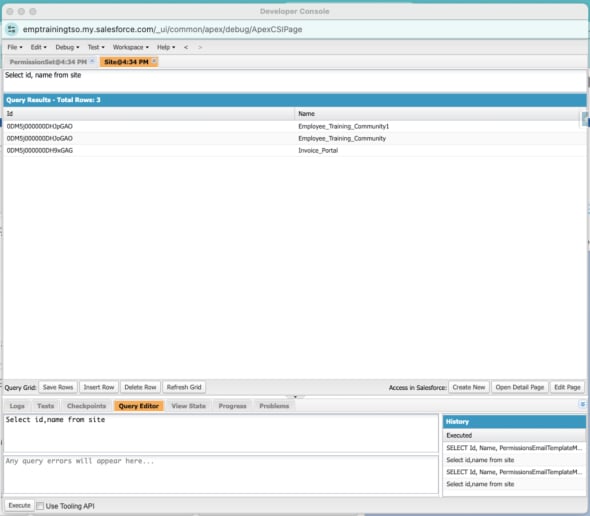 **Important Notes**
*(Community Permission Sets)*
2cloudnine Community Permission Sets should only be assigned to Community Users. If they are
assigned to Community Plus Users, there will be issues when upgrading packages in the future. An
example of an error message you may receive if you have assigned a 2cloudnine Permission Set to a
Community Plus User might be. “The user license doesn't allow the permission: Read All
tc9\_pr\_\_Assignment\_Rate\_\_c Employee\_Community\_Permission\_Set: The user license doesn't allow
the permission: Read All tc9\_pr\_\_Assignment\_Rate\_\_c.”
The following error message “Portal User Creation : : List has no rows for assignment to
SObject” please revisit the steps above.
The error message “Portal User Creation : : Field is not writable: User.ProfileID”
specifically relates to a User who is not a Salesforce Administrator or delegated
administrator creating an Experience (Community) User by manually generating
Timesheets or Payee creation. Only Salesforce System Administrators or Delegate
Administrators have the User permissions to be able to create Users on the Salesforce
Platform.
Please refer to the [salesforceReference Material: Define Delegate Administrators.](https://help.salesforce.com/s/articleView?id=sf.delegating_user_administration.htm\&type=5)
### Invoice Portal (only required if no Employee Community but still Invoicing in this Org)
This set is only required if the Org will be using the Invoicing functionality. If not, Users can proceed to the
next step. Users are advised that if they also have the Employee Community configured, then it would be
better to have the Employee Community referenced in the Custom Setting, so Invoices PDFs can be
viewed, however the auto creation of the Employee Community Users still functions.
Go to **Setup > Custom Settings >** **Time2pay Portal Specific Settings > Manage > New**
1. Complete in line with the details provided here:
1. Name = Invoice Portal (must be same as listed in Sites created earlier for Invoice Portal).
2. Site Label = Invoice Portal (must be the same name as the Site Label in the Sites).
3. Default: True.
4. Site URL = remain blank (however if Invoicing includes a separate Invoicing Portal site to
the Employee Community Site, you will need to copy and paste the URL from the Site
created in the earlier step for **Invoice Site Setup** (i.e.
[http://lorelletrain2.my.salesforce-sites.com/ClientPortal](http://lorelletrain2.my.salesforce-sites.com/ClientPortal))).
5. Site ID = (To attain, go to the Cogs (where you would normally locate Setup) > **Developer**
**Console**, select **Query Editor**, paste the following text
**Select id,name from site**
Then select the **Execute** button).
1. Copy the Site ID from the Id column of the Invoice Portal and paste into the Site ID field.
2. Click **Save** .
If there is no Employee Community Site listed in these Custom Settings, then this
Invoice Site must be set as Default = True. Otherwise, you must only have 1 site as
Default, which it’s recommended to be the Employee Community so the Auto Creation
of Users can be successful.
### Time2Pay Portal Permission Sets
**Employee Community**
This Custom Setting needs to be populated so that upon the creation of any Community Users,
they are assigned automatically with the required Permission Sets to access and perform the
various tasks within the Community.
Go to **Setup > Custom Settings > Time2Pay Portal Permission Sets > Manage > New**
1. **Name** = Give the record a name to help identify the specific Profile Name/Permission Set
Combination. This name must be unique.
2. **Portal Profile Name** = The value in this field must match an existing User Profile’s Name
(i.e. Customer Community User, Approver).
3. **Permission Set Api Name** = Define the Permission set that will be automatically assigned
during community user creation and update (i.e. Employee\_Community\_Permission\_Set)
4. Click **Save** .
5. Create a new Custom Setting record for each combination of Profile and Permission Set
required (i.e. will need the original and the cloned Permission Set for Community Users to
be 2 isolated Custom Setting records).
Please note: currently, if you are also required to assign the Locale of the User to be English
(United Kingdom), then you may still need to create a custom flow to do this. For assistance on
this matter, please refer to the 2cloudnine Education & Training Team.
### Rate Calc Line Overriding and Rounding Functionality (Optional)
The Rate Calculator Line QRG provides details related to the override and rounding functionality of the
Rate Calculator. To ensure the integrity of the Rate Calculators calculation, this feature is only available to
Users granted access. To enable rounding access:
Go to **Setup > Users > Edit** (next to the required user)
1. Select the checkbox **Enable Rate Calc Line Rounding** if required.
2. Click **Save** .
3. Repeat for all other Users who need the ability to have Rate Calc Line Rounding in Rate
Calculators.
Go to **Setup > Users >**
1. Locate your User record (i.e. 2cloudnine Admin) and select **Edit** next to the user
2. Check the field **Enable Rate Calc Overriding** .
3. Click **Save** .
4. Repeat for all other Users who need the ability to have Rate Calc Overriding in Rate
Calculators.
## 17. Assignment of Permission Sets to Users
The recommended method of providing suitable access to Users within Salesforce is by assigning the
Packaged Permission Sets, and the Custom Permission Sets created earlier in this guide (See Step 12
called Permission Sets).
Without assigning these Permission Sets, the Users will not gain access to the required Objects, Record
Types, Fields, Apex triggers, etc, as tested by the 2cloudnine Product Team. If a decision is made by
System Administrators to not use these recommended Permissions Sets created by the 2cloudnine
Product Team, then for any issues encountered with the product not working as expected, or inability to
perform expected tasks, the 2cloudnine Product Team request that you test the impacted
process/function again with the recommended Permission Sets assigned to confirm if the issue is a result
of not using the recommended Permission Sets or if this is an issue with the Product itself.
Below is a full list of the current 2cloudnine Permission Sets (both Packaged and Custom created as
detailed in Step 12 above), as well as some information regarding which Users these Permission Sets
should be assigned to.
### Packaged
| Permission Set | Purpose | Users |
| ------------------------------------------------------------- | ---------------------------------------------------------------------------------------------------------------------- | ------------------------------------ |
| **2cloudnine Aus** **Lodgement** | Creating and sending Lodgements. | Payroll Users |
| **2cloudnine Base GL** **Permission Set** | Creating and accessing General Ledger records. | Payroll Users Finance Users |
| **2cloudnine Bulk Data** **Creation Admin** | To perform Setup wizards. | Payroll Users (if required) |
| **2cloudnine Bulk Data** **Creation Field Access Only** | To view Data Creation Package records | Payroll Users |
| **2cloudnine Employee** **Community Permission** **Set** | To view, create and edit Community records. Must also assign the 2cloudnine Standard Objects Permission Set. | Employee Community Users |
| **2cloudnine Employee** **Community Plus** **Permission Set** | To use a Community when licence is Community Plus, in addition to a Public Group and Sharing Settings. | Employee Community Plus Users |
| **2cloudnine FBT Upload** **Callout** | To use the FBT Upload function, and would be auto-assigned to Users performing the task if they don’t already have it. | Payroll Users Finance Users |
| **2cloudnine Import Tool** | To use the Import Tool. | Payroll Users |
| **2cloudnine Interpretation** **Callout** | To utilise the Clone Interpretation Rule functionality. | Payroll Users |
| **2cloudnine Payroll Admin** | Provides Full access to Payroll Package. | Payroll Users |
| **2cloudnine Payroll** **Reconciliation** | Provides Full Access to the Reconciliation package. | Payroll Users Finance Users |
| **2cloudnine Rate Calculator** | To create/read Rate Calculator records. | Payroll Users using Rate Calculators |
| **2cloudnine Staffing** | Provides access to the areas pertaining to Staffing specific Objects/Fields. | Payroll Users in Staffing Orgs |
| **2cloudnine Time2Pay All** **Access** | Provides Full Access to the Time2Pay package. | Payroll Users |
| **2cloudnine Time2Pay** **Standard Online Invoice** | To provide access to online Invoices via URL link, instead of PDF attachment. | Invoice Guest Site User |
### Custom
| Permission Set | Purpose | Users |
| ------------------------------------------------------------- | ------------------------------------------------------------------------------------------------------------------------------------------------------------------ | -------------------------------------- |
| **2cloudnine Pay** **Transactions** | To perform Calculate within Pay Batches, and must be updated regularly to maintain Read access to all custom fields on Pay Transactions. | Payroll Users |
| 2cloudnine Rate Calculator Clone | To provide access to the Account to Rate Calculator Junction Object. This Permission Set is to be assigned along with the Packaged Rate Calculator Permission Set. | Payroll Users |
| **2cloudnine Standard** **Objects Permission Set** | Provides the required access to the Standard Salesforce Objects which can’t be provided within a Packaged Permission set. | Payroll Users Employee Community Users |
| **2cloudnine Time2Pay** **Standard Online Invoice** **Clone** | To provide access to view PDF Invoices online via a URL link. Must be provided in addition to the 2cloudnine Time2Pay Standard Online Invoice Permission Set. | Invoices Guest Site User |
Permission Sets can be assigned to Users by two methods, on an individual User you can assign multiple
Permissions Set, or from the specific Permission Set you can assign it to multiple Users.
### To assign multiple Permissions Sets to a User
Go to **Setup > Users > Users**
1. Select the name of the User(s) to assign Permission Sets to.
2. Select the **Permission Set Assignments** Related List.
3. Select the **Edit Assignments** button.
4. Multiselect the Permissions Sets from the **Available Permission Sets** list, and then select the **>**
button to move to the Enabled Permission Sets list.
5. Select **Save** when all required Permissions Sets are assigned.
6. Repeat the process for each User in the Org as required.
### To assign a Permissions Set to multiple Users
Go to **Setup > Permission Sets > 2cloudnine Aus Lodgement > Manage Assignments > Add**
### Assignments
1. Select the checkboxes next to the User(s) you have created.
2. Select the **Next** button.
3. Select the radio button of **No Expiration** or Specify the expiration date and select the expiration
period from the available options.
4. Select the **Assign** button and then select the **Done** button.
## 18. Administrator Guides
Once the compulsory configuration in previous sections has been completed, System Administrators can
refer to the following Administrator Guides to review and configure these optional functionalities:
* [Configurators - Administrator Guide](https://drive.google.com/file/d/1gMbTaGIIMxfMhedx3EFIq0AXJeOGEelY/view?usp=sharing)
* [Field Sets - Administrator Guide](https://drive.google.com/file/d/1HwPTjKfQbgeqJLMjy5eyXRMb19sg4uoh/view?usp=sharing)
* [Payment File Approval Process to Release - Administrator Guide](https://drive.google.com/file/d/19txOLmVLjWT-6EWFO1AUsdzpLvotPzJB/view?usp=sharing)
* [Validation Overrides - Administrator Guide](https://drive.google.com/file/d/1PKCYe86feHnNhWt92W1z-RqZRXSkEbfp/view?usp=sharing)
* [Workflow Rules - Administrator Guide](https://drive.google.com/file/d/1MwTCLV2OODK3vfzhoblVMVQlA-Ghk5sX/view?usp=sharing)
## 19. Discovery Workbook Data & additional required records
This section provides information relating to the Discovery Workbook and various records that require
creation during the configuration process, which are not included within the Data Creation Package
[steps. To learn more about the Discovery Workbook, please refer to the Discovery Workbook.](https://docs.google.com/spreadsheets/d/17WZq5IKjyx3V6mJvZg5pmK__pOLdTVMNKxVOUygEc8A/edit?usp=sharing)
There are some additional records which need creation before the Org is used to create any Pay
Transactions, which can not be completed as part of the Data Creation Setup detailed earlier in Step 3 of
this guide. To assist with knowing all required data prior to using 2cloudnine completely, users should
[refer to the Payroll Data Creation - Key Information.](https://drive.google.com/file/d/1wYCr5cRBHzJkFpdC0EhIfjLBOG0U9XmD/view?usp=sharing)
### Calendars and Calendar Periods
### Payroll Calendar and Calendar Periods
The Payroll Calendar record is related to the Payment Entity and the Schedule. The Calendar controls the
Start and End Dates of Payroll processing, the expected payroll processing date for each related Calendar
Period and the expected Payment File Release Date for each related Calendar Period. For details on
[creation of Payroll Calendar and Calendar Periods, please refer to the relevant QRG - Create Payroll](https://drive.google.com/file/d/1RcX84QKv1nJG80QaRr79ve63pOr5DG2A/view?usp=sharing)
[Calendar & Calendar Periods.](https://drive.google.com/file/d/1RcX84QKv1nJG80QaRr79ve63pOr5DG2A/view?usp=sharing)
### Invoice Calendar Periods
The Invoice Calendar Periods need to be created. The Invoice Calendar is related to the Schedule and is
Invoice Entity specific. The Calendar controls the Start and End Dates of Invoice Periods, and the
expected Invoice Date for each related Calendar Period. For details on creation of Invoicing Calendar and
[Calendar Periods, please refer to the relevant QRG - Create Invoice Calendar & Calendar Periods.](https://drive.google.com/open?id=1CyST3uG20s7XJ4HK4QtHCE_-H3vFki49)
### Pay Codes (For Invoicing Clients)
Additional fields are required to be completed on Pay Codes used within Org utilising the invoicing
functions. You will need to ensure these fields are populated prior to the creation of any Pay Transactions.
These additional fields are as follows:
* Invoice Name (Maximum 15 characters)
* Invoice Taxable
* Invoice Rate Multiplier
For more information on how to update Pay Codes, please refer to the various Create Pay Code QRGs.
### RDO Leave Rule for Daily Accruals
The RDO Leave Rule within Payroll Setup is configured to accrue leave based on the hours worked across
the week. However, some Awards such as the Building and Construction Award, require the accruals to
be based on hours worked per day, and also may not accrue on all the same Pay Codes that other Leave
Rules accrue on (i.e RDOs don’t accrue on Annual Leave, Personal Leave, etc). In order to achieve this,
there is additional configuration required on the RDO Leave Rule. For details on the creation of RDO
Leave Rules, please refer to the [Leave: Setup Leave Rules QRG.](https://drive.google.com/file/d/16ZX01NBfQoKLINGemCXoQha1DWSA-jvp/view?usp=sharing)
### Default Employer Superannuation Fund
All Payment Entities need to be set up with a Default Super Fund. This is used when Payees don’t have a
preferred Super Fund they are already a member of for their Superannuation contributions to be sent to.
These details should be provided within the Discovery Workbook, and to learn more about Default
Employer Superannuation Funds, please refer to the [QRG Create Default Employer Superannuation Fund.](https://drive.google.com/open?id=1EjPOfWdFTZ3QHx0By3dh-1cXwkEU1NU9)
### Create Authorised Contacts for all Payment Entities
These contacts will need to be set up as Users already with access to 2cloudnine Payroll, and must be
created as Authorised Contacts to submit the STP Lodgements. To learn more about Authorised Contacts,
please refer to the [QRG Authorised Contact.](https://drive.google.com/open?id=1ttXd9GFNYis7hzOod6pOGA_lW7mpd7ix)
**Important Notes**
*(Authorised Contacts Per Payment Entity)*
*For each registered Payment Entity you will have to create at least one Authorised Contact for that*
*corresponding Payment Entity. Only these Authorised Contacts can Lodge STP Lodgements to the*
*ATO for that Payment Entity, so if multiple Users must have the access to do this, then each will*
*require to be set up as an Authorised Contact.*
## 20. STP Submission
### Client Superchoice Registration
You will need to instruct the client to have their nominated person (possibly Payroll Manager or CFO) to
register with SuperChoice and ensure they have provided the details for each Authorised contact that
will need to submit lodgements:
*Dear XXX*
*For us to be able to successfully send the Single Touch Payroll Lodgement Files to the ATO via 2cloudnine Payroll, we*
*will require you to register with SuperChoice for both your Sandbox Org as well as from the Production Org.*
*Sandbox:*
* *[https://www.test.employerpay.com.au/2cloudnine](https://www.test.employerpay.com.au/2cloudnine)*
*Production*
* *[https://www.employerpay.com.au/2cloudnine](https://www.employerpay.com.au/2cloudnine)*
If you are processing pays for various Payment Entities, you must ensure each Payment Entity is registered with
Superchoice. The system will present an error if you try to submit an STP Lodgement that doesn't have a Payment
Entity registered with Superchoice.
*After you have completed the registration process for both Production & Fullsand, if you can confirm the registration*
*is complete by email to your Project Manager/Consultant, who will ensure with our Product Team that it's linked*
*correctly for successful testing and processing after Go Live.*
As part of the SuperChoice registration, the Payment Entity registering for this service will be asked to
provide their bank details. They do not need to provide their actual bank details as there is no service for
this whilst using it purely for the STP Lodgement integration, and they can enter default details as BSB
000000 and Account 00000000.
## Appendix Table of Contents
**2cloudnine Payroll Suite Overview** **1**
**Packages Included in 2cloudnine Payroll** **1**
**Add On Packages** **1**
**Important Information** **2**
**Read First: How to Use this Configuration Guide** **2**
**What is covered by this Configuration Guide?** **2**
**Discovery Workbook and Configuration Guide** **2**
**Task Types** **2**
**Task Classifications** **3**
1. Pre-Installation\*\* **4**
**Installation and Configuration Checklist** **4**
**Setup Custom Profile** **4**
**Creation of 2cloudnine Admin Users** **4**
**My Domain (Custom Domain)** **5**
**Submit a case to Salesforce for changes to My Domain (Conditionally Compulsory)** **6**
**Enabling Chatter** **6**
**Enabling Notes** **6**
**Community Licences Provision Check** **6**
**Administrators Can Log in as Any User** **7**
**Enable Digital Experiences** **7**
**Manage External Users (System Administrator Profile)** **7**
**Setup ‘Roles’** **8**
**Organization-Wide Email Addresses** **8**
**DKIM Setup (Email Authentication for Salesforce)** **9**
2. Installing Packages\*\* **10**
**Main Packages** **10**
**Add On Packages** **10**
**Installation Process** **11**
3. Data Creation Setup\*\* **13**
**Setup Payroll (Wizard)** **13**
**New Picklist Values** **19**
**Setup Time2Pay (Wizard)** **20**
4. Required General Configuration\*\* **26**
**Process Automation Settings** **26**
**Remote Site Settings** **27**
**Withholding Rule and Withholding Rule Item Tabs** **27**
**Send Invoice Emails With Attachments Over 3MB** **28**
5. Apex Classes\*\* **28**
**Retrieve Payroll Reporting Result** **28**
**Retrieve Active Superfunds from Superchoice** **29**
6. Custom Settings\*\* **29**
**Aus Extension Configuration** **29**
**Automatic Status Update** **29**
**Disable Assignment Record Type Validations (Optional)** **30**
**Payroll Configuration** **30**
**Time2Pay Batch Size Overrides Custom Setting (Optional)** **31**
**Time2Pay Create Timesheet Record Types** **31**
**Time2Pay Ext Main Settings** **32**
**Time2Pay Process Invoice - Invoice Types (Conditionally Compulsory)** **34**
**Time2Pay Rate Calculator Configurator (Conditionally Compulsory)** **34**
**Time2Pay Update Rates Settings Custom Setting (Optional)** **35**
7. Page Layout Assignments\*\* **36**
**Standard Page Layouts** **36**
**Employee Community Page Layouts** **38**
**Compact Layouts** **39**
**Search Layouts & List View Button Layouts** **39**
**Lightning Record Pages** **40**
8. Update Buttons, Links and Actions\*\* **42**
**Interpretation Rule** **42**
9. Update Standard Page Layouts\*\* **42**
**Account (Invoice Entity)** **42**
**Account (Payment Entity)** **42**
**Assignment (Conditionally Compulsory)** **43**
**Assignment (Optional)** **43**
**Contact** **43**
**Leave Rule (Optional)** **43**
**Invoice Settings (Optional)** **43**
**Interpretation Breakpoint** **44**
**Payee** **44**
**Payee Leave Event (Optional)** **44**
**Rate Calculator** **44**
**Timesheet Entry** **45**
**User** **45**
10. Field History Tracking\*\* **45**
**Account** **45**
**Contact** **46**
**Updating ALL remaining 2cloudnine Objects** **46**
11. Creation of Custom Permission Sets\*\* **46**
**Standard Objects Permission Set (Compulsory)** **46**
**2cloudnine View Setup Permission Set (Compulsory)** **47**
**Pay Transactions Permission Set (Compulsory)** **48**
**Rate Calculator Permission Set (Conditionally Compulsory)** **48**
**Online URL Invoices (Conditionally Compulsory)** **49**
**2cloudnine Front Office User Permission Set (Conditionally Compulsory)** **49**
12. Employee Community Plus Permission Set (only if using Community Plus Licences)\*\* **50**
13. Scheduled Jobs\*\* **51**
**Schedule Job Scripts - Packaged** **51**
**Delete Payroll Logs (Debug and Batch)** **54**
14. Employee Community Builder\*\* **56**
**Creating the Experience** **56**
**Activate the Community** **57**
**Community General Security Settings** **57**
**Enable Community Security Members** **57**
**Community Login Page Branding/Styling** **58**
**Community Emails & Templates** **58**
**Apply Theme, Colours, and Logo to the Community** **59**
**Creating Community Pages** **59**
**Community Navigation Menu** **60**
**Alternate Community Navigation Menu (Optional)** **61**
### Activate Timesheet Leave Events, Expenses, and Allowances in Community (Optional)62
### Deactivate Leave Forecast and other Leave Components in the Community (Optional)62
**Deactivate Company Details and other Components in the Community (Optional)** **63**
**Community Logout Button - Removal & Addition** **63**
**Dynamic Branding/Styling for different Audiences (Optional)** **63**
**Enable Community Sharing Set (Conditionally Compulsory)** **64**
**Create Approver Identifier & Audience (Conditional Compulsory)** **66**
15. Invoice Site Setup\*\* **68**
**Create a new Invoice Site (Conditional Compulsory)** **68**
16. Additional Custom Settings and Configuration\*\* **70**
**Time2Pay Portal Specific Settings** **70**
**Time2Pay Portal Permission Sets** **73**
17. Assignment of Permission Sets to Users\*\* **73**
**Packaged** **74**
**Custom** **74**
**To assign multiple Permissions Sets to a User** **75**
**To assign a Permissions Set to multiple Users** **75**
18. Administrator Guides\*\* **75**
19. Discovery Workbook Data & additional required records\*\* **76**
**Calendars and Calendar Periods** **76**
**Pay Codes (For Invoicing Clients)** **76**
**RDO Leave Rule for Daily Accruals** **76**
**Default Employer Superannuation Fund** **76**
**Create Authorised Contacts for all Payment Entities** **76**
20. STP Submission\*\* **77**
**Client Superchoice Registration** **77**
**Appendix** **78**
**Table of Contents** **78**
**Important Notes**
*(Community Permission Sets)*
2cloudnine Community Permission Sets should only be assigned to Community Users. If they are
assigned to Community Plus Users, there will be issues when upgrading packages in the future. An
example of an error message you may receive if you have assigned a 2cloudnine Permission Set to a
Community Plus User might be. “The user license doesn't allow the permission: Read All
tc9\_pr\_\_Assignment\_Rate\_\_c Employee\_Community\_Permission\_Set: The user license doesn't allow
the permission: Read All tc9\_pr\_\_Assignment\_Rate\_\_c.”
The following error message “Portal User Creation : : List has no rows for assignment to
SObject” please revisit the steps above.
The error message “Portal User Creation : : Field is not writable: User.ProfileID”
specifically relates to a User who is not a Salesforce Administrator or delegated
administrator creating an Experience (Community) User by manually generating
Timesheets or Payee creation. Only Salesforce System Administrators or Delegate
Administrators have the User permissions to be able to create Users on the Salesforce
Platform.
Please refer to the [salesforceReference Material: Define Delegate Administrators.](https://help.salesforce.com/s/articleView?id=sf.delegating_user_administration.htm\&type=5)
### Invoice Portal (only required if no Employee Community but still Invoicing in this Org)
This set is only required if the Org will be using the Invoicing functionality. If not, Users can proceed to the
next step. Users are advised that if they also have the Employee Community configured, then it would be
better to have the Employee Community referenced in the Custom Setting, so Invoices PDFs can be
viewed, however the auto creation of the Employee Community Users still functions.
Go to **Setup > Custom Settings >** **Time2pay Portal Specific Settings > Manage > New**
1. Complete in line with the details provided here:
1. Name = Invoice Portal (must be same as listed in Sites created earlier for Invoice Portal).
2. Site Label = Invoice Portal (must be the same name as the Site Label in the Sites).
3. Default: True.
4. Site URL = remain blank (however if Invoicing includes a separate Invoicing Portal site to
the Employee Community Site, you will need to copy and paste the URL from the Site
created in the earlier step for **Invoice Site Setup** (i.e.
[http://lorelletrain2.my.salesforce-sites.com/ClientPortal](http://lorelletrain2.my.salesforce-sites.com/ClientPortal))).
5. Site ID = (To attain, go to the Cogs (where you would normally locate Setup) > **Developer**
**Console**, select **Query Editor**, paste the following text
**Select id,name from site**
Then select the **Execute** button).
1. Copy the Site ID from the Id column of the Invoice Portal and paste into the Site ID field.
2. Click **Save** .
If there is no Employee Community Site listed in these Custom Settings, then this
Invoice Site must be set as Default = True. Otherwise, you must only have 1 site as
Default, which it’s recommended to be the Employee Community so the Auto Creation
of Users can be successful.
### Time2Pay Portal Permission Sets
**Employee Community**
This Custom Setting needs to be populated so that upon the creation of any Community Users,
they are assigned automatically with the required Permission Sets to access and perform the
various tasks within the Community.
Go to **Setup > Custom Settings > Time2Pay Portal Permission Sets > Manage > New**
1. **Name** = Give the record a name to help identify the specific Profile Name/Permission Set
Combination. This name must be unique.
2. **Portal Profile Name** = The value in this field must match an existing User Profile’s Name
(i.e. Customer Community User, Approver).
3. **Permission Set Api Name** = Define the Permission set that will be automatically assigned
during community user creation and update (i.e. Employee\_Community\_Permission\_Set)
4. Click **Save** .
5. Create a new Custom Setting record for each combination of Profile and Permission Set
required (i.e. will need the original and the cloned Permission Set for Community Users to
be 2 isolated Custom Setting records).
Please note: currently, if you are also required to assign the Locale of the User to be English
(United Kingdom), then you may still need to create a custom flow to do this. For assistance on
this matter, please refer to the 2cloudnine Education & Training Team.
### Rate Calc Line Overriding and Rounding Functionality (Optional)
The Rate Calculator Line QRG provides details related to the override and rounding functionality of the
Rate Calculator. To ensure the integrity of the Rate Calculators calculation, this feature is only available to
Users granted access. To enable rounding access:
Go to **Setup > Users > Edit** (next to the required user)
1. Select the checkbox **Enable Rate Calc Line Rounding** if required.
2. Click **Save** .
3. Repeat for all other Users who need the ability to have Rate Calc Line Rounding in Rate
Calculators.
Go to **Setup > Users >**
1. Locate your User record (i.e. 2cloudnine Admin) and select **Edit** next to the user
2. Check the field **Enable Rate Calc Overriding** .
3. Click **Save** .
4. Repeat for all other Users who need the ability to have Rate Calc Overriding in Rate
Calculators.
## 17. Assignment of Permission Sets to Users
The recommended method of providing suitable access to Users within Salesforce is by assigning the
Packaged Permission Sets, and the Custom Permission Sets created earlier in this guide (See Step 12
called Permission Sets).
Without assigning these Permission Sets, the Users will not gain access to the required Objects, Record
Types, Fields, Apex triggers, etc, as tested by the 2cloudnine Product Team. If a decision is made by
System Administrators to not use these recommended Permissions Sets created by the 2cloudnine
Product Team, then for any issues encountered with the product not working as expected, or inability to
perform expected tasks, the 2cloudnine Product Team request that you test the impacted
process/function again with the recommended Permission Sets assigned to confirm if the issue is a result
of not using the recommended Permission Sets or if this is an issue with the Product itself.
Below is a full list of the current 2cloudnine Permission Sets (both Packaged and Custom created as
detailed in Step 12 above), as well as some information regarding which Users these Permission Sets
should be assigned to.
### Packaged
| Permission Set | Purpose | Users |
| ------------------------------------------------------------- | ---------------------------------------------------------------------------------------------------------------------- | ------------------------------------ |
| **2cloudnine Aus** **Lodgement** | Creating and sending Lodgements. | Payroll Users |
| **2cloudnine Base GL** **Permission Set** | Creating and accessing General Ledger records. | Payroll Users Finance Users |
| **2cloudnine Bulk Data** **Creation Admin** | To perform Setup wizards. | Payroll Users (if required) |
| **2cloudnine Bulk Data** **Creation Field Access Only** | To view Data Creation Package records | Payroll Users |
| **2cloudnine Employee** **Community Permission** **Set** | To view, create and edit Community records. Must also assign the 2cloudnine Standard Objects Permission Set. | Employee Community Users |
| **2cloudnine Employee** **Community Plus** **Permission Set** | To use a Community when licence is Community Plus, in addition to a Public Group and Sharing Settings. | Employee Community Plus Users |
| **2cloudnine FBT Upload** **Callout** | To use the FBT Upload function, and would be auto-assigned to Users performing the task if they don’t already have it. | Payroll Users Finance Users |
| **2cloudnine Import Tool** | To use the Import Tool. | Payroll Users |
| **2cloudnine Interpretation** **Callout** | To utilise the Clone Interpretation Rule functionality. | Payroll Users |
| **2cloudnine Payroll Admin** | Provides Full access to Payroll Package. | Payroll Users |
| **2cloudnine Payroll** **Reconciliation** | Provides Full Access to the Reconciliation package. | Payroll Users Finance Users |
| **2cloudnine Rate Calculator** | To create/read Rate Calculator records. | Payroll Users using Rate Calculators |
| **2cloudnine Staffing** | Provides access to the areas pertaining to Staffing specific Objects/Fields. | Payroll Users in Staffing Orgs |
| **2cloudnine Time2Pay All** **Access** | Provides Full Access to the Time2Pay package. | Payroll Users |
| **2cloudnine Time2Pay** **Standard Online Invoice** | To provide access to online Invoices via URL link, instead of PDF attachment. | Invoice Guest Site User |
### Custom
| Permission Set | Purpose | Users |
| ------------------------------------------------------------- | ------------------------------------------------------------------------------------------------------------------------------------------------------------------ | -------------------------------------- |
| **2cloudnine Pay** **Transactions** | To perform Calculate within Pay Batches, and must be updated regularly to maintain Read access to all custom fields on Pay Transactions. | Payroll Users |
| 2cloudnine Rate Calculator Clone | To provide access to the Account to Rate Calculator Junction Object. This Permission Set is to be assigned along with the Packaged Rate Calculator Permission Set. | Payroll Users |
| **2cloudnine Standard** **Objects Permission Set** | Provides the required access to the Standard Salesforce Objects which can’t be provided within a Packaged Permission set. | Payroll Users Employee Community Users |
| **2cloudnine Time2Pay** **Standard Online Invoice** **Clone** | To provide access to view PDF Invoices online via a URL link. Must be provided in addition to the 2cloudnine Time2Pay Standard Online Invoice Permission Set. | Invoices Guest Site User |
Permission Sets can be assigned to Users by two methods, on an individual User you can assign multiple
Permissions Set, or from the specific Permission Set you can assign it to multiple Users.
### To assign multiple Permissions Sets to a User
Go to **Setup > Users > Users**
1. Select the name of the User(s) to assign Permission Sets to.
2. Select the **Permission Set Assignments** Related List.
3. Select the **Edit Assignments** button.
4. Multiselect the Permissions Sets from the **Available Permission Sets** list, and then select the **>**
button to move to the Enabled Permission Sets list.
5. Select **Save** when all required Permissions Sets are assigned.
6. Repeat the process for each User in the Org as required.
### To assign a Permissions Set to multiple Users
Go to **Setup > Permission Sets > 2cloudnine Aus Lodgement > Manage Assignments > Add**
### Assignments
1. Select the checkboxes next to the User(s) you have created.
2. Select the **Next** button.
3. Select the radio button of **No Expiration** or Specify the expiration date and select the expiration
period from the available options.
4. Select the **Assign** button and then select the **Done** button.
## 18. Administrator Guides
Once the compulsory configuration in previous sections has been completed, System Administrators can
refer to the following Administrator Guides to review and configure these optional functionalities:
* [Configurators - Administrator Guide](https://drive.google.com/file/d/1gMbTaGIIMxfMhedx3EFIq0AXJeOGEelY/view?usp=sharing)
* [Field Sets - Administrator Guide](https://drive.google.com/file/d/1HwPTjKfQbgeqJLMjy5eyXRMb19sg4uoh/view?usp=sharing)
* [Payment File Approval Process to Release - Administrator Guide](https://drive.google.com/file/d/19txOLmVLjWT-6EWFO1AUsdzpLvotPzJB/view?usp=sharing)
* [Validation Overrides - Administrator Guide](https://drive.google.com/file/d/1PKCYe86feHnNhWt92W1z-RqZRXSkEbfp/view?usp=sharing)
* [Workflow Rules - Administrator Guide](https://drive.google.com/file/d/1MwTCLV2OODK3vfzhoblVMVQlA-Ghk5sX/view?usp=sharing)
## 19. Discovery Workbook Data & additional required records
This section provides information relating to the Discovery Workbook and various records that require
creation during the configuration process, which are not included within the Data Creation Package
[steps. To learn more about the Discovery Workbook, please refer to the Discovery Workbook.](https://docs.google.com/spreadsheets/d/17WZq5IKjyx3V6mJvZg5pmK__pOLdTVMNKxVOUygEc8A/edit?usp=sharing)
There are some additional records which need creation before the Org is used to create any Pay
Transactions, which can not be completed as part of the Data Creation Setup detailed earlier in Step 3 of
this guide. To assist with knowing all required data prior to using 2cloudnine completely, users should
[refer to the Payroll Data Creation - Key Information.](https://drive.google.com/file/d/1wYCr5cRBHzJkFpdC0EhIfjLBOG0U9XmD/view?usp=sharing)
### Calendars and Calendar Periods
### Payroll Calendar and Calendar Periods
The Payroll Calendar record is related to the Payment Entity and the Schedule. The Calendar controls the
Start and End Dates of Payroll processing, the expected payroll processing date for each related Calendar
Period and the expected Payment File Release Date for each related Calendar Period. For details on
[creation of Payroll Calendar and Calendar Periods, please refer to the relevant QRG - Create Payroll](https://drive.google.com/file/d/1RcX84QKv1nJG80QaRr79ve63pOr5DG2A/view?usp=sharing)
[Calendar & Calendar Periods.](https://drive.google.com/file/d/1RcX84QKv1nJG80QaRr79ve63pOr5DG2A/view?usp=sharing)
### Invoice Calendar Periods
The Invoice Calendar Periods need to be created. The Invoice Calendar is related to the Schedule and is
Invoice Entity specific. The Calendar controls the Start and End Dates of Invoice Periods, and the
expected Invoice Date for each related Calendar Period. For details on creation of Invoicing Calendar and
[Calendar Periods, please refer to the relevant QRG - Create Invoice Calendar & Calendar Periods.](https://drive.google.com/open?id=1CyST3uG20s7XJ4HK4QtHCE_-H3vFki49)
### Pay Codes (For Invoicing Clients)
Additional fields are required to be completed on Pay Codes used within Org utilising the invoicing
functions. You will need to ensure these fields are populated prior to the creation of any Pay Transactions.
These additional fields are as follows:
* Invoice Name (Maximum 15 characters)
* Invoice Taxable
* Invoice Rate Multiplier
For more information on how to update Pay Codes, please refer to the various Create Pay Code QRGs.
### RDO Leave Rule for Daily Accruals
The RDO Leave Rule within Payroll Setup is configured to accrue leave based on the hours worked across
the week. However, some Awards such as the Building and Construction Award, require the accruals to
be based on hours worked per day, and also may not accrue on all the same Pay Codes that other Leave
Rules accrue on (i.e RDOs don’t accrue on Annual Leave, Personal Leave, etc). In order to achieve this,
there is additional configuration required on the RDO Leave Rule. For details on the creation of RDO
Leave Rules, please refer to the [Leave: Setup Leave Rules QRG.](https://drive.google.com/file/d/16ZX01NBfQoKLINGemCXoQha1DWSA-jvp/view?usp=sharing)
### Default Employer Superannuation Fund
All Payment Entities need to be set up with a Default Super Fund. This is used when Payees don’t have a
preferred Super Fund they are already a member of for their Superannuation contributions to be sent to.
These details should be provided within the Discovery Workbook, and to learn more about Default
Employer Superannuation Funds, please refer to the [QRG Create Default Employer Superannuation Fund.](https://drive.google.com/open?id=1EjPOfWdFTZ3QHx0By3dh-1cXwkEU1NU9)
### Create Authorised Contacts for all Payment Entities
These contacts will need to be set up as Users already with access to 2cloudnine Payroll, and must be
created as Authorised Contacts to submit the STP Lodgements. To learn more about Authorised Contacts,
please refer to the [QRG Authorised Contact.](https://drive.google.com/open?id=1ttXd9GFNYis7hzOod6pOGA_lW7mpd7ix)
**Important Notes**
*(Authorised Contacts Per Payment Entity)*
*For each registered Payment Entity you will have to create at least one Authorised Contact for that*
*corresponding Payment Entity. Only these Authorised Contacts can Lodge STP Lodgements to the*
*ATO for that Payment Entity, so if multiple Users must have the access to do this, then each will*
*require to be set up as an Authorised Contact.*
## 20. STP Submission
### Client Superchoice Registration
You will need to instruct the client to have their nominated person (possibly Payroll Manager or CFO) to
register with SuperChoice and ensure they have provided the details for each Authorised contact that
will need to submit lodgements:
*Dear XXX*
*For us to be able to successfully send the Single Touch Payroll Lodgement Files to the ATO via 2cloudnine Payroll, we*
*will require you to register with SuperChoice for both your Sandbox Org as well as from the Production Org.*
*Sandbox:*
* *[https://www.test.employerpay.com.au/2cloudnine](https://www.test.employerpay.com.au/2cloudnine)*
*Production*
* *[https://www.employerpay.com.au/2cloudnine](https://www.employerpay.com.au/2cloudnine)*
If you are processing pays for various Payment Entities, you must ensure each Payment Entity is registered with
Superchoice. The system will present an error if you try to submit an STP Lodgement that doesn't have a Payment
Entity registered with Superchoice.
*After you have completed the registration process for both Production & Fullsand, if you can confirm the registration*
*is complete by email to your Project Manager/Consultant, who will ensure with our Product Team that it's linked*
*correctly for successful testing and processing after Go Live.*
As part of the SuperChoice registration, the Payment Entity registering for this service will be asked to
provide their bank details. They do not need to provide their actual bank details as there is no service for
this whilst using it purely for the STP Lodgement integration, and they can enter default details as BSB
000000 and Account 00000000.
## Appendix Table of Contents
**2cloudnine Payroll Suite Overview** **1**
**Packages Included in 2cloudnine Payroll** **1**
**Add On Packages** **1**
**Important Information** **2**
**Read First: How to Use this Configuration Guide** **2**
**What is covered by this Configuration Guide?** **2**
**Discovery Workbook and Configuration Guide** **2**
**Task Types** **2**
**Task Classifications** **3**
1. Pre-Installation\*\* **4**
**Installation and Configuration Checklist** **4**
**Setup Custom Profile** **4**
**Creation of 2cloudnine Admin Users** **4**
**My Domain (Custom Domain)** **5**
**Submit a case to Salesforce for changes to My Domain (Conditionally Compulsory)** **6**
**Enabling Chatter** **6**
**Enabling Notes** **6**
**Community Licences Provision Check** **6**
**Administrators Can Log in as Any User** **7**
**Enable Digital Experiences** **7**
**Manage External Users (System Administrator Profile)** **7**
**Setup ‘Roles’** **8**
**Organization-Wide Email Addresses** **8**
**DKIM Setup (Email Authentication for Salesforce)** **9**
2. Installing Packages\*\* **10**
**Main Packages** **10**
**Add On Packages** **10**
**Installation Process** **11**
3. Data Creation Setup\*\* **13**
**Setup Payroll (Wizard)** **13**
**New Picklist Values** **19**
**Setup Time2Pay (Wizard)** **20**
4. Required General Configuration\*\* **26**
**Process Automation Settings** **26**
**Remote Site Settings** **27**
**Withholding Rule and Withholding Rule Item Tabs** **27**
**Send Invoice Emails With Attachments Over 3MB** **28**
5. Apex Classes\*\* **28**
**Retrieve Payroll Reporting Result** **28**
**Retrieve Active Superfunds from Superchoice** **29**
6. Custom Settings\*\* **29**
**Aus Extension Configuration** **29**
**Automatic Status Update** **29**
**Disable Assignment Record Type Validations (Optional)** **30**
**Payroll Configuration** **30**
**Time2Pay Batch Size Overrides Custom Setting (Optional)** **31**
**Time2Pay Create Timesheet Record Types** **31**
**Time2Pay Ext Main Settings** **32**
**Time2Pay Process Invoice - Invoice Types (Conditionally Compulsory)** **34**
**Time2Pay Rate Calculator Configurator (Conditionally Compulsory)** **34**
**Time2Pay Update Rates Settings Custom Setting (Optional)** **35**
7. Page Layout Assignments\*\* **36**
**Standard Page Layouts** **36**
**Employee Community Page Layouts** **38**
**Compact Layouts** **39**
**Search Layouts & List View Button Layouts** **39**
**Lightning Record Pages** **40**
8. Update Buttons, Links and Actions\*\* **42**
**Interpretation Rule** **42**
9. Update Standard Page Layouts\*\* **42**
**Account (Invoice Entity)** **42**
**Account (Payment Entity)** **42**
**Assignment (Conditionally Compulsory)** **43**
**Assignment (Optional)** **43**
**Contact** **43**
**Leave Rule (Optional)** **43**
**Invoice Settings (Optional)** **43**
**Interpretation Breakpoint** **44**
**Payee** **44**
**Payee Leave Event (Optional)** **44**
**Rate Calculator** **44**
**Timesheet Entry** **45**
**User** **45**
10. Field History Tracking\*\* **45**
**Account** **45**
**Contact** **46**
**Updating ALL remaining 2cloudnine Objects** **46**
11. Creation of Custom Permission Sets\*\* **46**
**Standard Objects Permission Set (Compulsory)** **46**
**2cloudnine View Setup Permission Set (Compulsory)** **47**
**Pay Transactions Permission Set (Compulsory)** **48**
**Rate Calculator Permission Set (Conditionally Compulsory)** **48**
**Online URL Invoices (Conditionally Compulsory)** **49**
**2cloudnine Front Office User Permission Set (Conditionally Compulsory)** **49**
12. Employee Community Plus Permission Set (only if using Community Plus Licences)\*\* **50**
13. Scheduled Jobs\*\* **51**
**Schedule Job Scripts - Packaged** **51**
**Delete Payroll Logs (Debug and Batch)** **54**
14. Employee Community Builder\*\* **56**
**Creating the Experience** **56**
**Activate the Community** **57**
**Community General Security Settings** **57**
**Enable Community Security Members** **57**
**Community Login Page Branding/Styling** **58**
**Community Emails & Templates** **58**
**Apply Theme, Colours, and Logo to the Community** **59**
**Creating Community Pages** **59**
**Community Navigation Menu** **60**
**Alternate Community Navigation Menu (Optional)** **61**
### Activate Timesheet Leave Events, Expenses, and Allowances in Community (Optional)62
### Deactivate Leave Forecast and other Leave Components in the Community (Optional)62
**Deactivate Company Details and other Components in the Community (Optional)** **63**
**Community Logout Button - Removal & Addition** **63**
**Dynamic Branding/Styling for different Audiences (Optional)** **63**
**Enable Community Sharing Set (Conditionally Compulsory)** **64**
**Create Approver Identifier & Audience (Conditional Compulsory)** **66**
15. Invoice Site Setup\*\* **68**
**Create a new Invoice Site (Conditional Compulsory)** **68**
16. Additional Custom Settings and Configuration\*\* **70**
**Time2Pay Portal Specific Settings** **70**
**Time2Pay Portal Permission Sets** **73**
17. Assignment of Permission Sets to Users\*\* **73**
**Packaged** **74**
**Custom** **74**
**To assign multiple Permissions Sets to a User** **75**
**To assign a Permissions Set to multiple Users** **75**
18. Administrator Guides\*\* **75**
19. Discovery Workbook Data & additional required records\*\* **76**
**Calendars and Calendar Periods** **76**
**Pay Codes (For Invoicing Clients)** **76**
**RDO Leave Rule for Daily Accruals** **76**
**Default Employer Superannuation Fund** **76**
**Create Authorised Contacts for all Payment Entities** **76**
20. STP Submission\*\* **77**
**Client Superchoice Registration** **77**
**Appendix** **78**
**Table of Contents** **78**