> ## Documentation Index
> Fetch the complete documentation index at: https://documentation.2cloudnine.com/llms.txt
> Use this file to discover all available pages before exploring further.
# Utilities Extension Information & Configuration Guide
## **Disclaimer**
## Table of Contents
* [Read Before Installing](#read-before-installing)
* [Tax File Number Declaration Screenflow](#tax-file-number-declaration-screenflow)
* [Superannuation Choice Screenflow](#superannuation-choice-screenflow)
* [Payment Details Screenflow](#payment-details-screenflow)
* [Timesheet Notifications Record Triggered Flow](#timesheet-notifications-record-triggered-flow)
* [Leave Notifications Record Triggered Flow](#leave-notifications-record-triggered-flow)
* [Expense Claim Notifications Record Triggered Flow](#expense-claim-notifications-record-triggered-flow)
* [Assign Employee Community Permission Sets Record Triggered Flow](#assign-employee-community-permission-sets-record-triggered-flow)
* [Expense Claim Notification Manager Screenflow](#expense-claim-notification-manager-screenflow)
* [Reports & Dashboards](#reports-dashboards)
* [Appendix 1](#appendix-1)
### Disclaimer
**Please ensure you have read and understood this disclaimer before installing the Utility Extension into your Sandbox and Production environments.**
The 2cloudnine Utility Extension Package is an unmanaged package providing
customers with the ability to increase functionality and provide general usability
enhancements that are not yet available in our managed Payroll, Time2Pay,
General Ledger and Community Packages.
It is intended to provide customers with a base build of components that can be
cloned and customised to meet the needs of their specific business requirements.
The Utility Extension Package is available to all 2cloudnine customers as an
optional installation and is not supported under the standard 2cloudnine support
agreement. Any questions or issues relating to the Utility Extension must be
referred to your Salesforce Administrator.
Whilst every endeavour has been made to ensure optimal performance of the
available components, it is the responsibility of the customer installing the package
to perform all adequate testing, including any load testing.
The Utility Extension leverages fields and components from the 2cloudnine
standard managed packages but does not undergo the same rigorous QA process.
This means that we do not guarantee any future upgrade to our managed
2cloudnine packages will not have an adverse impact on functionality provided in
the Utility Extension. It is the responsibility of any customer installing a new
2cloudnine package to also consider the Utility Extension in their package testing.
Where a new 2cloudnine managed package includes functionality that supersedes
that in the Utility Extension, all effort will be made to communicate this as part of
our Release Notes. It will however be the responsibility of the customer to disable
any respective components from the Utility Extension.
As an unmanaged package, the Utility Extension cannot be upgraded. Any new
releases of the Utility Package that contain upgraded components you wish to
utilise will first require you to uninstall the existing package.
We strongly recommend that any flows deployed with the Utility Package are
cloned and saved as a new copy. Failure to do this means the flows and any
changes made to them will be deleted during the uninstall.
Only your authorised Salesforce System Administrator or Partner should be
actioning any installation, configuration items and tasks.
The Salesforce System Administrator or Partner will be responsible for ensuring all
these configuration items and tasks are completed within a reasonable timeframe
of the packages being installed. Please ensure you have familiarised yourself with
all of the requirements PRIOR to installing the package and ensure you have
sufficient time and resources available for configuration and testing. Failing to do
so can negatively impact the user experience and stability of 2cloudnine Payroll.
Where the Utility Package is installed and configured by 2cloudnine, it remains the
responsibility of your Salesforce System Administrator or Partner to have read and
understood the requirements of this guide in full.
They must ensure that any necessary information / data is provided to 2cloudnine
in a timely manner as well as ensure there is adequate time and resources within
the organisation to effectively test the installed functionally.
None of the components included in the Utility Extension package should be
activated within a production org until it is sufficiently tested in an up-to-date
sandbox.
This guide should always be accessed and used via your web browser. This will
ensure you are viewing the most recent version of the document. Further,
downloading the document and opening it with desktop programs, such as Adobe,
have been found to cause errors when copying and using the scripts provided for
data updates. These errors do not occur when viewed through a browser.
### Pre-Installation Checklist
The following items are highly recommended to be completed prior to
commencing the installation and configuration of the Utility Package.
| Configuration Item / Task | Requirement? |
| --------------------------------------- | ---------------------------- |
| **Read Before Installing** | |
| ☐ Prerequisites | **Compulsory** |
| ☐ Install the Utility Extension package | **Compulsory** |
| ☐ Upgrading the Utility Package | **Conditionally Compulsory** |
### Installation and Configuration Checklist
All components in the Utility Package are optional for activation. Where you will be
utilising a component then you must complete all compulsory requirements and
where applicable conditionally compulsory requirements to ensure the
functionality works as intended.
| Configuration Item / Task | Requirement? |
| ------------------------------------------------------------------- | ---------------------------- |
| **Tax File Number Declaration Screenflow** | |
| ☐ Enable Custom Setting | **Compulsory** |
| ☐ Update Profile/Permission Set | **Compulsory** |
| ☐ Activate Flow | **Compulsory** |
| ☐ Add Flow to Community Builder | **Compulsory** |
| ☐ Enable Update to Personal Information | **Optional** |
| **Superannuation Choice Screenflow** | |
| ☐ Enable Custom Setting | **Compulsory** |
| ☐ Update Profile/Permission Set | **Compulsory** |
| ☐ Activate Flow | **Compulsory** |
| ☐ Add Flow to Community Builder | **Compulsory** |
| ☐ Mandatory File Uploads | **Compulsory** |
| **Payment Details Screenflow** | |
| ☐ Update Profile/Permission Set | **Compulsory** |
| ☐ Activate Flow | **Compulsory** |
| ☐ Add Flow to Community Builder | **Compulsory** |
| **Timesheet Notifications Record Triggered Flow** | |
| ☐ Create new picklist values | **Compulsory** |
| ☐ Create Timesheet Notification Setting | **Conditionally Compulsory** |
| ☐ Update Notification Setting to use flow | **Conditionally Compulsory** |
| ☐ Add and verify Organisational Wide Email Address | **Conditionally Compulsory** |
| ☐ Update email templates | **Optional** |
| ☐ Activate flow | **Compulsory** |
| **Leave Notifications Record Triggered Flow** | |
| ☐ Create new picklist values | **Compulsory** |
| ☐ Create Leave Notification Setting | **Conditionally Compulsory** |
| ☐ Update Notification Setting to use flow | **Conditionally Compulsory** |
| ☐ Add and verify Organisation Wide Email Address | **Conditionally Compulsory** |
| ☐ Update email templates | **Optional** |
| ☐ Activate flow | **Compulsory** |
| **Expense Claim Notifications Record Triggered Flow** | |
| ☐ Create new picklist values | **Compulsory** |
| ☐ Create Expense Claim Notification Setting | **Conditionally Compulsory** |
| ☐ Update Notification Setting to use flow | **Conditionally Compulsory** |
| ☐ Add and verify Organisation Wide Email Address | **Conditionally Compulsory** |
| ☐ Update email templates | **Optional** |
| ☐ Activate flow | **Compulsory** |
| **Assign Employee Community Permission Sets Record Triggered Flow** | |
| ☐ Activate flow | **Compulsory** |
| **Expense Claim Notification Manager Screenflow** | |
| ☐ Create and Verify Organisation Wide Email Address | **Conditionally Compulsory** |
| ☐ Update email templates | **Optional** |
| ☐ Activate flow | **Compulsory** |
| **Reports and Dashboards** | |
| **Timesheet** | |
| ☐ Approved Timesheets with Zero Hours | **N/A** |
| ☐ Assignments with NO Timesheets Report | **N/A** |
| ☐ Failed Timesheets | **N/A** |
| ☐ Flagged Timesheets for Review | **N/A** |
| ☐ Missing Timesheets Report | **N/A** |
| ☐ Public Holidays - TSEs for Review | **N/A** |
| ☐ Timesheet Debug Report | **N/A** |
| ☐ Timesheet Status Report | **N/A** |
| ☐ Timesheets vs Transactions Report | **N/A** |
| ☐ Timesheets with Notes | **N/A** |
| **Payroll** | |
| ☐ Allowance Pay Transactions for Review | **N/A** |
| ☐ Contractor Payees without GST Tax Details | **N/A** |
| ☐ Current Leave Balances | **N/A** |
| ☐ Debug Headers - 2cloudnine Payroll | **N/A** |
| ☐ Debug Headers - This Week | **N/A** |
| ☐ Debug Headers - Time2Pay | **N/A** |
| ☐ Debug Headers - Today | **N/A** |
| ☐ Deductions File Cross Check | **N/A** |
| ☐ Deductions Limit Remaining Report | **N/A** |
| ☐ Deductions Report for Payroll Processing | **N/A** |
| ☐ Expense Claims with GST Breakdown | **N/A** |
| ☐ Leave Balances Report | **N/A** |
| ☐ Pay Batch Deductions Report | **N/A** |
| ☐ Pay Transactions not in a Pay Batch | **N/A** |
| ☐ Payee Leave Accruals | **N/A** |
| ☐ Payee Leave Balance Movement | **N/A** |
| ☐ Payees without PAYG Tax Details | **N/A** |
| ☐ Payees without Payment Details | **N/A** |
| ☐ Payees without Payroll Tax Details | **N/A** |
| ☐ Payees without Superannuation Details | **N/A** |
| ☐ PAYG Transactions Report | **N/A** |
| ☐ Payroll Detail Report | **N/A** |
| ☐ Payroll Register Report | **N/A** |
| ☐ STP Employee Data Checking Report | **N/A** |
| ☐ Superannuation Pay Transactions Review | **N/A** |
| **Invoicing** | |
| ☐ Clients with/without Invoice Settings | **N/A** |
| ☐ Fees Invoices Report | **N/A** |
| ☐ Invoices without Invoice Contacts | **N/A** |
| ☐ Outstanding Fees Invoices | **N/A** |
| ☐ Outstanding Temp Invoices | **N/A** |
| ☐ Temp Invoices Report | **N/A** |
| **Dashboard** | |
| ☐ Debugs Dashboard | **N/A** |
| ☐ Invoice Checks Dashboard | **N/A** |
| ☐ Payroll Checks Dashboard | **N/A** |
### Read Before Installing
### Prerequisites
The following packages must be installed in the Org before you can install the
2cloudnine Utilities Extension:
* 2cloudnine Payroll Package
* 2cloudnine Time2Pay Package
* 2cloudnine Communities Package
Package Name (to be installed): 2cloudnine Utilities Extension:
[https://login.salesforce.com/packaging/installPackage.apexp?p0=04t5g000000hHEh](https://login.salesforce.com/packaging/installPackage.apexp?p0=04t5g000000hHEh)
### Installing the Package
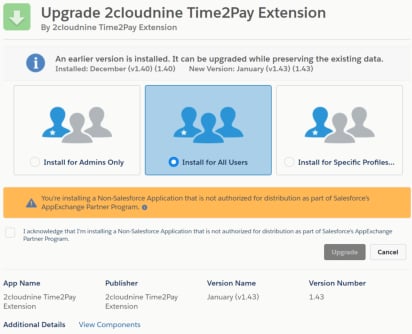
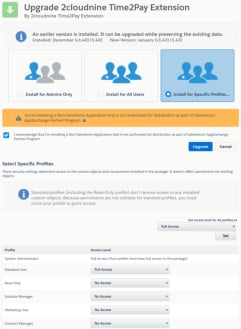
When you install an unmanaged package you need to select if the security is going
to be applied to all profiles or you need to manually select which profiles you will be
applying the security to. This will only happen on the first install of the product so
make sure you get it right.
 As an unmanaged package you will also need to select an option for what to do
when installing components with conflicting names. In order to proceed with the
installation you must select ‘Rename conflicting components in the package’.
As an unmanaged package you will also need to select an option for what to do
when installing components with conflicting names. In order to proceed with the
installation you must select ‘Rename conflicting components in the package’.
 ### Upgrading the Utility Package
As an unmanaged package, the Utility Package cannot be upgraded.
Any new releases of the Utility Package that contain new or updated components
that you wish to utilise will first require you to uninstall the existing package.
Any components from the Utility Package that are in use and you wish to keep
must be saved as new prior to uninstalling the Utility Package (ie Cloned). If this
step has been skipped or an edited component has only been saved as a new
version prior to the uninstall of the Utility package then they will be deleted during
the uninstall process.
We strongly recommend that anytime a component from the Utility Package is
used that you save a new copy at the time to avoid any risk of data deletion.
### Tax File Number Declaration Screenflow
### About
The Tax File Number Declaration screenflow can be added to the Employee
community to provide a user-friendly option for completing an online Tax File
Number Declaration.
The screenflow which is closely aligned to the ATO’s standard TFN Declaration form
can be used to replace the ‘TFN Details’ tab on 2c9 ‘Emp Comm Profile’ and will
allow an employee to both create and update their PAYG Withholding record.
An additional option to show or hide an employee’s name and DOB information
allows for greater control over what information the employee can update.
### Configuration
The flow requires the following configuration before it can be used. Failure to
complete these steps will result in the flow not displaying or running with errors.
1. Enable Custom Setting (compulsory)
2. Update Profile/Permission Sets (compulsory)
3. Activate Flow (compulsory)
4. Add Flow to Community Builder (compulsory)
5. Enable update to Personal Information (optional)
### Enable Custom Setting
1. Go to Setup and Search ‘Custom Settings’
2. Locate the custom setting ‘Utility Extension Settings’ and select ‘Manage’
3. Click ‘New’ and then cancel to create the setting
### Update Profile/Permission Sets
The access outlined in Appendix 1 must be made available for use either via profiles
or custom permission sets in order to use this flow.
### Activate Flow
By default all flows in the Utility Extension are disabled upon installation and must
be manually enabled:
1. Go to Setup and Search ‘Flow’
2. Locate the flow labelled ‘Community Capture TFN Details’
3. Select ‘View Details and Versions’
4. Select ‘Activate’ next to the version with the highest number
### Add Flow to Community Builder
The screenflow is only available for the community and must be added to a
community page using the community builder:
1. Go to Setup and Search ‘All Sites’
2. Locate your Employee community and select ‘Builder’
3. Navigate to the page you want the flow to be inserted into (We recommend
using a ‘My Profile’ page and using the Tabs component if using the TFN,
Super and Payment Details Screen Flows.)
4. Drag the flow component where you would like
5. In the flow component window select the flow labelled ‘Community
Capture TFN Details’ and leave everything else as default
6. If you are using the standard 2c9 ‘Emp Comm Profile’ LWC we recommend
clicking into it and setting the picklist ‘Enable TFN Details Tab’ to ‘No’
7. Publish your community
### Enable Update to Personal Information
The flow contains a section for an employee's name and DOB which is enabled by
default and contains the following fields; Title, Firstname, Surname, Other Names,
Previous Family Name, DOB.
Customers that do not want employees to update this information can disable it:
1. Go to Setup and Search ‘Custom Settings’
2. Locate the custom setting ‘Utility Extension Settings’ and select ‘Manage’
3. Check the setting ‘TFN Remove Personal Details’ and click ‘Save’
## Superannuation Choice Screenflow
### **About**
The Superannuation Choice screenflow can be added to the Employee community
to provide a user-friendly option for employees to add or update a Super
Withholding record.
The screenflow can be used to replace the ‘Super Details’ tab on the ‘Emp Comm
Profile’ LWC and provides options for adding an APRA, SMSF or Client Default fund.
An additional feature allows the upload of files for an APRA or SMSF to be made
mandatory, preventing the employee from continuing without first uploading the
required fund documents.
### **Configuration**
The flow requires the following configuration before it can be used. Failure to
complete these steps will result in the flow not displaying or running with errors.
1. Enable Custom Setting (compulsory)
2. Update Profile / Permission Sets (compulsory)
3. Activate Flow (compulsory)
4. Add Flow to Community Builder (compulsory)
5. Mandatory File Uploads (optional)
**Enable Custom Setting**
1. Go to Setup and Search ‘Custom Settings’
2. Locate the custom setting ‘Utility Extension Settings’ and select ‘Manage’
3. Click ‘New’ and then cancel to create the setting
**Update Profile / Permission Sets**
The access outlined in Appendix 1 must be made available for use either via profiles
or custom permission sets in order to use this flow.
**Activate Flow**
By default all flows in the Utility Extension are disabled upon installation and must
be manually enabled:
1. Go to Setup and Search ‘Flow’
2. Locate the flow labelled ‘Community Capture Super Details’
3. Select ‘View Details and Versions’
4. Select ‘Activate’ next to the version with the highest number
**Add Flow to Community Builder**
The screenflow is only available for the community and must be added to a
community page using the community builder:
1. Go to Setup and Search ‘All Sites’
2. Locate your Employee community and select ‘Builder’
3. Navigate to the page you want the flow to be inserted into (We recommend
using a ‘My Profile’ page and using the Tabs component if using the TFN,
Super and Payment Details Screen Flows.)
4. Drag the flow component where you would like
5. In the flow component window select the flow labelled ‘Community
Capture Super Details’ and leave everything else as default
6. If you are using the standard 2c9 ‘Emp Comm Profile’ LWC we recommend
clicking into it and setting the picklist ‘Enable Super Details Tab’ to ‘No’
7. Publish your community
### Mandatory File Uploads
The flow provides the option to make file uploads mandatory for both APRA and
SMSF funds. To enable this feature:
1. Go to Setup and Search ‘Custom Settings’
2. Locate the custom setting ‘Utility Extension Settings’ and select ‘Manage’
3. Check the setting ‘Super SMSF File Mandatory’ And/Or ‘Super Apra File
Mandatory’.
4. If you need to update the wording in the mandatory file upload, this must
be done within the flow itself. Please contact your system admin if this is
required.
## Payment Details Screenflow
### **About**
The Payment Details screenflow can be added to the Employee community to
provide a user-friendly option for employees to add or update their Payment
Details records
The screenflow can be used to replace the ‘Payment Details’ tab on the ‘Emp
Comm Profile’ LWC and provides the employee with the ability to set up multiple
accounts with different distribution types such as fixed or percentage.
### **Configuration**
The flow requires the following configuration before it can be used. Failure to
complete these steps will result in the flow not displaying or running with errors.
1. Update Profile / Permission Sets (compulsory)
2. Activate Flow (compulsory)
3. Add Flow to Community Builder (compulsory)
**Update Profile / Permission Sets**
The access outlined in Appendix 1 must be made available for use either via profiles
or custom permission sets in order to use this flow.
**Activate Flow**
By default all flows in the Utility Extension are disabled upon installation and must
be manually enabled:
1. Go to Setup and Search ‘Flow’
2. Locate the flow labelled ‘Community Capture Payment Details’
3. Select ‘View Details and Versions’
4. Select ‘Activate’ next to the version with the highest number
**Add Flow to Community Builder**
The screenflow is only available for the community and must be added to a
community page using the community builder:
1. Go to Setup and Search ‘All Sites’
2. Locate your Employee community and select ‘Builder’
3. Navigate to the page you want the flow to be inserted into (We recommend
using a ‘My Profile’ page and using the Tabs component if using the TFN,
Super and Payment Details Screen Flows.)
4. Drag the flow component where you would like
5. In the flow component window select the flow labelled ‘Community
Capture Payment Details’ and leave everything else as default
6. If you are using the standard 2c9 ‘Emp Comm Profile’ LWC we recommend
clicking into it and setting the picklist ‘Enable Payment Details Tab’ to ‘No’
7. Publish your community
## Timesheet Notifications Record Triggered Flow
### **About**
The Timesheet Notifications record triggered flow is used to send emails to
employees and approvers based upon the ‘Timesheet’ Notification Setting related
to an assignment’s related pay schedule or client.
This flow is intended to be used as an interim solution for upcoming
standardisations to notification functionality as of this document version.
Enabling this flow will ensure all immediate send options defined on the
notification setting will trigger emails as intended.
### **Configuration**
The flow requires the following configuration before it can be used. Failure to
complete these steps will result in the flow running with errors:
1. Create new picklist values (compulsory)
2. Create Timesheet Notification Setting (conditionally compulsory)
3. Update Notification Setting to use flow (conditionally compulsory)
4. Add and verify Organisation Wide Email Address (conditionally compulsory)
5. Update Email Templates (optional)
6. Activate Flow (compulsory)
### Create new picklist values
1. Go to Setup and Search ‘Picklist Value Sets’
2. Add a picklist value ‘Custom Send’ and ensure you select ‘Add the new
picklist values to all Record Types that use this Global Value Set.’ to the
following picklist value sets:
1. Auto Send A.Approver Approval Request
2. Auto Send Employee Approved
3. Auto Send Employee Rejected
4. Auto Send P.Approver Actioned By Other
5. Auto Send P.Approver Actioned On Behalf
6. Auto Send P.Approver Approval Request
### Create Timesheet Notification Setting
This step is compulsory if you do not yet have a Timesheet Notification Setting or
want a separate setting for the custom flow.
1. Select the App Launcher and search for ‘Notification Settings’.
2. Click the ‘New’ button and select the ‘Timesheet’ notification record type.
3. Progress to the next step.
### Update Notification Setting to use flow
This step is compulsory for any setting that you wish to use the flow for sending of
the email. If you do not wish to send an email for an option, select ‘Don’t Send
Automatically’
1. Open your Timesheet Notification Setting record.
2. Define an email in the ‘Notification from Email Address’ field which will be
used as the sending emails From address. This email must be a verified org
wide email address (see below)
3. Update your required auto-send options to the new ‘Custom Send’ picklist
value:
1. Auto Send A.Approver Approval Request
2. Auto Send Employee Approved
3. Auto Send Employee Rejected
4. Auto Send P.Approver Actioned By Other
5. Auto Send P.Approver Actioned On Behalf
6. Auto Send P.Approver Approval Request
4. Update all remaining fields.
*Important! - Reminder Notifications are not supported by this flow or the current*
*2cloudnine product.*
### Add and verify Organisation Wide Email Address
The step is compulsory if your org does not yet have an organisation wide email
address or you wish to use a different sending address for the notification email.
1. Go to Setup and Search ‘Organisation-Wide Addresses’
2. Add either a user purpose or special purpose Organisation-Wide Email
Address and ensure the email is set as per step 2. Once saved an email will
be sent to that email address which you must click and verify.
### Update Email Templates
This flow uses text templates within the flow itself. If you wish to update an email
template you must do it within the flow by updating the various text templates
(supports HTML) and saving a new version of the flow.
The text templates contain basic formatting with no letterheads.
Please note the link to access the community found in the approver request emails
is by default set to the value defined in the ‘Approver Link Token’ field of the
approvers contact record. If you are using a different community such as an
authenticated user, then you will need to update the text templates with your
static community URL.
Please contact your system administrator if you need to update a template.
**Activate Flow**
By default all flows in the Utility Extension are disabled upon installation and must
be manually activated:
1. Go to Setup and Search ‘Flow’
2. Locate the flow labelled ‘Timesheet Notifications’
3. Select ‘View Details and Versions’
4. Select ‘Activate’ next to the version with the highest number
## Leave Notifications Record Triggered Flow
### **About**
The Leave Notifications record triggered flow is used to send emails to employees
and Approvers based upon the ‘Leave’ Notification Setting related to an
assignment’s pay schedule or client.
This flow is intended to be used as an interim solution for upcoming
standardisations to notification functionality as of this document version.
Enabling this flow will ensure all immediate send options defined on the
notification setting will trigger emails as intended.
### **Configuration**
The flow requires the following configuration before it can be used. Failure to
complete these steps will result in the flow running with errors:
1. Create new picklist values (compulsory)
2. Create Leave Notification Setting (conditionally compulsory)
3. Update Notification Setting to use flow (conditionally compulsory)
4. Add and verify Organisation Wide Email Address (conditionally compulsory)
5. Update Email Templates (optional)
6. Activate Flow (compulsory)
**Create new picklist values**
1. Go to Setup and Search ‘Picklist Value Sets’
2. Add a picklist value ‘Custom Send’ and ensure you select ‘Add the new
picklist values to all Record Types that use this Global Value Set.’ to the
following picklist value sets:
1. Auto Send A.Approver Approval Request
2. Auto Send Employee Approved
3. Auto Send Employee Rejected
4. Auto Send P.Approver Actioned By Other
5. Auto Send P.Approver Actioned On Behalf
6. Auto Send P.Approver Approval Request
### Create Leave Notification Setting
This step is compulsory if you do not yet have a Leave Notification Setting or want a
separate setting for the custom flow.
1. Select the App Launcher and search for ‘Notification Settings’.
2. Click the ‘New’ button and select the ‘Leave’ notification record type.
3. Progress to the next step.
**Update Notification Setting to use flow**
This step is compulsory for any setting that you wish to use the flow for sending of
the email. If you do not wish to send an email for an option, select ‘Don’t Send
Automatically’.
1. Open your Leave Notification Setting record.
2. Define an email in the ‘Notification from Email Address’ field which will be
used as the sending emails From address. This email must be a verified org
wide email address (see below)
3. Update your required auto-send options to the new ‘Custom Send’ picklist
value:
1. Auto Send A.Approver Approval Request
2. Auto Send Employee Approved
3. Auto Send Employee Rejected
4. Auto Send P.Approver Actioned By Other
5. Auto Send P.Approver Actioned On Behalf
6. Auto Send P.Approver Approval Request
4. Update all remaining fields.
*Important! - Reminder Notifications are not supported by this flow or the current*
*2cloudnine product.*
**Add and verify Organisation Wide Email Address**
The step is compulsory if your org does not yet have an organisation wide email
address or you wish to use a different sending address for the notification email.
1. Go to Setup and Search ‘Organisation-Wide Addresses’
2. Add either a user purpose or special purpose Organisation-Wide Email
Address and ensure the email is set as per step 2. Once saved an email will
be sent to that email address which you must click and Verify.
**Update Email Templates**
This flow uses text templates within the flow itself. If you wish to update an email
template you must do it within the flow by updating the various text templates
(supports HTML) and saving a new version of the flow.
The text templates contain basic formatting with no letterheads.
Please note the link to access the community found in the Approver Request
Emails is by default set to the value defined in the ‘Approver Link Token’ field of the
approvers contact record. If you are using a different community such as an
authenticated user, then you will need to update the text templates with your
static community URL.
Please contact your system administrator if you need to update a template.
**Activate Flow**
By default all flows in the Utility Extension are disabled upon installation and must
be manually enabled:
1. Go to Setup and Search ‘Flow’
2. Locate the flow labelled ‘Leave Notifications’
3. Select ‘View Details and Versions’
4. Select ‘Activate’ next to the version with the highest number
## Expense Claim Notifications Record Triggered Flow
### **About**
The Expense Notifications record triggered flow is used to send emails to
employees and approvers based upon the ‘Expense Claim’ Notification Setting
related to an assignment’s pay schedule or client.
This flow is intended to be used as an interim solution for upcoming
standardisations to notification functionality as of this document version.
Enabling this flow will ensure all immediate send options defined on the
notification setting will trigger emails as intended.
### **Configuration**
The flow requires the following configuration before it can be used. Failure to
complete these steps will result in the flow running with errors:
1. Create new picklist values (compulsory)
2. Create Expense Claim Notification Setting (conditionally compulsory)
3. Update Notification Setting to use flow (conditionally compulsory)
4. Add and verify Organisation Wide Email Address (conditionally compulsory)
5. Update Email Templates (optional)
6. Activate Flow (compulsory)
**Create new picklist values**
1. Go to Setup and Search ‘Picklist Value Sets’
2. Add a picklist value ‘Custom Send’ and ensure you select ‘Add the new
picklist values to all Record Types that use this Global Value Set.’ to the
following picklist value sets:
1. Auto Send A.Approver Approval Request
2. Auto Send Employee Approved
3. Auto Send Employee Rejected
4. Auto Send P.Approver Actioned By Other
5. Auto Send P.Approver Actioned On Behalf
6. Auto Send P.Approver Approval Request
### Create Expense Claim Notification Setting
This step is compulsory if you do not yet have an Expense Claim Notification
Setting or want a separate setting for the custom flow.
1. Select the App Launcher and search for ‘Notification Settings’.
2. Click the ‘New’ button and select the ‘Expense Claim’ notification record
type.
3. Progress to the next step.
**Update Notification Setting to use flow**
This step is compulsory for any setting that you wish to use the flow for sending of
the email. If you do not wish to send an email for an option, select ‘Don’t Send
Automatically’
1. Open your Leave Notification Setting record.
2. Define an email in the ‘Notification from Email Address’ field which will be
used as the sending emails From address. This email must be a verified org
wide email address (see below)
3. Update your required auto-send options to the new ‘Custom Send’ picklist
value:
1. Auto Send A.Approver Approval Request
2. Auto Send Employee Approved
3. Auto Send Employee Rejected
4. Auto Send P.Approver Actioned By Other
5. Auto Send P.Approver Actioned On Behalf
6. Auto Send P.Approver Approval Request
4. Update all remaining fields.
*Important! - Reminder Notifications are not supported by this flow or the current*
*2cloudnine product.*
**Add and verify Organisation Wide Email Address**
The step is compulsory if your org does not yet have an organisation wide email
address or you wish to use a different sending address for the notification email.
1. Go to Setup and Search ‘Organisation-Wide Addresses’
2. Add either a user purpose or special purpose Organisation-Wide Email
Address and ensure the email is set as per step 2. Once saved an email will
be sent to that email address which you must click and Verify.
### Update Email Templates (optional)
This flow uses text templates within the flow itself. If you wish to update an email
template you must do it within the flow by updating the various text templates
(supports HTML) and saving a new version of the flow.
The text templates contain basic formatting with no letterheads.
Please note the link to access the community found in the Approver Request
Emails is by default set to the value defined in the ‘Approver Link Token’ field of the
Approver’s Contact record. If you are using a different community such as an
authenticated user, then you will need to update the text templates with your
static community URL.
Please contact your system administrator if you need to update an email template.
**Activate Flow**
By default all flows in the Utility Extension are disabled upon installation and must
be manually enabled:
1. Go to Setup and Search ‘Flow’
2. Locate the flow labelled ‘Expense Notifications’
3. Select ‘View Details and Versions’
4. Select ‘Activate’ next to the version with the highest number
## Assign Employee Community Permission Sets Record Triggered Flow
### **About**
The Assign Employee Community Permission Sets record triggered flow is used to
automatically assign the ‘Employee Community Permission Set’ and ‘Employee
Community Permission Set Clone' permission sets on the creation of a User record
with the ‘Customer Community User’ profile.
These permission sets are required to ensure employee community users can
access all required functionality of the Employee community. For more information
on these permission sets please refer to the [Community Configuration and](https://docs.google.com/document/d/1YWjwot9HNNTw2Fx6YiFyNSz-m9usdH7tcyes3ROZOj4/edit?pli=1)
[Implementation Guide.](https://docs.google.com/document/d/1YWjwot9HNNTw2Fx6YiFyNSz-m9usdH7tcyes3ROZOj4/edit?pli=1)
**Important! -** The 2cloudnine Time2Pay product includes a custom setting
‘Time2pay Portal Permission Sets’ that can also be used to automatically apply
permission sets to profiles. You must only use one of these options as enabling
both will cause the flow to fail.
Whilst we always recommend using product functionality this flow can be used
when additional functionality is required, such as assigning approver permission
sets or updating the user record.
### **Configuration**
The flow requires the following configuration before it can be used. Failure to
complete these steps will result in the flow not running and users having minimal
access to the Employee community.
1. Activate Flow (compulsory)
**Activate Flow**
By default all flows in the Utility Extension are disabled upon installation and must
be manually enabled:
1. Go to Setup and Search ‘Flows’
2. Locate the flow labelled ‘Assign Employee Permission Sets’
3. Select ‘View Details and Versions’
4. Select ‘Activate’ next to the version with the highest number
## Expense Claim Notification Manager Screenflow
### **About**
The Expense Claim Notification Manager Screenflow can be used to automatically
send Expense Claim reminder emails to employees and approvers to action
pending expense claims.
The screenflow provides users with the option to send email reminders to
employees with rejected expense claims or primary and alternative approvers with
pending submitted expenses claims.
This screenflow does not use any of the 2cloudnine notification settings. A single
email will be sent to every employee or approver based upon the option selected
and for every applicable expense claim.
### **Configuration**
The flow requires the following configuration before it can be used. Failure to
complete these steps will result in the flow running with errors:
1. Create and Verify Organisation Wide Email Address (conditionally
compulsory)
2. Update email templates (optional)
3. Activate Flow (compulsory)
### Create and Verify Organisation Wide Email Address
This step is only required if you do not already have an organisation wide email
address. If one already exists please move to the next step.
1. Go to Setup and Search ‘Organisation-Wide Addresses’
2. Add an Organisation-Wide Email Address
3. Verify the email sent to that email address which you must click and Verify.
Note - If multiple organisation wide email addresses exist, the screenflow will use
the first record that was created in your org as the sender address. If a different
email address is required, you must update the flow.
**Update Email Templates**
This flow uses text templates within the flow itself. If you wish to update an email
template you must do it within the flow by updating the various text templates
(supports HTML) and saving a new version of the flow.
The text templates contain basic formatting with no letterheads.
Please note the link to access the community found in the approver request emails
is by default set to the value defined in the ‘Approver Link Token’ field of the
approvers contact record. If you are using a different community such as an
authenticated user, then you will need to update the text templates with your
static community URL.
Please contact your system administrator if you need to update a template.
**Activate Flow**
By default all flows in the Utility Extension are disabled upon installation and must
be manually enabled:
1. Go to Setup and Search ‘Flows’
2. Locate the flow labelled ‘Expense Claim Notification Manager’
3. Select ‘View Details and Versions’
4. Select ‘Activate’ next to the version with the highest number
Important! - If your internal end users will be accessing and running the
screenflow, you will need to provide access to the flow. There are many ways to
make flows available within an org including the utility bar, home page, record
pages and buttons.
## Reports & Dashboards
### **About**
The Utilities Package contains numerous Reports & Dashboards which are
recommended for users to run to assist with their various processes throughout
the Payroll and Invoicing stages of 2c9 Payroll.
As the reports are packaged, their predetermined filters will often be generic ones,
and once installed it is recommended that users review all reports against when
each report is needed for their own process, in order to evaluate if there are more
suitable filters or groupings that should be applied.
The reports within the dashboards are those that are recommended by 2cloudnine
Payroll SMEs: customisations can easily be made by cloning and updating each
dashboard with custom reports.
It may appear that some reports are duplicates: however you will find on closer
inspection that often reports are filtered slightly differently, or use different source
data in order to present information in a different manner.
Users are reminded that any changes made to the templated reports, including
such as altering or adding filters, adding or deleting fields, or amending the
grouped fields will override the default Report/Dashboard installed, making the
original installed version unavailable.
It is highly recommended to clone and maintain a new version of the templated
report should you wish to make any changes.
### Timesheets
### Approved Timesheets with Zero Hours
This report is suitable for reviewing which timesheets have been submitted by
payees for not working any hours this timesheet period. It is recommended to run
this report before the creation of Pay Batches.
### Assignments with NO Timesheets Report
This report provides users with a complete list of temp assignments currently
without any timesheets. It is recommended that this is run regularly before any
notifications are sent out to payees to submit their timesheets, to ensure all payees
who should have timesheets awaiting submission have them available to enter
times against.
### Failed Timesheets
Payroll users will find this report useful to run prior to the Pay Batch Creation stage
to ensure all timesheets have had their pay transactions created successfully by the
related interpretation rule. It is recommended that this is run prior to any pay batch
creation as those appearing on this report will not be included in the pay batches
created until any issues on the timesheets are resolved and pay transactions are
created successfully.
### Flagged Timesheets for Review
This report provides all timesheets which have been checked as “Flagged for
Review” on either the timesheet or the timesheet entry. This record may have
been ticked manually by payroll users, or it may have been applied by an
automation using Workflow Rules or Flows.
### Missing Timesheets Report
This report provides users with a list of temp assignments where the “Is Timesheet
Created?” checkbox field is false. It is recommended that this is run regularly to
resolve the missing timesheets to enable payees to submit them in a timely
manner.
### Public Holidays - TSEs for Review
This Report will identify all pay transactions where the associated timesheet entry
has the “Is Public Holiday?” checkbox marked as True. Users would then review
these pay transactions to confirm that the payee has actually worked on that day,
and that the Pay Code and Pay Rate being used are correct. It would be
recommended to run this report prior to creating the pay batches.
### Timesheet Debug Report
This report provides a list of all Debugs created this week, where the source is
Time2Pay and they are not related to expense claims. This report is best accessed
from the Debugs Dashboard on a regular basis, especially if there are issues
occurring.
### Timesheet Status Report
This report provides a full list of all timesheets where the end date is less than or
equal to Today, and the pay transactions are not processed. This would provide
users with a view of how many timesheets are still awaiting submission, are still
awaiting approval, or have been rejected and therefore required corrections before
submitting again. Users may prefer to filter this report on just the current Pay
Calendar Period, or to filter based on particular Payment Entities. It would be
recommended to run this report prior to the creation of the Pay Batch.
### Timesheets vs Transactions Report
This joined report is the master to review all approved timesheets, against the pay
transactions that have been created against them, including those for allowances
and expenses. It allows the user to review horizontally the interpretation of the
timesheet, including Pay Rates and Invoice Rates applied, and data can be
“checked off” from this report by applying an additional filter such as the “Flags
Acknowledged” fields. It is recommended that this report is reviewed prior to the
creation of any pay batches for timesheet payees.
### Timesheets with Notes
This report lists all timesheets that have either approver notes or employee notes
on the timesheet or timesheet entries. Ideally, this would be run by payroll users
prior to the creation of the pay batch, and after review may require some
amendments to the pay transactions that have been created by the interpretation
rule.
### Payroll
### Allowance Pay Transactions for Review
This report is currently filtered on pay transactions with a record type of Allowance
that are not yet included in a pay batch. The intended use of this report is to review
those pay transactions created via interpretation rules or are timesheet allowances
selected by payees, and that need a final review by payroll prior to being processed
in a pay batch.
### Contractor Payees without GST Tax Details
This report will list all payees who have their Earner Type as PTY/LTD or Self
Employed, and currently do not have a Payee Withholding of Record Type AU GST
created. This should be run prior to the pay batch creation to ensure any payees of
this earner type have the required GST calculations applied.
### Current Leave Balances
This report will provide the current leave balance as detailed on a payee leave rule,
specific to those record types that either have an accrual or a credit applied which
can be taken as leave at a later date. This report would be most useful to run after
the pay batch status is Payment File Released, or as part of end of month
processing.
### [Debug Headers - 2cloudnine Payroll](https://lorelletrain2.lightning.force.com/lightning/r/sObject/00O5g00000FnUP7EAN/view?queryScope=userFolders)
This report provides a list of all debugs created this week, where the source is
2cloudnine Payroll. This report is best accessed from the debugs dashboard on a
regular basis, especially if there are issues occurring.
### [Debug Headers - This Week](https://lorelletrain2.lightning.force.com/lightning/r/sObject/00O5g00000FnUP7EAN/view?queryScope=userFolders)
This report provides a list of all debugs created this week, where the source is
Time2Pay and are not related to expense claims. This report is best accessed from
the debugs dashboard on a regular basis, especially if there are issues occurring.
### [Debug Headers - Time2Pay](https://lorelletrain2.lightning.force.com/lightning/r/sObject/00O5g00000FnUP7EAN/view?queryScope=userFolders)
This report provides a list of all debugs created this week, where the source is
Time2Pay. This report is best accessed from the debugs dashboard on a regular
basis, especially if there are issues occurring.
### [Debug Headers - Today](https://lorelletrain2.lightning.force.com/lightning/r/sObject/00O5g00000FnUP7EAN/view?queryScope=userFolders)
This report provides a list of all debugs created today, regardless of the product
that has created the debug. This report is best accessed from the debugs
dashboard on a regular basis, especially if there are issues occurring.
### Deductions File Cross Check
This report lists all deduction pay transactions, and provides some details for
related records. Users may find this useful to be run after the pay batch status
becoming “Payment File Released” as a way of confirming the superstream
lodgement, or to create any payments to child support or other third party
companies. Users may like to add an additional filter based on the payment date.
### Deductions Limit Remaining Report
This report will provide all payee deductions records where a value in the “Amount
Remaining” field is populated. This would be useful for Payroll & Finance users to
identify how much remains on various deductions. It is recommended to run this
either before or after a pay batch is at status “Payment File Released”.
### Deductions Report for Payroll Processing
This report is grouped by deduction pay code, and provides a full list of the
deduction pay transactions processed and the pay batch they were processed in.
Users may filter this based on “Payment Processed Date” during a particular period
of time (last fortnight or last month) or for a particular pay batch. It is
recommended this is run to confirm the payments to be made to various third
parties (eg. union fees, child support agency, garnishees, etc).
### Expense Claims with GST Breakdown
This report provides users with a complete list of the expense claims, their
associated expenses, and the GST breakdown for them. It would be recommended
to run this prior to the creation of the pay batches, so any issues with the GST
breakdown are resolved prior to being locked from inclusion in the pay batch. Users
may wish to add an additional filter to ensure it only reports on expenses claims
where the expenses are not already included in a pay batch.
### Leave Balances Report
This report provides the full history of a payee’s leave balance by payee leave rule as
reported on their pay advice lines. Users may wish to filter this based on a
particular payee, or group of payees such as in a payment entity. It also includes a
chart at the top grouped by leave rule type. This report would be useful to run after
pay batch status is “Payment File Released”, as part of end of month processing, or
specific to reviewing a payee’s changes in leave balances.
### Pay Batch Deductions Report
This report provides a detailed list of all deduction pay transactions processed in a
pay batch, grouped by payroll processed date, by payee. This is useful to confirm to
finance teams what has been processed against the GL. It is recommended that
this is processed after a pay batch is calculated for reviewing, and often after a pay
batch to provide to finance teams.
### Pay Transactions not in a Pay Batch
This report is to identify all pay transactions that are not yet processed in a pay
batch to ensure no pay transactions are missed from being paid, including pay
transactions relating to historic calendar periods. It is recommended to run this
report post the pay batch status being “Payment File Released”.
### Payee Leave Accruals
This report provides details of all payee leave accruals based on payee aggregates
with a payee leave rule. It provides a full history of all accruals therefore it can be
monitored if there have been changes to a rate of accrual. This would be most
useful if run when reviews of payee leave balances are required, or any review
against the GL for accruals. It is recommended that this is run post the pay batch
status being “Payment File Released”, or as part of end of month or specific leave
accrual reviews.
### Payee Leave Balance Movement
This report provides a full comprehensive review of all payee aggregates relating to
each payee leave rule, including the starting balance, leave accrued, leave credited,
leave cashed out, leave taken, and leave closing balance for each payee aggregate.
It is recommended that this is run when a reconciliation needs to occur for a payee
on their current leave balance.
### Payees without PAYG Tax Details
This report will list all Payees who do not have PAYG payee withholding records. It
will still list those payees who are an earner type of Pty/Ltd or subcontractor who
will have their GST withholding already created, but can be used as an extra
verification step if required. Ideally this report would be run prior to the creation of
the pay batch, to ensure any PAYG calculations will be considered during the first
calculation for all payees.
### Payees without Payment Details
This report will list all payees who do not have payment details. Ideally, this report
should be run prior to the pay batch creation, to ensure all included can proceed to
the “Payment File Released” stage.
### Payees without Payroll Tax Details
This report will list all payees who do not have a payroll tax withholding record. If
users are wanting to use the payroll tax lodgements as part of the lodgements
package, it requires payees to have a payroll tax withholding prior to the pay batch
being finalised. It is recommended that this would be run prior to the pay batch
creation
### Payees without Superannuation Details
This report will list all payees who do not have superannuation withholding records.
It will still list those payees who are an earner type of Pty/Ltd or subcontractor who
have their GST withholding already created, but can be used as an extra verification
step if required. Ideally this report would be run prior to the creation of the pay
batch, to ensure any superannuation calculations will be considered during the first
calculation for all Payees.
### PAYG Transactions Report
This report provides a detailed list of all deduction pay transactions processed,
grouped by payee per pay batch. This would be suitable for payroll/finance users to
cross check the required PAYG payments to be made to the ATO, and to validate
against the STP reporting. It is recommended that this is run either when creating
an STP file, or when creating the external payment file for PAYG payments.
### Payroll Detail Report
This report is intended to provide users with a comprehensive view of all pay
transactions included in a pay batch, including allowances, payments, deductions,
withholdings, leave accruals, leave events, etc. This report is suitable to be run after
the pay batch calculated stage.
### Payroll Register Report
This report is intended to provide users with a summary level review of the pay
batch at a payee pay batch level. Users would find this report useful either during
or after the pay batch calculation stage, or even at the end of the week to detail all
pay batches processed for the week.
### STP Employee Data Checking Report
This report details employee profile information including address, birthdate,
gender, and phone details, to confirm all of the data is compliant with the ATO
address guidelines and superstream formats for their super funds. It’s encouraged
to always be run prior to any STP or superstream lodgements being created.
### Superannuation Pay Transactions Review
This report details all superannuation withholding or deduction pay transactions
that have a related superannuation fund detailed on them, that have been created
in the last month. The report provides the breakdown of pre or post tax deductions
as well as those that are the SGC contributions. Users would find this report useful
to reconcile against the SuperStream Lodgements.
### Invoicing
### Clients with/without Invoice Settings
This report will list all clients who currently don’t have any invoice settings created,
which would prevent them from having pay transactions updated with the
invoicing fields in preparation for the creation of invoices. It is recommended this
report is run weekly to ensure data integrity doesn’t prevent timesheets from
having pay transactions create or prevent creation of client invoices.
### Fees Invoices Report
This report provides a full list of all “Invoiceable Fees” invoices created with related
detail. Users are recommended to apply filters to this report as required to specify
those created in the week/fortnight/month. This report should be run after the
invoices have been created and when the business requires reporting to be
provided on them.
### Invoices without Invoice Contacts
This report will show any invoices created without an invoice contact specified.
These need to be resolved so the invoice can be emailed to the client using the
email address of the invoice contact. Users are recommended to run this report
after the completion of their invoices being generated.
### Outstanding Fees Invoices
This report will provide a full list of invoiceable fee pay transactions that have not
yet been invoiced. It is recommended to run this prior to creation of “Invoiceable
Fee” invoices to confirm what should be created, and more importantly after you
have completed creating invoices to review what pay transactions remain
outstanding to be invoiced.
### Outstanding Temp Invoices
This report will provide a full list of pay transactions relating to temp assignments
that have not yet been invoiced. It is recommended to run this prior to creation of
invoices to confirm what should be created, and more importantly after you have
completed creating invoices to review which pay transactions remain outstanding
to be invoiced.
### Temp Invoices Report
This report provides a full list of all temp invoices created with related details. Users
are recommended to apply filters to this report as required to specify those created
in the week/fortnight/month. This report should be run after the invoices have
been created and when the business requires reporting to be provided on them.
### Dashboards
### Debugs Dashboard
* Debug Headers - 2cloudnine Payroll
* Debug Headers - This Week
* Debug Headers - Time2Pay
* Debug Headers - Today
### Invoice Checks Dashboard
* Clients with/without Invoice Settings
* Invoices without Invoice Contacts
* Outstanding Fees Invoices
* Outstanding Temp Invoices
* Temp Invoices Report
* Fees Invoices Report
### Payroll Checks Dashboard
* Payees without Payment Details
* Payees without PAYG Tax Details
* Payees without Superannuation Details
* Contractor Payees without GST Details
* Public Holiday - TSEs for Review
* Approved Timesheets with Zero Hours
* Failed Timesheets
* Missing Timesheets Report
* Pay Transactions not in a Pay Batch
## Appendix 1
The below table defines the access that must be granted to either the ‘Customer
Community User’ profile or the ‘Employee Permission Set Clone” to enable them to
run flows.
| Users Key | |
| --------- | ------------------------------- |
| User 1 | Employees who will run the flow |
| Minimum Access Key | |
| ------------------ | -------- |
| R | Read |
| C | Create |
| E | Edit |
| A | Assigned |
| Type | Name | Object (Fields Only) | User 1 |
| ------------------ | --------- | -------------------- | ------ |
| System Permissions | Run Flows | N/A | A |
### Upgrading the Utility Package
As an unmanaged package, the Utility Package cannot be upgraded.
Any new releases of the Utility Package that contain new or updated components
that you wish to utilise will first require you to uninstall the existing package.
Any components from the Utility Package that are in use and you wish to keep
must be saved as new prior to uninstalling the Utility Package (ie Cloned). If this
step has been skipped or an edited component has only been saved as a new
version prior to the uninstall of the Utility package then they will be deleted during
the uninstall process.
We strongly recommend that anytime a component from the Utility Package is
used that you save a new copy at the time to avoid any risk of data deletion.
### Tax File Number Declaration Screenflow
### About
The Tax File Number Declaration screenflow can be added to the Employee
community to provide a user-friendly option for completing an online Tax File
Number Declaration.
The screenflow which is closely aligned to the ATO’s standard TFN Declaration form
can be used to replace the ‘TFN Details’ tab on 2c9 ‘Emp Comm Profile’ and will
allow an employee to both create and update their PAYG Withholding record.
An additional option to show or hide an employee’s name and DOB information
allows for greater control over what information the employee can update.
### Configuration
The flow requires the following configuration before it can be used. Failure to
complete these steps will result in the flow not displaying or running with errors.
1. Enable Custom Setting (compulsory)
2. Update Profile/Permission Sets (compulsory)
3. Activate Flow (compulsory)
4. Add Flow to Community Builder (compulsory)
5. Enable update to Personal Information (optional)
### Enable Custom Setting
1. Go to Setup and Search ‘Custom Settings’
2. Locate the custom setting ‘Utility Extension Settings’ and select ‘Manage’
3. Click ‘New’ and then cancel to create the setting
### Update Profile/Permission Sets
The access outlined in Appendix 1 must be made available for use either via profiles
or custom permission sets in order to use this flow.
### Activate Flow
By default all flows in the Utility Extension are disabled upon installation and must
be manually enabled:
1. Go to Setup and Search ‘Flow’
2. Locate the flow labelled ‘Community Capture TFN Details’
3. Select ‘View Details and Versions’
4. Select ‘Activate’ next to the version with the highest number
### Add Flow to Community Builder
The screenflow is only available for the community and must be added to a
community page using the community builder:
1. Go to Setup and Search ‘All Sites’
2. Locate your Employee community and select ‘Builder’
3. Navigate to the page you want the flow to be inserted into (We recommend
using a ‘My Profile’ page and using the Tabs component if using the TFN,
Super and Payment Details Screen Flows.)
4. Drag the flow component where you would like
5. In the flow component window select the flow labelled ‘Community
Capture TFN Details’ and leave everything else as default
6. If you are using the standard 2c9 ‘Emp Comm Profile’ LWC we recommend
clicking into it and setting the picklist ‘Enable TFN Details Tab’ to ‘No’
7. Publish your community
### Enable Update to Personal Information
The flow contains a section for an employee's name and DOB which is enabled by
default and contains the following fields; Title, Firstname, Surname, Other Names,
Previous Family Name, DOB.
Customers that do not want employees to update this information can disable it:
1. Go to Setup and Search ‘Custom Settings’
2. Locate the custom setting ‘Utility Extension Settings’ and select ‘Manage’
3. Check the setting ‘TFN Remove Personal Details’ and click ‘Save’
## Superannuation Choice Screenflow
### **About**
The Superannuation Choice screenflow can be added to the Employee community
to provide a user-friendly option for employees to add or update a Super
Withholding record.
The screenflow can be used to replace the ‘Super Details’ tab on the ‘Emp Comm
Profile’ LWC and provides options for adding an APRA, SMSF or Client Default fund.
An additional feature allows the upload of files for an APRA or SMSF to be made
mandatory, preventing the employee from continuing without first uploading the
required fund documents.
### **Configuration**
The flow requires the following configuration before it can be used. Failure to
complete these steps will result in the flow not displaying or running with errors.
1. Enable Custom Setting (compulsory)
2. Update Profile / Permission Sets (compulsory)
3. Activate Flow (compulsory)
4. Add Flow to Community Builder (compulsory)
5. Mandatory File Uploads (optional)
**Enable Custom Setting**
1. Go to Setup and Search ‘Custom Settings’
2. Locate the custom setting ‘Utility Extension Settings’ and select ‘Manage’
3. Click ‘New’ and then cancel to create the setting
**Update Profile / Permission Sets**
The access outlined in Appendix 1 must be made available for use either via profiles
or custom permission sets in order to use this flow.
**Activate Flow**
By default all flows in the Utility Extension are disabled upon installation and must
be manually enabled:
1. Go to Setup and Search ‘Flow’
2. Locate the flow labelled ‘Community Capture Super Details’
3. Select ‘View Details and Versions’
4. Select ‘Activate’ next to the version with the highest number
**Add Flow to Community Builder**
The screenflow is only available for the community and must be added to a
community page using the community builder:
1. Go to Setup and Search ‘All Sites’
2. Locate your Employee community and select ‘Builder’
3. Navigate to the page you want the flow to be inserted into (We recommend
using a ‘My Profile’ page and using the Tabs component if using the TFN,
Super and Payment Details Screen Flows.)
4. Drag the flow component where you would like
5. In the flow component window select the flow labelled ‘Community
Capture Super Details’ and leave everything else as default
6. If you are using the standard 2c9 ‘Emp Comm Profile’ LWC we recommend
clicking into it and setting the picklist ‘Enable Super Details Tab’ to ‘No’
7. Publish your community
### Mandatory File Uploads
The flow provides the option to make file uploads mandatory for both APRA and
SMSF funds. To enable this feature:
1. Go to Setup and Search ‘Custom Settings’
2. Locate the custom setting ‘Utility Extension Settings’ and select ‘Manage’
3. Check the setting ‘Super SMSF File Mandatory’ And/Or ‘Super Apra File
Mandatory’.
4. If you need to update the wording in the mandatory file upload, this must
be done within the flow itself. Please contact your system admin if this is
required.
## Payment Details Screenflow
### **About**
The Payment Details screenflow can be added to the Employee community to
provide a user-friendly option for employees to add or update their Payment
Details records
The screenflow can be used to replace the ‘Payment Details’ tab on the ‘Emp
Comm Profile’ LWC and provides the employee with the ability to set up multiple
accounts with different distribution types such as fixed or percentage.
### **Configuration**
The flow requires the following configuration before it can be used. Failure to
complete these steps will result in the flow not displaying or running with errors.
1. Update Profile / Permission Sets (compulsory)
2. Activate Flow (compulsory)
3. Add Flow to Community Builder (compulsory)
**Update Profile / Permission Sets**
The access outlined in Appendix 1 must be made available for use either via profiles
or custom permission sets in order to use this flow.
**Activate Flow**
By default all flows in the Utility Extension are disabled upon installation and must
be manually enabled:
1. Go to Setup and Search ‘Flow’
2. Locate the flow labelled ‘Community Capture Payment Details’
3. Select ‘View Details and Versions’
4. Select ‘Activate’ next to the version with the highest number
**Add Flow to Community Builder**
The screenflow is only available for the community and must be added to a
community page using the community builder:
1. Go to Setup and Search ‘All Sites’
2. Locate your Employee community and select ‘Builder’
3. Navigate to the page you want the flow to be inserted into (We recommend
using a ‘My Profile’ page and using the Tabs component if using the TFN,
Super and Payment Details Screen Flows.)
4. Drag the flow component where you would like
5. In the flow component window select the flow labelled ‘Community
Capture Payment Details’ and leave everything else as default
6. If you are using the standard 2c9 ‘Emp Comm Profile’ LWC we recommend
clicking into it and setting the picklist ‘Enable Payment Details Tab’ to ‘No’
7. Publish your community
## Timesheet Notifications Record Triggered Flow
### **About**
The Timesheet Notifications record triggered flow is used to send emails to
employees and approvers based upon the ‘Timesheet’ Notification Setting related
to an assignment’s related pay schedule or client.
This flow is intended to be used as an interim solution for upcoming
standardisations to notification functionality as of this document version.
Enabling this flow will ensure all immediate send options defined on the
notification setting will trigger emails as intended.
### **Configuration**
The flow requires the following configuration before it can be used. Failure to
complete these steps will result in the flow running with errors:
1. Create new picklist values (compulsory)
2. Create Timesheet Notification Setting (conditionally compulsory)
3. Update Notification Setting to use flow (conditionally compulsory)
4. Add and verify Organisation Wide Email Address (conditionally compulsory)
5. Update Email Templates (optional)
6. Activate Flow (compulsory)
### Create new picklist values
1. Go to Setup and Search ‘Picklist Value Sets’
2. Add a picklist value ‘Custom Send’ and ensure you select ‘Add the new
picklist values to all Record Types that use this Global Value Set.’ to the
following picklist value sets:
1. Auto Send A.Approver Approval Request
2. Auto Send Employee Approved
3. Auto Send Employee Rejected
4. Auto Send P.Approver Actioned By Other
5. Auto Send P.Approver Actioned On Behalf
6. Auto Send P.Approver Approval Request
### Create Timesheet Notification Setting
This step is compulsory if you do not yet have a Timesheet Notification Setting or
want a separate setting for the custom flow.
1. Select the App Launcher and search for ‘Notification Settings’.
2. Click the ‘New’ button and select the ‘Timesheet’ notification record type.
3. Progress to the next step.
### Update Notification Setting to use flow
This step is compulsory for any setting that you wish to use the flow for sending of
the email. If you do not wish to send an email for an option, select ‘Don’t Send
Automatically’
1. Open your Timesheet Notification Setting record.
2. Define an email in the ‘Notification from Email Address’ field which will be
used as the sending emails From address. This email must be a verified org
wide email address (see below)
3. Update your required auto-send options to the new ‘Custom Send’ picklist
value:
1. Auto Send A.Approver Approval Request
2. Auto Send Employee Approved
3. Auto Send Employee Rejected
4. Auto Send P.Approver Actioned By Other
5. Auto Send P.Approver Actioned On Behalf
6. Auto Send P.Approver Approval Request
4. Update all remaining fields.
*Important! - Reminder Notifications are not supported by this flow or the current*
*2cloudnine product.*
### Add and verify Organisation Wide Email Address
The step is compulsory if your org does not yet have an organisation wide email
address or you wish to use a different sending address for the notification email.
1. Go to Setup and Search ‘Organisation-Wide Addresses’
2. Add either a user purpose or special purpose Organisation-Wide Email
Address and ensure the email is set as per step 2. Once saved an email will
be sent to that email address which you must click and verify.
### Update Email Templates
This flow uses text templates within the flow itself. If you wish to update an email
template you must do it within the flow by updating the various text templates
(supports HTML) and saving a new version of the flow.
The text templates contain basic formatting with no letterheads.
Please note the link to access the community found in the approver request emails
is by default set to the value defined in the ‘Approver Link Token’ field of the
approvers contact record. If you are using a different community such as an
authenticated user, then you will need to update the text templates with your
static community URL.
Please contact your system administrator if you need to update a template.
**Activate Flow**
By default all flows in the Utility Extension are disabled upon installation and must
be manually activated:
1. Go to Setup and Search ‘Flow’
2. Locate the flow labelled ‘Timesheet Notifications’
3. Select ‘View Details and Versions’
4. Select ‘Activate’ next to the version with the highest number
## Leave Notifications Record Triggered Flow
### **About**
The Leave Notifications record triggered flow is used to send emails to employees
and Approvers based upon the ‘Leave’ Notification Setting related to an
assignment’s pay schedule or client.
This flow is intended to be used as an interim solution for upcoming
standardisations to notification functionality as of this document version.
Enabling this flow will ensure all immediate send options defined on the
notification setting will trigger emails as intended.
### **Configuration**
The flow requires the following configuration before it can be used. Failure to
complete these steps will result in the flow running with errors:
1. Create new picklist values (compulsory)
2. Create Leave Notification Setting (conditionally compulsory)
3. Update Notification Setting to use flow (conditionally compulsory)
4. Add and verify Organisation Wide Email Address (conditionally compulsory)
5. Update Email Templates (optional)
6. Activate Flow (compulsory)
**Create new picklist values**
1. Go to Setup and Search ‘Picklist Value Sets’
2. Add a picklist value ‘Custom Send’ and ensure you select ‘Add the new
picklist values to all Record Types that use this Global Value Set.’ to the
following picklist value sets:
1. Auto Send A.Approver Approval Request
2. Auto Send Employee Approved
3. Auto Send Employee Rejected
4. Auto Send P.Approver Actioned By Other
5. Auto Send P.Approver Actioned On Behalf
6. Auto Send P.Approver Approval Request
### Create Leave Notification Setting
This step is compulsory if you do not yet have a Leave Notification Setting or want a
separate setting for the custom flow.
1. Select the App Launcher and search for ‘Notification Settings’.
2. Click the ‘New’ button and select the ‘Leave’ notification record type.
3. Progress to the next step.
**Update Notification Setting to use flow**
This step is compulsory for any setting that you wish to use the flow for sending of
the email. If you do not wish to send an email for an option, select ‘Don’t Send
Automatically’.
1. Open your Leave Notification Setting record.
2. Define an email in the ‘Notification from Email Address’ field which will be
used as the sending emails From address. This email must be a verified org
wide email address (see below)
3. Update your required auto-send options to the new ‘Custom Send’ picklist
value:
1. Auto Send A.Approver Approval Request
2. Auto Send Employee Approved
3. Auto Send Employee Rejected
4. Auto Send P.Approver Actioned By Other
5. Auto Send P.Approver Actioned On Behalf
6. Auto Send P.Approver Approval Request
4. Update all remaining fields.
*Important! - Reminder Notifications are not supported by this flow or the current*
*2cloudnine product.*
**Add and verify Organisation Wide Email Address**
The step is compulsory if your org does not yet have an organisation wide email
address or you wish to use a different sending address for the notification email.
1. Go to Setup and Search ‘Organisation-Wide Addresses’
2. Add either a user purpose or special purpose Organisation-Wide Email
Address and ensure the email is set as per step 2. Once saved an email will
be sent to that email address which you must click and Verify.
**Update Email Templates**
This flow uses text templates within the flow itself. If you wish to update an email
template you must do it within the flow by updating the various text templates
(supports HTML) and saving a new version of the flow.
The text templates contain basic formatting with no letterheads.
Please note the link to access the community found in the Approver Request
Emails is by default set to the value defined in the ‘Approver Link Token’ field of the
approvers contact record. If you are using a different community such as an
authenticated user, then you will need to update the text templates with your
static community URL.
Please contact your system administrator if you need to update a template.
**Activate Flow**
By default all flows in the Utility Extension are disabled upon installation and must
be manually enabled:
1. Go to Setup and Search ‘Flow’
2. Locate the flow labelled ‘Leave Notifications’
3. Select ‘View Details and Versions’
4. Select ‘Activate’ next to the version with the highest number
## Expense Claim Notifications Record Triggered Flow
### **About**
The Expense Notifications record triggered flow is used to send emails to
employees and approvers based upon the ‘Expense Claim’ Notification Setting
related to an assignment’s pay schedule or client.
This flow is intended to be used as an interim solution for upcoming
standardisations to notification functionality as of this document version.
Enabling this flow will ensure all immediate send options defined on the
notification setting will trigger emails as intended.
### **Configuration**
The flow requires the following configuration before it can be used. Failure to
complete these steps will result in the flow running with errors:
1. Create new picklist values (compulsory)
2. Create Expense Claim Notification Setting (conditionally compulsory)
3. Update Notification Setting to use flow (conditionally compulsory)
4. Add and verify Organisation Wide Email Address (conditionally compulsory)
5. Update Email Templates (optional)
6. Activate Flow (compulsory)
**Create new picklist values**
1. Go to Setup and Search ‘Picklist Value Sets’
2. Add a picklist value ‘Custom Send’ and ensure you select ‘Add the new
picklist values to all Record Types that use this Global Value Set.’ to the
following picklist value sets:
1. Auto Send A.Approver Approval Request
2. Auto Send Employee Approved
3. Auto Send Employee Rejected
4. Auto Send P.Approver Actioned By Other
5. Auto Send P.Approver Actioned On Behalf
6. Auto Send P.Approver Approval Request
### Create Expense Claim Notification Setting
This step is compulsory if you do not yet have an Expense Claim Notification
Setting or want a separate setting for the custom flow.
1. Select the App Launcher and search for ‘Notification Settings’.
2. Click the ‘New’ button and select the ‘Expense Claim’ notification record
type.
3. Progress to the next step.
**Update Notification Setting to use flow**
This step is compulsory for any setting that you wish to use the flow for sending of
the email. If you do not wish to send an email for an option, select ‘Don’t Send
Automatically’
1. Open your Leave Notification Setting record.
2. Define an email in the ‘Notification from Email Address’ field which will be
used as the sending emails From address. This email must be a verified org
wide email address (see below)
3. Update your required auto-send options to the new ‘Custom Send’ picklist
value:
1. Auto Send A.Approver Approval Request
2. Auto Send Employee Approved
3. Auto Send Employee Rejected
4. Auto Send P.Approver Actioned By Other
5. Auto Send P.Approver Actioned On Behalf
6. Auto Send P.Approver Approval Request
4. Update all remaining fields.
*Important! - Reminder Notifications are not supported by this flow or the current*
*2cloudnine product.*
**Add and verify Organisation Wide Email Address**
The step is compulsory if your org does not yet have an organisation wide email
address or you wish to use a different sending address for the notification email.
1. Go to Setup and Search ‘Organisation-Wide Addresses’
2. Add either a user purpose or special purpose Organisation-Wide Email
Address and ensure the email is set as per step 2. Once saved an email will
be sent to that email address which you must click and Verify.
### Update Email Templates (optional)
This flow uses text templates within the flow itself. If you wish to update an email
template you must do it within the flow by updating the various text templates
(supports HTML) and saving a new version of the flow.
The text templates contain basic formatting with no letterheads.
Please note the link to access the community found in the Approver Request
Emails is by default set to the value defined in the ‘Approver Link Token’ field of the
Approver’s Contact record. If you are using a different community such as an
authenticated user, then you will need to update the text templates with your
static community URL.
Please contact your system administrator if you need to update an email template.
**Activate Flow**
By default all flows in the Utility Extension are disabled upon installation and must
be manually enabled:
1. Go to Setup and Search ‘Flow’
2. Locate the flow labelled ‘Expense Notifications’
3. Select ‘View Details and Versions’
4. Select ‘Activate’ next to the version with the highest number
## Assign Employee Community Permission Sets Record Triggered Flow
### **About**
The Assign Employee Community Permission Sets record triggered flow is used to
automatically assign the ‘Employee Community Permission Set’ and ‘Employee
Community Permission Set Clone' permission sets on the creation of a User record
with the ‘Customer Community User’ profile.
These permission sets are required to ensure employee community users can
access all required functionality of the Employee community. For more information
on these permission sets please refer to the [Community Configuration and](https://docs.google.com/document/d/1YWjwot9HNNTw2Fx6YiFyNSz-m9usdH7tcyes3ROZOj4/edit?pli=1)
[Implementation Guide.](https://docs.google.com/document/d/1YWjwot9HNNTw2Fx6YiFyNSz-m9usdH7tcyes3ROZOj4/edit?pli=1)
**Important! -** The 2cloudnine Time2Pay product includes a custom setting
‘Time2pay Portal Permission Sets’ that can also be used to automatically apply
permission sets to profiles. You must only use one of these options as enabling
both will cause the flow to fail.
Whilst we always recommend using product functionality this flow can be used
when additional functionality is required, such as assigning approver permission
sets or updating the user record.
### **Configuration**
The flow requires the following configuration before it can be used. Failure to
complete these steps will result in the flow not running and users having minimal
access to the Employee community.
1. Activate Flow (compulsory)
**Activate Flow**
By default all flows in the Utility Extension are disabled upon installation and must
be manually enabled:
1. Go to Setup and Search ‘Flows’
2. Locate the flow labelled ‘Assign Employee Permission Sets’
3. Select ‘View Details and Versions’
4. Select ‘Activate’ next to the version with the highest number
## Expense Claim Notification Manager Screenflow
### **About**
The Expense Claim Notification Manager Screenflow can be used to automatically
send Expense Claim reminder emails to employees and approvers to action
pending expense claims.
The screenflow provides users with the option to send email reminders to
employees with rejected expense claims or primary and alternative approvers with
pending submitted expenses claims.
This screenflow does not use any of the 2cloudnine notification settings. A single
email will be sent to every employee or approver based upon the option selected
and for every applicable expense claim.
### **Configuration**
The flow requires the following configuration before it can be used. Failure to
complete these steps will result in the flow running with errors:
1. Create and Verify Organisation Wide Email Address (conditionally
compulsory)
2. Update email templates (optional)
3. Activate Flow (compulsory)
### Create and Verify Organisation Wide Email Address
This step is only required if you do not already have an organisation wide email
address. If one already exists please move to the next step.
1. Go to Setup and Search ‘Organisation-Wide Addresses’
2. Add an Organisation-Wide Email Address
3. Verify the email sent to that email address which you must click and Verify.
Note - If multiple organisation wide email addresses exist, the screenflow will use
the first record that was created in your org as the sender address. If a different
email address is required, you must update the flow.
**Update Email Templates**
This flow uses text templates within the flow itself. If you wish to update an email
template you must do it within the flow by updating the various text templates
(supports HTML) and saving a new version of the flow.
The text templates contain basic formatting with no letterheads.
Please note the link to access the community found in the approver request emails
is by default set to the value defined in the ‘Approver Link Token’ field of the
approvers contact record. If you are using a different community such as an
authenticated user, then you will need to update the text templates with your
static community URL.
Please contact your system administrator if you need to update a template.
**Activate Flow**
By default all flows in the Utility Extension are disabled upon installation and must
be manually enabled:
1. Go to Setup and Search ‘Flows’
2. Locate the flow labelled ‘Expense Claim Notification Manager’
3. Select ‘View Details and Versions’
4. Select ‘Activate’ next to the version with the highest number
Important! - If your internal end users will be accessing and running the
screenflow, you will need to provide access to the flow. There are many ways to
make flows available within an org including the utility bar, home page, record
pages and buttons.
## Reports & Dashboards
### **About**
The Utilities Package contains numerous Reports & Dashboards which are
recommended for users to run to assist with their various processes throughout
the Payroll and Invoicing stages of 2c9 Payroll.
As the reports are packaged, their predetermined filters will often be generic ones,
and once installed it is recommended that users review all reports against when
each report is needed for their own process, in order to evaluate if there are more
suitable filters or groupings that should be applied.
The reports within the dashboards are those that are recommended by 2cloudnine
Payroll SMEs: customisations can easily be made by cloning and updating each
dashboard with custom reports.
It may appear that some reports are duplicates: however you will find on closer
inspection that often reports are filtered slightly differently, or use different source
data in order to present information in a different manner.
Users are reminded that any changes made to the templated reports, including
such as altering or adding filters, adding or deleting fields, or amending the
grouped fields will override the default Report/Dashboard installed, making the
original installed version unavailable.
It is highly recommended to clone and maintain a new version of the templated
report should you wish to make any changes.
### Timesheets
### Approved Timesheets with Zero Hours
This report is suitable for reviewing which timesheets have been submitted by
payees for not working any hours this timesheet period. It is recommended to run
this report before the creation of Pay Batches.
### Assignments with NO Timesheets Report
This report provides users with a complete list of temp assignments currently
without any timesheets. It is recommended that this is run regularly before any
notifications are sent out to payees to submit their timesheets, to ensure all payees
who should have timesheets awaiting submission have them available to enter
times against.
### Failed Timesheets
Payroll users will find this report useful to run prior to the Pay Batch Creation stage
to ensure all timesheets have had their pay transactions created successfully by the
related interpretation rule. It is recommended that this is run prior to any pay batch
creation as those appearing on this report will not be included in the pay batches
created until any issues on the timesheets are resolved and pay transactions are
created successfully.
### Flagged Timesheets for Review
This report provides all timesheets which have been checked as “Flagged for
Review” on either the timesheet or the timesheet entry. This record may have
been ticked manually by payroll users, or it may have been applied by an
automation using Workflow Rules or Flows.
### Missing Timesheets Report
This report provides users with a list of temp assignments where the “Is Timesheet
Created?” checkbox field is false. It is recommended that this is run regularly to
resolve the missing timesheets to enable payees to submit them in a timely
manner.
### Public Holidays - TSEs for Review
This Report will identify all pay transactions where the associated timesheet entry
has the “Is Public Holiday?” checkbox marked as True. Users would then review
these pay transactions to confirm that the payee has actually worked on that day,
and that the Pay Code and Pay Rate being used are correct. It would be
recommended to run this report prior to creating the pay batches.
### Timesheet Debug Report
This report provides a list of all Debugs created this week, where the source is
Time2Pay and they are not related to expense claims. This report is best accessed
from the Debugs Dashboard on a regular basis, especially if there are issues
occurring.
### Timesheet Status Report
This report provides a full list of all timesheets where the end date is less than or
equal to Today, and the pay transactions are not processed. This would provide
users with a view of how many timesheets are still awaiting submission, are still
awaiting approval, or have been rejected and therefore required corrections before
submitting again. Users may prefer to filter this report on just the current Pay
Calendar Period, or to filter based on particular Payment Entities. It would be
recommended to run this report prior to the creation of the Pay Batch.
### Timesheets vs Transactions Report
This joined report is the master to review all approved timesheets, against the pay
transactions that have been created against them, including those for allowances
and expenses. It allows the user to review horizontally the interpretation of the
timesheet, including Pay Rates and Invoice Rates applied, and data can be
“checked off” from this report by applying an additional filter such as the “Flags
Acknowledged” fields. It is recommended that this report is reviewed prior to the
creation of any pay batches for timesheet payees.
### Timesheets with Notes
This report lists all timesheets that have either approver notes or employee notes
on the timesheet or timesheet entries. Ideally, this would be run by payroll users
prior to the creation of the pay batch, and after review may require some
amendments to the pay transactions that have been created by the interpretation
rule.
### Payroll
### Allowance Pay Transactions for Review
This report is currently filtered on pay transactions with a record type of Allowance
that are not yet included in a pay batch. The intended use of this report is to review
those pay transactions created via interpretation rules or are timesheet allowances
selected by payees, and that need a final review by payroll prior to being processed
in a pay batch.
### Contractor Payees without GST Tax Details
This report will list all payees who have their Earner Type as PTY/LTD or Self
Employed, and currently do not have a Payee Withholding of Record Type AU GST
created. This should be run prior to the pay batch creation to ensure any payees of
this earner type have the required GST calculations applied.
### Current Leave Balances
This report will provide the current leave balance as detailed on a payee leave rule,
specific to those record types that either have an accrual or a credit applied which
can be taken as leave at a later date. This report would be most useful to run after
the pay batch status is Payment File Released, or as part of end of month
processing.
### [Debug Headers - 2cloudnine Payroll](https://lorelletrain2.lightning.force.com/lightning/r/sObject/00O5g00000FnUP7EAN/view?queryScope=userFolders)
This report provides a list of all debugs created this week, where the source is
2cloudnine Payroll. This report is best accessed from the debugs dashboard on a
regular basis, especially if there are issues occurring.
### [Debug Headers - This Week](https://lorelletrain2.lightning.force.com/lightning/r/sObject/00O5g00000FnUP7EAN/view?queryScope=userFolders)
This report provides a list of all debugs created this week, where the source is
Time2Pay and are not related to expense claims. This report is best accessed from
the debugs dashboard on a regular basis, especially if there are issues occurring.
### [Debug Headers - Time2Pay](https://lorelletrain2.lightning.force.com/lightning/r/sObject/00O5g00000FnUP7EAN/view?queryScope=userFolders)
This report provides a list of all debugs created this week, where the source is
Time2Pay. This report is best accessed from the debugs dashboard on a regular
basis, especially if there are issues occurring.
### [Debug Headers - Today](https://lorelletrain2.lightning.force.com/lightning/r/sObject/00O5g00000FnUP7EAN/view?queryScope=userFolders)
This report provides a list of all debugs created today, regardless of the product
that has created the debug. This report is best accessed from the debugs
dashboard on a regular basis, especially if there are issues occurring.
### Deductions File Cross Check
This report lists all deduction pay transactions, and provides some details for
related records. Users may find this useful to be run after the pay batch status
becoming “Payment File Released” as a way of confirming the superstream
lodgement, or to create any payments to child support or other third party
companies. Users may like to add an additional filter based on the payment date.
### Deductions Limit Remaining Report
This report will provide all payee deductions records where a value in the “Amount
Remaining” field is populated. This would be useful for Payroll & Finance users to
identify how much remains on various deductions. It is recommended to run this
either before or after a pay batch is at status “Payment File Released”.
### Deductions Report for Payroll Processing
This report is grouped by deduction pay code, and provides a full list of the
deduction pay transactions processed and the pay batch they were processed in.
Users may filter this based on “Payment Processed Date” during a particular period
of time (last fortnight or last month) or for a particular pay batch. It is
recommended this is run to confirm the payments to be made to various third
parties (eg. union fees, child support agency, garnishees, etc).
### Expense Claims with GST Breakdown
This report provides users with a complete list of the expense claims, their
associated expenses, and the GST breakdown for them. It would be recommended
to run this prior to the creation of the pay batches, so any issues with the GST
breakdown are resolved prior to being locked from inclusion in the pay batch. Users
may wish to add an additional filter to ensure it only reports on expenses claims
where the expenses are not already included in a pay batch.
### Leave Balances Report
This report provides the full history of a payee’s leave balance by payee leave rule as
reported on their pay advice lines. Users may wish to filter this based on a
particular payee, or group of payees such as in a payment entity. It also includes a
chart at the top grouped by leave rule type. This report would be useful to run after
pay batch status is “Payment File Released”, as part of end of month processing, or
specific to reviewing a payee’s changes in leave balances.
### Pay Batch Deductions Report
This report provides a detailed list of all deduction pay transactions processed in a
pay batch, grouped by payroll processed date, by payee. This is useful to confirm to
finance teams what has been processed against the GL. It is recommended that
this is processed after a pay batch is calculated for reviewing, and often after a pay
batch to provide to finance teams.
### Pay Transactions not in a Pay Batch
This report is to identify all pay transactions that are not yet processed in a pay
batch to ensure no pay transactions are missed from being paid, including pay
transactions relating to historic calendar periods. It is recommended to run this
report post the pay batch status being “Payment File Released”.
### Payee Leave Accruals
This report provides details of all payee leave accruals based on payee aggregates
with a payee leave rule. It provides a full history of all accruals therefore it can be
monitored if there have been changes to a rate of accrual. This would be most
useful if run when reviews of payee leave balances are required, or any review
against the GL for accruals. It is recommended that this is run post the pay batch
status being “Payment File Released”, or as part of end of month or specific leave
accrual reviews.
### Payee Leave Balance Movement
This report provides a full comprehensive review of all payee aggregates relating to
each payee leave rule, including the starting balance, leave accrued, leave credited,
leave cashed out, leave taken, and leave closing balance for each payee aggregate.
It is recommended that this is run when a reconciliation needs to occur for a payee
on their current leave balance.
### Payees without PAYG Tax Details
This report will list all Payees who do not have PAYG payee withholding records. It
will still list those payees who are an earner type of Pty/Ltd or subcontractor who
will have their GST withholding already created, but can be used as an extra
verification step if required. Ideally this report would be run prior to the creation of
the pay batch, to ensure any PAYG calculations will be considered during the first
calculation for all payees.
### Payees without Payment Details
This report will list all payees who do not have payment details. Ideally, this report
should be run prior to the pay batch creation, to ensure all included can proceed to
the “Payment File Released” stage.
### Payees without Payroll Tax Details
This report will list all payees who do not have a payroll tax withholding record. If
users are wanting to use the payroll tax lodgements as part of the lodgements
package, it requires payees to have a payroll tax withholding prior to the pay batch
being finalised. It is recommended that this would be run prior to the pay batch
creation
### Payees without Superannuation Details
This report will list all payees who do not have superannuation withholding records.
It will still list those payees who are an earner type of Pty/Ltd or subcontractor who
have their GST withholding already created, but can be used as an extra verification
step if required. Ideally this report would be run prior to the creation of the pay
batch, to ensure any superannuation calculations will be considered during the first
calculation for all Payees.
### PAYG Transactions Report
This report provides a detailed list of all deduction pay transactions processed,
grouped by payee per pay batch. This would be suitable for payroll/finance users to
cross check the required PAYG payments to be made to the ATO, and to validate
against the STP reporting. It is recommended that this is run either when creating
an STP file, or when creating the external payment file for PAYG payments.
### Payroll Detail Report
This report is intended to provide users with a comprehensive view of all pay
transactions included in a pay batch, including allowances, payments, deductions,
withholdings, leave accruals, leave events, etc. This report is suitable to be run after
the pay batch calculated stage.
### Payroll Register Report
This report is intended to provide users with a summary level review of the pay
batch at a payee pay batch level. Users would find this report useful either during
or after the pay batch calculation stage, or even at the end of the week to detail all
pay batches processed for the week.
### STP Employee Data Checking Report
This report details employee profile information including address, birthdate,
gender, and phone details, to confirm all of the data is compliant with the ATO
address guidelines and superstream formats for their super funds. It’s encouraged
to always be run prior to any STP or superstream lodgements being created.
### Superannuation Pay Transactions Review
This report details all superannuation withholding or deduction pay transactions
that have a related superannuation fund detailed on them, that have been created
in the last month. The report provides the breakdown of pre or post tax deductions
as well as those that are the SGC contributions. Users would find this report useful
to reconcile against the SuperStream Lodgements.
### Invoicing
### Clients with/without Invoice Settings
This report will list all clients who currently don’t have any invoice settings created,
which would prevent them from having pay transactions updated with the
invoicing fields in preparation for the creation of invoices. It is recommended this
report is run weekly to ensure data integrity doesn’t prevent timesheets from
having pay transactions create or prevent creation of client invoices.
### Fees Invoices Report
This report provides a full list of all “Invoiceable Fees” invoices created with related
detail. Users are recommended to apply filters to this report as required to specify
those created in the week/fortnight/month. This report should be run after the
invoices have been created and when the business requires reporting to be
provided on them.
### Invoices without Invoice Contacts
This report will show any invoices created without an invoice contact specified.
These need to be resolved so the invoice can be emailed to the client using the
email address of the invoice contact. Users are recommended to run this report
after the completion of their invoices being generated.
### Outstanding Fees Invoices
This report will provide a full list of invoiceable fee pay transactions that have not
yet been invoiced. It is recommended to run this prior to creation of “Invoiceable
Fee” invoices to confirm what should be created, and more importantly after you
have completed creating invoices to review what pay transactions remain
outstanding to be invoiced.
### Outstanding Temp Invoices
This report will provide a full list of pay transactions relating to temp assignments
that have not yet been invoiced. It is recommended to run this prior to creation of
invoices to confirm what should be created, and more importantly after you have
completed creating invoices to review which pay transactions remain outstanding
to be invoiced.
### Temp Invoices Report
This report provides a full list of all temp invoices created with related details. Users
are recommended to apply filters to this report as required to specify those created
in the week/fortnight/month. This report should be run after the invoices have
been created and when the business requires reporting to be provided on them.
### Dashboards
### Debugs Dashboard
* Debug Headers - 2cloudnine Payroll
* Debug Headers - This Week
* Debug Headers - Time2Pay
* Debug Headers - Today
### Invoice Checks Dashboard
* Clients with/without Invoice Settings
* Invoices without Invoice Contacts
* Outstanding Fees Invoices
* Outstanding Temp Invoices
* Temp Invoices Report
* Fees Invoices Report
### Payroll Checks Dashboard
* Payees without Payment Details
* Payees without PAYG Tax Details
* Payees without Superannuation Details
* Contractor Payees without GST Details
* Public Holiday - TSEs for Review
* Approved Timesheets with Zero Hours
* Failed Timesheets
* Missing Timesheets Report
* Pay Transactions not in a Pay Batch
## Appendix 1
The below table defines the access that must be granted to either the ‘Customer
Community User’ profile or the ‘Employee Permission Set Clone” to enable them to
run flows.
| Users Key | |
| --------- | ------------------------------- |
| User 1 | Employees who will run the flow |
| Minimum Access Key | |
| ------------------ | -------- |
| R | Read |
| C | Create |
| E | Edit |
| A | Assigned |
| Type | Name | Object (Fields Only) | User 1 |
| ------------------ | --------- | -------------------- | ------ |
| System Permissions | Run Flows | N/A | A |