> ## Documentation Index
> Fetch the complete documentation index at: https://documentation.2cloudnine.com/llms.txt
> Use this file to discover all available pages before exploring further.
# QRG Create an Account - Payment Entity
## Purpose
The purpose of this quick reference guide is to step through the process of setting up a Payment Entity
record. The intended audience for this document is System Administrators / Standard Users.
## Steps
### Create a new Payment Entity record
The Payment Entity record holds company information related to the Employer processing payments to
Employees in Pay Batches.
To create a Payment Entity record, follow the steps below:
1. Go to the **Accounts** object and click on the **New** button. (See Figure 1)
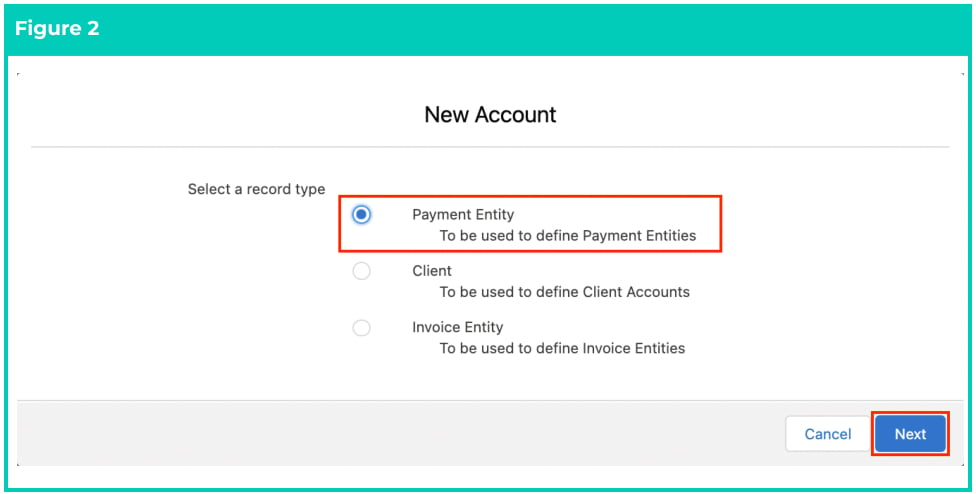
 2. Choose the record type **Payment Entity** and click **Next** .
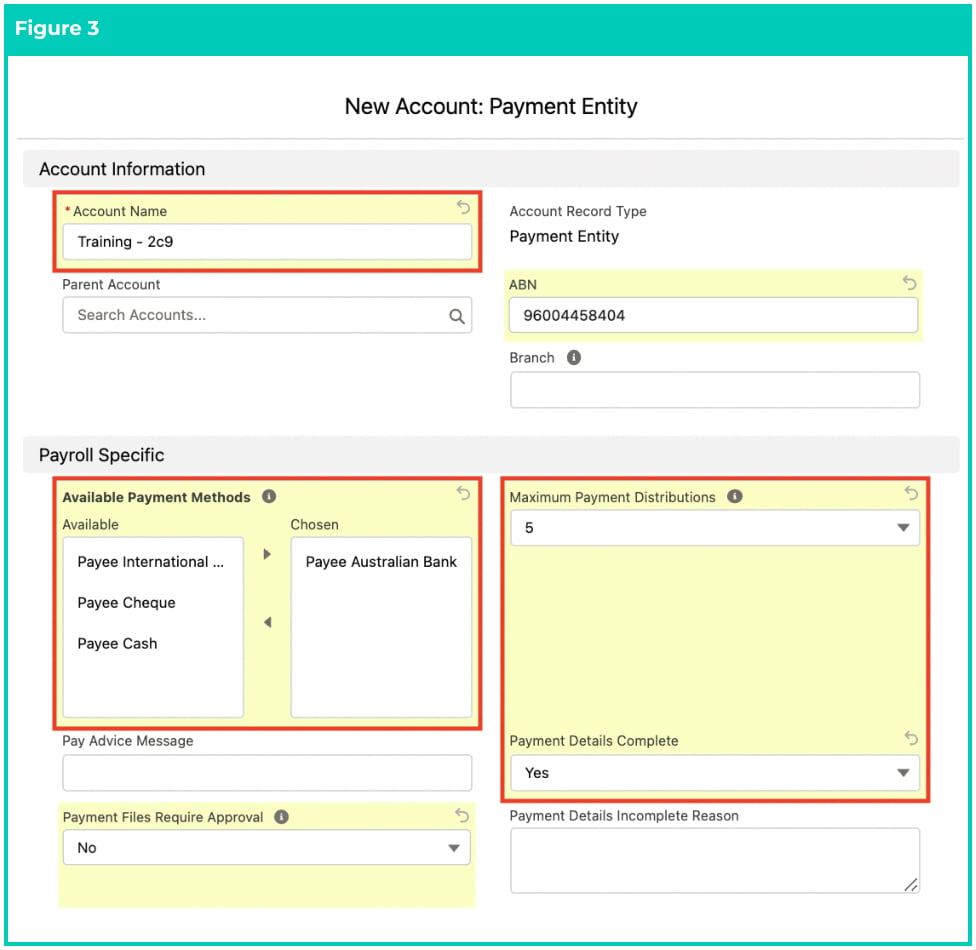
 3. Populate the following required fields to provide the base details of the Payment Entity (see
Figure 3):
1. **Account Name**
2. **Available Payment Methods**
3. **Maximum Payment Distribution**
4. **Parent Account**
5. **STP Contact Name**
6. **STP Contact Email**
7. **STP Contact Phone**
8. **STP Declarer Identifier**
9. **STP Address Line 1**
10. **STP Suburb/Town**
11. **STP State**
12. **STP Postcode**
13. **STP Country**
4. Populate the following optional fields as needed (see Figure 3):
1. To provide details of the Payment Entity’s registered business, populate the following
optional fields:
1. **ABN**
2. **Branch**
2. To declare if the payment details are complete, populate the **Payment Details**
**Complete** field. If not, populate the **Payment Details Incomplete Reason** field.
3. To add a custom message on the Pay Advice PDF, populate the optional field **Pay**
**Advice Message** .
4. To indicate whether or not the Payment Files related to this payment entity must be
approved before they can be released, populate the optional field **Payment Files**
**Require Approval** .
5. To automate the creation of the Employee Community User accounts, populate the
optional fields **Auto Create Employee Community Users** and **Employee Community** .
6. To provide details of the Payment Entity’s preferred Superannuation provider, populate
the following fields:
1. **Superannuation Payment Type**
2. **Superannuation Contact First Name**
3. **Superannuation Contact Last Name**
4. **Superannuation Contact Phone**
5. **Superannuation Contact Email**
5. Click on the **Save** button.
Once the record is saved, the ABN Lookup field will be updated, which can be selected
to open the Australian Business Register ABN Lookup website in a new tab, detailing
the actual details of the ABN entered as per that website.
3. Populate the following required fields to provide the base details of the Payment Entity (see
Figure 3):
1. **Account Name**
2. **Available Payment Methods**
3. **Maximum Payment Distribution**
4. **Parent Account**
5. **STP Contact Name**
6. **STP Contact Email**
7. **STP Contact Phone**
8. **STP Declarer Identifier**
9. **STP Address Line 1**
10. **STP Suburb/Town**
11. **STP State**
12. **STP Postcode**
13. **STP Country**
4. Populate the following optional fields as needed (see Figure 3):
1. To provide details of the Payment Entity’s registered business, populate the following
optional fields:
1. **ABN**
2. **Branch**
2. To declare if the payment details are complete, populate the **Payment Details**
**Complete** field. If not, populate the **Payment Details Incomplete Reason** field.
3. To add a custom message on the Pay Advice PDF, populate the optional field **Pay**
**Advice Message** .
4. To indicate whether or not the Payment Files related to this payment entity must be
approved before they can be released, populate the optional field **Payment Files**
**Require Approval** .
5. To automate the creation of the Employee Community User accounts, populate the
optional fields **Auto Create Employee Community Users** and **Employee Community** .
6. To provide details of the Payment Entity’s preferred Superannuation provider, populate
the following fields:
1. **Superannuation Payment Type**
2. **Superannuation Contact First Name**
3. **Superannuation Contact Last Name**
4. **Superannuation Contact Phone**
5. **Superannuation Contact Email**
5. Click on the **Save** button.
Once the record is saved, the ABN Lookup field will be updated, which can be selected
to open the Australian Business Register ABN Lookup website in a new tab, detailing
the actual details of the ABN entered as per that website.
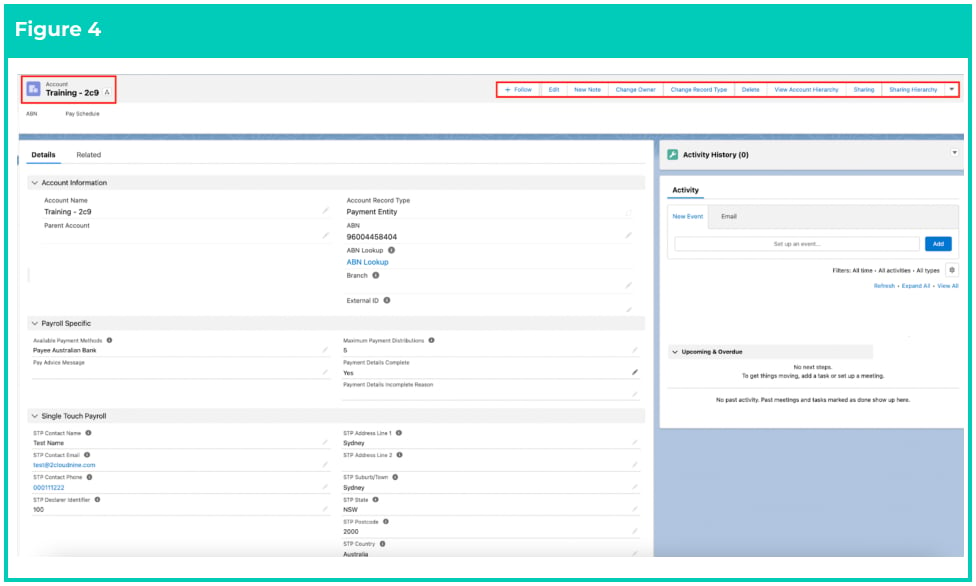
 6. A new Payment Entity record has been created and ready for use in Assignments, Payees and
other related records. (See Figure 4)
6. A new Payment Entity record has been created and ready for use in Assignments, Payees and
other related records. (See Figure 4)
 Payment Entity records CANNOT be deleted if they have related records or are used in
other records. Deleting records is not recommended unless absolutely essential.
7. To modify an existing **Payment Entity** record, open the required record and select the **Edit**
button available on the top right side of the page. You can also double click in any of the fields
that need editing or just click on the pencil icon that appears within fields when you
move your cursor over the field.
8. When complete, click on the **Save** button.
### Payment Entity Logo
If you require a Payment Entity to have a default logo to display on Pay Advices (if no logo is associated
specifically on the Pay Advice Template), you can upload it to the Files tab under the Related List of the
Payment Entity record.
* File format must be gif, png, or jpg
* File name must contain the word ‘logo' (i.e. it could be either logo.jpg or Companylogo.gif
or PayAdvicelogo.png or something similar) or else it will not be displayed as the logo.
To add a logo to the Payment Entity, follow the steps below:
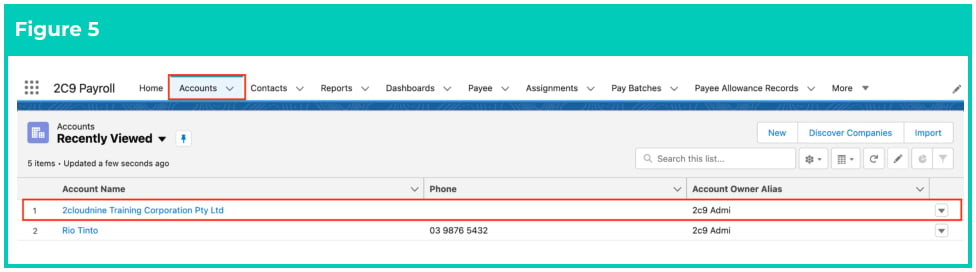
1. Go to the **Accounts** object and open the **Payment Entity** record. (See Figure 5)
Payment Entity records CANNOT be deleted if they have related records or are used in
other records. Deleting records is not recommended unless absolutely essential.
7. To modify an existing **Payment Entity** record, open the required record and select the **Edit**
button available on the top right side of the page. You can also double click in any of the fields
that need editing or just click on the pencil icon that appears within fields when you
move your cursor over the field.
8. When complete, click on the **Save** button.
### Payment Entity Logo
If you require a Payment Entity to have a default logo to display on Pay Advices (if no logo is associated
specifically on the Pay Advice Template), you can upload it to the Files tab under the Related List of the
Payment Entity record.
* File format must be gif, png, or jpg
* File name must contain the word ‘logo' (i.e. it could be either logo.jpg or Companylogo.gif
or PayAdvicelogo.png or something similar) or else it will not be displayed as the logo.
To add a logo to the Payment Entity, follow the steps below:
1. Go to the **Accounts** object and open the **Payment Entity** record. (See Figure 5)
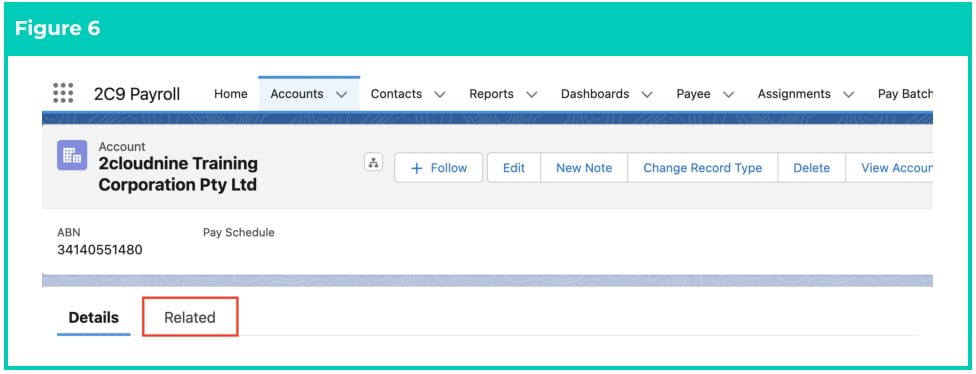
 2. Click on the **Related** tab. (See Figure 6)
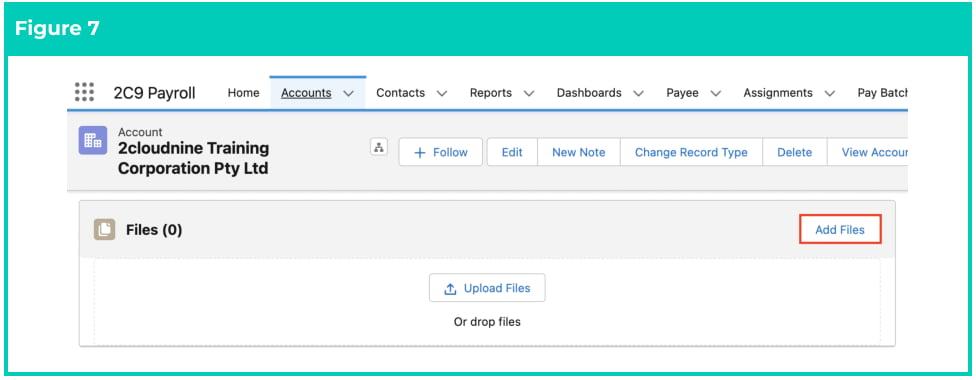
 3. Click on the **Add Files** button. (See Figure 7)
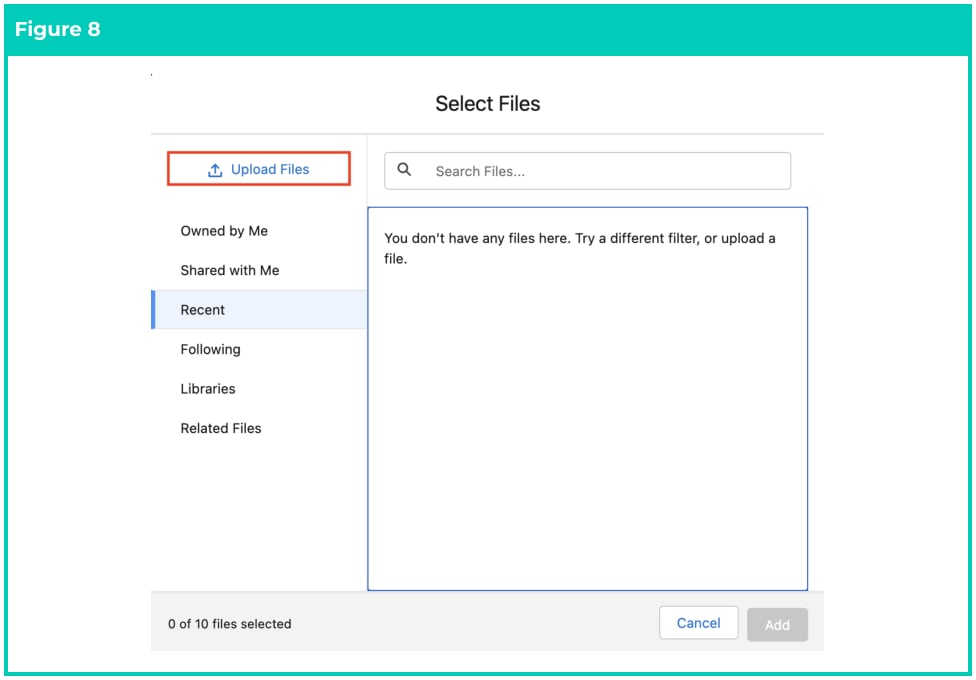
 4. Click on the **Upload Files** button. (See Figure 8)
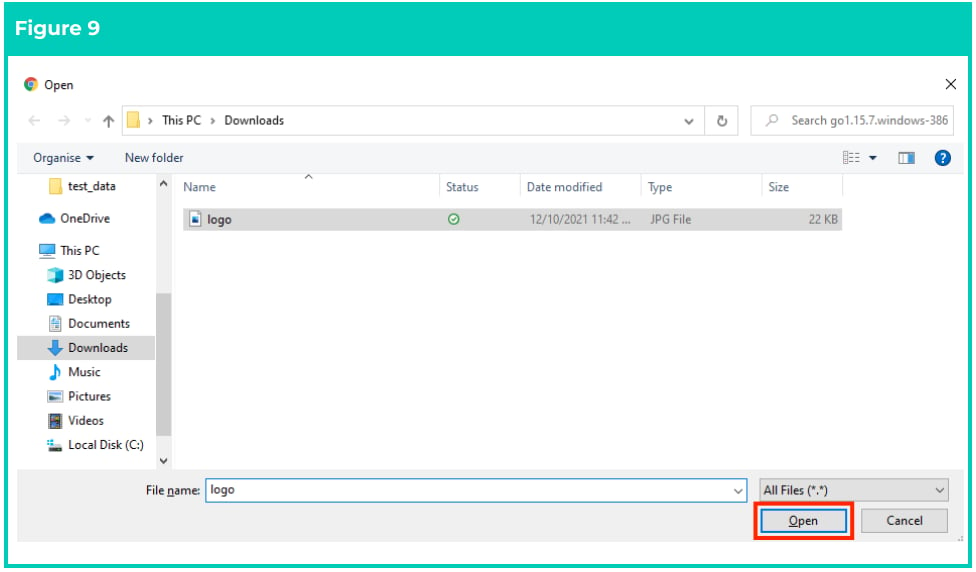
 5. Select the required logo file and click on the **Open** button. (See Figure 9)
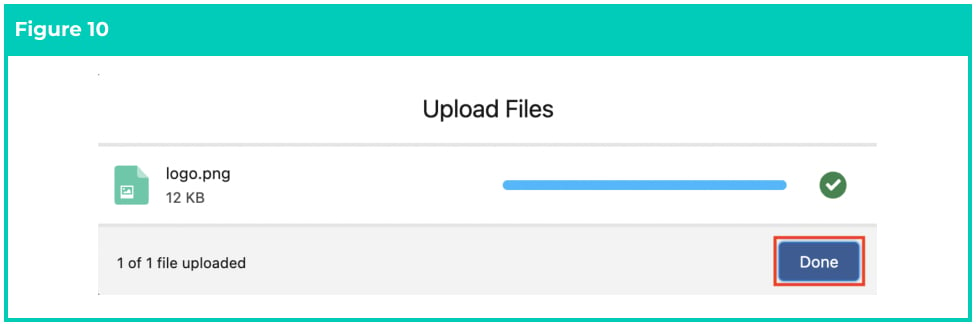
 6. Click on the **Done** button. (See Figure 10)
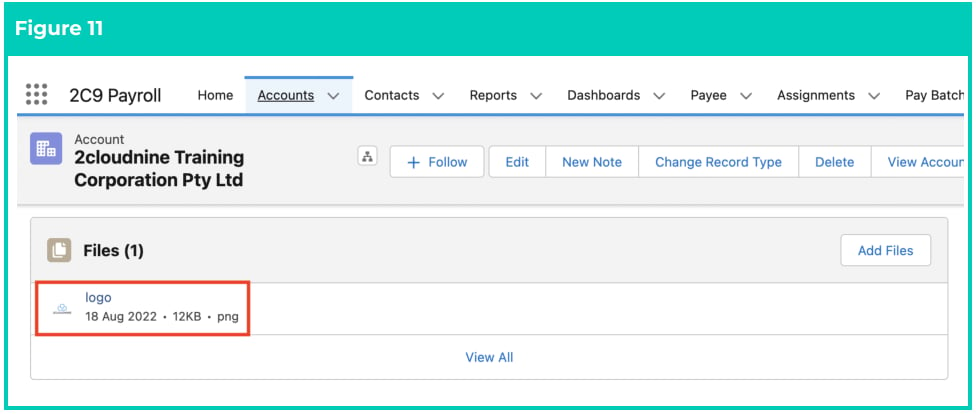
 7. The logo has been uploaded under the Files tab. (See Figure 11)
 You can only attach a .png or .jpg image with the name ‘logo’. This image will be used
as the logo on 2cloudnine Payroll Pay Advice PDFs for this Payment Entity.
If you attach a logo file to a Pay Advice Template record similar to the Payment Entity
record, it overrides the logo attached to the Payment Entity.
If two or more logo files are uploaded on the same Payment Entity record, Salesforce
will randomly select one of those as the logo on the PDF files.
## Field Descriptions
**ABN** is the Australian Business Number of the Account.
**ABN Lookup** is used to confirm the entered ABN in the Australian Business Register ABN Lookup website
matches the correct company name.
**Account Name** is the name given to the new Account/Payment Entity record that is being created.
**Auto Create Employee Community Users** defines that Employee Community Users will be automatically
created for Employees related to the Payment Entity via their Primary Payee.
**Available Payment Methods** are the payment methods that are available to use by the Payment Entity.
**Branch** is the ATO Branch of Payment Entity for inclusion in STP communication.
**Employee Community** defines the Employee Community that will be used by Employees related to the
Payment Entity via their Primary Payee. This value is used in auto creating Community User records.
**Maximum Payment Distributions** is the maximum number of payment distributions allowed per Payee
for the Payment Entity. A global maximum of 5 applies.
**Pay Advice Message** is the message that displays in the Pay Advice document.
The message on the PDF populates from the Pay Advice Message field on the following records:
* Payment Entity
* Pay Advice Template
* Payee
* Pay Advice Creation
If the Pay Advice Message is populated on multiple records detailed above, the Pay Advice PDF will
merge all of them together to display only up to a maximum of 255 characters.
**Parent Account** is the name given to the parent company of the Account record.
**Payment Details Complete** represents that the payment details are complete.
**Payment Details Incomplete Reason** is the reason why the payment details are not complete.
**Payment Files Require Approval** indicates whether Payment Files related to this Payment Entity must
go through an approval process before they can be released.
**STP Contact Email** is the email address of the contact person for inclusion in STP communication.
**STP Country** is the country of source payer for inclusion in STP communication.
**STP Declarer Identifier** is the Declarer Identifier of source payer for inclusion in STP communication.
**STP Address Line 1** is the Business Address Line 1 of source payer for inclusion in STP communication.
**STP Address Line 2** is the Business Address Line 2 of source payer for inclusion in STP communication.
**STP Contact Name** is the contact person for inclusion in STP communication.
**STP Contact Phone** is the phone number of the contact person for inclusion in STP communication.
**STP Postcode** is the Post Code of source payer for inclusion in STP communication.
**STP State** is the state of source payer for inclusion in STP communication.
**STP Suburb/Town** is the Suburb/Town of source payer for inclusion in STP communication.
**Superannuation Contact Email** is the email address of appointed Superannuation Contact.
**Superannuation Contact First Name** is the first name of appointed Superannuation Contact.
**Superannuation Contact Last Name** is the last name of appointed Superannuation Contact.
**Superannuation Contact Phone** is the phone number of appointed Superannuation Contact.
**Superannuation Payment Type** is the method by which superannuation contributions will be paid included in SuperChoice Contributions API.
## Further Information
| Document | Document Type | Description |
| ----------------------------------- | ----------------- | ---------------------------------------------------------------------- |
| QRG Create an Assignment - Employee | Task Instructions | How to create an Assignment for autopay Employees |
| QRG Create an Assignment - Temp | Task Instructions | How to create an Assignment for Timesheet Employees |
| QRG Create a Pay Schedule | Task Instructions | How to create a Pay Schedule |
| QRG Create Timesheet Calendar | Task Instructions | How to create a Timesheet Calendar and Calendar Periods |
| Create Payment Details | Task Instructions | How to create a Payment Details record for Payees and Payment Entities |
You can only attach a .png or .jpg image with the name ‘logo’. This image will be used
as the logo on 2cloudnine Payroll Pay Advice PDFs for this Payment Entity.
If you attach a logo file to a Pay Advice Template record similar to the Payment Entity
record, it overrides the logo attached to the Payment Entity.
If two or more logo files are uploaded on the same Payment Entity record, Salesforce
will randomly select one of those as the logo on the PDF files.
## Field Descriptions
**ABN** is the Australian Business Number of the Account.
**ABN Lookup** is used to confirm the entered ABN in the Australian Business Register ABN Lookup website
matches the correct company name.
**Account Name** is the name given to the new Account/Payment Entity record that is being created.
**Auto Create Employee Community Users** defines that Employee Community Users will be automatically
created for Employees related to the Payment Entity via their Primary Payee.
**Available Payment Methods** are the payment methods that are available to use by the Payment Entity.
**Branch** is the ATO Branch of Payment Entity for inclusion in STP communication.
**Employee Community** defines the Employee Community that will be used by Employees related to the
Payment Entity via their Primary Payee. This value is used in auto creating Community User records.
**Maximum Payment Distributions** is the maximum number of payment distributions allowed per Payee
for the Payment Entity. A global maximum of 5 applies.
**Pay Advice Message** is the message that displays in the Pay Advice document.
The message on the PDF populates from the Pay Advice Message field on the following records:
* Payment Entity
* Pay Advice Template
* Payee
* Pay Advice Creation
If the Pay Advice Message is populated on multiple records detailed above, the Pay Advice PDF will
merge all of them together to display only up to a maximum of 255 characters.
**Parent Account** is the name given to the parent company of the Account record.
**Payment Details Complete** represents that the payment details are complete.
**Payment Details Incomplete Reason** is the reason why the payment details are not complete.
**Payment Files Require Approval** indicates whether Payment Files related to this Payment Entity must
go through an approval process before they can be released.
**STP Contact Email** is the email address of the contact person for inclusion in STP communication.
**STP Country** is the country of source payer for inclusion in STP communication.
**STP Declarer Identifier** is the Declarer Identifier of source payer for inclusion in STP communication.
**STP Address Line 1** is the Business Address Line 1 of source payer for inclusion in STP communication.
**STP Address Line 2** is the Business Address Line 2 of source payer for inclusion in STP communication.
**STP Contact Name** is the contact person for inclusion in STP communication.
**STP Contact Phone** is the phone number of the contact person for inclusion in STP communication.
**STP Postcode** is the Post Code of source payer for inclusion in STP communication.
**STP State** is the state of source payer for inclusion in STP communication.
**STP Suburb/Town** is the Suburb/Town of source payer for inclusion in STP communication.
**Superannuation Contact Email** is the email address of appointed Superannuation Contact.
**Superannuation Contact First Name** is the first name of appointed Superannuation Contact.
**Superannuation Contact Last Name** is the last name of appointed Superannuation Contact.
**Superannuation Contact Phone** is the phone number of appointed Superannuation Contact.
**Superannuation Payment Type** is the method by which superannuation contributions will be paid included in SuperChoice Contributions API.
## Further Information
| Document | Document Type | Description |
| ----------------------------------- | ----------------- | ---------------------------------------------------------------------- |
| QRG Create an Assignment - Employee | Task Instructions | How to create an Assignment for autopay Employees |
| QRG Create an Assignment - Temp | Task Instructions | How to create an Assignment for Timesheet Employees |
| QRG Create a Pay Schedule | Task Instructions | How to create a Pay Schedule |
| QRG Create Timesheet Calendar | Task Instructions | How to create a Timesheet Calendar and Calendar Periods |
| Create Payment Details | Task Instructions | How to create a Payment Details record for Payees and Payment Entities |