> ## Documentation Index
> Fetch the complete documentation index at: https://documentation.2cloudnine.com/llms.txt
> Use this file to discover all available pages before exploring further.
# QRG Create Project Codes
export const InlineImage = ({src, alt = "", height = "1.6em"}) => {
return  ;
};
## Purpose
The purpose of this quick reference guide is to step through the process of creating a Project Code. The
intended audience for this document are system administrators / standard users.
## Steps
### Create a Project Code
Project Codes are used to provide various Pay Rates (and Invoice Rates) to be applied to Pay Codes for the
same Assignment, based on the particular Project or task being performed.
There are three types of Project Code records:
* **Template Level** - The Template Level Project Code is used to create a Template Project Code to be
used as a basis for creating Client Level and Assignment Level Project Codes.
* **Client Level** - The Client Level Project Code is used to define a Client specific Project Code which
can be used for creating an Assignment Level Project code.
* **Assignment Level** - The Assignment Level Project Code is used to define an Assignment specific
Project Code, which will only apply to the related Assignment record, and can be selected on
Timesheet Entries and Assignment Rate Records relating to that Assignment.
Create a Project Code by following the below steps:
;
};
## Purpose
The purpose of this quick reference guide is to step through the process of creating a Project Code. The
intended audience for this document are system administrators / standard users.
## Steps
### Create a Project Code
Project Codes are used to provide various Pay Rates (and Invoice Rates) to be applied to Pay Codes for the
same Assignment, based on the particular Project or task being performed.
There are three types of Project Code records:
* **Template Level** - The Template Level Project Code is used to create a Template Project Code to be
used as a basis for creating Client Level and Assignment Level Project Codes.
* **Client Level** - The Client Level Project Code is used to define a Client specific Project Code which
can be used for creating an Assignment Level Project code.
* **Assignment Level** - The Assignment Level Project Code is used to define an Assignment specific
Project Code, which will only apply to the related Assignment record, and can be selected on
Timesheet Entries and Assignment Rate Records relating to that Assignment.
Create a Project Code by following the below steps:
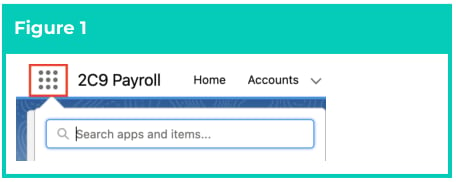
1. Click on the App Launcher icon (see
Figure 1).
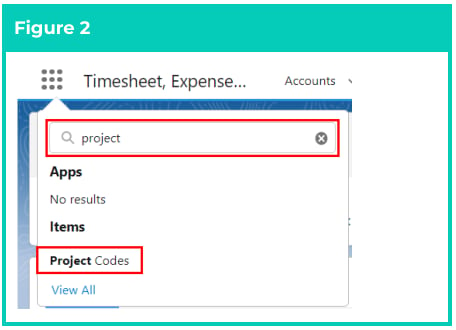
2. Go to the **Project Codes** object by using
the Search function (see Figure 2).
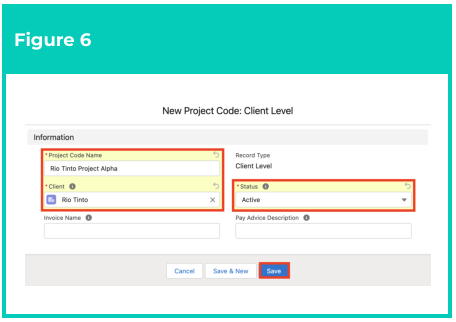
3. Click on the **New** button (see Figure 3).
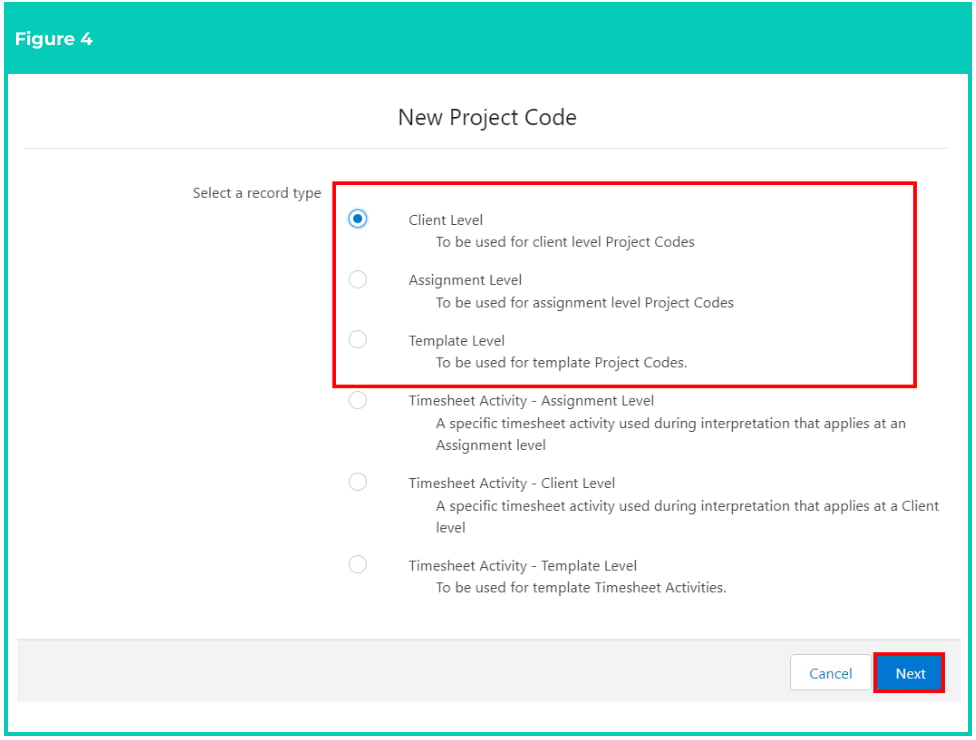
 4. Select **Client Level**, **Assignment Level** or **Template Level** from the available record types, and
click on the Next button (see Figure 4).
4. Select **Client Level**, **Assignment Level** or **Template Level** from the available record types, and
click on the Next button (see Figure 4).
 5. If the **Template Level** record type was selected, follow this step in the sequence given below:
1. Populate the following required fields to provide the base details of the Project Code (see
Figure 5):
1. **Project Code Name**
2. **Status**
2. Populate the following optional fields as required (See Figure 5):
1. To define a specific name for any Invoices related to this **Project Code**, populate
the **Invoice Name** field.
2. To define a specific description for any **Pay Advices** related to this **Project Code**,
populate the **Pay Advice Description** field.
6. Click on the **Save** button (see Figure 5).
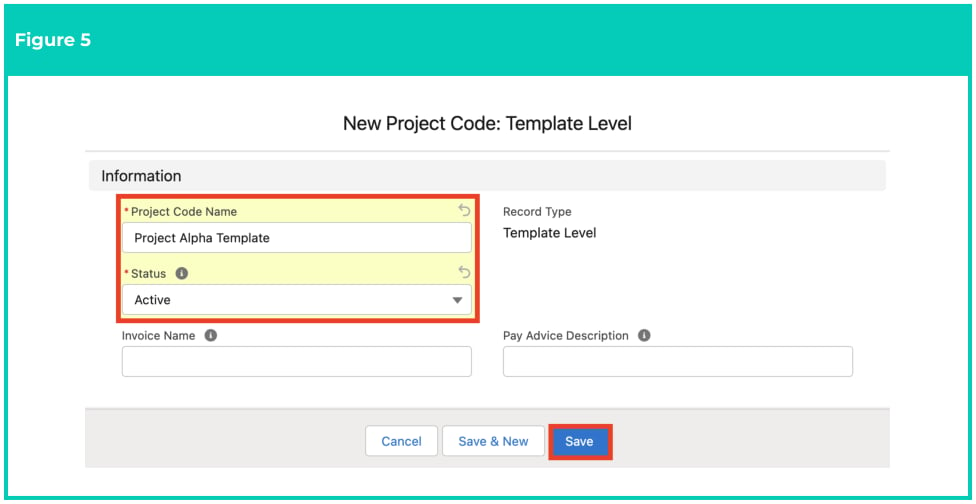
5. If the **Template Level** record type was selected, follow this step in the sequence given below:
1. Populate the following required fields to provide the base details of the Project Code (see
Figure 5):
1. **Project Code Name**
2. **Status**
2. Populate the following optional fields as required (See Figure 5):
1. To define a specific name for any Invoices related to this **Project Code**, populate
the **Invoice Name** field.
2. To define a specific description for any **Pay Advices** related to this **Project Code**,
populate the **Pay Advice Description** field.
6. Click on the **Save** button (see Figure 5).
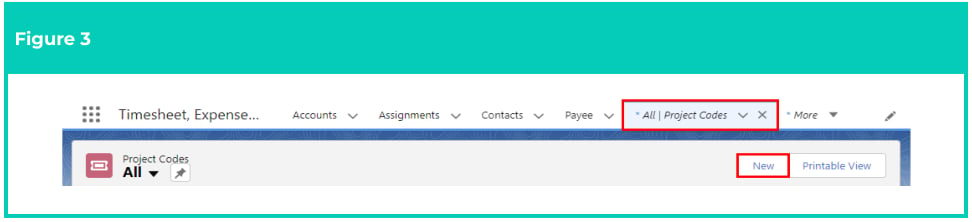
 7. If the **Client Level** record type was selected, follow this step in the sequence given below:
1. Populate the following required fields to provide the base details of the **Project Code** (see
Figure 6):
1. **Project Code Name**
2. **Client**
3. **Status**
2. Populate the following optional fields as required (See Figure 6):
1. To define a specific name for any Invoices related to this Project Code, populate
the **Invoice Name** field.
2. To define a specific description for any Pay Advices related to this Project Code,
populate the **Pay Advice Description** field.
7. If the **Client Level** record type was selected, follow this step in the sequence given below:
1. Populate the following required fields to provide the base details of the **Project Code** (see
Figure 6):
1. **Project Code Name**
2. **Client**
3. **Status**
2. Populate the following optional fields as required (See Figure 6):
1. To define a specific name for any Invoices related to this Project Code, populate
the **Invoice Name** field.
2. To define a specific description for any Pay Advices related to this Project Code,
populate the **Pay Advice Description** field.
8) Click on the **Save** button (see Figure 6):
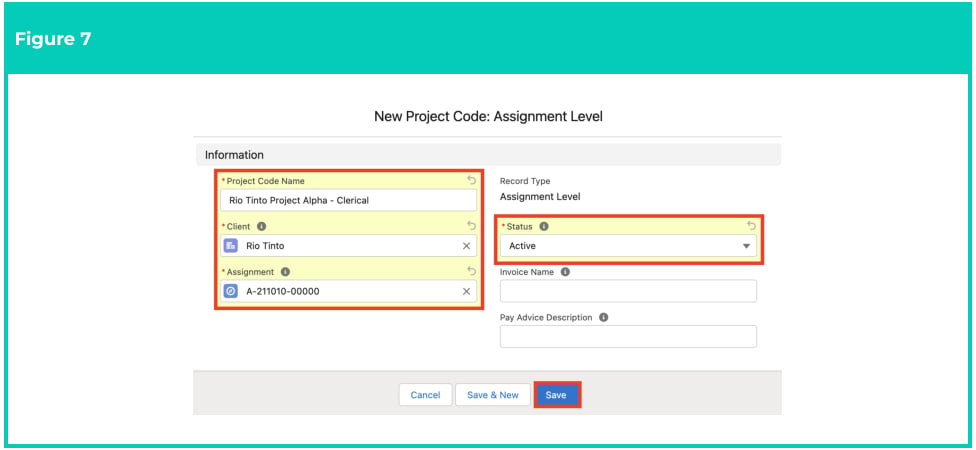
9. If the **Assignment Level** record type was selected, follow this step in the sequence given below:
1. Populate the following required fields to provide the base details of the Project Code (see
Figure 7):
1. **Project Code Name**
2. **Client**
3. **Assignment**
4. **Status**
2. Populate the following optional fields as required (See Figure 7):
1. To define a specific name for any Invoices related to this Project Code, populate
the **Invoice Name** field.
2. To define a specific description for any Pay Advices related to this Project Code,
populate the **Pay Advice Description** field.
10. Click on the **Save** button (see Figure 7).
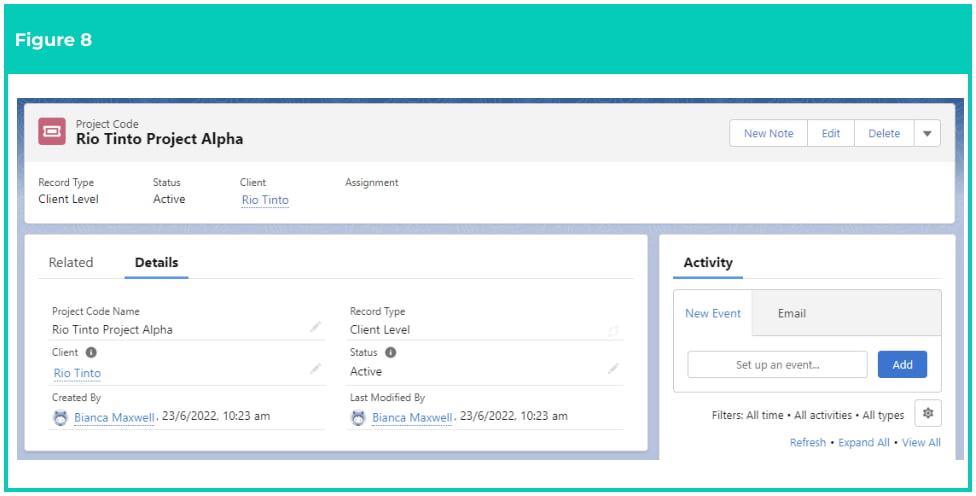
 A new **Project Code** record has been created (see Figure 8).
 Project Codes CAN NOT be deleted if they are used in other records. Deleting records is
not recommended unless absolutely essential.
A Project Code record can only be edited if it has not already been referenced within
Pay Transactions, Interpretation Rules or Payee Allowance records. A new Project Code
will need to be created if updates are required after this point.
1. To modify an existing Client Level Project Code record, open the required record and select the
**Edit** button available on the top right side of the page. You can also double click in any of the
fields that need editing or just click on the pencil icon that appears within fields when you
move your cursor over the field.
2. When complete, click on the **Save** button.
## Field Descriptions
**Assignment** is the specific Assignment this Project Code applies to.
**Client** is the specific Client this Project Code applies to.
**Invoice Name** defines the Name that will be used on Invoices for the Project Code. If not populated, the
Project Code will be trimmed to 15 characters
**Pay Advice Description** is the Project Code description that will be displayed to the Employee on their
Pay Advice.
**Project Code Name** is the name assigned to the Project Code record.
**Status** is the Status of the Project Code.
## Further Information
| Document | Document Type | Description |
| --------------------------------------------- | ---------------- | ---------------------------------------------------------- |
| QRG Create Project Codes - Timesheet Activity | Task Information | How to create Timesheet Activity Project Codes |
| Create an Assignment - Temp | Task Information | How to create an Assignment record for Timesheet Employees |
| Create an Assignment Rate record - Timesheet | Task Information | How to create a Timesheet Assignment Rate Record |
Project Codes CAN NOT be deleted if they are used in other records. Deleting records is
not recommended unless absolutely essential.
A Project Code record can only be edited if it has not already been referenced within
Pay Transactions, Interpretation Rules or Payee Allowance records. A new Project Code
will need to be created if updates are required after this point.
1. To modify an existing Client Level Project Code record, open the required record and select the
**Edit** button available on the top right side of the page. You can also double click in any of the
fields that need editing or just click on the pencil icon that appears within fields when you
move your cursor over the field.
2. When complete, click on the **Save** button.
## Field Descriptions
**Assignment** is the specific Assignment this Project Code applies to.
**Client** is the specific Client this Project Code applies to.
**Invoice Name** defines the Name that will be used on Invoices for the Project Code. If not populated, the
Project Code will be trimmed to 15 characters
**Pay Advice Description** is the Project Code description that will be displayed to the Employee on their
Pay Advice.
**Project Code Name** is the name assigned to the Project Code record.
**Status** is the Status of the Project Code.
## Further Information
| Document | Document Type | Description |
| --------------------------------------------- | ---------------- | ---------------------------------------------------------- |
| QRG Create Project Codes - Timesheet Activity | Task Information | How to create Timesheet Activity Project Codes |
| Create an Assignment - Temp | Task Information | How to create an Assignment record for Timesheet Employees |
| Create an Assignment Rate record - Timesheet | Task Information | How to create a Timesheet Assignment Rate Record |