> ## Documentation Index
> Fetch the complete documentation index at: https://documentation.2cloudnine.com/llms.txt
> Use this file to discover all available pages before exploring further.
# QRG Create an Expense Claim as a Payroll User
## Purpose
The purpose of this quick reference guide is to step through the process of creating an Expense Claim as
a Payroll User. The intended audience for this document is system administrators / standard users.
## Steps
### Create a new Expense Claim as a Payroll User
To create a new Expense Claim, follow the steps below:
1. Go to the **Assignment** record.
1. To identify an Assignment record from an Employee record, enter the Employee name
into the **Global Search** . (See Figure 1)
 2. Select the **Employee** record from the suggestions provided.
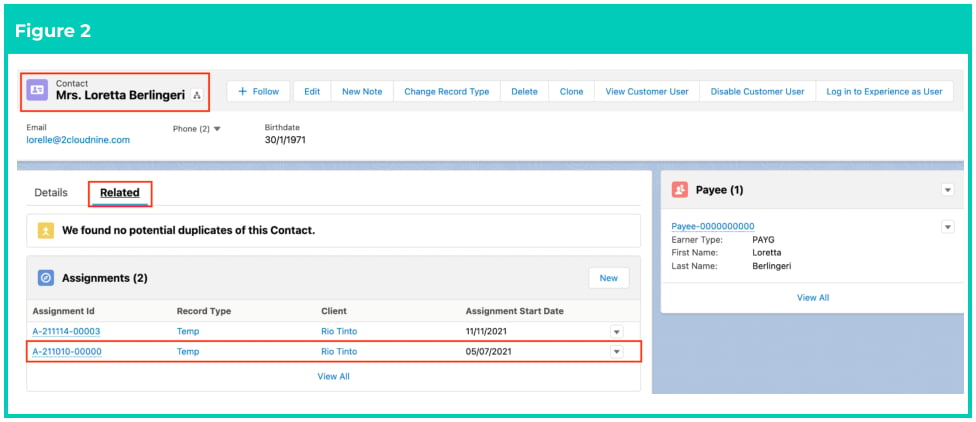
3. Open the **Related** tab. (See Figure 2)
4. Identify the **Assignment** record(s).
5. Select the **Assignment** record.
2. Select the **Employee** record from the suggestions provided.
3. Open the **Related** tab. (See Figure 2)
4. Identify the **Assignment** record(s).
5. Select the **Assignment** record.
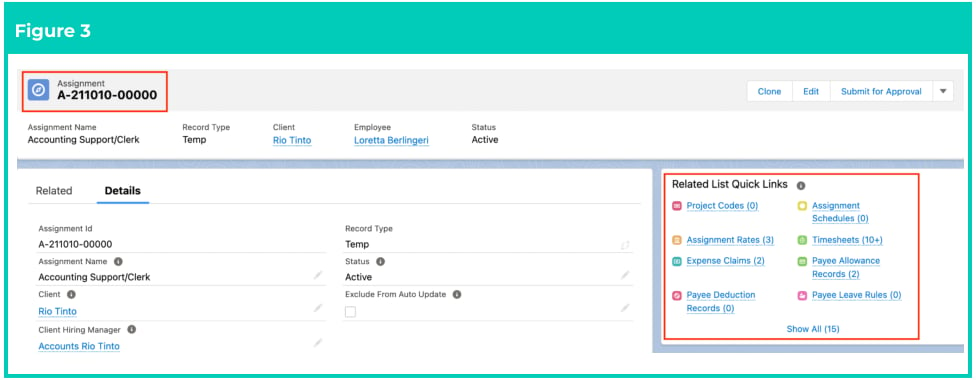
 2. On the Assignment page, locate the Related List Quick Links tab. (See Figure 3)
 3. Under the Related List Quick Links tab, select the Expense Claims link. (See Figure 4)
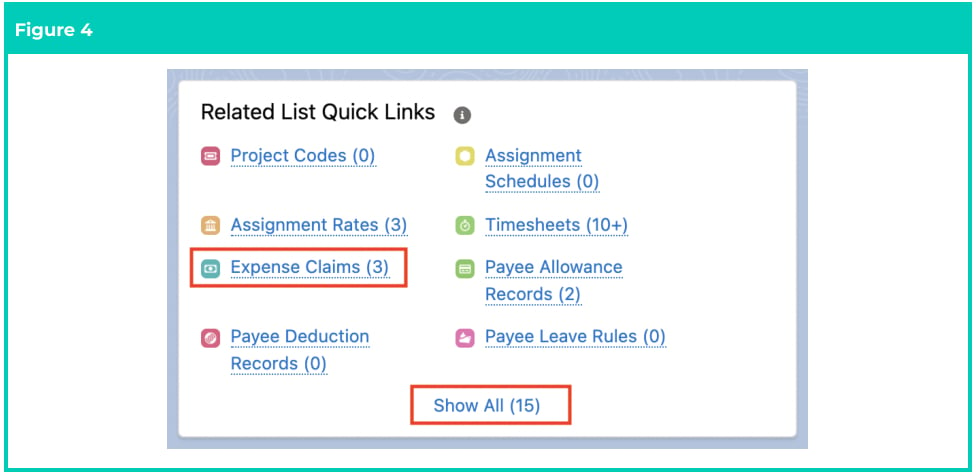 If the Expense Claims link is not available in the given options, you can click on the
‘Show All’ link to view the full list of available related objects.
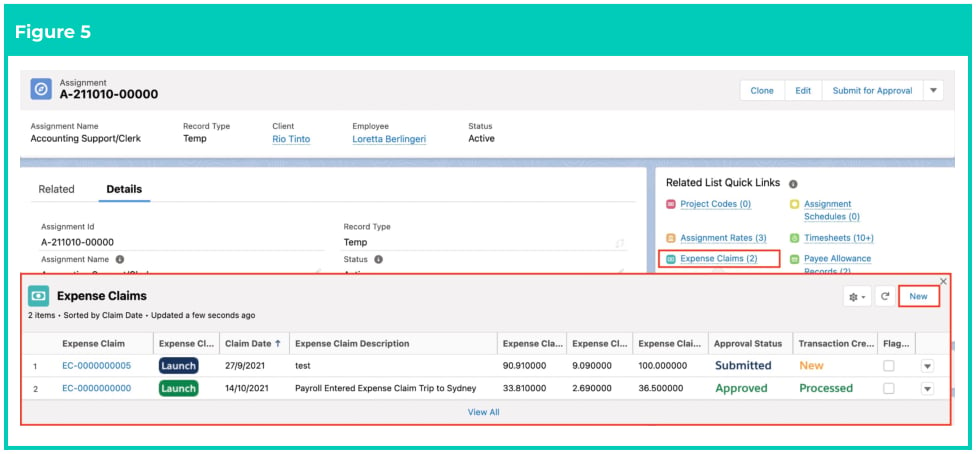
4. To create and complete an Expense Claim, follow steps 5 to 16 in sequence.
5. Under the Expense Claims panel, click on the New button. (See Figure 5)
If the Expense Claims link is not available in the given options, you can click on the
‘Show All’ link to view the full list of available related objects.
4. To create and complete an Expense Claim, follow steps 5 to 16 in sequence.
5. Under the Expense Claims panel, click on the New button. (See Figure 5)
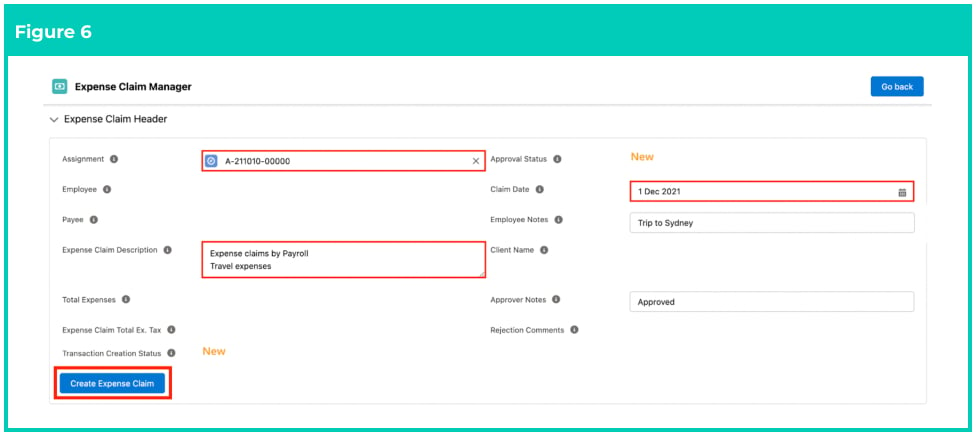
 6. Populate the following required fields on the Expense Claims Manager to provide base details of
the Expense Claim record: (See Figure 6)
1. **Assignment**
2. **Expense Claim Description**
3. **Claim Date**
7. Populate the following optional fields as needed: (See Figure 6)
1. To populate notes that the Employee may have provided for this Expense Claim, populate
the field **Employee Notes** .
2. To populate notes that the Approver may have provided for this Expense Claim, populate
the field **Approver Notes** .
8. Click on the **Create Expense Claim** button.
6. Populate the following required fields on the Expense Claims Manager to provide base details of
the Expense Claim record: (See Figure 6)
1. **Assignment**
2. **Expense Claim Description**
3. **Claim Date**
7. Populate the following optional fields as needed: (See Figure 6)
1. To populate notes that the Employee may have provided for this Expense Claim, populate
the field **Employee Notes** .
2. To populate notes that the Approver may have provided for this Expense Claim, populate
the field **Approver Notes** .
8. Click on the **Create Expense Claim** button.
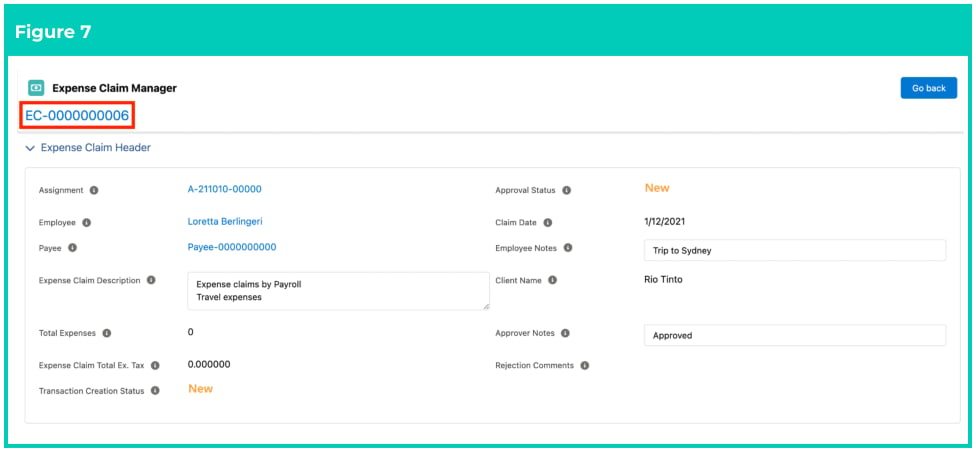
 9. A new Expense Claim has been created and will display the Expense Claim number on the top.
(See Figure 7)
9. A new Expense Claim has been created and will display the Expense Claim number on the top.
(See Figure 7)
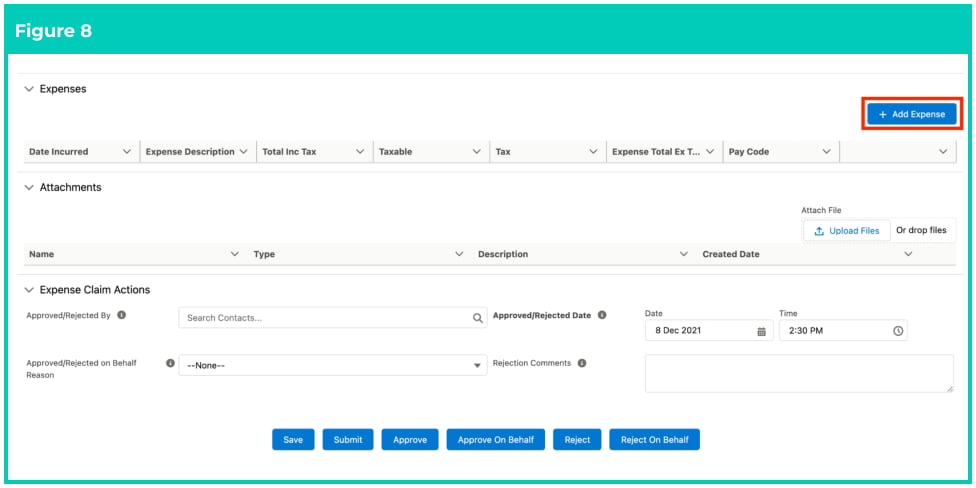
 10. Scroll down to navigate to the Expenses section on the same page, and click on the **Add Expense**
button. (See Figure 8)
10. Scroll down to navigate to the Expenses section on the same page, and click on the **Add Expense**
button. (See Figure 8)
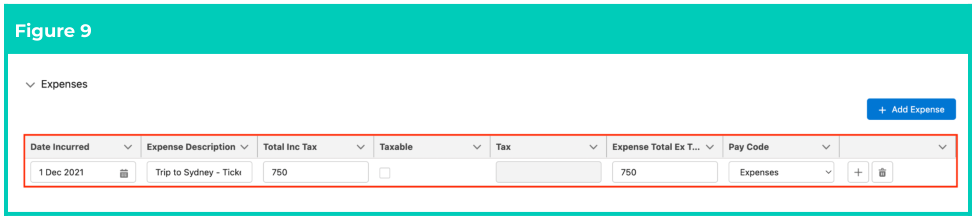
 11. Populate the following required fields under the Expenses section: (See Figure 9)
1. **Date Incurred**
2. **Expense Description**
3. **Total Inc Tax**
4. **Pay Code**
12. Populate the following optional fields as needed: (See Figure 9)
1. If tax is included in the total Expense value, populate the **Taxable** checkbox.
2. If the Taxable (checkbox) is populated as True, populate the value of tax in the **Tax** field.
11. Populate the following required fields under the Expenses section: (See Figure 9)
1. **Date Incurred**
2. **Expense Description**
3. **Total Inc Tax**
4. **Pay Code**
12. Populate the following optional fields as needed: (See Figure 9)
1. If tax is included in the total Expense value, populate the **Taxable** checkbox.
2. If the Taxable (checkbox) is populated as True, populate the value of tax in the **Tax** field.
 The Expense Total Ex. Tax field is an automated field. This field auto populates and auto adjusts
from being equal to the Total Inc Tax value (by default) if Tax field is left blank, or equal to
Total Inc Tax minus the Tax amount once the value in the Tax field is entered and Users tab out of
that field.
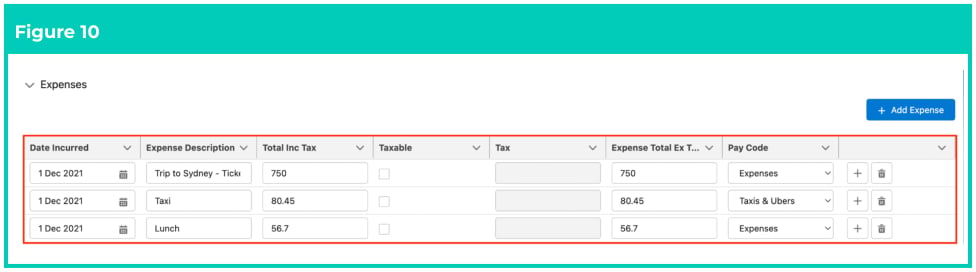
13. Now that you have added an Expense, if you need to add more Expense records related to this
Expense Claim, click on the **Add Expense** button again to add a new row and repeat steps 11 and 12. This can be repeated numerous times. (See Figure 10)
The Expense Total Ex. Tax field is an automated field. This field auto populates and auto adjusts
from being equal to the Total Inc Tax value (by default) if Tax field is left blank, or equal to
Total Inc Tax minus the Tax amount once the value in the Tax field is entered and Users tab out of
that field.
13. Now that you have added an Expense, if you need to add more Expense records related to this
Expense Claim, click on the **Add Expense** button again to add a new row and repeat steps 11 and 12. This can be repeated numerous times. (See Figure 10)
 14. Click **Upload Files** under the Attachments section to attach any relevant receipts, or use the
drag-and-drop feature to upload (see Figure 11).
14. Click **Upload Files** under the Attachments section to attach any relevant receipts, or use the
drag-and-drop feature to upload (see Figure 11).
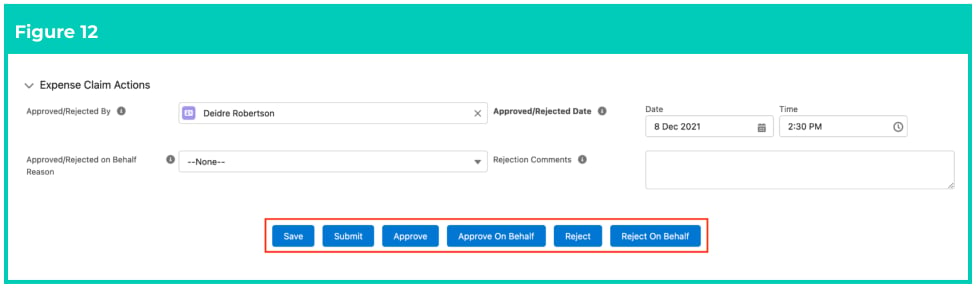
 15. Populate the fields under the Expense Claim Actions section and complete this Expense Claim following the relevant points below: (See Figure 12)
1. It is recommended to save the changes now. To save the changes so far, which can be
edited, added, deleted, submitted, or approved later, click on the **Save** button.
2. To submit the Expense Claim for Approval, select the **Submit** button. This will send a
notification to the Expense Claim Approver as detailed in the Assignment requesting
their approval.
3. To approve this claim as a different user, populate the **Approved/Rejected By** field with
the Approver user. If left blank, it will be automatically populated as the current user.
4. To approve on behalf of someone else, populate the **Approved/Rejected on Behalf**
**Reason** field. Other fields can be left blank, as it will populate the "Approved/Rejected By"
as the Current User and populate with the current date and time. Then, click on the
**Approve on Behalf** button to approve this claim.
5. To reject this claim as a different user, populate the **Approved/Rejected By** field with the
Approver user. If left blank, it will be automatically populated as the current user. Once
populated, click on the **Reject** button to reject this Expense Claim.
6. To reject on behalf of someone else, populate the **Approved/Rejected on Behalf Reason**
field only. Users will also be required to enter some comments in the Rejection
Comments field, or you will not be able to proceed. Other fields can be left blank, as it will
populate the ‘Approved/Rejected By’ as the Current User and populate with the current
date/time. Now click on the Reject on Behalf button to reject this claim right now.
7. If you need to record a different date and time than the current date and time, populate
the Approved/Rejected Date fields (Date and Time are separate fields). If left blank, they
will be populated with Current Date/Time.
15. Populate the fields under the Expense Claim Actions section and complete this Expense Claim following the relevant points below: (See Figure 12)
1. It is recommended to save the changes now. To save the changes so far, which can be
edited, added, deleted, submitted, or approved later, click on the **Save** button.
2. To submit the Expense Claim for Approval, select the **Submit** button. This will send a
notification to the Expense Claim Approver as detailed in the Assignment requesting
their approval.
3. To approve this claim as a different user, populate the **Approved/Rejected By** field with
the Approver user. If left blank, it will be automatically populated as the current user.
4. To approve on behalf of someone else, populate the **Approved/Rejected on Behalf**
**Reason** field. Other fields can be left blank, as it will populate the "Approved/Rejected By"
as the Current User and populate with the current date and time. Then, click on the
**Approve on Behalf** button to approve this claim.
5. To reject this claim as a different user, populate the **Approved/Rejected By** field with the
Approver user. If left blank, it will be automatically populated as the current user. Once
populated, click on the **Reject** button to reject this Expense Claim.
6. To reject on behalf of someone else, populate the **Approved/Rejected on Behalf Reason**
field only. Users will also be required to enter some comments in the Rejection
Comments field, or you will not be able to proceed. Other fields can be left blank, as it will
populate the ‘Approved/Rejected By’ as the Current User and populate with the current
date/time. Now click on the Reject on Behalf button to reject this claim right now.
7. If you need to record a different date and time than the current date and time, populate
the Approved/Rejected Date fields (Date and Time are separate fields). If left blank, they
will be populated with Current Date/Time.
 Approve on Behalf function is mostly used when the Approver details are not available. E.g. Payroll
Users can select the Approve on Behalf option if they aren't named as the Approver in the
Assignment, however due to their role, they have the authority to approve.
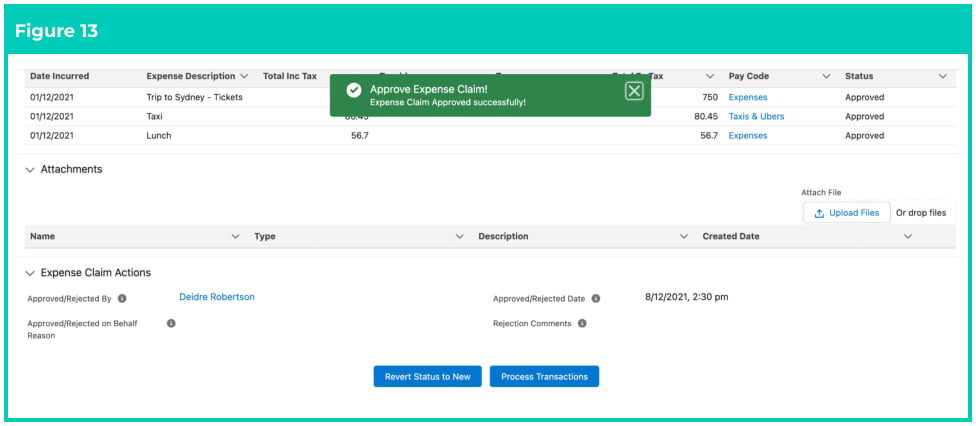
16. Depending on the button you click, a confirmation message will appear. For example, if you click
on the Approve button, you will get a confirmation message as shown in the screenshot below.
(See Figure 13)
Approve on Behalf function is mostly used when the Approver details are not available. E.g. Payroll
Users can select the Approve on Behalf option if they aren't named as the Approver in the
Assignment, however due to their role, they have the authority to approve.
16. Depending on the button you click, a confirmation message will appear. For example, if you click
on the Approve button, you will get a confirmation message as shown in the screenshot below.
(See Figure 13)
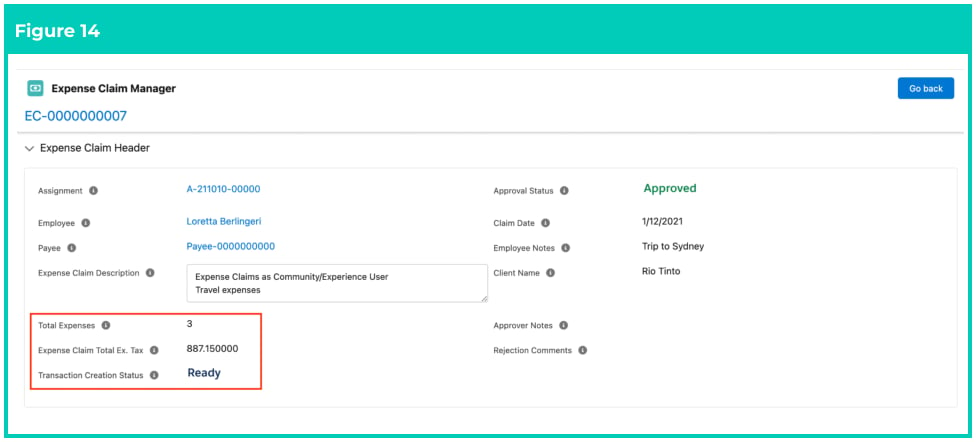
 17. Under Expense Claim Header, the Total Expenses and Expense Claim Total Ex. Tax fields will
update to reflect a total of all the related Expense records. (See Figure 14)
17. Under Expense Claim Header, the Total Expenses and Expense Claim Total Ex. Tax fields will
update to reflect a total of all the related Expense records. (See Figure 14)
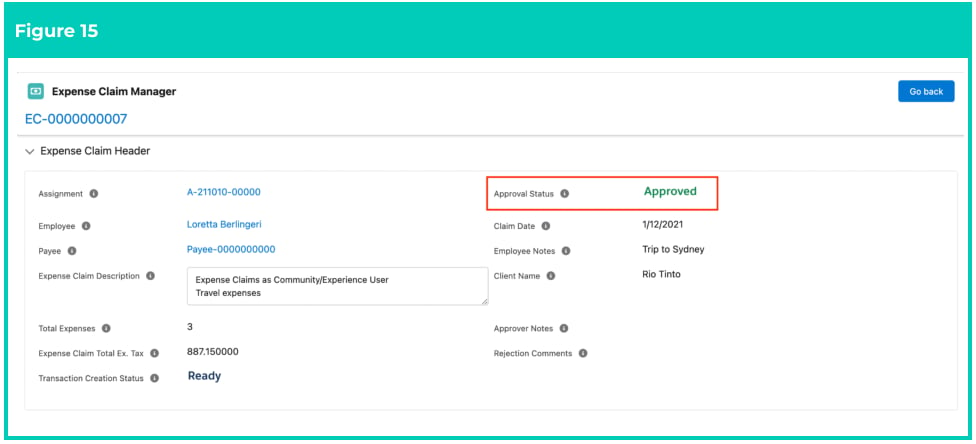
 18. The status of the Expense Claim will change to Approved. (See Figure 15)
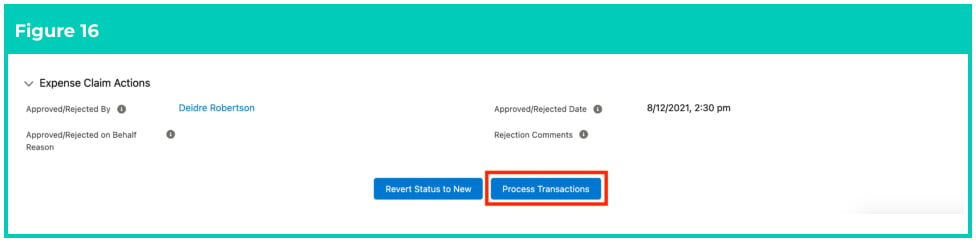
 19. When an Expense Claim is Approved, the buttons on the Expense Claim Manager page will
change to Revert Status to New and Process Transactions. Users can click the **Process**
**Transactions** button to create the Pay Transactions now, ready for Pay Batch and Invoice
processing. (See Figure 16). Alternatively, users can await the scheduled job to create the Pay
Transactions.
19. When an Expense Claim is Approved, the buttons on the Expense Claim Manager page will
change to Revert Status to New and Process Transactions. Users can click the **Process**
**Transactions** button to create the Pay Transactions now, ready for Pay Batch and Invoice
processing. (See Figure 16). Alternatively, users can await the scheduled job to create the Pay
Transactions.
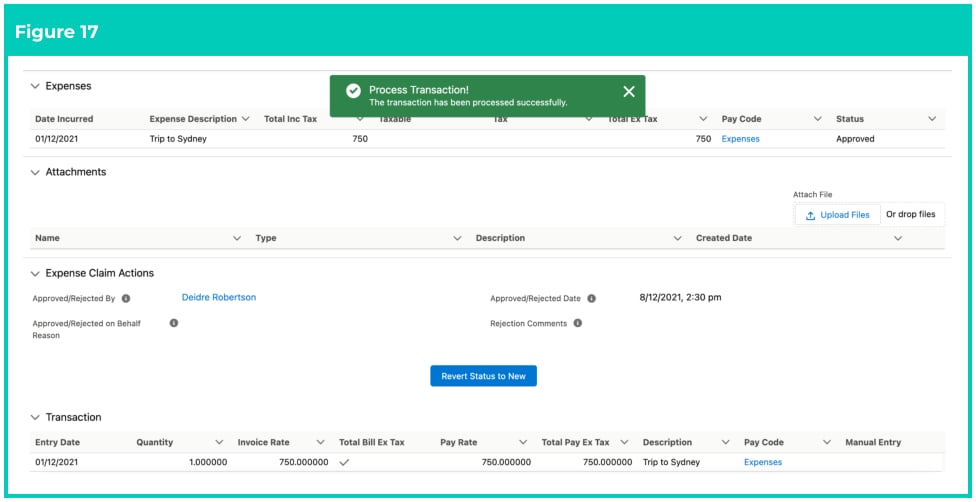
 20. If selecting the button manually, when Pay Transactions have been created successfully, another
confirmation message will appear on the top of the screen. (See Figure 17)
20. If selecting the button manually, when Pay Transactions have been created successfully, another
confirmation message will appear on the top of the screen. (See Figure 17)
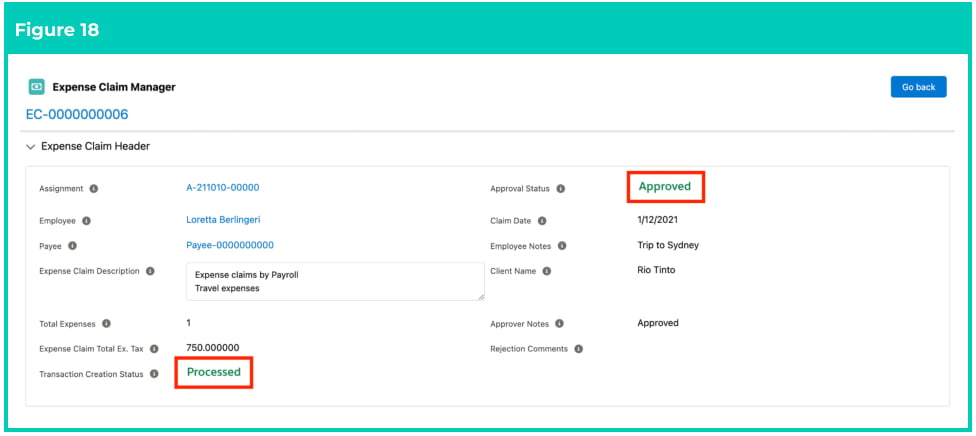
 21. The Transaction Creation Status of the Expense Claim will change to Processed. (See Figure 18)
 ## Field Descriptions
**Approved/Rejected By** is the User who Approved or Rejected the Expense Claim.
**Approved/Rejected Date** is the Date/Time the Expense Claim was Approved or Rejected.
**Approved/Rejected on Behalf Reason** If the Expense Claim was Approved or Rejected on Behalf of the
Approver, this field records the reason why the Expense Claim was Approved or Rejected.
**Approver Notes** are comments from the Approver relating to the Expense Claim.
**Assignment** defines the Assignment the Expense Claim relates to.
**Claim Date** identifies the date the Expense Claim is made.
**Date Incurred** is the date when the Expenses were incurred.
**Employee Notes** are comments from the Employee relating to the Expense Claim.
**Expense Claim Description** is a high level description given to the Expense Claim to assist in the
identification of its purpose and approval.
**Expense Description** is a description given to the individual Expenses to assist in the identification of
their purpose and approval.
**Expense Total Ex Tax** is the sum total of Expense Total Ex. Tax of all the Expenses related to the Expense
Claim.
**Pay Code** is the Pay Code allocated to individual Expenses.
**Rejection Comments** if the Expense Claim has an Approval Status of Rejected, the reason given by the
Approver for the rejection.
**Tax** is the sum total of Expense Total Tax of all the Expenses related to the Expense Claim.
**Taxable (checkbox)** is ticked when the amount of the Expense is taxable.
**Total Inc Tax** is the sum total of Expense Total Inc. Tax of all the Expenses related to the Expense Claim.
## Further Information
| Document | Document Type | Description |
| ----------------------------------- | ----------------- | ---------------------------------------------------------- |
| QRG Create an Assignment - Employee | Task Instructions | How to create an Assignment for autopay Employees |
| QRG Create an Assignment - Temp | Task Instructions | How to create an Assignment record for Timesheet Employees |
## Field Descriptions
**Approved/Rejected By** is the User who Approved or Rejected the Expense Claim.
**Approved/Rejected Date** is the Date/Time the Expense Claim was Approved or Rejected.
**Approved/Rejected on Behalf Reason** If the Expense Claim was Approved or Rejected on Behalf of the
Approver, this field records the reason why the Expense Claim was Approved or Rejected.
**Approver Notes** are comments from the Approver relating to the Expense Claim.
**Assignment** defines the Assignment the Expense Claim relates to.
**Claim Date** identifies the date the Expense Claim is made.
**Date Incurred** is the date when the Expenses were incurred.
**Employee Notes** are comments from the Employee relating to the Expense Claim.
**Expense Claim Description** is a high level description given to the Expense Claim to assist in the
identification of its purpose and approval.
**Expense Description** is a description given to the individual Expenses to assist in the identification of
their purpose and approval.
**Expense Total Ex Tax** is the sum total of Expense Total Ex. Tax of all the Expenses related to the Expense
Claim.
**Pay Code** is the Pay Code allocated to individual Expenses.
**Rejection Comments** if the Expense Claim has an Approval Status of Rejected, the reason given by the
Approver for the rejection.
**Tax** is the sum total of Expense Total Tax of all the Expenses related to the Expense Claim.
**Taxable (checkbox)** is ticked when the amount of the Expense is taxable.
**Total Inc Tax** is the sum total of Expense Total Inc. Tax of all the Expenses related to the Expense Claim.
## Further Information
| Document | Document Type | Description |
| ----------------------------------- | ----------------- | ---------------------------------------------------------- |
| QRG Create an Assignment - Employee | Task Instructions | How to create an Assignment for autopay Employees |
| QRG Create an Assignment - Temp | Task Instructions | How to create an Assignment record for Timesheet Employees |