> ## Documentation Index
> Fetch the complete documentation index at: https://documentation.2cloudnine.com/llms.txt
> Use this file to discover all available pages before exploring further.
# Import Tool QRG v2.2
## Purpose
The purpose of this quick reference guide is to explain the end to end process that a 2cloudnine Payroll user will follow so that they can successfully import Timesheets or Pay Transactions.
## Content covered
* [Overview](#overview)
* [Prerequisites](#prerequisites)
* [Configuration Changes in v1.14 and v.1.15](#configuration-changes-in-v114-and-v115)
* [For the Assignment Import Tool](#for-the-assignment-import-tool)
* [For the Timesheet Import Tool](#for-the-timesheet-import-tool)
* [For the Pay Transaction Import Tool](#for-the-pay-transaction-import-tool)
* [Assignment Import Template](#assignment-import-template)
* [Timesheet Import Template](#timesheet-import-template)
* [How to Import Uninterpreted Timesheet Data via the Timesheet Import Tool](#how-to-import-uninterpreted-timesheet-data-via-the-timesheet-import-tool)
* [Pay Transaction Import Template](#pay-transaction-import-template)
* [How to Import Interpreted Timesheet Data via the Pay Transaction Import Tool](#how-to-import-interpreted-timesheet-data-via-the-pay-transaction-import-tool)
* [Troubleshooting Error Messages](#troubleshooting-error-messages)
## Overview
2cloudnine Payroll has a standard import visualforce page for interpreted and uninterpreted timesheet data using the Timesheet Import Tool Package that can be installed into any salesforce org with 2cloudnine Payroll and Time2Pay packages.
The purpose of this package is to assist our clients that use 3rd party VMS systems that provide outputs of both interpreted and uninterpreted time can be uploaded using a csv file format into the Payroll system for interpretation and payment, or for payment only. Examples of providers include Comensura, Fieldglass, Timetarget and Beeline.
## Prerequisites
Before proceeding with Importing Data please ensure that:
1. 2cloundnine Payroll users must be in the ‘Salesforce Lightning Experience’ and not in the Salesforce Classic view mode.
2. Have enabled a custom domain (My Domain) in order to see the Lightning Web Components (LWC) on the Page Layouts.
3. Have installed the Timesheet Import Tool Package v1.15 or higher.
4. Apply the ‘2cloudnine Timesheet Import’ Permission set to relevant users.
## Configuration changes in v1.14 and v.1.15
New Import Status colour status field
Uplift to Import UI look and feel with a processing status bar
Cost Center details can be Imported via the Timesheet Import Tool
New Assignment Import Tool
Optional Column headings should remain and not be removed from the import file but can still be left blank
### Configuration instructions
* Navigate to Settings.
* Select the Object Manger Tab.
* In the Quick Find Search box search and select Imported Record.
* On the Left hand panel choose Page Layout.
* Select the TC9IMP Timesheet Import Layout.
* Remove the Status field from the layout and replace this with the Import Status field.
* Click on the App manager and search for Imported Records.
* Change the List View to All.
* Amend the List View to show the Import Status field instead of the Status field.
### For the Assignment Import Tool
1. External IDs have to be setup on the Contact, Account (Client Record Type), and the Payment Entity to reference in the csv import file.
2. Salesforce IDs for the Pay Schedule, Public Holiday Calendar, Timesheet Calendar, Invoice Schedule, Invoice Tax ID records are also required to be referenced in the relevant columns for Assignments to be successfully created.
3. [Assignment Import Guide can be found here](https://drive.google.com/file/d/1NNZ0XxCRWBSyhTyrar3gIAp7TA9ernRn/view?usp=sharing).
4. [Assignment CSV Import File can be found here](https://drive.google.com/file/d/1qsK28LVFc79rAnOYcGUHIXwCMWfmflSy/view?usp=sharing).
### For the Timesheet Import Tool
1. External IDs have to be setup on the Contact and Assignment records to reference in the csv import file.
2. For importing Timesheet Leave entries you can either reference the External ID on the Payee Leave Rule or the Payee Leave Rule Name in the import file.
3. Ensure that the Payees, the Assignments and all of their associated records are complete to avoid intrusive errors.
4. Timesheets have been generated for the related Assignments.
5. [Timesheet Import Guide can be found here](https://drive.google.com/file/d/1hcLHiJ1OT_MypzaJulSrEcQbDO-Ky0FY/view?usp=sharing).
6. [Timesheet CSV Import File can be found here](https://drive.google.com/file/d/1houH9aHgJg0zuo9m3QbensdhRVGVrUMT/view?usp=sharing).
### For the Pay Transaction Import Tool
1. External IDs have to be setup in the Contact, Assignment, Payment Entity, Pay Code and the Pay Schedule Records to reference in the csv import file and for Transactions to be successfully processed in a Pay Batch.
2. External IDs additionally will have to be setup in the Invoice Tax Id and Invoice Schedule to be successfully processed in the Invoice Generation Manager.
3. Ensure that the Payee, the Assignment and all of their associated records are complete to avoid intrusive errors.
4. [Pay Transaction Import Guide can be found here](https://drive.google.com/file/d/1UPcCR-tcNv1cP9WIEkqJC0KXjN28a7t4/view?usp=sharing).
5. [Pay Transactions CSV Import File can be found here](https://drive.google.com/file/d/1bodOHZYQtRd0ad3u_xavdwbVOdEEL6a-/view?usp=sharing).
## Assignment import template
### Information
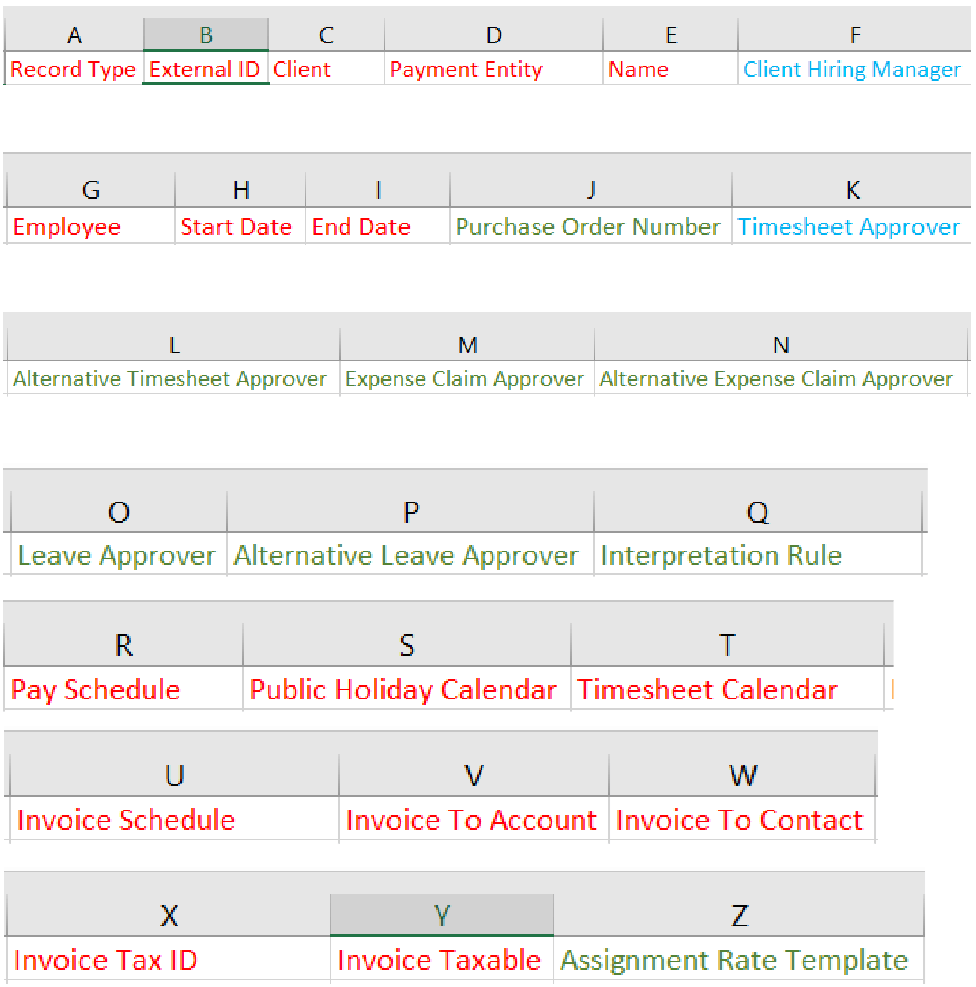
#### 1. The Assignment Import Columns
| Column Headings | \*Mandatory / Optional | Notes for Importing |
| ---------------------------------- | ---------------------------------------------- | -------------------------------------------------------------------------------------------------------------------------- |
| Record Type | Mandatory | Enter the Assignment Record Type Employee, Temp |
| External ID | Mandatory | External ID for referencing purposes this can be for e.g. ABC701128 |
| Client | Mandatory | External ID of the Client’s |
| Payment Entity | Mandatory | External ID of the Payment Entity’s |
| Name | Mandatory | Free Text - The name of the Assignment |
| Client Hiring Manager | Optional but Mandatory when Record Type = Temp | Enter the External ID of the Client Hiring Manager from their Contact (Candidate/Employee Record Type) Record |
| Employee | Mandatory | External ID of the Employee’s |
| Start Date | Mandatory | Date format is dd/mm/yyyy |
| End Date | Mandatory | Date format is dd/mm/yyyy |
| Purchase Order Number | Optional | Free Text - Enter a Purchase Order Number |
| Timesheet Approver | Optional but Mandatory when Record Type = Temp | Enter the External ID of the Timesheet Approver on the Contact (Candidate/Employee Record Type) Record |
| Alternative Timesheet Approver | Optional | Enter the External ID of the Alternative Timesheet Approver from their Contact (Candidate/Employee Record Type) Record |
| Expense Claim Approver | Optional | Enter the External ID of the Expense Claim Approver from their e Contact (Candidate/Employee Record Type) Record |
| Alternative Expense Claim Approver | Optional | Enter the External ID of the Alternative Expense Claim Approver from their Contact (Candidate/Employee Record Type) Record |
| Leave Approver | Optional | Enter the External ID of the Leave Approver from their Contact (Candidate/Employee Record Type) Record |
| Alternative Leave Approver | Optional | Enter the External ID of the Alternative Leave Approver from their Contact (Candidate/Employee Record Type) Record |
| Interpretation Rule | Optional | Salesforce ID is required of the Interpretation Rule |
| Pay Schedule | Mandatory | Salesforce ID is required of the Pay Schedule |
| Public Holiday Calendar | Mandatory | Salesforce ID is required of the Public Holiday Calendar |
| Timesheet Calendar | Mandatory | Salesforce ID is required of the Timesheet Calendar |
| Invoice Schedule | Mandatory | Salesforce ID is required of the Invoice Schedule |
| Invoice To Account | Mandatory | Enter the External ID of the Client’s Record |
| Invoice To Contact | Mandatory | Enter the External ID of the Invoice Contact on the Contact (Candidate/Employee Record Type) Record |
| Invoice Tax ID | Mandatory | Salesforce ID is required of the Invoice Tax ID |
| Invoice Taxable | Mandatory | Enter Yes or No |
| Assignment Rate Template | Optional | Salesforce ID is required of the Assignment Rate Template |
Mandatory: The column in the csv upload should be populated with relevant data corresponding to the Field Mapping.
Optional: These columns can be left blank.
### Screen Shots
### 1. Navigate to the ‘Assignment Import Tool’
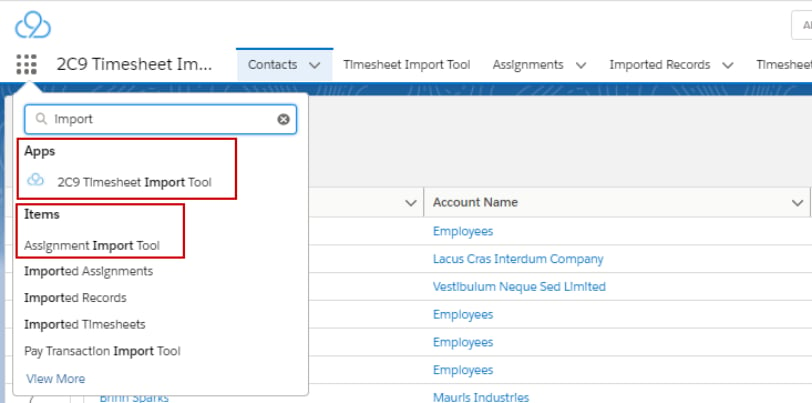
The Assignment Import Tool can be accessed by searching for Import from the App Launcher and then:
* Selecting the’ 2C9 Timesheet Import Tool’ App and then clicking on the ‘Assignment Import Tool’ tab.
* Or by selecting the ‘Assignment Import Tool’ Item.
### 2. Assignment Import Tool - Validate the File
After navigating to the Assignment Import Tool:
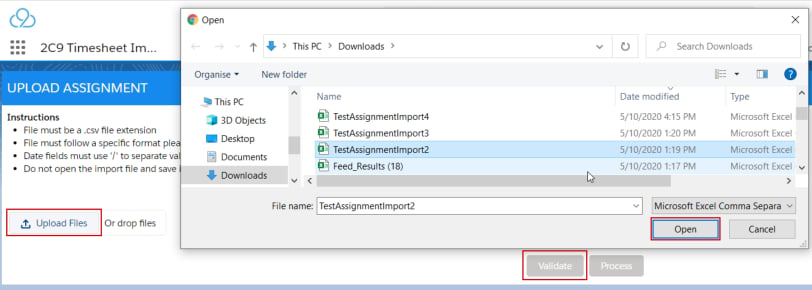
1. Select the ‘Upload Files’ button or drop files.
2. A dialog box will open allowing you to choose your file which must be a Comma Separated Values file.
3. Select ‘Open’ once you have chosen your import file.
4. Select ‘Validate’.
### 3. File Inserted Successful pop up message
After approximately 1-2 minutes if the following pop up message does not appear on the screen then reload / refresh the page.
You will be Navigated automatically to the Imported Record page.

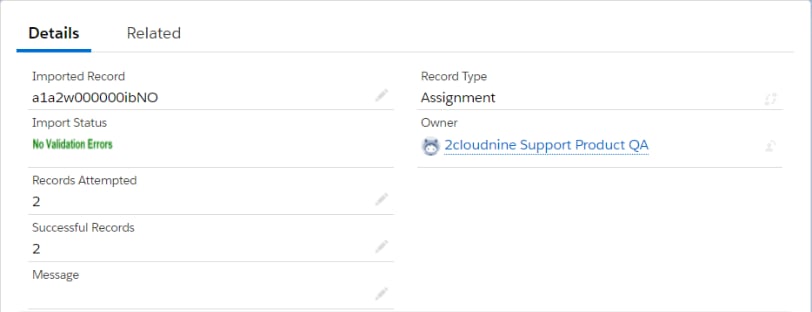
### 4. Imported Record Screen
#### Details Tab
**Imported Record**: Salesforce Record ID.
**Record Type**: For Assignment Imports the record type will display as ‘Assignment’.
**Import Status**: Shows the Status of the Import. The different values are:
* **New** - Initial Status of the imported record when the batch is running.
* **Validation Failed** - Data errors exist in some rows - Download the Feed\_results file and then refer to the Troubleshooting section.
* **No Validation Errors** - The Imported file contains no errors.
* **Failed** - The import has failed - refer to the Troubleshooting section.
**Records Attempted**: Displays the number of Data rows that the import file contains.
**Successful Records**: Displays the number of Data rows the import will import.
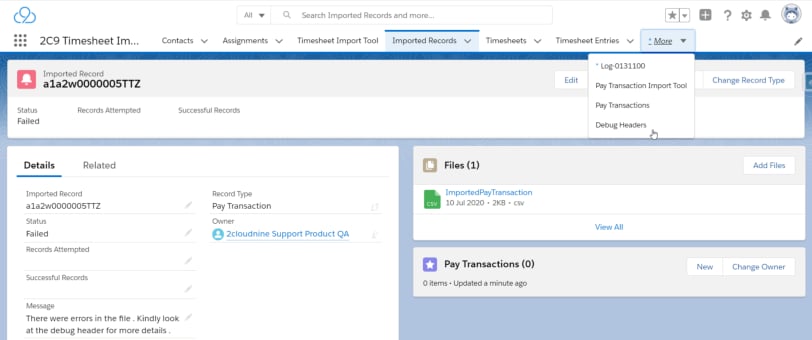
**Message**: A message may appear “There were errors in the file . Kindly look at the debug header for more details” if the Import Status is Failed.
#### Files Lightning Web Component
There should be 2 files that are produced the Feed\_Results (contain the Error/Warnings in column 2 to assist in troubleshooting data errors) and the ImportedTimesheetEntry (contains data matching to the file being imported).
Details Tab
Files - Lightning Web Component (LWC)

### 5. Process the Import (Navigate to the Assignment Import Tool)
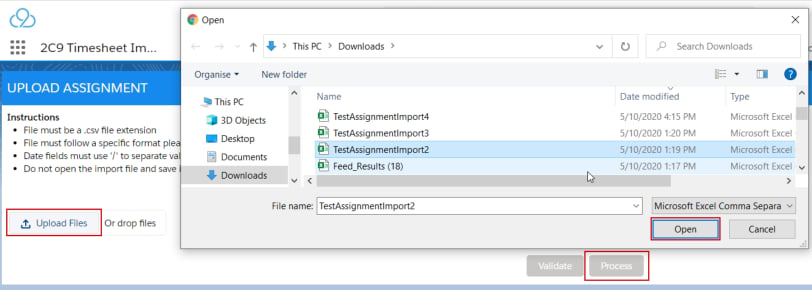
1. Select the ‘Upload Files’ button or drop files.
2. A dialog box will open allowing you to choose your file which must be a Comma Separated Values file.
3. Select ‘Open’ once you have chosen your import file.
4. Select ‘Process’.
### 6. File Inserted Successful pop up message
After approximately 1-2 minutes if the following pop up message does not appear on the screen then reload / refresh the page.
You will be Navigated automatically to the Imported Record page.

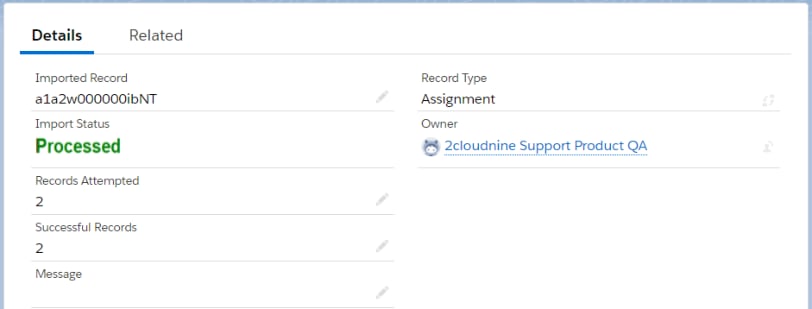
### 7. Imported Record Screen
#### Details Tab
**Imported Record**: Salesforce Record ID.
**Record Type**: For Assignment Imports the record type will display as ‘Assignment’.
**Import Status**: Shows the Status of the Import. The different values are:
* **New** - Initial Status of the imported record when the batch is running.
* **Processed with Errors** - Data rows have validation errors which were not able to be successfully imported. Download the Feed\_results file and then refer to the Troubleshooting section.
* **Processed** - The Data rows have been successfully imported.
* **Failed** - The import has failed - refer to the Troubleshooting section.
**Records Attempted**: Displays the number of Data rows that the import file contains.
**Successful Records**: Displays the number of Data rows the import was able to import.
**Message**: A message may appear “There were errors in the file . Kindly look at the debug header for more details” if the Import Status is Failed.
#### Files Lightning Web Component (LWC)
There should be 2 files that are produced the Feed\_Results (contain the Error/Warnings in column 2 to assist in troubleshooting data errors) and the ImportedTimesheetEntry (contains data matching to the file being imported).
#### Assignment Lightning Web Component (LWC)
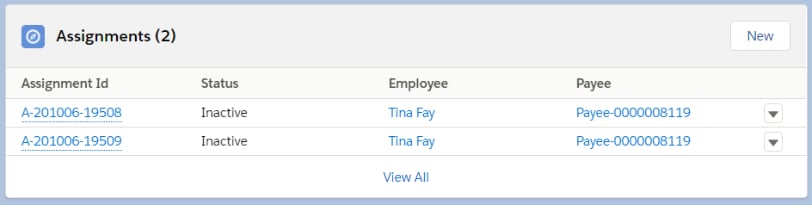
Assignment related records will appear once the Import has been Processed.
Details Tab
Files - Lightning Web Component (LWC)

Assignment Lightning Web Component (LWC)
### Information
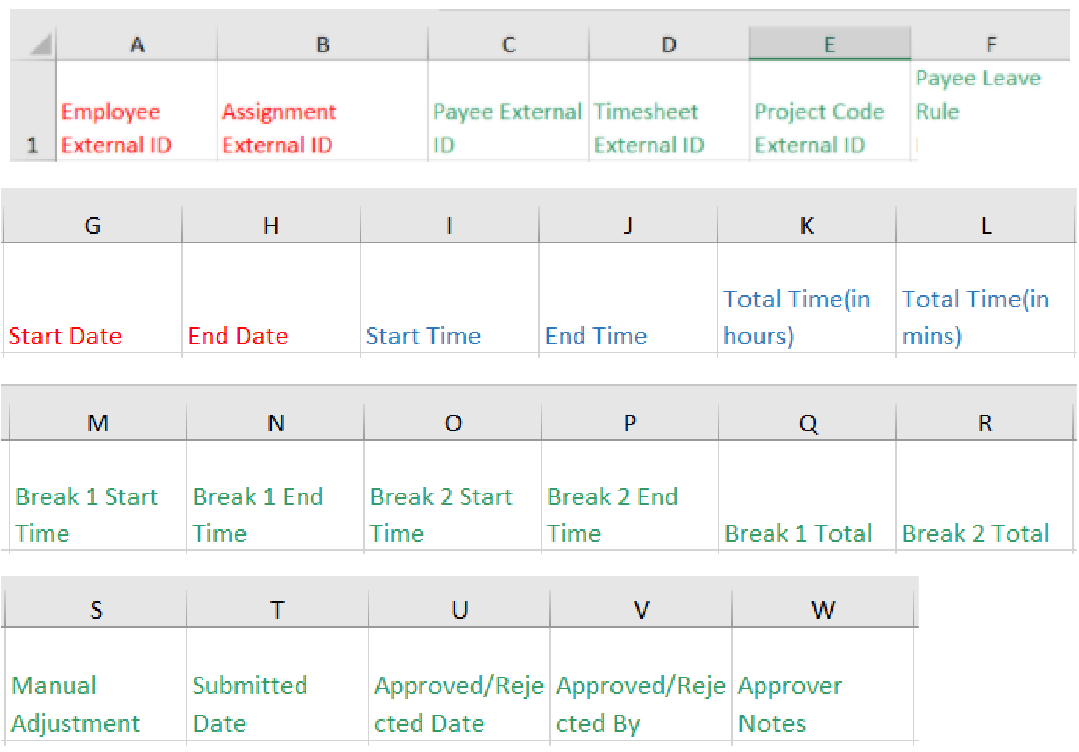
#### 1. The Timesheet Import Columns
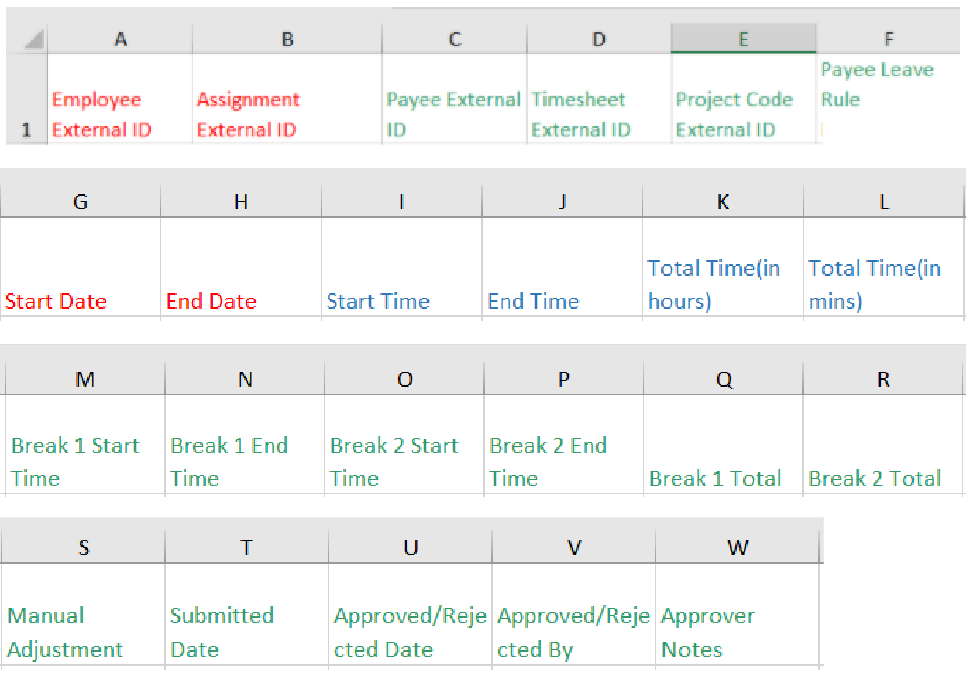
| Column Headings | \*Mandatory / Optional / Validation Controlled | Notes for Importing |
| ------------------------ | -------------------------------------------------------------------- | ----------------------------------------------------------------------------------------------------------------------------------------------------------------------------------------------------------------------------------------------------- |
| Employee External ID | Mandatory | External ID is to be populated on the Contact (Candidate/Employee Record Type) Record |
| Assignment External ID | Mandatory | External ID is to be populated on the Assignment Record |
| Payee External ID | Optional | External ID is to be populated on the Payee Record |
| Timesheet External ID | Optional | External ID is to be populated on the Timesheet Record |
| Project Code External ID | Optional | External ID is to be populated on the Project Code record |
| Payee Leave Rule | Optional but Mandatory if importing Leave | External ID is to be populated on the Payee Leave Rule OR use the Payee Leave Rule name e.g. "Annual Leave" |
| Start Date | Mandatory | Date format is dd/mm/yyyy |
| End Date | Mandatory | Date format is dd/mm/yyyy |
| Start Time | Validation Controlled | Enter Time in either 00:00 OR 0:00 format e.g. 8:00 for 8am if the Timesheet Entry Format = Start/End Times. Mandatory for Timesheet Entry Format = Start/End Times. (i.e. Not required when the Timesheet Entry Format = Total Hours) |
| End Time | Validation Controlled | Enter Time in either 00:00 OR 0:00 format e.g. 16:00 for 4pm if the Timesheet Entry Format = Start/End Times. Mandatory for Timesheet Entry Format = Start/End Times. (i.e. Not required when the Timesheet Entry Format = Total Hours) |
| Total Time(in hours) | Validation Controlled (Not required when start and end time is used) | Enter Amount e.g. 10 for 10 hours if the Timesheet Entry Format = Total Hours. To be completed if Timesheet Entry Format = Total Hours. (i.e. Not required when the Timesheet Entry Format = Start/End Times) |
| Total Time(in mins) | Validation Controlled (Not required when start and end time is used) | Enter Amount e.g. 45 for 45 minutes if the Timesheet Entry Format = Total Hours. Optional for Timesheet Entry Format = Total Hours. (i.e. Not required when the Timesheet Entry Format = Start/End Times) |
| Break 1 Start Time | Optional | Enter Time in either 00:00 OR 0:00 format e.g. 10:00 for 10am |
| Break 1 End Time | Optional | Enter Time in either 00:00 OR 0:00 format e.g. 10:30 for 10:30am |
| Break 2 Start Time | Optional | Enter Time in either 00:00 OR 0:00 format e.g. 14:00 for 2pm |
| Break 2 End Time | Optional | Enter Time in either 00:00 OR 0:00 format e.g. 14:30 for 2:30pm |
| Break 1 Total | Optional | Enter Amount e.g 15 for 15 minutes |
| Break 2 Total | Optional | Enter Amount e.g 30 minutes for 30 mins |
| Manual Adjustment | Optional | Enter 1 for Yes or 0 for no |
| Submitted Date | Optional | This will auto populated based on today's current data and time if this is blank. However if required to be populated based on the Employee’s actual submission date then please enter in the following format DD/MM/YYYY HH:MM e.g. 10/08/2020 11:34 |
| Approved/Rejected Date | Optional | This will auto populated based on today's current date and time if this is blank. If required to be populated based on the Approver’s actual approval/rejected date then please enter in the following format DD/MM/YYYY HH:MM e.g. 10/08/2020 16:34 |
| Approved/Rejected By | Optional | This will be auto populated with the User ID of the user importing the file. However if required to have the Approver’s name recorded then the External ID is to be populated on the Contact (Client Contact/Employee Record Type) Record |
| Approver Notes | Optional | Free Text |
Mandatory: The column in the csv upload should be populated with relevant data corresponding to the Field Mapping.
Validation Controlled: These are to be populated according to the Timesheet Entry Format e.g. Start/End Times or Total Hours.
Optional: These columns can be left blank.
### Screen Shots
 ## How to import uninterpreted Timesheet data via the Timesheet Import Tool
When timesheet entries are imported into the system they should be loaded in with a status of “Approved” so that the transactions can be automatically created (if the scheduled job is enabled) or the user can select the ‘Process Transactions’ button.
## How to import uninterpreted Timesheet data via the Timesheet Import Tool
When timesheet entries are imported into the system they should be loaded in with a status of “Approved” so that the transactions can be automatically created (if the scheduled job is enabled) or the user can select the ‘Process Transactions’ button.
### 1. Navigate to the ‘Timesheet Import Tool’
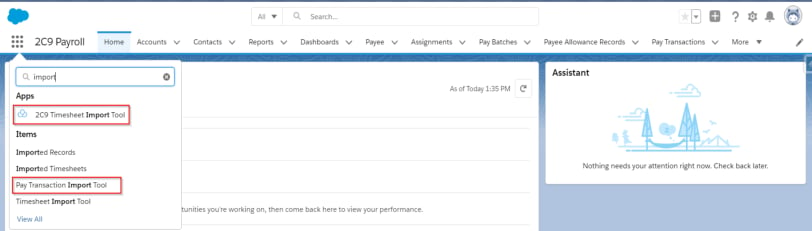
The Timesheet Import Tool can be accessed by searching for Timesheet Import from the App Launcher and then:
* Selecting the’ 2C9 Timesheet Import Tool’ App and then clicking on the ‘Timesheet Import Tool’ tab.
* Or by selecting the ‘Timesheet Import Tool’ Item.
### 2. Timesheet Import Tool - Validate the File
After navigating to the Timesheet Import Tool:
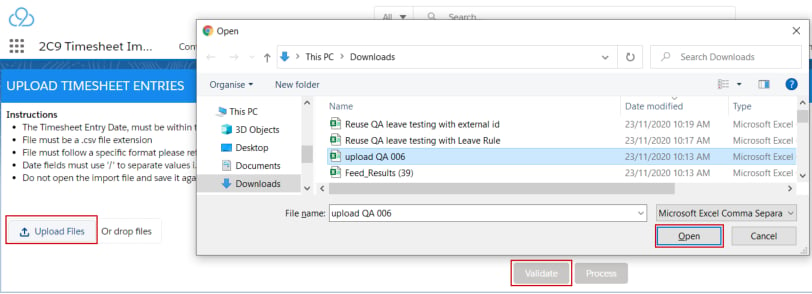
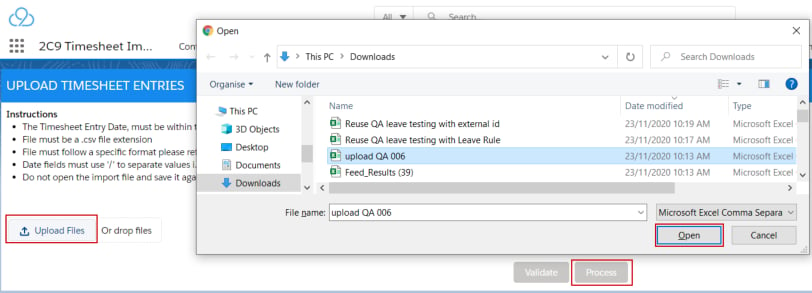
1. Select the ‘Upload Files’ button or drop files.
2. A dialog box will open allowing you to choose your file which must be a Comma Separated Values file.
3. Select ‘Open’ once you have chosen your import file.
4. Select ‘Validate’.
### 3. File Inserted Successful pop up message
After approximately 1-2 minutes if the following pop up message does not appear on the screen then reload / refresh the page.
You will be Navigated automatically to the Imported Record page.

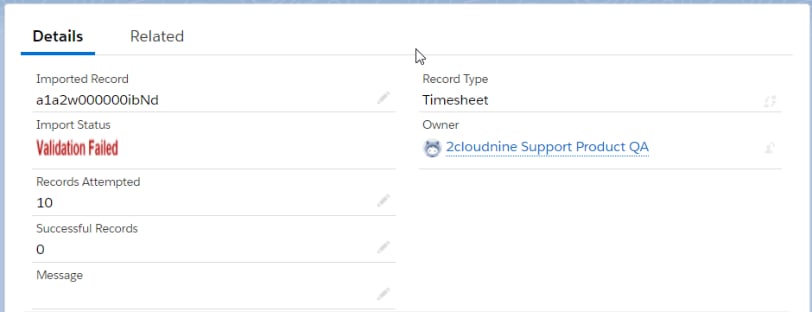
### 4. Imported Record Screen
#### Details Tab
**Imported Record**: Salesforce Record ID.
**Record Type**: For Timesheet Imports the record type will display as ‘Timesheet’.
**Import Status**: Shows the Status of the Import. The different values are:
* **New** - Initial Status of the imported record when the batch is running.
* **Validation Failed** - Data errors exist in some rows - Download the Feed\_results file and then refer to the Troubleshooting section.
* **No Validation Errors** - The Imported file contains no errors.
* **Failed** - The import has failed - refer to the Troubleshooting section.
**Records Attempted**: Displays the number of Data rows that the import file contains.
**Successful Records**: Displays the number of Data rows the import will import.
**Message**: A message may appear “There were errors in the file . Kindly look at the debug header for more details” if the Status is Failed.
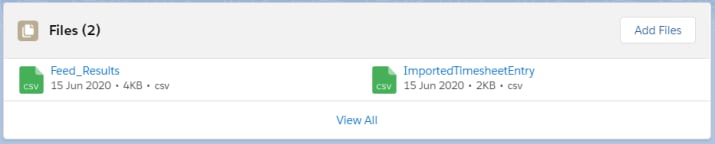
#### Files Lightning Web Component
There should be 2 files that are produced: the Feed\_Results (contain the Error/Warnings in column 2 to assist in troubleshooting data errors) and the ImportedTimesheetEntry (contains data matching to the file being imported).
Details Tab
Files Lightning Web Component
### 5. Process the Import (Navigate to the Timesheet Import Tool)
1. Select the ‘Upload Files’ button or drop files.
2. A dialog box will open allowing you to choose your file which must be a Comma Separated Values file.
3. Select ‘Open’ once you have chosen your import file.
4. Select ‘Process’.
### 6. File Inserted Successful pop up message
After approximately 1-2 minutes if the following pop up message does not appear on the screen then reload / refresh the page.
You will be Navigated automatically to the Imported Record page.

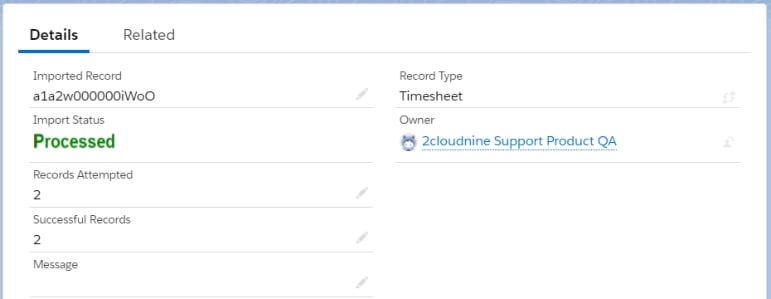
### 7. Imported Record Screen
#### Details Tab
**Imported Record**: Salesforce Record ID.
**Record Type**: For Timesheet Imports the record type will display as ‘Timesheet’.
**Import Status**: Shows the Status of the Import. The different values are:
* **New** - Initial Status of the imported record when the batch is running.
* **Processed with Errors** - Data rows have validation errors which were not able to be successfully imported. Download the Feed\_results file and then refer to the Troubleshooting section.
* **Processed** - The Data rows have been successfully imported.
* **Failed** - The import has failed - refer to the Troubleshooting section.
**Records Attempted**: Displays the number of Data rows that the import file contains.
**Successful Records**: Displays the number of Data rows the import was able to import.
**Message**: A message may appear “There were errors in the file . Kindly look at the debug header for more details” if the Import Status is Failed.
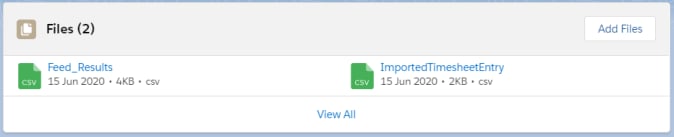
#### Files Lightning Web Component (LWC)
There should be 2 files that are produced: the Feed\_Results (contain the Error/Warnings in column 2 to assist in troubleshooting data errors) and the ImportedTimesheetEntry (contains data matching to the file being imported).
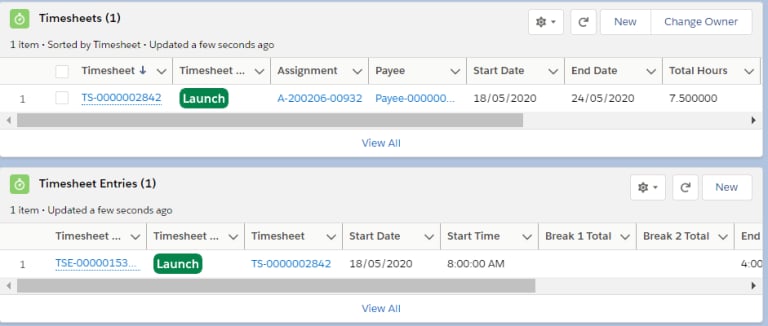
#### Timesheet and Timesheet Entries Lightning Web Component (LWC)
Timesheet and Timesheet Entries related records will appear once the Import has been Processed.
Details Tab
Files Lightning Web Component (LWC)
Timesheet and Timesheet Entries Lightning Web Component (LWC)
### 1. The Pay Transaction Import Columns
| Column Headings | \*Mandatory / Optional | Notes for Importing |
| ---------------- | ---------------------- | --------------------------------------------------------------------------------------------------------------- |
| Assignment | Mandatory | External ID is to be populated on the Assignment Record |
| Payment Entity | Mandatory | External ID is to be populated on the Payment Entity Record |
| Invoice Tax ID | Optional | External ID is to be populated on the Invoice Tax Record |
| Pay Code | Mandatory | External ID is to be populated on the Pay Code record |
| Payee | Optional | External ID is to be populated on the Payee Record |
| Employee | Mandatory | External ID is to be populated on the Contact (Candidate/Employee Record Type) Record |
| Project Code | Optional | External ID is to be populated on the Project Code Record |
| Invoice Schedule | Optional | External ID is to be populated on the Schedule (Record Type = Invoice Schedule) Record |
| Pay Schedule | Mandatory | External ID is to be populated on the Schedule (Record Type = Pay Schedule) Record |
| To Be Invoiced? | Optional | Enter Yes or No |
| Entry Date | Mandatory | Date format is dd/mm/yyyy |
| Description | Optional | Free Text |
| Invoice Rate | Optional | Enter Amount |
| Pay Rate | Optional | Enter Amount |
| Quantity | Mandatory | Enter the Quantity |
| Transaction Type | Mandatory | Enter Allowance if the related Pay Code is an Allowance or Enter Timesheet if the related Pay Code is a Payment |
Mandatory: The column in the csv upload should be populated with relevant data corresponding to the Field Mapping.
Optional: These columns can be left blank.
### Screen Shots
### 1. Navigate to the ‘Pay Transaction Tool’
The Pay Transaction Import Tool can be accessed by searching for Import for e.g. from the App Launcher and then:
* Selecting the’ 2C9 Timesheet Import Tool’ App and then clicking on the ‘Pay Transaction Import Tool’ tab.
* Or by selecting the ‘Pay Transaction Import Tool’ Item.
### 2. Pay Transaction Import Tool - Validate the File
After navigating to the Pay Transaction Import Tool:
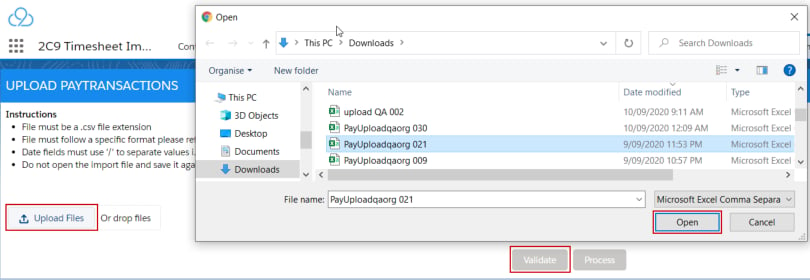
1. Select the ‘Upload Files’ button or drop files.
2. A dialog box will open allowing you to choose your file which must be a Comma Separated Values file.
3. Select ‘Open’ once you have chosen your import file.
4. Select ‘Validate’.
### 3. File Inserted Successful pop up message
After approximately 1-2 minutes if the following pop up message does not appear on the screen then reload / refresh the page.
You will be Navigated automatically to the Imported Record page.

### 4. Imported Record Screen
#### Details Tab
**Imported Record**: Salesforce Record ID.
**Status**: Shows the Status of the Imported File. The different values are:
* **New** - Initial Status of the imported record when the batch is running.
* **Validation Failed** - Data errors exist in some rows - Download the Feed\_results file and then refer to the Troubleshooting section.
* **No Validation Errors** - The Imported file contains no errors.
* **Failed** - The import has failed - refer to the Troubleshooting section.
**Record Type**: For Pay Transaction Imports the record type will display as ‘Pay Transaction’.
**Records Attempted**: Displays the number of Data rows that the import file contains.
**Successful Records**: Displays the number of Data rows the import will import.
**Message**: A message may appear “There were errors in the file. Kindly look at the debug header for more details” if the Import Status is Failed.
#### Files - Lightning Web Component (LWC)
There should be 2 files that are produced: the Feed\_Results (contain the Error/Warnings in column 2 to assist in troubleshooting data errors) and the ImportedPayTransaction (contains data matching to the file being imported).
Details Tab
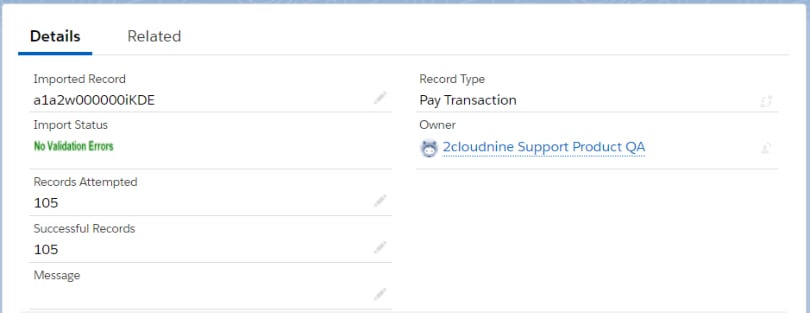
Files - Lightning Web Component (LWC)

### 5. Process the Import
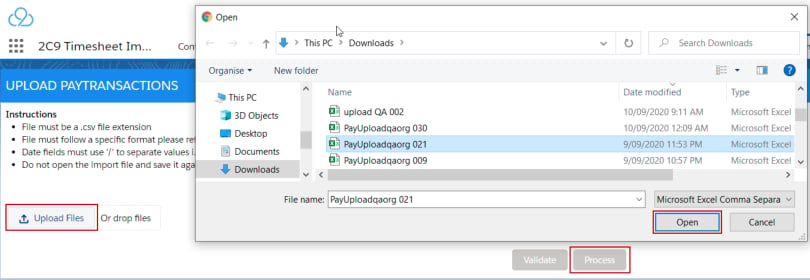
1. Select the ‘Upload Files’ button or drop files.
2. A dialog box will open allowing you to choose your file which must be a Comma Separated Values file.
3. Select ‘Open’ once you have chosen your import file.
4. Select ‘Process’.
### 6. File Inserted Successful pop up message
After approximately 1-2 minutes if the following pop up message does not appear on the screen then reload / refresh the page.
You will be Navigated automatically to the Imported Record page.

### 7. Imported Record Screen
#### Details Tab
**Imported Record**: Salesforce Record ID.
**Status**: Shows the Status of the Imported File. The different values are:
* **New** - Initial Status of the imported record when the batch is running.
* **Processed with Errors** - Data rows have validation errors which were not able to be successfully imported. Download the Feed\_results file and then refer to the Troubleshooting section.
* **Processed** - The Data rows have been successfully imported.
* **Failed** - The import has failed - refer to the Troubleshooting section.
**Record Type**: For Pay Transaction Imports the record type will display as ‘Pay Transaction’.
**Records Attempted**: Displays the number of Data rows that the import file contains.
**Successful Records**: Displays the number of Data rows the import was able to import.
**Message**: A message may appear “There were errors in the file. Kindly look at the debug header for more details” if the Impot Status is Failed.
#### Files - Lightning Web Component (LWC)
There should be 2 files that are produced: the Feed\_Results (contain the Error/Warnings in column 2 to assist in troubleshooting data errors) and the ImportedPayTransaction (contains data matching to the file being imported).
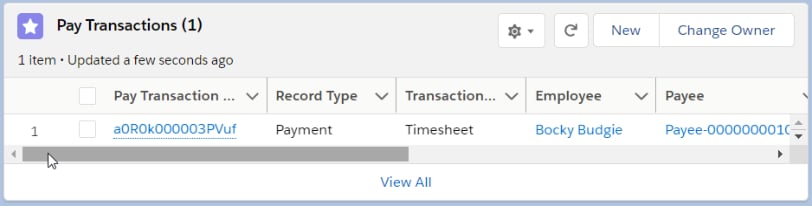
#### Pay Transactions - Lightning Web Component (LWC)
Pay Transaction related records will appear once the Import has been Processed.
Details Tab
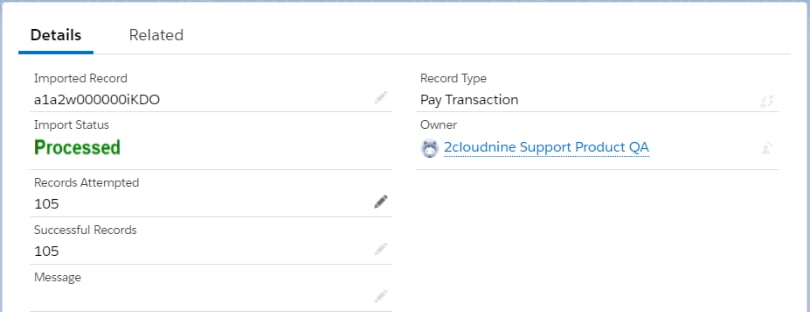
Files - Lightning Web Component (LWC)

Pay Transactions - Lightning Web Component (LWC)
### Timesheet Import Validation Error Messages
```text theme={null}
Error Message Troubleshooting Notes
Mandatory field Assignment External ID is missing An Assignment External Id is missing in the Import file. Please also check the column heading is Assignment External ID.
Mandatory field Employee External ID is missing An Employee External id is missing in the Import file. Please also check the column heading is Employee External ID.
No matching External ID found in the Assignment The External ID is not found in any Assignments.
No matching External ID found in the Employee The External ID is not found in any Employees.
The break 1 start time cannot be before break end 1 time Amend the break 1 start time to be earlier than the break 1 end time.
The break 2 start time cannot be before break end 2 time Amend the break 2 start time to be earlier than the break 2 end time.
break 2 Start Time should be after break 1 End Time for overnight hours
Break Times overlaps in the overnight shift, amend the Break1 or Break 2 start/end times so that they are not overlapping.
break 1 start & end time should lie between start and end time Check Break 1 start & end time are between the Start and End Times.
break 2 start & end time should lie between start and end time Check Break 2 start & end time are between the Start and End Times.
break 2 Start Time should be after break 1 End Time Break time overlaps, amend the Break 1 or Break 2 start/end times so that they are not overlapping.
No timesheets in a status of New exist in Salesforce for that date entry
A Timesheet Entry does not exist for that Date.
A timesheet has already been submitted for the period Unable to upload the data row as the related timesheet’s status is not "New". A manual adjustment may be required for the employee.
This timesheet in the status New has some logged hours The timesheet has some logged hours against it.
Either Start time, End time is null Ensure a value is in the Start Time and End Time.
Total Hours(in mins) is null Input a value in Total Time(in hours) or in the Total Time(in mins).
Time format must be hh:mm The Date format should be hh:mm on the Start Time/End Time and the Break 1 Start/ End Time and the Break 2 Start/End Time.
Start Date Format must be dd/mm/yyyy;End Date Format must be dd/mm/yyyy
Check the Start Date or End Date and ensure the date format is dd/mm/yyyy.
The total of two cost code Distribution % values must be equal or less than 100.00%
Ensure that the Cost Code 1 Distribution % and the Cost Code 2 Distribution % adds up to 100%.
The Cost Code 1 Distribution % value cannot be blank or zero Ensure that there is a Cost Code 1 Distribution % value.
Cost Code 1 value cannot be blank Ensure that there is a Cost Code 1 value and Distribution % value.
You cannot upload Cost Code 2 details without Cost Code 1 details
No Matching Accounting Segment found for Cost Code 1 There is no matching Accounting Segment for the Cost Code 1.
No Matching Accounting Segment found for Cost Code 2 There is no matching Accounting Segment for the Cost Code 2.
```
### Pay Transaction Import Validation Error Messages
```text theme={null}
Error Message Troubleshooting Notes
Assignment field is Mandatory An Assignment External Id is missing in the Import file. Please also check the column heading is Assignment.
Payment Entity field is Mandatory A Payment Entity External id is missing in the Import file. Please also check the column heading is Payment Entity.
Pay Code field is Mandatory A Pay code External id is missing in the Import file. Please also check the column heading is Pay Code.
Employee field is Mandatory An Employee External id is missing in the Import file. Please also check the column heading is Employee.
Pay Schedule field is Mandatory A Pay Schedule External id is missing in the Import file. Please also check the column heading is Pay Schedule.
Entry date field is Mandatory An entry date is missing in the Import file. Please also check the column heading is Entry Date.
Quantity field is Mandatory A Quantity amount is missing in the Import file. Please also check the column heading is Quantity.
Transaction type field is Mandatory only Transaction Types of Timesheet and Allowance are allowed
A Transaction Type is missing in the Import file. Please also check the column heading is Transaction Type.
Pay Transaction entry date should be between the Assignment start and end date
If entry date is greater than assignment end date.
No Matching External ID found in Assignment The External ID is not found in any Assignments.
No Matching External ID found in Payment Entity The External ID is not found in any Payment Entities.
No Matching External ID found in Pay Code The External ID is not found in any Pay Codes.
No Matching External ID found in Employee The External ID is not found in any Employees.
No Matching External ID found in Pay Schedule The External ID is not found in any Pay Schedules.
Only Transaction Types of Timesheet and Allowance are allowed Enter either’ Timesheet’ for the related Payment Pay Code or ‘Allowance’ for the related Allowance Pay Code.
Mismatch error with Pay Code and Transaction Type The Pay Code and the Transaction Type have a mismatch e.g. An Allowance Pay Code should have a Transaction Type = Allowance and a Payment Pay Code should have a Transaction Type = Timesheet.
The total of two cost code Distribution % values must be equal or less than 100.00%
Ensure that the Cost Code 1 Distribution % and the Cost Code 2 Distribution % adds up to 100%.
The Cost Code 1 Distribution % value cannot be blank or zero Ensure that there is a Cost Code 1 Distribution % value.
Cost Code 1 value cannot be blank Ensure that there is a Cost Code 1 value and Distribution % value.
You cannot upload Cost Code 2 details without Cost Code 1 details
No Matching Accounting Segment found for Cost Code 1 There is no matching Accounting Segment for the Cost Code 1.
No Matching Accounting Segment found for Cost Code 2 There is no matching Accounting Segment for the Cost Code 2.
```
### Debug Headers
Debug Header can be viewed from the Debug Header Tab.
Common Reasons whereby an Import will Fail and a debug will be created:
* You are trying to import a Pay Transaction file using the Timesheet Import Tool instead of the Pay Transaction Import Tool.
* You are trying to import a Timesheet file using the Pay Transaction Import Tool instead of the Timesheet Import Tool.
* Data entered for some columns might be in the wrong columns thus please check all the data is in the right columns.
* Column Headings are the Api names instead of the field names e.g. tc9\_et\_\_Start\_Date\_\_c instead of Start Date.