> ## Documentation Index
> Fetch the complete documentation index at: https://documentation.2cloudnine.com/llms.txt
> Use this file to discover all available pages before exploring further.
# QRG Creating Invoices
## Purpose
The purpose of this quick reference guide is to step through the process of creating Invoices using the
Invoice Generation Manager. The intended audience for this document is System Administrators /
Standard Users.
## Steps
### **Create Invoices**
To create Invoices, follow the steps below:
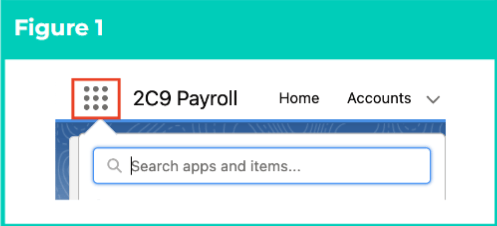
1. Click on the **App Launcher** icon (see Figure 1).
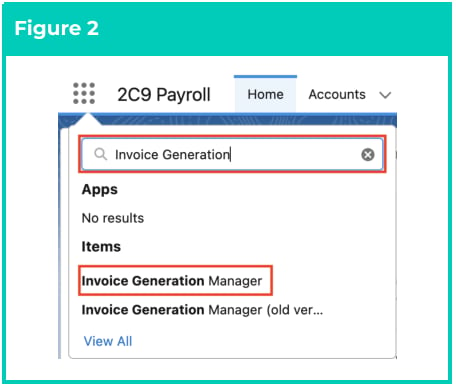
 2. Go to the **Invoice Generation Manager** object by using the Search function (see Figure 2).
 3. Select either **Standard Invoice Filters** to create the Invoices without reviewing the Pay
Transactions being invoiced, or **Transaction Filters** to present the Pay Transactions matching the
filter criteria available to be selected for Invoicing (see Figure 3).
3. Select either **Standard Invoice Filters** to create the Invoices without reviewing the Pay
Transactions being invoiced, or **Transaction Filters** to present the Pay Transactions matching the
filter criteria available to be selected for Invoicing (see Figure 3).
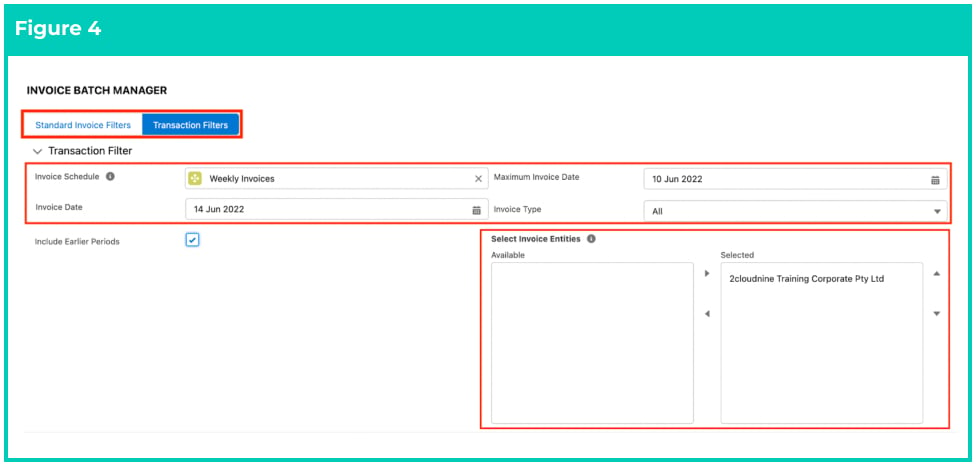
 4. Populate the following required fields to filter the Pay Transactions to be invoiced: (see Figure 4)
1. **Invoice Schedule**
2. **Maximum Invoice Date** (should match End Date of Invoice Calendar Period if you want Pay Transactions from full Invoice Calendar Period to display)
3. **Invoice Date**
4. **Invoice Type**
5. **Select Invoice Entities** (Multiselect Picklist)
5. Populate the following optional fields as needed: (see Figure 4)
1. To include Pay Transactions from prior Invoice Calendar Periods, tick the **Include Earlier**
**Periods** checkbox.
If selected, Pay Transactions from all previous Invoice Calendar Periods will be included,
up to the Maximum Invoice Date entered.
If not selected, the Invoice Calendar Period is determined based on the entered
Maximum Invoice Date. The Pay Transactions will then be displayed starting from the first
date of the above determined Invoice Calendar Period up to the Maximum Invoice Date
that is entered.
4. Populate the following required fields to filter the Pay Transactions to be invoiced: (see Figure 4)
1. **Invoice Schedule**
2. **Maximum Invoice Date** (should match End Date of Invoice Calendar Period if you want Pay Transactions from full Invoice Calendar Period to display)
3. **Invoice Date**
4. **Invoice Type**
5. **Select Invoice Entities** (Multiselect Picklist)
5. Populate the following optional fields as needed: (see Figure 4)
1. To include Pay Transactions from prior Invoice Calendar Periods, tick the **Include Earlier**
**Periods** checkbox.
If selected, Pay Transactions from all previous Invoice Calendar Periods will be included,
up to the Maximum Invoice Date entered.
If not selected, the Invoice Calendar Period is determined based on the entered
Maximum Invoice Date. The Pay Transactions will then be displayed starting from the first
date of the above determined Invoice Calendar Period up to the Maximum Invoice Date
that is entered.
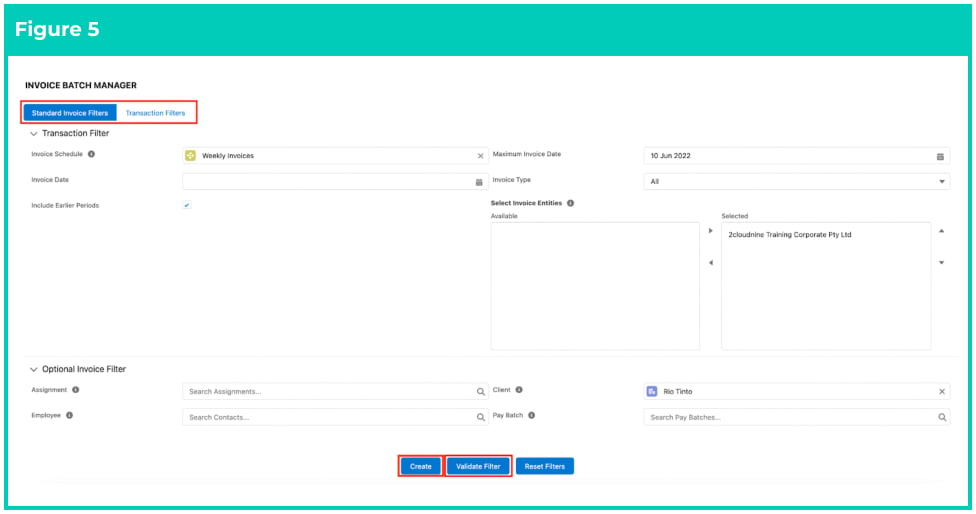
 6. Populate the following optional fields as needed: (see Figure 5)
1. To filter Pay Transactions applicable to a specific Assignment, populate the **Assignment** filter.
2. To filter Pay Transactions applicable to a specific Employee, populate the **Employee** filter.
3. To filter Pay Transactions applicable to a specific Client, populate the **Client** filter.
4. To filter Pay Transactions applicable to a specific Pay Batch, populate the **Pay Batch** filter.
7. Choose one of the following options:
1. If using the Standard Invoice Filters, select the **Validate Filters** button to ensure the filters
used will create at least 1 invoice.
OR
Select the **Create** button to automatically create Invoices (see Figure 5).
6. Populate the following optional fields as needed: (see Figure 5)
1. To filter Pay Transactions applicable to a specific Assignment, populate the **Assignment** filter.
2. To filter Pay Transactions applicable to a specific Employee, populate the **Employee** filter.
3. To filter Pay Transactions applicable to a specific Client, populate the **Client** filter.
4. To filter Pay Transactions applicable to a specific Pay Batch, populate the **Pay Batch** filter.
7. Choose one of the following options:
1. If using the Standard Invoice Filters, select the **Validate Filters** button to ensure the filters
used will create at least 1 invoice.
OR
Select the **Create** button to automatically create Invoices (see Figure 5).
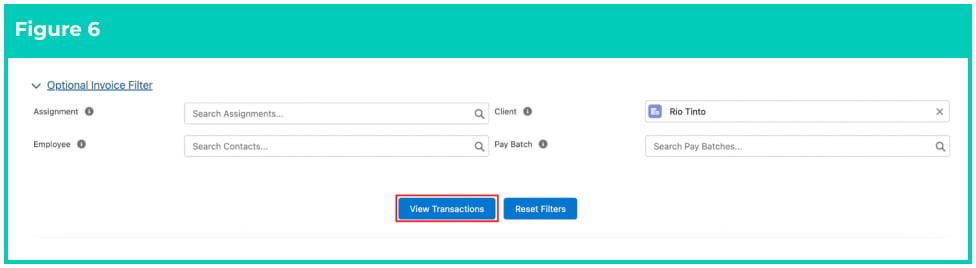 2. If using the Transaction Filters, click on the **View Transactions** button (see Figure 6).
If you need to amend the filters or start again at any time, click **Reset Filters** .
2. If using the Transaction Filters, click on the **View Transactions** button (see Figure 6).
If you need to amend the filters or start again at any time, click **Reset Filters** .
 8. If using the Transaction Filters, the Pay Transactions will display in table format. You can click on the **Clear Transactions** button to clear these Pay Transactions if required.
9. Click on the **Export Transactions** button to export the Pay Transactions in CSV format.
10. Select the required **Pay Transactions** to be invoiced by ticking the relevant checkboxes
11. When satisfied with the Pay Transactions selected, click on the **Create** button (see Figure 7).
8. If using the Transaction Filters, the Pay Transactions will display in table format. You can click on the **Clear Transactions** button to clear these Pay Transactions if required.
9. Click on the **Export Transactions** button to export the Pay Transactions in CSV format.
10. Select the required **Pay Transactions** to be invoiced by ticking the relevant checkboxes
11. When satisfied with the Pay Transactions selected, click on the **Create** button (see Figure 7).
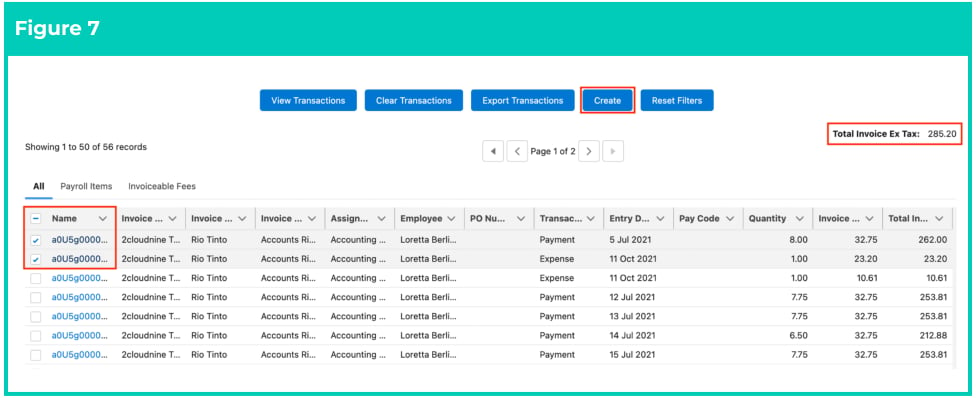 Users are limited to selecting a maximum of 2,000 Pay Transactions to create an
12. When created successfully, you will see a confirmation message ‘Success! A batch has been successfully initiated to create the Invoices’ (see Figure 8).
Users are limited to selecting a maximum of 2,000 Pay Transactions to create an
12. When created successfully, you will see a confirmation message ‘Success! A batch has been successfully initiated to create the Invoices’ (see Figure 8).
 13. Another confirmation message will also appear saying ‘Invoice Creation process completed
14. After the Invoice has been created, users are recommended to review the Invoice and the PDF. If
the Invoice is incorrect, users can delete the Invoice which will revert all the data back to the
status prior to the Invoice being created. To learn more about reviewing and deleting Invoices,
please refer to the QRG Review Invoices.
13. Another confirmation message will also appear saying ‘Invoice Creation process completed
14. After the Invoice has been created, users are recommended to review the Invoice and the PDF. If
the Invoice is incorrect, users can delete the Invoice which will revert all the data back to the
status prior to the Invoice being created. To learn more about reviewing and deleting Invoices,
please refer to the QRG Review Invoices.
 ## Field Descriptions
**Assignment** When populated, the Pay Transactions to be invoiced will be filtered specifically to the
Assignment entered.
**Client** When populated, the Pay Transactions to be invoiced will be filtered specifically to the Client
entered.
**Employee** When populated, the Pay Transactions to be invoiced will be filtered specifically to the
Employee entered.
**Invoice Date** is the Invoice Date to be displayed on the Invoice.
**Include Earlier Periods** indicates the filter process to review all prior Invoice Calendar Periods that also
match the other filters in addition to the Invoice Calendar Period matching the Maximum Invoice Date.
**Invoice Schedule** defines the Invoice Schedule that applies to the Pay Transactions to be filtered.
**Invoice Type** This enables users to filter only on specific Record Types of Pay Transactions.
**Maximum Invoice Date** is the maximum date to use when filtering on Pay Transactions within an Invoice
Calendar Period.
**Pay Batch** When populated, the Pay Transactions to be invoiced will be filtered specifically to the Pay
Batch entered.
**Select Invoice Entities** the Pay Transactions filtered will be specific to the Invoice Entities selected.
**Standard Invoice Filters button** will automatically create the Invoices of the matching Pay Transactions,
without providing users the option to choose which should be invoiced.
**Transaction Filters button** will display the matching Pay Transactions to the filters used, which are
available to be invoiced. This requires users to select the Pay Transactions to proceed with the Invoice
creation process. Also provides additional functionality with the ability to use the Export Transactions
button to review the Pay Transactions externally in Excel.
## Further Information
| Document | Document Type | Description |
| ---------------------------------------------- | ----------------- | ------------------------------------------------------ |
| QRG Create Invoice Settings | Task Instructions | How to create Invoice Settings |
| QRG Create Invoice Schedules | Task Instructions | How to create an Invoice Schedule |
| QRG Create Invoice Calendar & Calendar Periods | Task Instructions | How to create an Invoice Calendar and Calendar Periods |
| QRG Create an Account - Invoice Entity | Task Instructions | How to create an Invoice Entity |
| QRG Create Credit Notes | Task Instructions | How to create a Credit Note from an existing Invoice |
| QRG Review Invoices | Task Instructions | How to review the Invoices created and their PDFs |
## Field Descriptions
**Assignment** When populated, the Pay Transactions to be invoiced will be filtered specifically to the
Assignment entered.
**Client** When populated, the Pay Transactions to be invoiced will be filtered specifically to the Client
entered.
**Employee** When populated, the Pay Transactions to be invoiced will be filtered specifically to the
Employee entered.
**Invoice Date** is the Invoice Date to be displayed on the Invoice.
**Include Earlier Periods** indicates the filter process to review all prior Invoice Calendar Periods that also
match the other filters in addition to the Invoice Calendar Period matching the Maximum Invoice Date.
**Invoice Schedule** defines the Invoice Schedule that applies to the Pay Transactions to be filtered.
**Invoice Type** This enables users to filter only on specific Record Types of Pay Transactions.
**Maximum Invoice Date** is the maximum date to use when filtering on Pay Transactions within an Invoice
Calendar Period.
**Pay Batch** When populated, the Pay Transactions to be invoiced will be filtered specifically to the Pay
Batch entered.
**Select Invoice Entities** the Pay Transactions filtered will be specific to the Invoice Entities selected.
**Standard Invoice Filters button** will automatically create the Invoices of the matching Pay Transactions,
without providing users the option to choose which should be invoiced.
**Transaction Filters button** will display the matching Pay Transactions to the filters used, which are
available to be invoiced. This requires users to select the Pay Transactions to proceed with the Invoice
creation process. Also provides additional functionality with the ability to use the Export Transactions
button to review the Pay Transactions externally in Excel.
## Further Information
| Document | Document Type | Description |
| ---------------------------------------------- | ----------------- | ------------------------------------------------------ |
| QRG Create Invoice Settings | Task Instructions | How to create Invoice Settings |
| QRG Create Invoice Schedules | Task Instructions | How to create an Invoice Schedule |
| QRG Create Invoice Calendar & Calendar Periods | Task Instructions | How to create an Invoice Calendar and Calendar Periods |
| QRG Create an Account - Invoice Entity | Task Instructions | How to create an Invoice Entity |
| QRG Create Credit Notes | Task Instructions | How to create a Credit Note from an existing Invoice |
| QRG Review Invoices | Task Instructions | How to review the Invoices created and their PDFs |