> ## Documentation Index
> Fetch the complete documentation index at: https://documentation.2cloudnine.com/llms.txt
> Use this file to discover all available pages before exploring further.
# QRG Creating Re-Invoices
## Purpose
The purpose of this quick reference guide is to step through the process of creating Re-Invoices from a
Credit Note. The intended audience for this document is System Administrators / Standard Payroll Users.
## Steps
### **Create Re-Invoices**
To create a Re-Invoice, follow the steps below:
1. Click on the **App Launcher** icon (see Figure 1).
 2. Go to the **Invoices** object by using the Search function (see Figure 2).
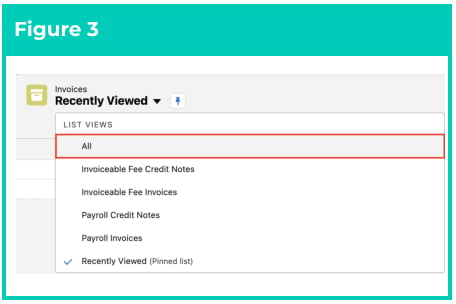
 3. From the displayed List View, if required, click on the down arrow and select a relevant List View (see Figure 3).
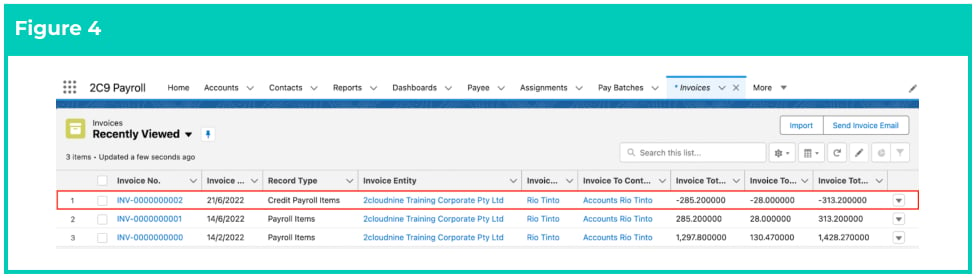
 4. Open the required Credit Note record (see Figure 4).
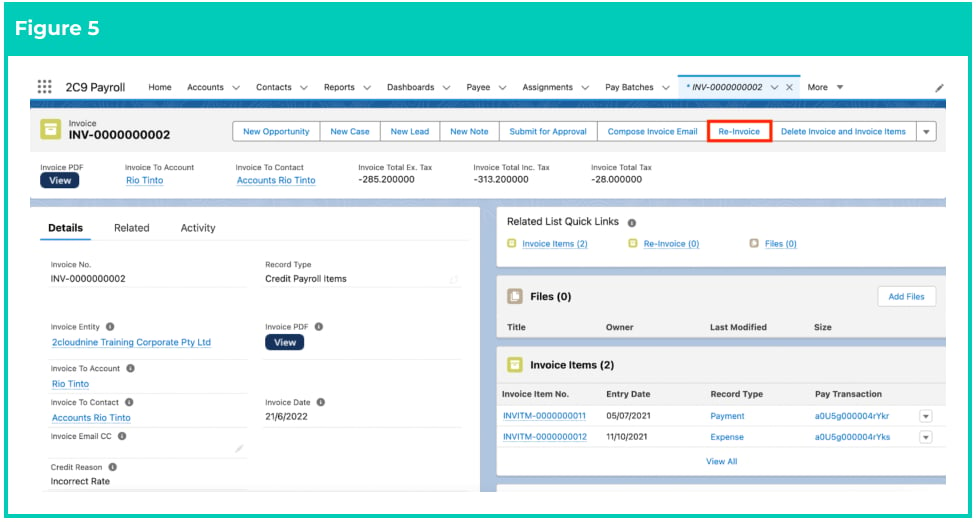
 5. Within the Credit Note record, click on the **Re-Invoice** button (see Figure 5).
 6. Populate the **Invoice Date** for the new Invoice as required (see Figure 6).
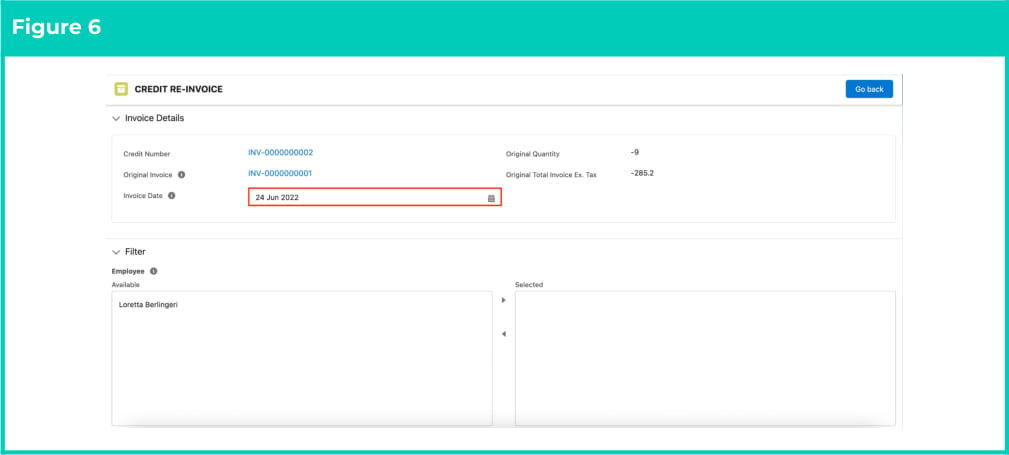 If there are multiple Employees listed on the Invoice, users can select Employees from
the Available column to move to the Selected column, and filter the Pay Transactions
displayed for ease of editing or deleting as required. When the Re-Invoice is created, it
will be created for all Employees unless the Employee's Pay Transactions are deleted.
7. The full list of Pay Transactions within the Credit Note will be duplicated on the Re-invoice
without the “-” before the Quantity. Users can change the Pay Code, the Quantity, and the Invoice
Rate on each of the new Pay Transactions listed as required for the Re-Invoice.
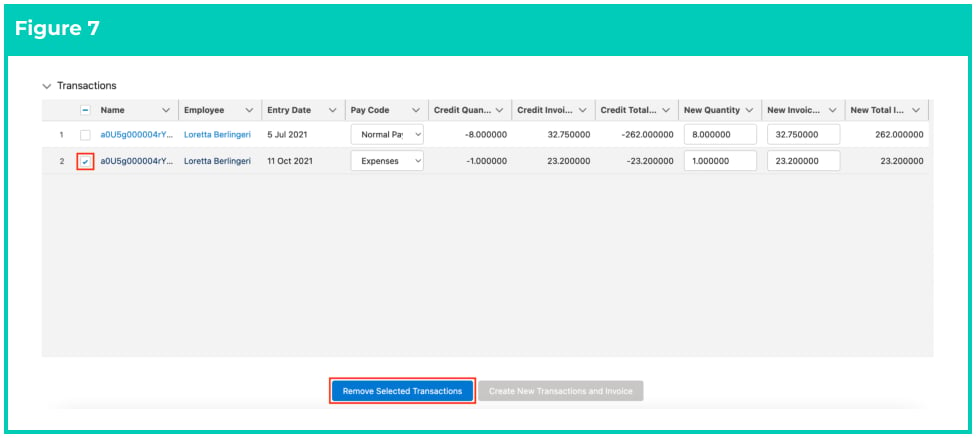
8. Users can also remove a Pay Transaction by selecting the required individual checkboxes and
then selecting the Remove Selected Transactions button (see Figure 7). This will remove the Pay
Transaction from the Re-invoice page ONLY and won’t delete it permanently.
If there are multiple Employees listed on the Invoice, users can select Employees from
the Available column to move to the Selected column, and filter the Pay Transactions
displayed for ease of editing or deleting as required. When the Re-Invoice is created, it
will be created for all Employees unless the Employee's Pay Transactions are deleted.
7. The full list of Pay Transactions within the Credit Note will be duplicated on the Re-invoice
without the “-” before the Quantity. Users can change the Pay Code, the Quantity, and the Invoice
Rate on each of the new Pay Transactions listed as required for the Re-Invoice.
8. Users can also remove a Pay Transaction by selecting the required individual checkboxes and
then selecting the Remove Selected Transactions button (see Figure 7). This will remove the Pay
Transaction from the Re-invoice page ONLY and won’t delete it permanently.
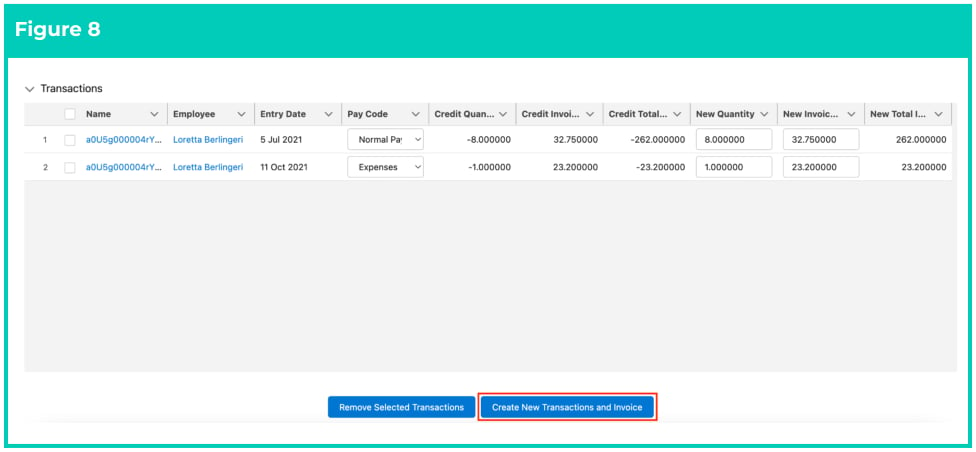
 9. When all required changes have been actioned and you want to create the new Invoice, click on
the **Create New Transactions and Invoice** button (see Figure 8).
9. When all required changes have been actioned and you want to create the new Invoice, click on
the **Create New Transactions and Invoice** button (see Figure 8).
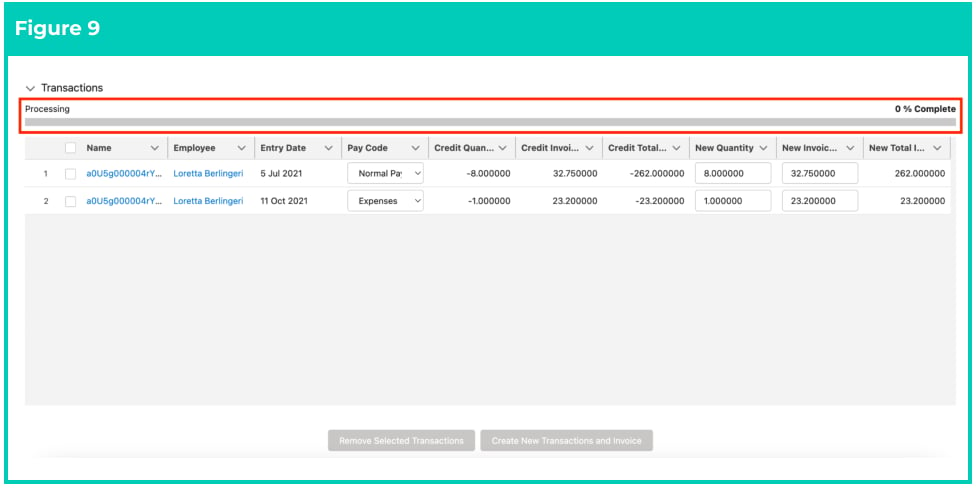
 10. You will see a progress bar as shown in the screenshot below (see Figure 9).
 11. You will then see a notification saying ‘Success! Re-Invoice process completed successfully.’ (see Figure 10).
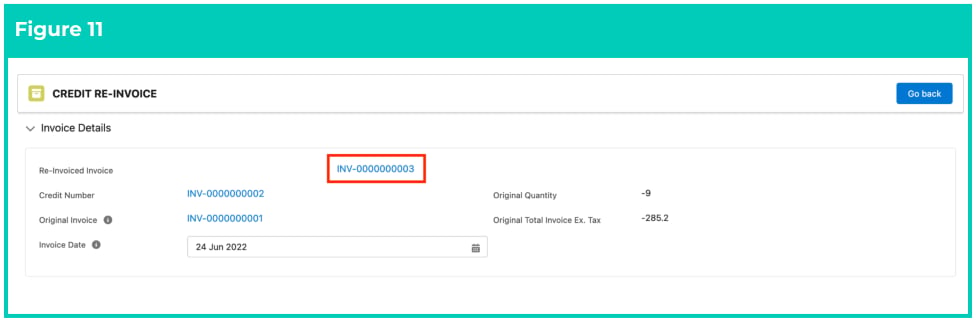
 12. Click on the Invoice link to open the new Re-Invoice record (see Figure 11).
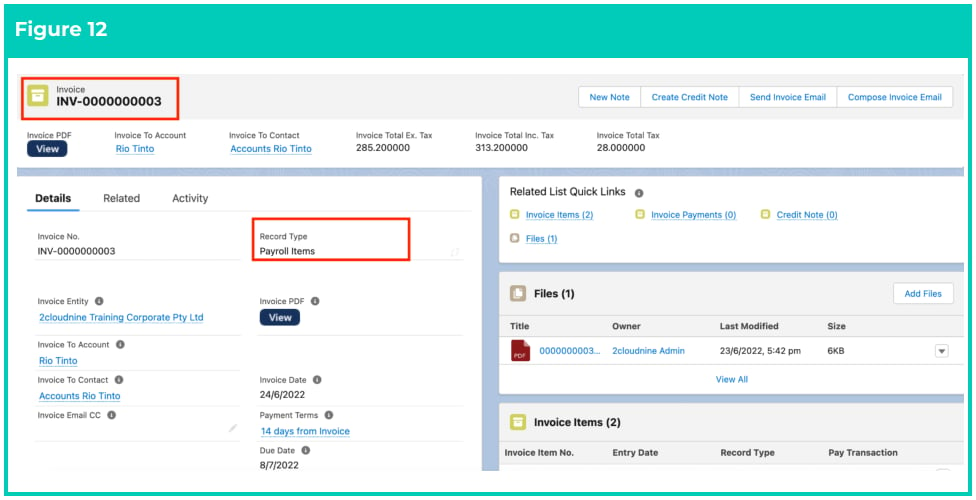
 13. A new Invoice record has been created as a record type of Payroll Items or Invoiceable Fees
depending on the Original Invoice and the Credit Note Record Types (see Figure 12).
13. A new Invoice record has been created as a record type of Payroll Items or Invoiceable Fees
depending on the Original Invoice and the Credit Note Record Types (see Figure 12).
 1. To modify an existing **Invoices** record, open the required record and select the **Edit** button available on the top right side of the page. You can also double-click in any of the fields that need editing or just click on the pencil icon that appears within fields when you move your cursor over the field.
2. When complete, click on the **Save** button.
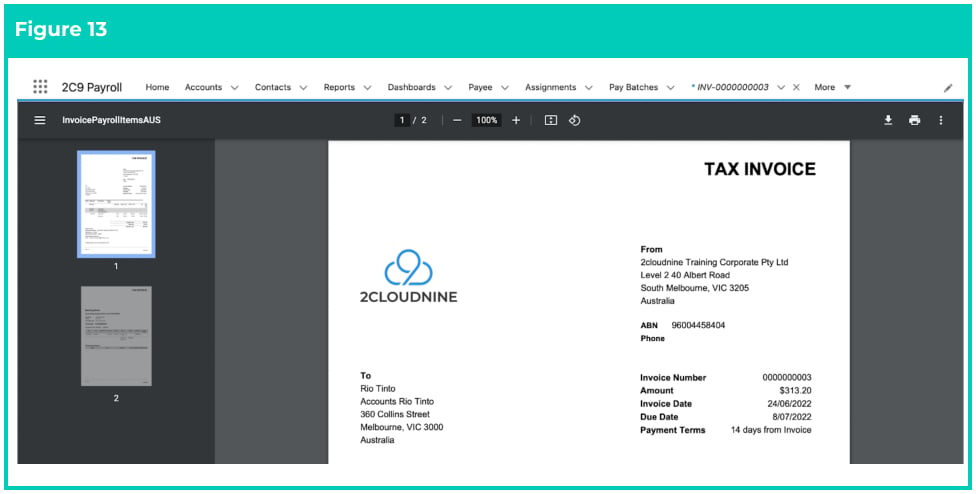
3. To create the Invoice PDF select the Create Invoice PDF button, or alternatively, Users can wait for
the scheduled job to run, which will then attach the PDF to the Files of the Re-Invoice. If the PDF
is displayed there, Users can open the PDF or select the View button (see Figure 13).
1. To modify an existing **Invoices** record, open the required record and select the **Edit** button available on the top right side of the page. You can also double-click in any of the fields that need editing or just click on the pencil icon that appears within fields when you move your cursor over the field.
2. When complete, click on the **Save** button.
3. To create the Invoice PDF select the Create Invoice PDF button, or alternatively, Users can wait for
the scheduled job to run, which will then attach the PDF to the Files of the Re-Invoice. If the PDF
is displayed there, Users can open the PDF or select the View button (see Figure 13).
 ### **Delete Re-Invoices**
In some circumstances, the need to delete an Invoice is required, but this is only possible if the following
criteria is met:
1. The Invoice has not been sent to the Client; and
2. The Invoice field “Invoice Payments Total” remains blank; and
3. The Invoice has not been reflected in the GL Accounting Invoices.
If the above are all true, then the Invoice can be deleted by:
1. Users selecting the **Delete Invoice and Invoice Items** button on the individual Invoice (see Figure
14\).
### **Delete Re-Invoices**
In some circumstances, the need to delete an Invoice is required, but this is only possible if the following
criteria is met:
1. The Invoice has not been sent to the Client; and
2. The Invoice field “Invoice Payments Total” remains blank; and
3. The Invoice has not been reflected in the GL Accounting Invoices.
If the above are all true, then the Invoice can be deleted by:
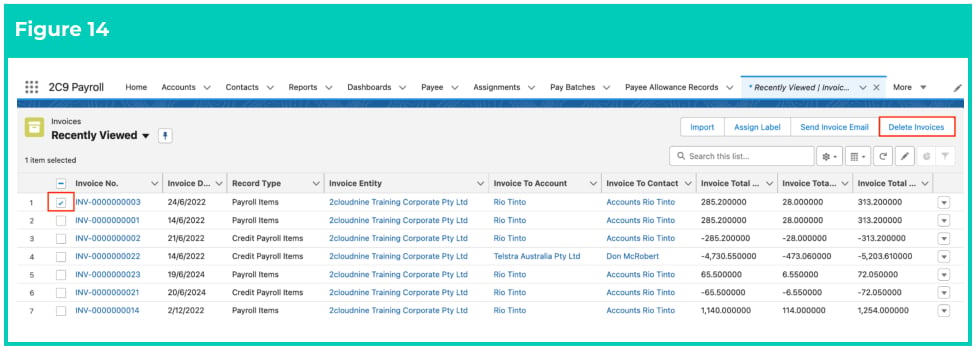
1. Users selecting the **Delete Invoice and Invoice Items** button on the individual Invoice (see Figure
14\).
 OR
2. Users selecting suitable Re-Invoices to be deleted from a List View and then clicking the **Delete**
**Invoices** button (see Figure 14).
If the Delete button will not proceed to completing the deletion of the Invoice(s), then
Users will be required to proceed with creating a Credit Note, please refer to the QRG
Creating Credit Notes.
## Field Descriptions
No field descriptions are required for this QRG document.
## Further Information
| Document | Document Type | Description |
| ---------------------------------------------- | ----------------- | ----------------------------------------------------------- |
| QRG Create Invoice Settings | Task Instructions | How to create Invoice Settings |
| QRG Create Invoice Schedules | Task Instructions | How to create an Invoice Schedule |
| QRG Create Invoice Calendar & Calendar Periods | Task Instructions | How to create an Invoice Calendar and Calendar Periods |
| QRG Create an Account - Invoice Entity | Task Instructions | How to create an Invoice Entity |
| QRG Creating Invoices | Task Instructions | How to create Invoices using the Invoice Generation Manager |
| QRG Review Invoices | Task Instructions | How to review the Invoices created and their PDFs |
| QRG Create Credit Notes | Task Instructions | How to create a Credit Note from an existing Invoice |
OR
2. Users selecting suitable Re-Invoices to be deleted from a List View and then clicking the **Delete**
**Invoices** button (see Figure 14).
If the Delete button will not proceed to completing the deletion of the Invoice(s), then
Users will be required to proceed with creating a Credit Note, please refer to the QRG
Creating Credit Notes.
## Field Descriptions
No field descriptions are required for this QRG document.
## Further Information
| Document | Document Type | Description |
| ---------------------------------------------- | ----------------- | ----------------------------------------------------------- |
| QRG Create Invoice Settings | Task Instructions | How to create Invoice Settings |
| QRG Create Invoice Schedules | Task Instructions | How to create an Invoice Schedule |
| QRG Create Invoice Calendar & Calendar Periods | Task Instructions | How to create an Invoice Calendar and Calendar Periods |
| QRG Create an Account - Invoice Entity | Task Instructions | How to create an Invoice Entity |
| QRG Creating Invoices | Task Instructions | How to create Invoices using the Invoice Generation Manager |
| QRG Review Invoices | Task Instructions | How to review the Invoices created and their PDFs |
| QRG Create Credit Notes | Task Instructions | How to create a Credit Note from an existing Invoice |