> ## Documentation Index
> Fetch the complete documentation index at: https://documentation.2cloudnine.com/llms.txt
> Use this file to discover all available pages before exploring further.
# QRG Finalise a Pay Batch
## Purpose
The purpose of this quick reference guide is to step through the process of Finalising a Pay Batch
through the Pay Batch Manager. The intended audience for this document is Standard Payroll Users.
A Calculated Pay Batch must be Finalised, ensuring that any further changes to the Pay Batch are not
possible, before the creation of Pay Advices and releasing the Payment File.
Once the Payment File is created, it may be required to be submitted for approval (where applicable)
before it is Released. The status of the Pay Batch will be updated to Payment File Released.
Despite a Pay Batch being Finalised, the 2cloudnine Pay Batch has the flexibility of being rolled back to
prior statuses and adjusted until it reaches the Pay Batch Status of Payment File Released. A popup
reminder has been included to ensure Users are aware of this being the ‘point of no return’.
## Steps
To Finalise a Pay Batch, the users may need to complete one or more of the following steps depending
on what their requirements are:
1. Finalise a Pay Batch
2. Unfinalise a Pay Batch (if needed)
3. Create Pay Advices
4. Preview a Pay Advice (if needed)
5. Delete Pay Advice (if needed)
6. Create a Payment File
7. Delete the Payment File (if needed)
8. Payment File Approval (if needed)
9. Download/Release Payment File
10. Review Payment File details for Individual Payee Pay Batch
### **Finalise a Pay Batch**
To Finalise a Pay Batch, the following steps should be completed. Please skip to step 4, if you already
have the Pay Batch Manager UI open on your screen:
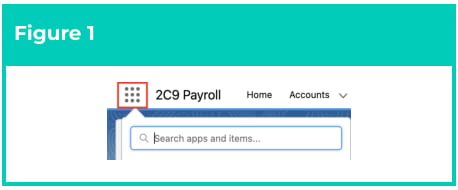
1. Click on the **App Launcher** icon (see Figure 1).
 2. Go to the **Pay Batches** object by using the Search function (see Figure 2).
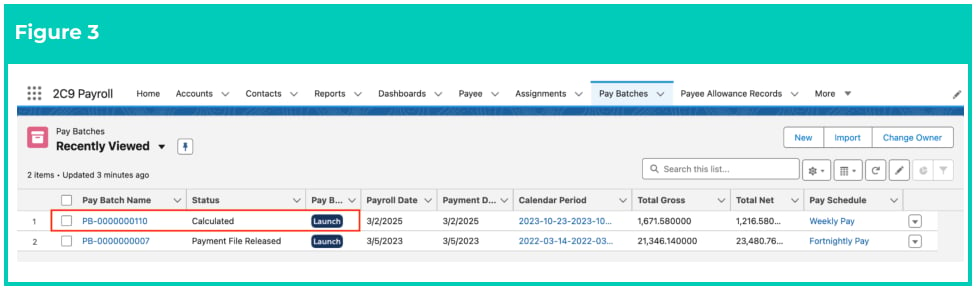
 3. From the List View, select the Pay Batch you want to review with the status of Calculated and click the **Launch** button (see Figure 3).
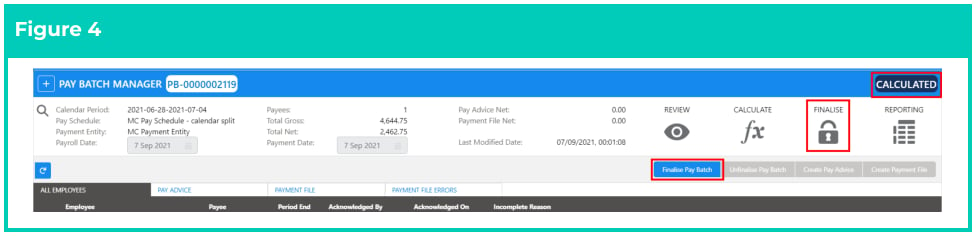
 4. Starting within a Pay Batch where the Status is Calculated, go to the **Finalise** navigation icon (see Figure 4).
5. Click on the **Finalise Pay Batch** button.
4. Starting within a Pay Batch where the Status is Calculated, go to the **Finalise** navigation icon (see Figure 4).
5. Click on the **Finalise Pay Batch** button.
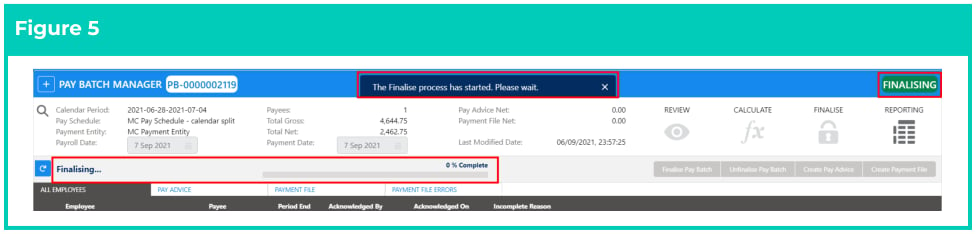
 6. A pop-up message indicating that the Finalisation Process has commenced will be shown. The Pay Batch Status will be updated to Finalising, and a progress bar showing the progression of the Finalisation Process will be displayed (see Figure 5).
 7. Once the Finalisation Process is complete, the Pay Batch Status will be updated to one of the below:
1. If the Calculation Process is completed successfully, the Status of the Pay Batch will be updated to **Finalised**, therefore Users can now proceed to the next steps of creating Pay Advices.
2. If the Finalisation Process fails, it means that an error has been found with one or more associated records, and the Status of the Pay Batch will be updated to **Finalise Failed** .
When this occurs, a Debug Log will be created to provide details of the error. The reason for the failure must be addressed before the Pay Batch can be Finalised.
### **Unfinalise a Pay Batch (Optional)**
Once a Pay Batch is Finalised, you cannot make any changes to the associated Pay Transactions and
other related records to the Pay Batch. However, if you need to go back and make some changes, you can
roll back the Status of the Pay Batch to be Calculated, so any changes can be made as required. You can
Unfinalise a Pay Batch only until the Payment File is released.
A Pay Batch must have a Status of Finalised before it can be Unfinalised. To Unfinalise a Pay Batch, the
following steps should be completed:
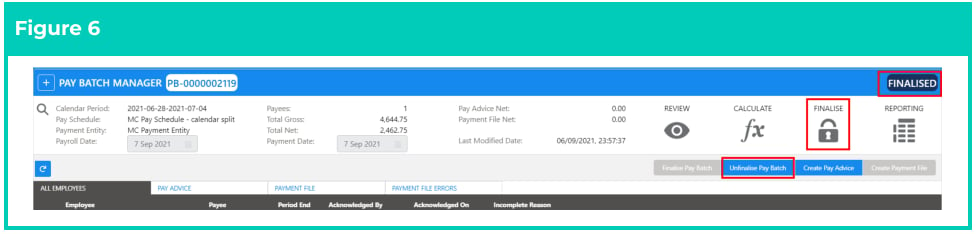
1. For a Pay Batch with a Status of Finalised, go to the **Finalise** navigation icon (see Figure 6).
2. Click on the **Unfinalise Pay Batch** button.
7. Once the Finalisation Process is complete, the Pay Batch Status will be updated to one of the below:
1. If the Calculation Process is completed successfully, the Status of the Pay Batch will be updated to **Finalised**, therefore Users can now proceed to the next steps of creating Pay Advices.
2. If the Finalisation Process fails, it means that an error has been found with one or more associated records, and the Status of the Pay Batch will be updated to **Finalise Failed** .
When this occurs, a Debug Log will be created to provide details of the error. The reason for the failure must be addressed before the Pay Batch can be Finalised.
### **Unfinalise a Pay Batch (Optional)**
Once a Pay Batch is Finalised, you cannot make any changes to the associated Pay Transactions and
other related records to the Pay Batch. However, if you need to go back and make some changes, you can
roll back the Status of the Pay Batch to be Calculated, so any changes can be made as required. You can
Unfinalise a Pay Batch only until the Payment File is released.
A Pay Batch must have a Status of Finalised before it can be Unfinalised. To Unfinalise a Pay Batch, the
following steps should be completed:
1. For a Pay Batch with a Status of Finalised, go to the **Finalise** navigation icon (see Figure 6).
2. Click on the **Unfinalise Pay Batch** button.
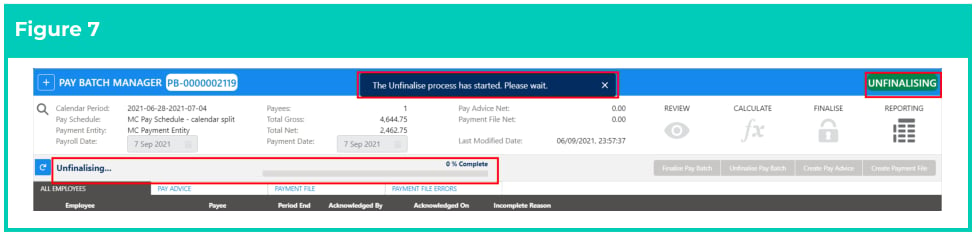
 3. A pop-up message indicating that the Unfinalisation Process has commenced will be shown. The Pay Batch Status will be updated to Unfinalising and a progress bar showing the progression of the Unfinalisation Process will be displayed (see Figure 7).
 4. Once the Unfinalise Process is complete, the Payee Pay Batch Status will be updated to either Calculated or Unfinalise Failed based on the successful completion of the process:
1. If the Unfinalise Process is completed successfully, the Status of the Pay Batch will be updated to Calculated, which means any changes can now be made as required.
2. If the Unfinalise process fails, it means there is an error found with one or more of the associated records. The Status of the Pay Batch will be updated to Unfinalise Failed. When this occurs, a Debug Log will provide details of the error. The reason for the failure must be addressed before the Pay Batch can be Unfinalised.
On clicking the Unfinalise Pay Batch button, all the Payee Aggregate records are
deleted ready for new ones to be created when the Pay Batch is eventually Finalised.
### **Create Pay Advices**
Once a Pay Batch is Finalised, the next stage is to create Pay Advices. To create Pay Advices, the following
steps should be completed:
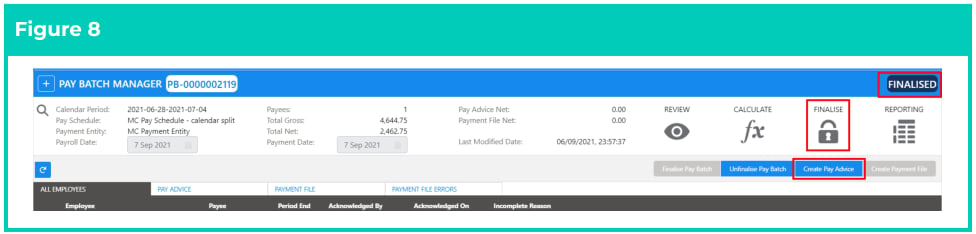
1. From within a Pay Batch with a Status of Finalised, go to the **Finalise** navigation icon (see Figure 8).
2. Click on the **Create Pay Advice** button.
4. Once the Unfinalise Process is complete, the Payee Pay Batch Status will be updated to either Calculated or Unfinalise Failed based on the successful completion of the process:
1. If the Unfinalise Process is completed successfully, the Status of the Pay Batch will be updated to Calculated, which means any changes can now be made as required.
2. If the Unfinalise process fails, it means there is an error found with one or more of the associated records. The Status of the Pay Batch will be updated to Unfinalise Failed. When this occurs, a Debug Log will provide details of the error. The reason for the failure must be addressed before the Pay Batch can be Unfinalised.
On clicking the Unfinalise Pay Batch button, all the Payee Aggregate records are
deleted ready for new ones to be created when the Pay Batch is eventually Finalised.
### **Create Pay Advices**
Once a Pay Batch is Finalised, the next stage is to create Pay Advices. To create Pay Advices, the following
steps should be completed:
1. From within a Pay Batch with a Status of Finalised, go to the **Finalise** navigation icon (see Figure 8).
2. Click on the **Create Pay Advice** button.
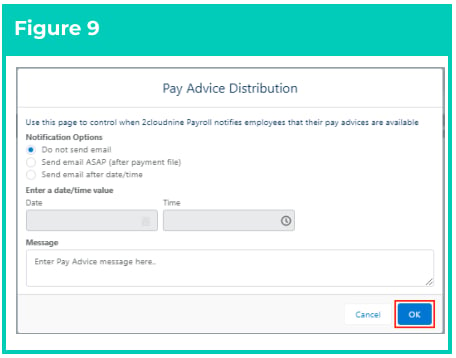
3. The Pay Advice Distribution pop-up page will be displayed (see Figure 9).
4. Select the Distribution Option to be applied:
1. **Do not send email** : The Pay Advices are not emailed to any of the Payees.
2. **Send email ASAP** : The Pay Advice emails are sent in a Scheduled Job after the Pay Batch has a status of Payment File Released.
3. **Send email after date/time** : Enables entry of specific date and time for Pay Advice emails to be distributed, via a Scheduled Job after the Pay Batch has a status of Payment File Released.
5. If required, populate a customised **Message** to be displayed on all the **Pay Advices** created for
the Pay Batch. Payment Entity, Pay Advice Template, and Payee level messages will also still
apply (see Figure 9).
6. Click on the **OK** button.
If the Pay Advice Message field is populated on multiple records, the Pay Advice PDF
will merge all of them to display only up to a maximum of 255 characters.
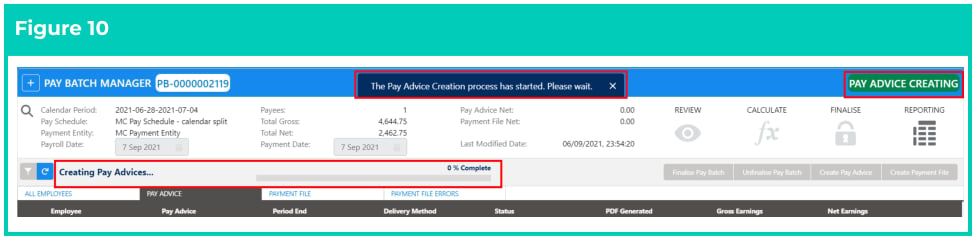
7. A pop-up message indicating that the Pay Advice Creation process has commenced will be
shown. The Pay Batch Status will be updated to Pay Advice Creating, and a progress bar showing
the progress of the Pay Advice creation will be displayed (see Figure 10).
 8. Once the Pay Advice Creation process is complete, the Status of the Pay Batch will be updated to either Pay Advice Created or Pay Advice Failed based on the successful completion of the process:
1. If the Pay Advice Creation process is completed successfully, the Status of the Pay Batch will be updated to Pay Advice Created. A draft of the Pay Advice document(s) can now be viewed within Pay Batch Manager.
2. If the Pay Advice Creation fails, it means there is an error with one or more of the records associated with the Pay Batch, and the Status of the Pay Batch will be updated to Pay Advice Failed. The reason for the failure must be addressed before the Pay Advices can be created. If this occurs, a Debug Log will be created to provide details of the error.
Before creating Pay Advices, ensure that a Pay Advice Template is defined. This can be
either an organisation-wide Default template, Payment Entity/Pay Schedule, or Payee
specific. Also, ensure that the Pay Advice distribution method is defined against all
Payees included within the Pay Batch.
The Create Pay Advice process creates draft Pay Advice documents. The final version of
the Pay Advice document, in PDF format, will not be created until the Pay Batch Status
is updated to the Payment File Released. Once this occurs, the PDFs will be generated
on the next scheduled job available.
### **Preview a Pay Advice**
Once the Pay Advices are created, they can be previewed through the Detail View for the Payee Pay
Batch. To preview a Pay Advice the following steps must be completed:
1. For a Pay Batch with a Status of Pay Advice Created, go to the **Finalise** navigation icon (see Figure 11)
2. From the **Pay Advice** tab, click the action dropdown button at the end of the row for the **Pay Advice** to be previewed.
3. Select the **Preview PDF** option.
8. Once the Pay Advice Creation process is complete, the Status of the Pay Batch will be updated to either Pay Advice Created or Pay Advice Failed based on the successful completion of the process:
1. If the Pay Advice Creation process is completed successfully, the Status of the Pay Batch will be updated to Pay Advice Created. A draft of the Pay Advice document(s) can now be viewed within Pay Batch Manager.
2. If the Pay Advice Creation fails, it means there is an error with one or more of the records associated with the Pay Batch, and the Status of the Pay Batch will be updated to Pay Advice Failed. The reason for the failure must be addressed before the Pay Advices can be created. If this occurs, a Debug Log will be created to provide details of the error.
Before creating Pay Advices, ensure that a Pay Advice Template is defined. This can be
either an organisation-wide Default template, Payment Entity/Pay Schedule, or Payee
specific. Also, ensure that the Pay Advice distribution method is defined against all
Payees included within the Pay Batch.
The Create Pay Advice process creates draft Pay Advice documents. The final version of
the Pay Advice document, in PDF format, will not be created until the Pay Batch Status
is updated to the Payment File Released. Once this occurs, the PDFs will be generated
on the next scheduled job available.
### **Preview a Pay Advice**
Once the Pay Advices are created, they can be previewed through the Detail View for the Payee Pay
Batch. To preview a Pay Advice the following steps must be completed:
1. For a Pay Batch with a Status of Pay Advice Created, go to the **Finalise** navigation icon (see Figure 11)
2. From the **Pay Advice** tab, click the action dropdown button at the end of the row for the **Pay Advice** to be previewed.
3. Select the **Preview PDF** option.
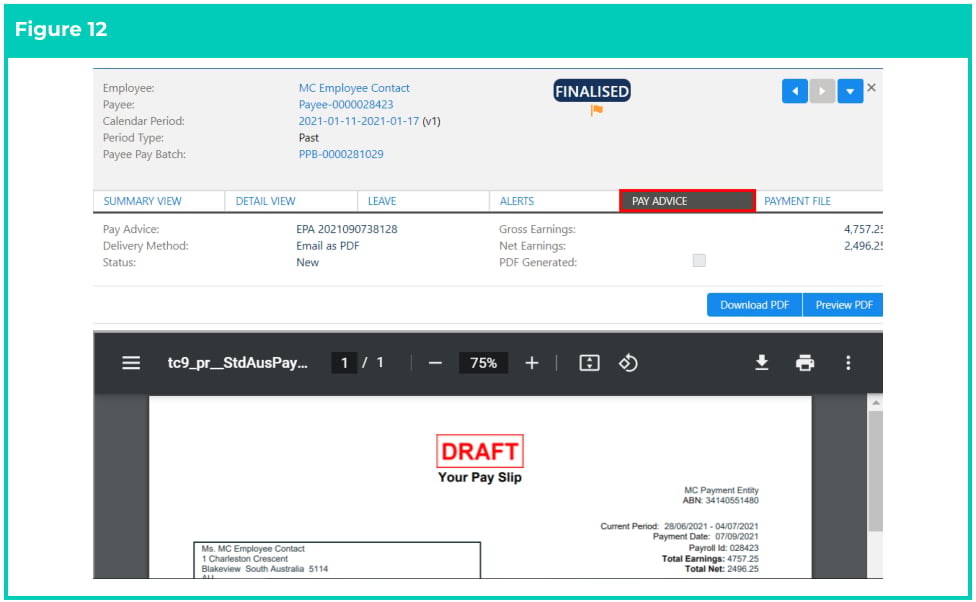
 4. The Detail View for the corresponding Payee Pay Batch record will be opened with a preview of
the Pay Advice displayed (see Figure 12).
4. The Detail View for the corresponding Payee Pay Batch record will be opened with a preview of
the Pay Advice displayed (see Figure 12).
 ### **Delete Pay Advice (Optional)**
Once a Pay Batch has the Pay Advices created, it can not be rolled back to a status of Unfinalised without
first deleting any Pay Advice records that have been created. To delete Pay Advices, the following steps
should be completed:
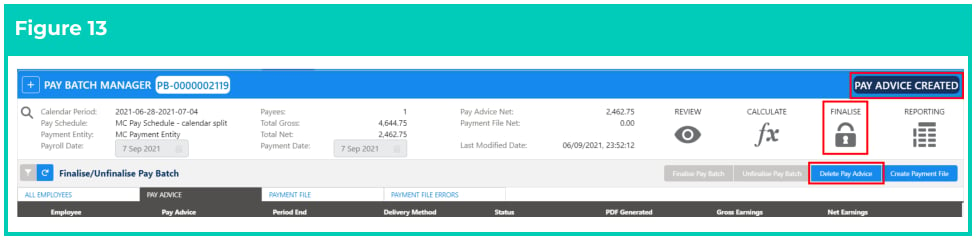
1. For a Pay Batch with a Status of Pay Advice Created, go to the **Finalise** navigation icon (see Figure 13).
2. Click on the **Delete Pay Advice** button. A pop-up confirming you want to delete the Pay Advice will display.
3. Click on the **Delete** button.
### **Delete Pay Advice (Optional)**
Once a Pay Batch has the Pay Advices created, it can not be rolled back to a status of Unfinalised without
first deleting any Pay Advice records that have been created. To delete Pay Advices, the following steps
should be completed:
1. For a Pay Batch with a Status of Pay Advice Created, go to the **Finalise** navigation icon (see Figure 13).
2. Click on the **Delete Pay Advice** button. A pop-up confirming you want to delete the Pay Advice will display.
3. Click on the **Delete** button.
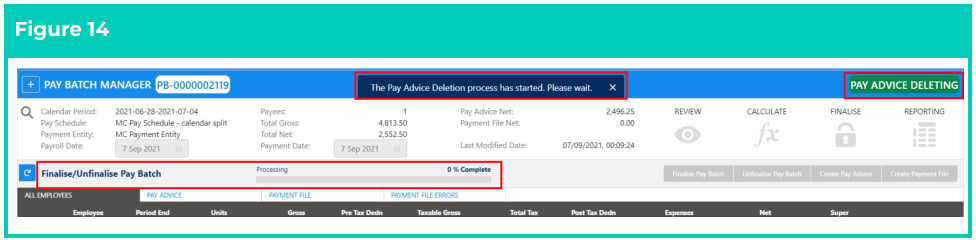
 4. A pop-up message indicating that the Pay Advice Deletion process has commenced will be
shown. The Pay Batch Status will be updated to Pay Advice Deleting and a progress bar showing
the progression of the Pay Advice Deletion process will be displayed (see Figure 14).
4. A pop-up message indicating that the Pay Advice Deletion process has commenced will be
shown. The Pay Batch Status will be updated to Pay Advice Deleting and a progress bar showing
the progression of the Pay Advice Deletion process will be displayed (see Figure 14).
 5. Once the Pay Advice Deletion Process is complete the Status of the Pay Batch will be updated to either Finalised or Pay Advice Delete Failed based on the successful completion of the process:
* If the Pay Advice Deletion Process is completed successfully, the Status of the Pay Batch will be updated to Pay Advice Created, therefore the Pay Batch can now be rolled back to a status of Unfinalised so any changes required can be made.
* If the Pay Advice Deletion process fails, it means that an error has been found with one or more of the records associated with the Pay Batch, and the Status of the Pay Batch will be updated to Pay Advice Delete Failed. If this occurs, a Debug Log will provide details of the error. The reason for the failure must be addressed before another attempt to delete the Pay Advices can be done.
### **Create a Payment File**
Once a Pay Batch has had its Pay Advices Created, any required Payment File can be created. To create a
Payment File, the following steps should be completed:
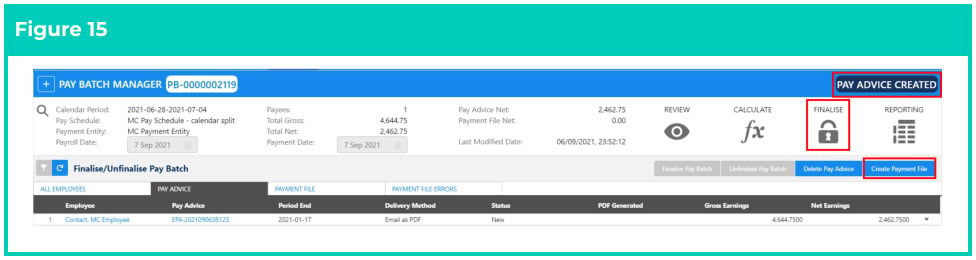
1. For a Pay Batch with a Status of Pay Advice Created, go to the **Finalise** navigation icon (see Figure 15).
2. Click on the **Create Payment File** button.
5. Once the Pay Advice Deletion Process is complete the Status of the Pay Batch will be updated to either Finalised or Pay Advice Delete Failed based on the successful completion of the process:
* If the Pay Advice Deletion Process is completed successfully, the Status of the Pay Batch will be updated to Pay Advice Created, therefore the Pay Batch can now be rolled back to a status of Unfinalised so any changes required can be made.
* If the Pay Advice Deletion process fails, it means that an error has been found with one or more of the records associated with the Pay Batch, and the Status of the Pay Batch will be updated to Pay Advice Delete Failed. If this occurs, a Debug Log will provide details of the error. The reason for the failure must be addressed before another attempt to delete the Pay Advices can be done.
### **Create a Payment File**
Once a Pay Batch has had its Pay Advices Created, any required Payment File can be created. To create a
Payment File, the following steps should be completed:
1. For a Pay Batch with a Status of Pay Advice Created, go to the **Finalise** navigation icon (see Figure 15).
2. Click on the **Create Payment File** button.
 3. A pop-up message indicating that the Payment File Creation process has commenced will be shown. The Pay Batch Status will be updated to Payment File Creating and a progress bar showing the progression of the Payment File Creation process will be displayed (see Figure 16)
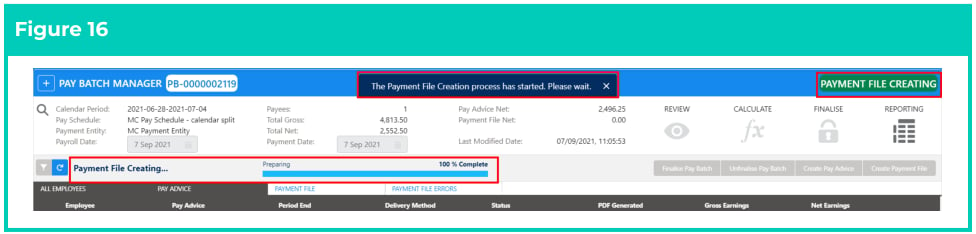 4. Once the Payment File Creation process is complete, the Status of the Pay Batch will be updated to either Payment File Created or Payment File Creation Failed based on the successful completion of the process:
* If the Payment File Creation process is completed successfully, the Status of the Pay Batch will be updated to Payment File Created. Therefore the Payment File can now be submitted for approval (if required) and released.
* If the Payment File Creation fails, there is an error with one or more records associated with the Pay Batch, and the Status of the Pay Batch will be updated to Payment File Failed. If this occurs, a Debug Log will provide details of the error. The reason for the failure must be addressed before the Payment File can be created.
During Payment File Creation, if any Payees have incomplete Payment Details, the
process will fail. The Payees with incomplete Payment Details will be identified under
the Payment File Errors tab. The complete details for the listed Payees must be
provided before the Payment File can be created.
### **Delete the Payment File (Optional)**
Once a Pay Batch has had a Payment File Created, it can not be Unfinalised without first deleting any
Payment Files and Pay Advice records that have been created. To delete Payment Files, the following
steps should be completed:
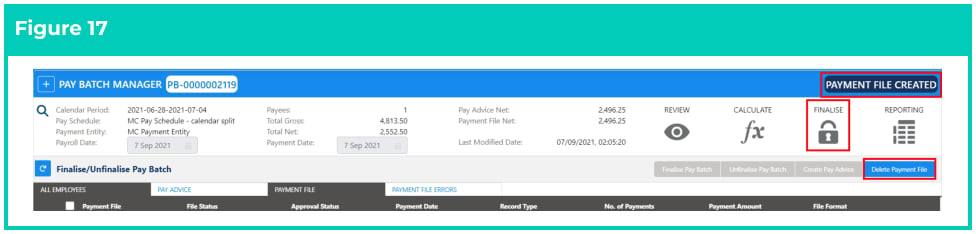
1. For a Pay Batch with a Status of Payment File Created, go to the **Finalise** navigation icon (see Figure 17).
2. Click on the **Delete Payment File** button. A pop-up confirming you want to delete the Payment File will display.
3. Click on the **Delete** button.
4. Once the Payment File Creation process is complete, the Status of the Pay Batch will be updated to either Payment File Created or Payment File Creation Failed based on the successful completion of the process:
* If the Payment File Creation process is completed successfully, the Status of the Pay Batch will be updated to Payment File Created. Therefore the Payment File can now be submitted for approval (if required) and released.
* If the Payment File Creation fails, there is an error with one or more records associated with the Pay Batch, and the Status of the Pay Batch will be updated to Payment File Failed. If this occurs, a Debug Log will provide details of the error. The reason for the failure must be addressed before the Payment File can be created.
During Payment File Creation, if any Payees have incomplete Payment Details, the
process will fail. The Payees with incomplete Payment Details will be identified under
the Payment File Errors tab. The complete details for the listed Payees must be
provided before the Payment File can be created.
### **Delete the Payment File (Optional)**
Once a Pay Batch has had a Payment File Created, it can not be Unfinalised without first deleting any
Payment Files and Pay Advice records that have been created. To delete Payment Files, the following
steps should be completed:
1. For a Pay Batch with a Status of Payment File Created, go to the **Finalise** navigation icon (see Figure 17).
2. Click on the **Delete Payment File** button. A pop-up confirming you want to delete the Payment File will display.
3. Click on the **Delete** button.
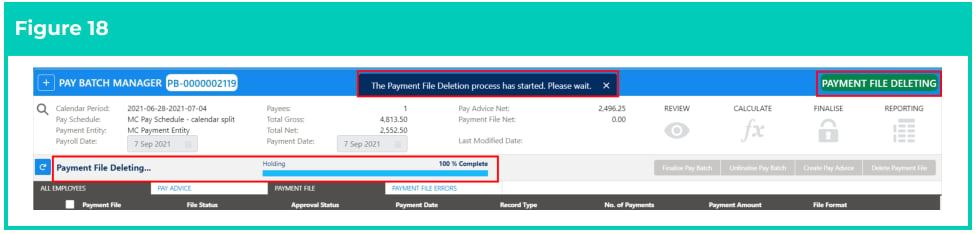
 4. A pop-up message indicating that the Payment File Deletion process has commenced will be
shown. The Pay Batch Status will be updated to Payment File Deleting and a progress bar
showing the progress of the Payment File Deletion process will be displayed (see Figure 18).
4. A pop-up message indicating that the Payment File Deletion process has commenced will be
shown. The Pay Batch Status will be updated to Payment File Deleting and a progress bar
showing the progress of the Payment File Deletion process will be displayed (see Figure 18).
 5. Once the Payment File Deletion process is complete, the Status of the Pay Batch will be updated to either Pay Advice Created or Payment File Delete Failed based on the successful completion of the process:
* If the Payment File Deletion process is completed successfully, the Status of the Pay Batch will be updated to Pay Advice Created. The Pay Batch can now have Pay Advice records deleted so that it can be rolled back to a status of Unfinalised, and any changes required can be made.
* If the Payment File Deletion fails, there is an error with one or more of the records associated with the Pay Batch, and the Status of the Pay Batch will be updated to Payment File Delete Failed. If this occurs, a Debug Log will detail the error. The reason for the failure must be addressed before the Payment Files can be deleted.
### **Payment File Approval (Optional)**
Once the Payment File is created, if Payment File Approval is required, the approval process needs to be
completed before the next stage can be completed. To receive Payment File Approval the following steps
must be completed:
1. For a Pay Batch with a Status of Payment File Created, go to the **Finalise** navigation icon (see Figure 19).
2. From the **Payment File** tab, click the action dropdown button at the end of the row for the **Payment File** requiring approval.
3. Select the **Submit for Approval** option.
5. Once the Payment File Deletion process is complete, the Status of the Pay Batch will be updated to either Pay Advice Created or Payment File Delete Failed based on the successful completion of the process:
* If the Payment File Deletion process is completed successfully, the Status of the Pay Batch will be updated to Pay Advice Created. The Pay Batch can now have Pay Advice records deleted so that it can be rolled back to a status of Unfinalised, and any changes required can be made.
* If the Payment File Deletion fails, there is an error with one or more of the records associated with the Pay Batch, and the Status of the Pay Batch will be updated to Payment File Delete Failed. If this occurs, a Debug Log will detail the error. The reason for the failure must be addressed before the Payment Files can be deleted.
### **Payment File Approval (Optional)**
Once the Payment File is created, if Payment File Approval is required, the approval process needs to be
completed before the next stage can be completed. To receive Payment File Approval the following steps
must be completed:
1. For a Pay Batch with a Status of Payment File Created, go to the **Finalise** navigation icon (see Figure 19).
2. From the **Payment File** tab, click the action dropdown button at the end of the row for the **Payment File** requiring approval.
3. Select the **Submit for Approval** option.
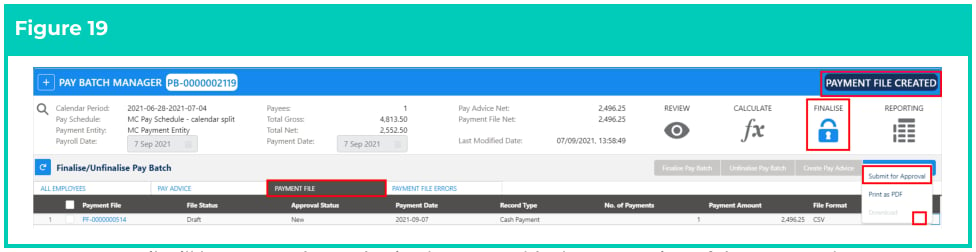 4. An email will be sent to the Authorised Approver(s). The processing of the Pay Batch can not proceed until the required approval is actioned. Once approval is received, the Payment File can be downloaded and released.
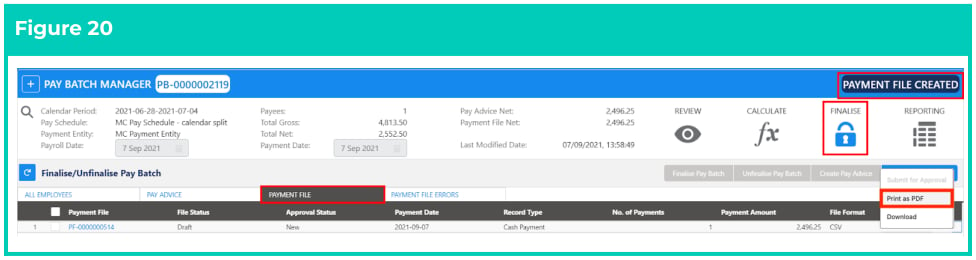
5. To download the Payment File in PDF format, click on the **Print as PDF** button, as shown in the screenshot below, which downloads and saves the file (see Figure 20).
4. An email will be sent to the Authorised Approver(s). The processing of the Pay Batch can not proceed until the required approval is actioned. Once approval is received, the Payment File can be downloaded and released.
5. To download the Payment File in PDF format, click on the **Print as PDF** button, as shown in the screenshot below, which downloads and saves the file (see Figure 20).
 ### **Download/Release Payment File**
Once the Payment File approval is received, or if Approval is not required, the aba file can be downloaded
which updates the status to Payment File Released.
To download a Payment File, the following steps must be completed:
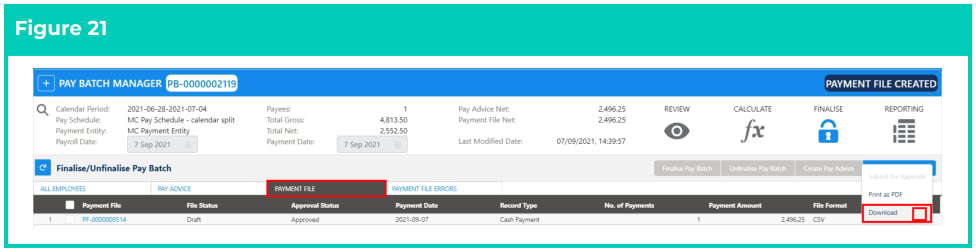
1. For a Pay Batch with a Status of Payment File Created, go to the **Finalise** navigation icon (see Figure 21).
2. From the **Payment File** tab, click the action dropdown button at the end of the row for the **Payment File** you wish to download.
3. Select the **Download** option.
### **Download/Release Payment File**
Once the Payment File approval is received, or if Approval is not required, the aba file can be downloaded
which updates the status to Payment File Released.
To download a Payment File, the following steps must be completed:
1. For a Pay Batch with a Status of Payment File Created, go to the **Finalise** navigation icon (see Figure 21).
2. From the **Payment File** tab, click the action dropdown button at the end of the row for the **Payment File** you wish to download.
3. Select the **Download** option.
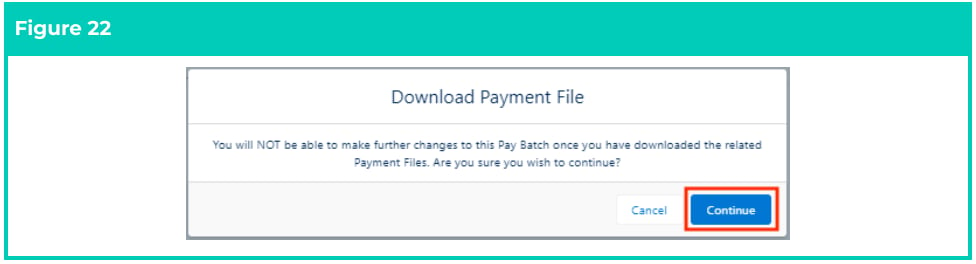
 4. A pop-up window confirming you want to download the Payment File will display (see Figure 22).
5. Click on the **Continue** button.
4. A pop-up window confirming you want to download the Payment File will display (see Figure 22).
5. Click on the **Continue** button.
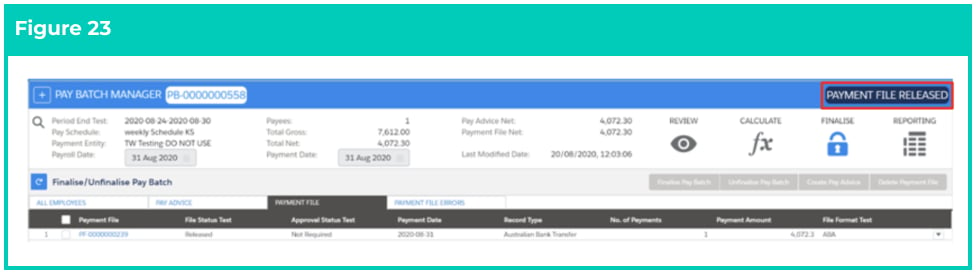
 6. The Status of the Payment File is updated to Released. Once all related Payment Files to a Pay Batch have a Status of Released, the Status of the Pay Batch is updated to Payment File Released (see Figure 23).
The Payment File will download to your computer (shown at the bottom of your screen or in your downloads folder). The file can be opened to review, moved to another folder if required, and is ready to upload to your online banking system.
This is the POINT OF NO RETURN, so once downloaded, you can never revert the Pay
Batch to any previous statuses, and therefore can not make any amendments at all.
6. The Status of the Payment File is updated to Released. Once all related Payment Files to a Pay Batch have a Status of Released, the Status of the Pay Batch is updated to Payment File Released (see Figure 23).
The Payment File will download to your computer (shown at the bottom of your screen or in your downloads folder). The file can be opened to review, moved to another folder if required, and is ready to upload to your online banking system.
This is the POINT OF NO RETURN, so once downloaded, you can never revert the Pay
Batch to any previous statuses, and therefore can not make any amendments at all.
 ### **Review Payment File Released Pay Batch**
Once the Payment File is released, the details of the Payment File in respect to an individual Payee Pay
Batch can be viewed via the Detail View. To view the Payment File details for an individual Payee
Payment File, the following steps must be completed:
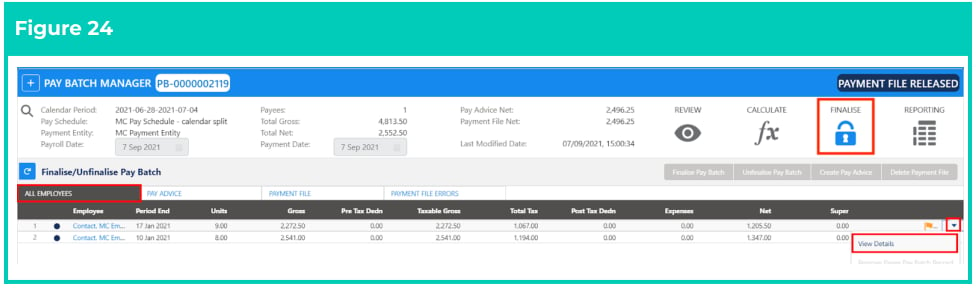
1. For a Pay Batch with a Status of Payment File Released, go to the **Finalise** navigation icon (see Figure 24).
2. Click on the Filters icon and add the **Employee** .
3. You can review the Pay Advice, Payment File, and Payment File Errors from different tabs as required.
4. To review individual Payee Pay Batch, from the **All Employees** tab, click the action dropdown button at the end of the row for the **Payee** to be reviewed.
5. Select the **View Details** option.
### **Review Payment File Released Pay Batch**
Once the Payment File is released, the details of the Payment File in respect to an individual Payee Pay
Batch can be viewed via the Detail View. To view the Payment File details for an individual Payee
Payment File, the following steps must be completed:
1. For a Pay Batch with a Status of Payment File Released, go to the **Finalise** navigation icon (see Figure 24).
2. Click on the Filters icon and add the **Employee** .
3. You can review the Pay Advice, Payment File, and Payment File Errors from different tabs as required.
4. To review individual Payee Pay Batch, from the **All Employees** tab, click the action dropdown button at the end of the row for the **Payee** to be reviewed.
5. Select the **View Details** option.
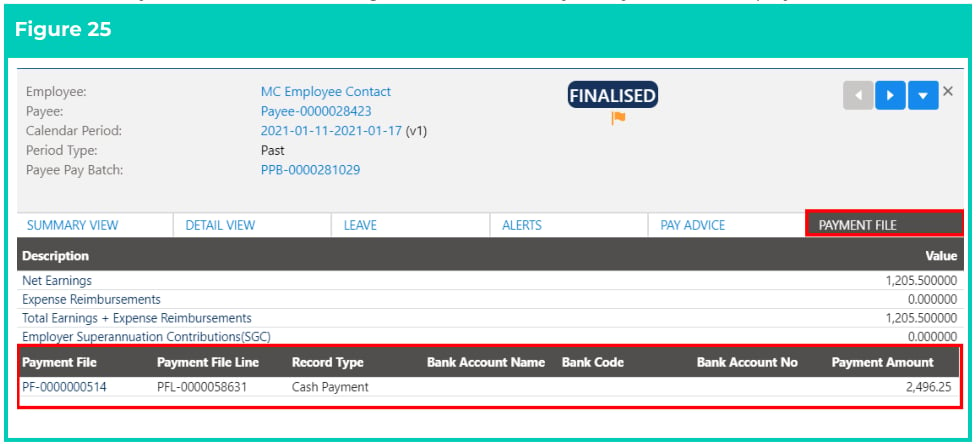
 6. The Detail View for the corresponding Payee Pay Batch record will be opened (see Figure 25).
7. Click the **Payment File** tab. The Payment File Details relating to the individual Payee Pay Batch are displayed.
6. The Detail View for the corresponding Payee Pay Batch record will be opened (see Figure 25).
7. Click the **Payment File** tab. The Payment File Details relating to the individual Payee Pay Batch are displayed.
 Outside of the Pay Batch Manager, the details of the Payment File in respect to an
individual Payee can also be viewed from the Payment File Line related list on the
Payment File object.
## Field Descriptions
| Field Name | Description |
| ------------------------------- | ------------------------------------------------------------------------------------------------------------------------------------------------------------------------------------------------------------------ |
| **Main UI** | **Main UI** |
| **Calculate** (navigation icon) | click this navigation icon to view options related to calculating the Pay Batch and the Part Calculate or Calculate All buttons. |
| **Calendar Period** | is the date range applicable for this Pay Batch. The Pay Batch may also contain Payee Pay batches relating to earlier Pay Calendar Periods if it was created with the ‘Include Earlier Periods’ checkbox selected. |
| **Create Pay Advice** | click this button to view options related to Creating and Distributing Pay Advices. |
| **Create Payment** **File** | click this button to create the Payment File. |
| **Delete Pay Advice** | is used to Delete the Pay Advice if there is a need to roll back the Pay Batch to a previous status. |
| **Delete Payment** **File** | is used to Delete the Payment File if there is a need to roll back the Pay Batch to a previous status. |
| **Download PDF** | is used to download the individual Pay Advice PDF fle. |
| **Finalise** (navigation icon) | click this navigation icon to view and action various options related to fnalising the Pay Batch. |
| **Finalise Pay Batch** | is clicked when the users want to Finalise the Pay Batch. |
| **Pay Advice Net** | is the total net amount of related Pay Advices. |
| **Pay Schedule** | defines the Pay Schedule of the Pay Batch. |
| **Payees** | is the count of unique Payees from related Payee Pay Batch records. |
| **Payment Date** | defines the Payment Date on the Payment File. This can be in the future, but it can not be in the past. |
| **Payment Entity** | is the Payment Entity that this Pay Batch is associated with. |
| **Payment File Net** | is the total net amount of the related Payment File. |
| **Payroll Date** | is the date that a Pay Batch will be fnalised. This date can be in the future, but can not be a historic date |
| **Preview PDF** | is clicked when Users want to preview a Draft Pay Advices PDF. |
| **Print as PDF** | is clicked when Users want to download the Pay Advices PDF for printing. |
| **Reporting** (navigation icon) | click this navigation icon to generate a Variation Report for this Pay Batch to compare it to another Pay Batch. |
| **Review** (navigation icon) | click this navigation icon to view options related to reviewing the Pay Batch. |
| **Submit for** **Approval** | is an optional button that is used to request approval of the Pay Batch to proceed to Payment File Released. This option is available only when it is pre-configured. |
| **Total Gross** | is the total gross earnings from all related Payee Pay Batch records. |
| **Total Net** | is the total net earnings from all related Payee Pay Batch records. |
| **Unfinalise Pay** **Batch** | is used to roll back the status of a Pay Batch to Calculated, so that further changes can be made to the Pay Batch or individual Payee Pay Batches. |
## Further Information
| Document | Document Type | Description |
| ----------------------------------------------- | --------------------------- | ---------------------------------------------------------------------------------------------------------------------------------------------------------------------------------------------------------------------------------------------------------------------------------------------------------------- |
| QRG Pay Batch Key Information | Information Quick Reference | Outlines useful information relevant to 2cloudnine Payroll’s Pay Batch functionality. The document includes definitions, prerequisites, diagrams, and other non-instructional information on how it facilitates efficient management of Pay Batches from Creation through Review, Calculation, and Finalisation. |
| QRG Create a New Pay Batch | Task Instructions | How to create a new Pay Batch through the Pay Batch Manager. |
| QRG Review a Pay Batch | Task Instructions | How to Review the Pay Batch on a Pay Batch level and an individual Payee Pay Batch level, as well as the steps required to use the Remove Pay Transaction, Remove Individual Payee Pay Batch records, Bulk Remove, Bulk Add, and Manual Adjustment functionalities within the Pay Batch Manager. |
| QRG Calculate a Pay Batch | Task Instructions | How to Calculate a Pay Batch as well as the steps to View and Resolve / Acknowledge Flags through the Pay Batch Manager. |
| QRG View Leave Accruals via Pay Batch Manager | Task Instructions | How to view Automatic Leave Accruals using Pay Batch Manager. |
| QRG Calculate a single Payee within a Pay Batch | Task Instructions | How to Calculate a Payee in isolation within the Pay Batch Manager. |
| QRG Reverse Payee Pay Batch | Task Instructions | How to Reverse a Payee Pay Batch within the Pay Batch Manager. |
| QRG Exclude from Payment File | Task Instructions | How to Exclude a Payee Pay Batch from the Payment File. |
| QRG Create a Variance Report | Task Instructions | How to create a Variance Report within the Pay Batch Manager. |
Outside of the Pay Batch Manager, the details of the Payment File in respect to an
individual Payee can also be viewed from the Payment File Line related list on the
Payment File object.
## Field Descriptions
| Field Name | Description |
| ------------------------------- | ------------------------------------------------------------------------------------------------------------------------------------------------------------------------------------------------------------------ |
| **Main UI** | **Main UI** |
| **Calculate** (navigation icon) | click this navigation icon to view options related to calculating the Pay Batch and the Part Calculate or Calculate All buttons. |
| **Calendar Period** | is the date range applicable for this Pay Batch. The Pay Batch may also contain Payee Pay batches relating to earlier Pay Calendar Periods if it was created with the ‘Include Earlier Periods’ checkbox selected. |
| **Create Pay Advice** | click this button to view options related to Creating and Distributing Pay Advices. |
| **Create Payment** **File** | click this button to create the Payment File. |
| **Delete Pay Advice** | is used to Delete the Pay Advice if there is a need to roll back the Pay Batch to a previous status. |
| **Delete Payment** **File** | is used to Delete the Payment File if there is a need to roll back the Pay Batch to a previous status. |
| **Download PDF** | is used to download the individual Pay Advice PDF fle. |
| **Finalise** (navigation icon) | click this navigation icon to view and action various options related to fnalising the Pay Batch. |
| **Finalise Pay Batch** | is clicked when the users want to Finalise the Pay Batch. |
| **Pay Advice Net** | is the total net amount of related Pay Advices. |
| **Pay Schedule** | defines the Pay Schedule of the Pay Batch. |
| **Payees** | is the count of unique Payees from related Payee Pay Batch records. |
| **Payment Date** | defines the Payment Date on the Payment File. This can be in the future, but it can not be in the past. |
| **Payment Entity** | is the Payment Entity that this Pay Batch is associated with. |
| **Payment File Net** | is the total net amount of the related Payment File. |
| **Payroll Date** | is the date that a Pay Batch will be fnalised. This date can be in the future, but can not be a historic date |
| **Preview PDF** | is clicked when Users want to preview a Draft Pay Advices PDF. |
| **Print as PDF** | is clicked when Users want to download the Pay Advices PDF for printing. |
| **Reporting** (navigation icon) | click this navigation icon to generate a Variation Report for this Pay Batch to compare it to another Pay Batch. |
| **Review** (navigation icon) | click this navigation icon to view options related to reviewing the Pay Batch. |
| **Submit for** **Approval** | is an optional button that is used to request approval of the Pay Batch to proceed to Payment File Released. This option is available only when it is pre-configured. |
| **Total Gross** | is the total gross earnings from all related Payee Pay Batch records. |
| **Total Net** | is the total net earnings from all related Payee Pay Batch records. |
| **Unfinalise Pay** **Batch** | is used to roll back the status of a Pay Batch to Calculated, so that further changes can be made to the Pay Batch or individual Payee Pay Batches. |
## Further Information
| Document | Document Type | Description |
| ----------------------------------------------- | --------------------------- | ---------------------------------------------------------------------------------------------------------------------------------------------------------------------------------------------------------------------------------------------------------------------------------------------------------------- |
| QRG Pay Batch Key Information | Information Quick Reference | Outlines useful information relevant to 2cloudnine Payroll’s Pay Batch functionality. The document includes definitions, prerequisites, diagrams, and other non-instructional information on how it facilitates efficient management of Pay Batches from Creation through Review, Calculation, and Finalisation. |
| QRG Create a New Pay Batch | Task Instructions | How to create a new Pay Batch through the Pay Batch Manager. |
| QRG Review a Pay Batch | Task Instructions | How to Review the Pay Batch on a Pay Batch level and an individual Payee Pay Batch level, as well as the steps required to use the Remove Pay Transaction, Remove Individual Payee Pay Batch records, Bulk Remove, Bulk Add, and Manual Adjustment functionalities within the Pay Batch Manager. |
| QRG Calculate a Pay Batch | Task Instructions | How to Calculate a Pay Batch as well as the steps to View and Resolve / Acknowledge Flags through the Pay Batch Manager. |
| QRG View Leave Accruals via Pay Batch Manager | Task Instructions | How to view Automatic Leave Accruals using Pay Batch Manager. |
| QRG Calculate a single Payee within a Pay Batch | Task Instructions | How to Calculate a Payee in isolation within the Pay Batch Manager. |
| QRG Reverse Payee Pay Batch | Task Instructions | How to Reverse a Payee Pay Batch within the Pay Batch Manager. |
| QRG Exclude from Payment File | Task Instructions | How to Exclude a Payee Pay Batch from the Payment File. |
| QRG Create a Variance Report | Task Instructions | How to create a Variance Report within the Pay Batch Manager. |