> ## Documentation Index
> Fetch the complete documentation index at: https://documentation.2cloudnine.com/llms.txt
> Use this file to discover all available pages before exploring further.
# QRG FBT File Upload
## Purpose
This quick reference guide details how to use the FBT File Upload to upload larger volumes of Reportable FBT and Non-Reportable FBT into 2c9 Payroll using a CSV file instead of manually entering all the data. The intended audience for this document are System Administrators and Payroll Users.
## Steps
### FBT File Upload
The FBT File Upload functionality has been introduced to allow bulk uploading of Reportable and Non-Reportable FBT amounts.
**Important:** To use the FBT File Upload, the following prerequisites **MUST** be completed:
1. Depending on your requirements, the Reportable and Non-Reportable FBT Pay Codes must be created and available.
2. An Integration User needs to be Active and the 2cloudnine Integrations Team must have confirmed this is linked correctly for the FBT File Upload function.
### Prepare the CSV File
To create the CSV file, follow these steps:
1. Open Microsoft Excel.
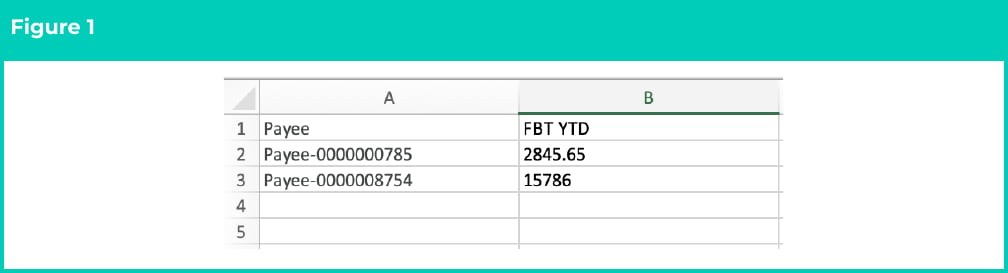
2. In the new Sheet, add the following two columns:
* A. **Payee**
* B. **FBT YTD**
3. The rows under the first column titled **Payee** should contain the Payee Names from the Payee records. The rows under the second column **FBT YTD** should be populated with the 'grossed up' FBT YTD amounts.
4. Save the Excel file in CSV format (for example, `Reportable FBT 2024.csv`). An example is provided in the screenshot below (see Figure 1):
 If you are required to provide data for both Reportable FBT and Non-Reportable FBT Pay Codes, these must be populated on 2 independent spreadsheets.
### Upload the CSV File
Once the spreadsheet is complete, the following steps should be completed:
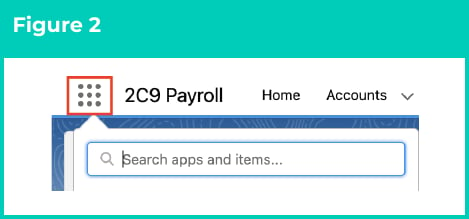
1. Click on the **App Launcher** icon (see Figure 2).
If you are required to provide data for both Reportable FBT and Non-Reportable FBT Pay Codes, these must be populated on 2 independent spreadsheets.
### Upload the CSV File
Once the spreadsheet is complete, the following steps should be completed:
1. Click on the **App Launcher** icon (see Figure 2).
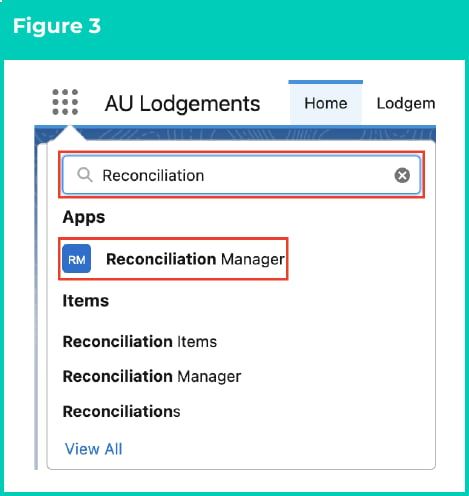
 2. Go to the **Reconciliation Manager** App by using the Search function (see Figure 3).
Type "Reconciliation Manager" in the search box to locate the app.
2. Go to the **Reconciliation Manager** App by using the Search function (see Figure 3).
Type "Reconciliation Manager" in the search box to locate the app.
 3. Click on the **Reconciliation Items** button in the navigation menu (see Figure 4).
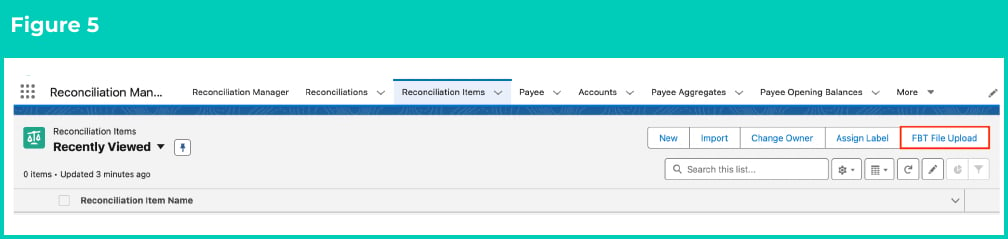
 4. Click on the **FBT File Upload** button (see Figure 5).
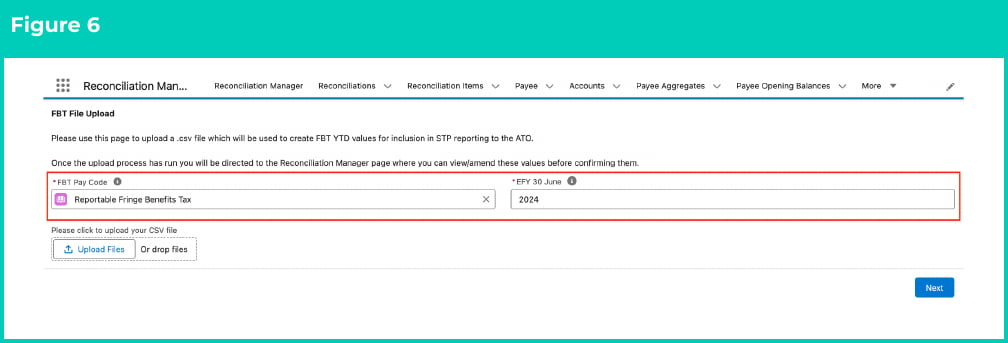
 5. On the FBT File Upload screen, populate the following required fields (see Figure 6):
1. **FBT Pay Code**
2. **EFY 30 June**
5. On the FBT File Upload screen, populate the following required fields (see Figure 6):
1. **FBT Pay Code**
2. **EFY 30 June**
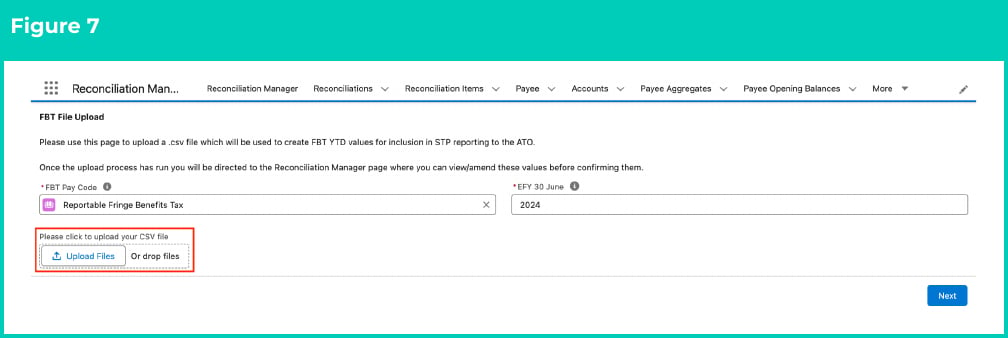
 6. Click on the **Upload Files** button (see Figure 7).
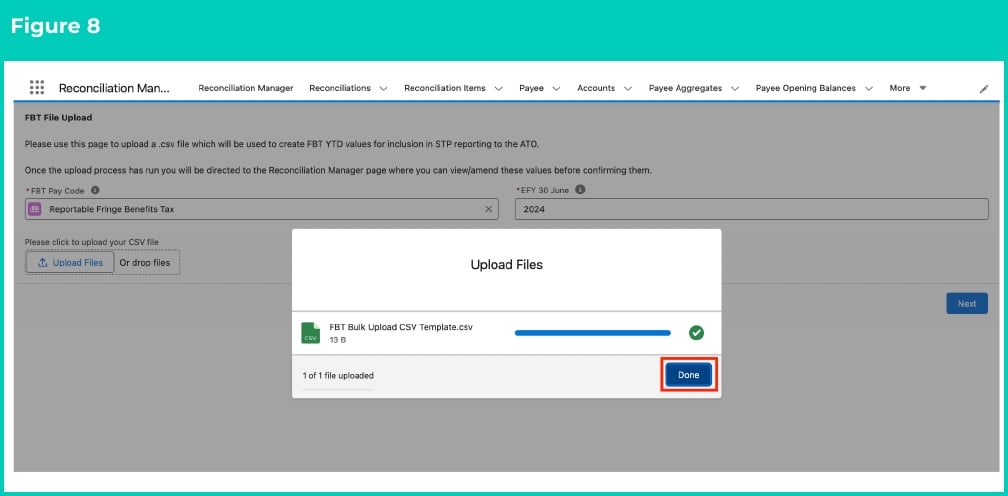
 7. Select and upload the CSV file and then click on the **Done** button (see Figure 8).
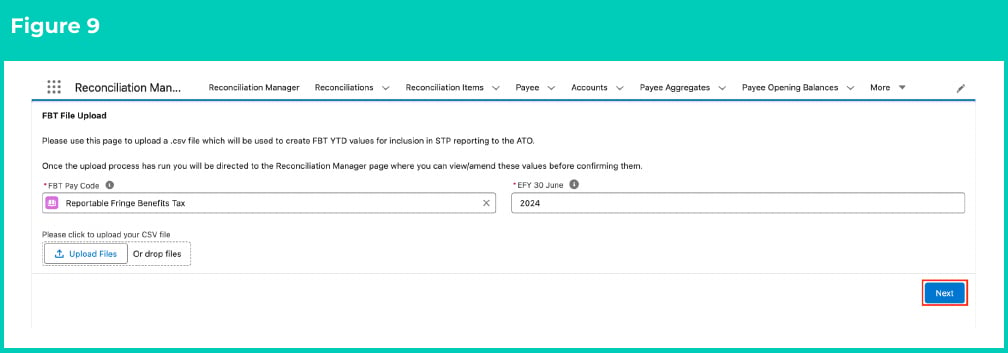
 8. Once all the fields have been populated and the CSV file has been uploaded, click on the **Next** button (see Figure 9).
 9. If you have uploaded the same CSV file previously, you will get a warning message saying 'a file already exists with the same file name.' Select either 'Yes' in the **Are you sure you wish to Continue?** dropdown, and click on the **Next** button (see Figure 10), or alternatively select 'No', review your file name to be uploaded and repeat the steps to upload the correct file. If you do not get this warning message, skip to step 10.
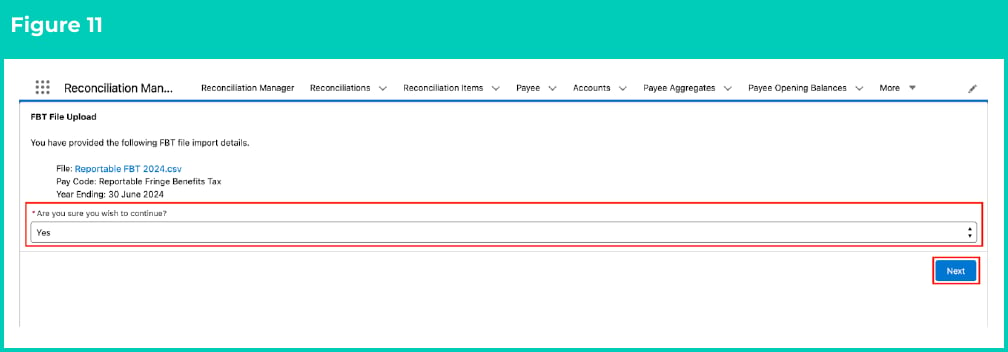
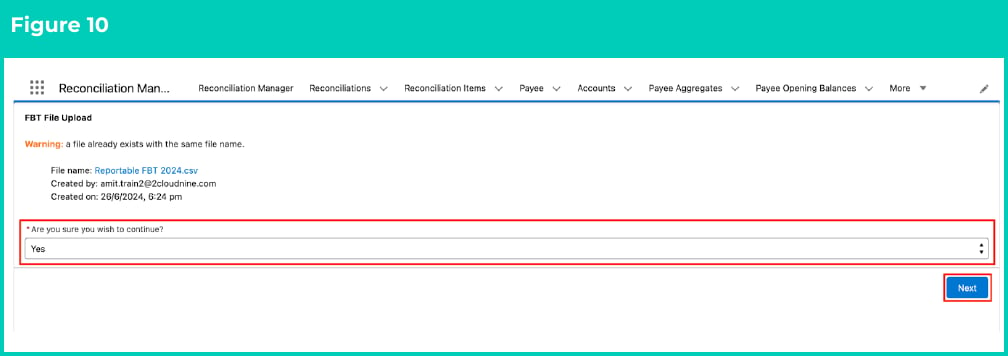 10. The next screen will confirm the File being uploaded, as well as the Pay Code and Year Ending that will have FBT amounts created for them. Select 'Yes' in the **Are you sure you wish to Continue?** dropdown and click on the **Next** button (see Figure 11).
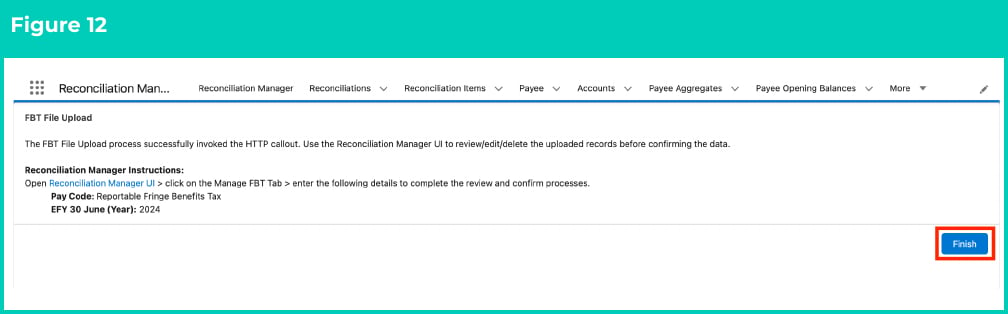
 11. If successful, you will get a confirmation message as below. Select the link on the screen in the message to open **Reconciliation Manager UI**, to review and complete the final creation of the FBT amounts being created (see Figure 12).
 12. Click on the **Manage FBT** tab. You will see the newly uploaded values in the table as shown in the screenshot below (see Figure 13).
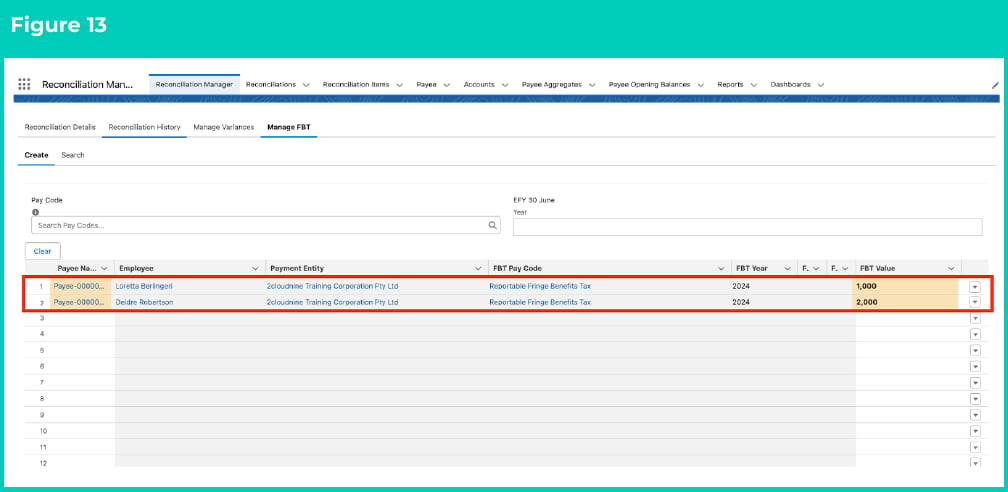 If the FBT values uploaded via the CSV do not appear in the first few rows, please scroll down to check, as the values may sometimes appear in later rows.
13. Populate the following required fields:
* **Pay Code** (filters only Pay Codes with record type FBT)
* **EFY 30 June Year**
14. Once all the FBT Values are entered, click the **Create** button (see Figure 14).
If the FBT values uploaded via the CSV do not appear in the first few rows, please scroll down to check, as the values may sometimes appear in later rows.
13. Populate the following required fields:
* **Pay Code** (filters only Pay Codes with record type FBT)
* **EFY 30 June Year**
14. Once all the FBT Values are entered, click the **Create** button (see Figure 14).
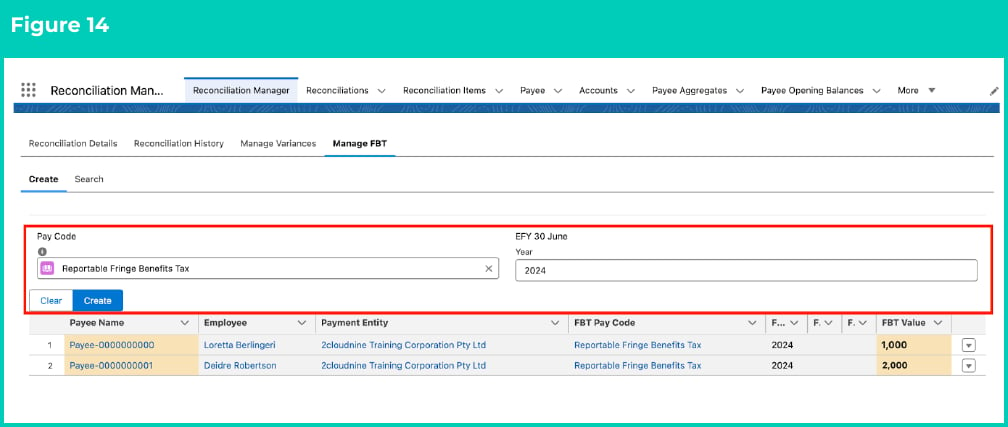 15. A confirmation message appears indicating 'Aggregate updated successfully'. The columns FBT Pay Code, FBT Year, FBT Opening Balance and FBT Payee Aggregate populate automatically (see Figure 14).
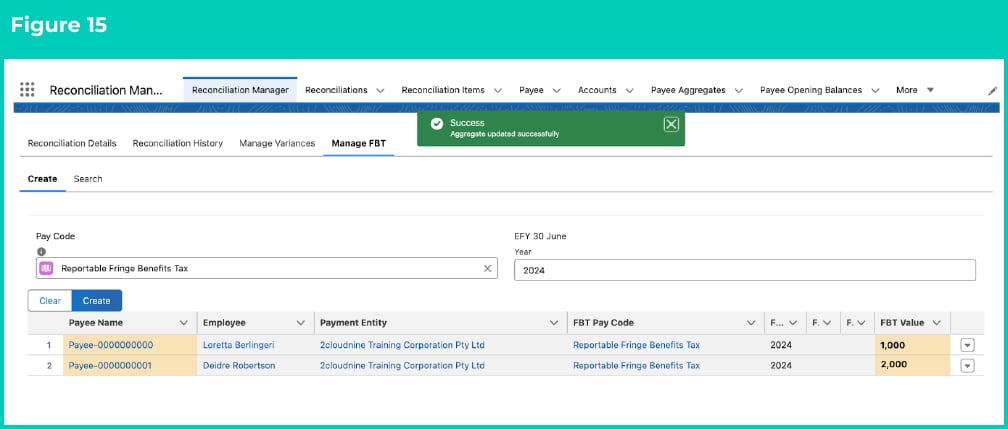
16. The FBT Payee Opening Balance record displays under the FBT Opening Balance column and the FBT Payee Aggregate record also displays under the FBT Payee Aggregate column. Both these newly created records will be linked to the most recent Finalised Payee Pay Batch record automatically (see Figure 15).
15. A confirmation message appears indicating 'Aggregate updated successfully'. The columns FBT Pay Code, FBT Year, FBT Opening Balance and FBT Payee Aggregate populate automatically (see Figure 14).
16. The FBT Payee Opening Balance record displays under the FBT Opening Balance column and the FBT Payee Aggregate record also displays under the FBT Payee Aggregate column. Both these newly created records will be linked to the most recent Finalised Payee Pay Batch record automatically (see Figure 15).
 17. To learn how to enter FBT amounts individually, please refer to the [QRG Manage FBT](/qrgs/reconciliation-manager/qrg-manage-fbt).
If you are required to upload more amounts for the same FBT Pay Code, or amounts for a different FBT Pay Code, then repeat all these steps again using your new file and the required Pay Code.
## Field descriptions
No field descriptions are required for this QRG document.
## Further information
| Document | Document Type | Description |
| :-------------------------------------------------------------------------------------------------------------------------------------- | :-------------------------- | :------------------------------------------------------------------------------------------------------------------------------------------------------------------- |
| [Quick Reference Guide Index - Reconciliation Manager](/qrgs/reconciliation-manager/quick-reference-guide-index-reconciliation-manager) | Index | An index document that lists and provides links to all Quick Reference Guides relating to Reconciliations. |
| [QRG Manage FBT](/qrgs/reconciliation-manager/qrg-manage-fbt) | Task Instructions | How to enter and search Reportable and Non-Reportable FBT amounts. |
| [QRG Process a new Reconciliation](/qrgs/reconciliation-manager/qrg-process-a-new-reconciliation) | Task Instructions | How to process a new Reconciliation. |
| [Review Reconciliation History (Results)](/qrgs/reconciliation-manager/qrg-review-reconciliation-history-results) | Task Instructions | How to review the existing Reconciliation records. |
| [Resolving Failed Reconciliation Results](/qrgs/reconciliation-manager/qrg-resolving-failed-reconciliation-results) | Task Instructions | How to resolve the failed Reconciliation results. |
| [Key Information - Reconciliation Manager](/qrgs/reconciliation-manager/qrg-reconciliation-manager-key-information) | Information Quick Reference | Outlines useful information relevant to the Reconciliation functionality. The document includes definitions, prerequisites, and other non-instructional information. |
17. To learn how to enter FBT amounts individually, please refer to the [QRG Manage FBT](/qrgs/reconciliation-manager/qrg-manage-fbt).
If you are required to upload more amounts for the same FBT Pay Code, or amounts for a different FBT Pay Code, then repeat all these steps again using your new file and the required Pay Code.
## Field descriptions
No field descriptions are required for this QRG document.
## Further information
| Document | Document Type | Description |
| :-------------------------------------------------------------------------------------------------------------------------------------- | :-------------------------- | :------------------------------------------------------------------------------------------------------------------------------------------------------------------- |
| [Quick Reference Guide Index - Reconciliation Manager](/qrgs/reconciliation-manager/quick-reference-guide-index-reconciliation-manager) | Index | An index document that lists and provides links to all Quick Reference Guides relating to Reconciliations. |
| [QRG Manage FBT](/qrgs/reconciliation-manager/qrg-manage-fbt) | Task Instructions | How to enter and search Reportable and Non-Reportable FBT amounts. |
| [QRG Process a new Reconciliation](/qrgs/reconciliation-manager/qrg-process-a-new-reconciliation) | Task Instructions | How to process a new Reconciliation. |
| [Review Reconciliation History (Results)](/qrgs/reconciliation-manager/qrg-review-reconciliation-history-results) | Task Instructions | How to review the existing Reconciliation records. |
| [Resolving Failed Reconciliation Results](/qrgs/reconciliation-manager/qrg-resolving-failed-reconciliation-results) | Task Instructions | How to resolve the failed Reconciliation results. |
| [Key Information - Reconciliation Manager](/qrgs/reconciliation-manager/qrg-reconciliation-manager-key-information) | Information Quick Reference | Outlines useful information relevant to the Reconciliation functionality. The document includes definitions, prerequisites, and other non-instructional information. |