> ## Documentation Index
> Fetch the complete documentation index at: https://documentation.2cloudnine.com/llms.txt
> Use this file to discover all available pages before exploring further.
# Sandbox Creation & Refresh Guide v1.4
## 2cloudnine Sandbox Creation & Refresh Guide
| | |
| ------------------------ | ---------------- |
| **Most Recent Release:** | Desert Flame ’24 |
| **Most Recent Version:** | v1.4 |
| **Published Date:** | 16th May 2025 |
## Important Information
Only your authorised Salesforce System Administrator or Partner should be creating a new Sandbox,
actioning the refresh, and related tasks.
Before actioning a refresh, all vendors must agree with the timing of the intended Sandbox refresh, and
that the required packages, customisations, and data currently only within that Sandbox have been
saved elsewhere by them.
Users creating or refreshing the Sandbox must be on the System Administrator Profile for this process to
run successfully. They will be responsible for ensuring all configuration items and tasks are completed
within a reasonable timeframe of the sandbox being created/refreshed.
Please familiarise yourself with all of the requirements before actioning any steps and ensure you have
sufficient time and resources available. Failing to do so can negatively impact the User experience and
stability of 2cloudnine Payroll.
This guide should always be accessed and used via your web browser. This will confirm you are viewing
the most recent version of the document. Further, downloading the document and opening it with
desktop programs, such as Adobe, has been found to cause errors when copying and using the scripts
provided for data updates. These errors do not occur when viewed through a browser.
## Read First: How to Use this Configuration Guide
## What is covered by this Guide?
This Guide outlines the ‘out of the box’ setup of a new Sandbox and refreshing existing Sandboxes.
Where customisation is built into the product, we will cover how to configure it correctly within the
Sandbox environment.
Where it is identified that further customisations outside of those built by 2cloudnine Payroll have been
created by the implementation team, this will not be covered by this Guide.
## Create a Sandbox Template
Before creating a new Sandbox or refreshing a Sandbox, you will need to create a Sandbox Template.
Follow the steps below to create a Sandbox Template.
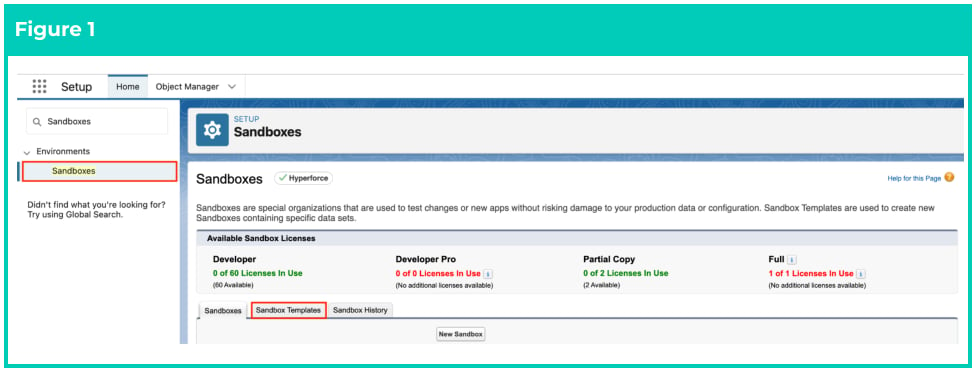
Go to **Setup** > **Environments** > **Sandboxes**
1. Click on the **Sandbox Templates** tab (see Figure 1).
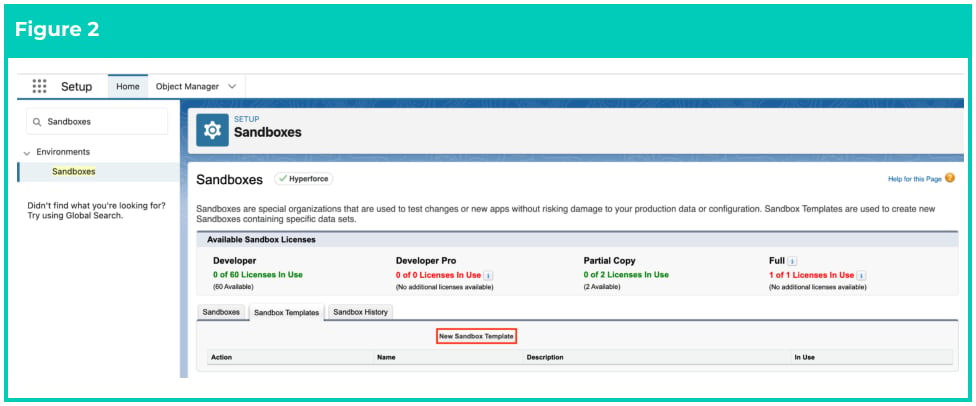
 2. Click on the **New Sandbox Template** button (see Figure 2).
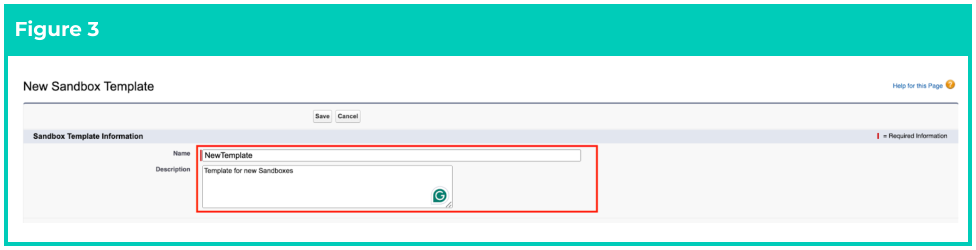
 3. Populate the fields **Name** and **Description** (see Figure 3).
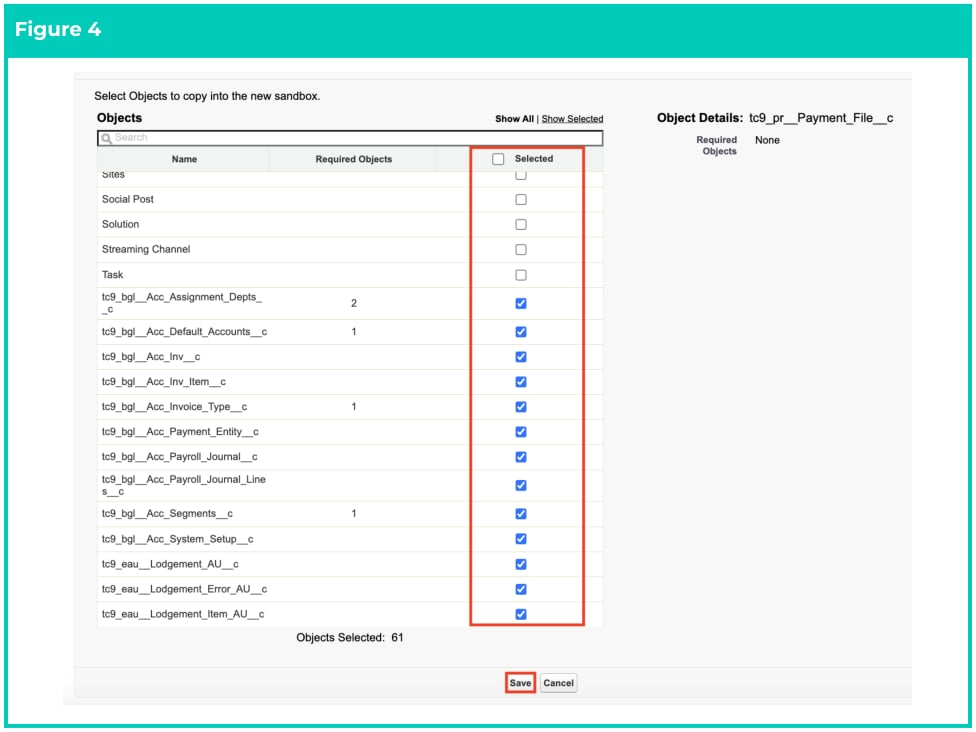
 4. Select the **Objects** you want to include in the new Template (see Figure 4).
5. Click the **Save** button.
4. Select the **Objects** you want to include in the new Template (see Figure 4).
5. Click the **Save** button.
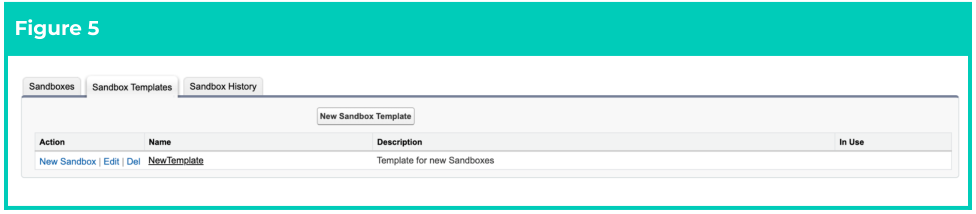
 6. A new Sandbox Template has been created (see Figure 5).
 ## Create a new Sandbox (Full or Partial)
Go to **Setup > Environments > Sandboxes**
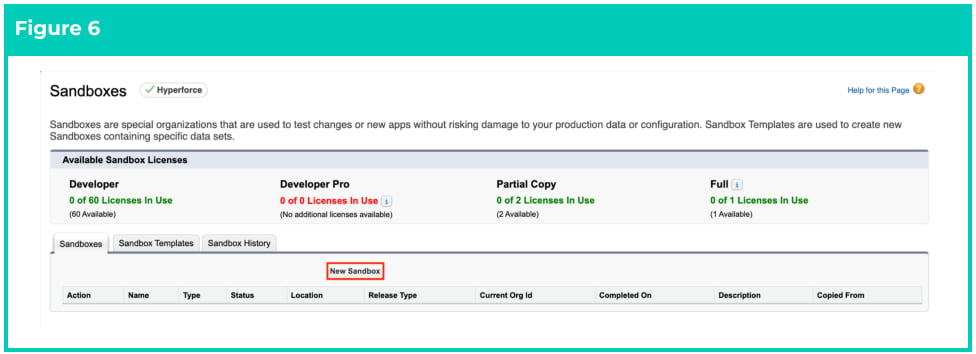
1. To create a new Sandbox, click on the **New Sandbox** button (see Figure 6).
## Create a new Sandbox (Full or Partial)
Go to **Setup > Environments > Sandboxes**
1. To create a new Sandbox, click on the **New Sandbox** button (see Figure 6).
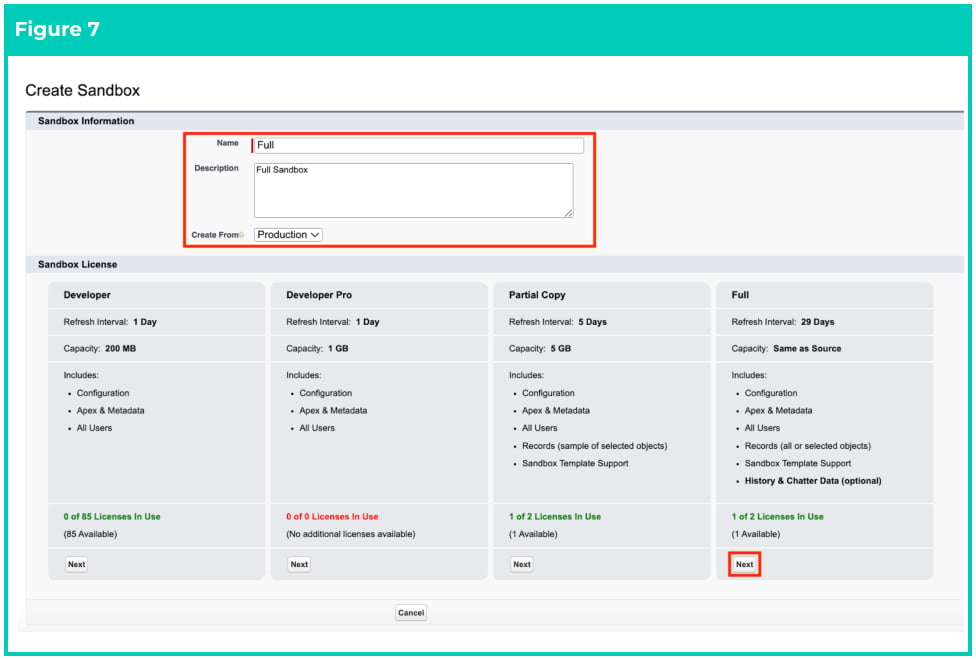
 2. Populate the fields **Name**, **Description**, and **Create From** (see Figure 7).
3. Click on the **Next** button located at the bottom of the required Sandbox License box. This
determines if it’s a Full, Partial, or Developer Sandbox.
2. Populate the fields **Name**, **Description**, and **Create From** (see Figure 7).
3. Click on the **Next** button located at the bottom of the required Sandbox License box. This
determines if it’s a Full, Partial, or Developer Sandbox.
 It is recommended to perform testing using a Full Sandbox to ensure the Sandbox
Template includes all Objects. If any 2cloudnine Objects are missing from the Sandbox,
it will cause issues with the end-to-end testing and performance of the packages.
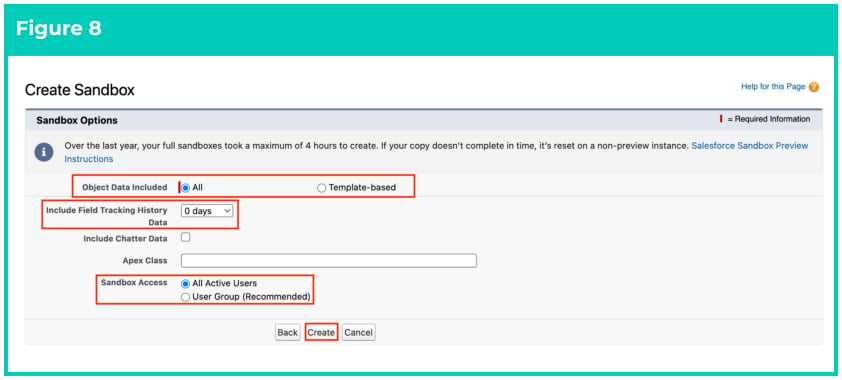
4. Populate the Sandbox Options as below:
1. If you selected Full in the previous step, then select either:
1. **All** or **Template Based,** in the **Object Data Included** field (see Figure 8),
2. Choose a Picklist value for **Include Field Tracking History Data** to copy all of the
Source Org Field History Tracking into this Sandbox,
3. Select the **Include Chatter Data** if required,
4. You can leave the **Apex Class** field blank,
5. In **Sandbox Access**, select either the radio button for All Active Users or User
Group (Recommended), the second option only provides access to specific Users
from a Public Group,
6. Click the **Create** button.
It is recommended to perform testing using a Full Sandbox to ensure the Sandbox
Template includes all Objects. If any 2cloudnine Objects are missing from the Sandbox,
it will cause issues with the end-to-end testing and performance of the packages.
4. Populate the Sandbox Options as below:
1. If you selected Full in the previous step, then select either:
1. **All** or **Template Based,** in the **Object Data Included** field (see Figure 8),
2. Choose a Picklist value for **Include Field Tracking History Data** to copy all of the
Source Org Field History Tracking into this Sandbox,
3. Select the **Include Chatter Data** if required,
4. You can leave the **Apex Class** field blank,
5. In **Sandbox Access**, select either the radio button for All Active Users or User
Group (Recommended), the second option only provides access to specific Users
from a Public Group,
6. Click the **Create** button.
 **OR**
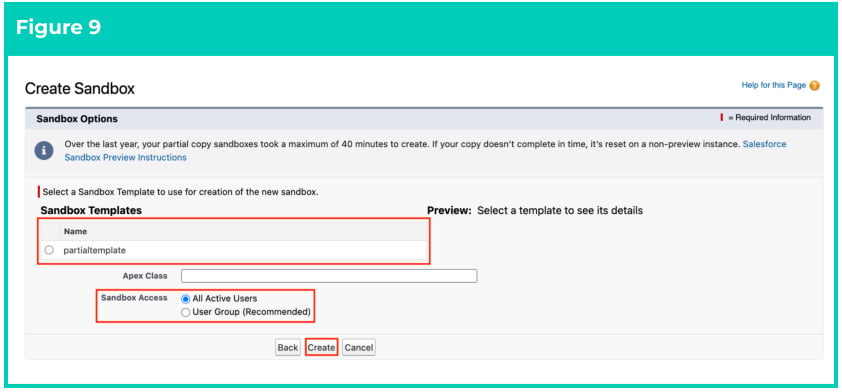
2. If you selected the Partial Copy option in the previous step:
1. You must choose a Sandbox Template (see Figure 9),
2. Select the **Include Chatter Data** if required,
3. You can leave the **Apex Class** field blank,
4. In **Sandbox Access**, select either the radio button for All Active Users or User
Group (Recommended). The second option only copies specific Users from a
Public Group to be the only Users set up in the Sandbox,
5. Click the **Create** button.
**OR**
2. If you selected the Partial Copy option in the previous step:
1. You must choose a Sandbox Template (see Figure 9),
2. Select the **Include Chatter Data** if required,
3. You can leave the **Apex Class** field blank,
4. In **Sandbox Access**, select either the radio button for All Active Users or User
Group (Recommended). The second option only copies specific Users from a
Public Group to be the only Users set up in the Sandbox,
5. Click the **Create** button.
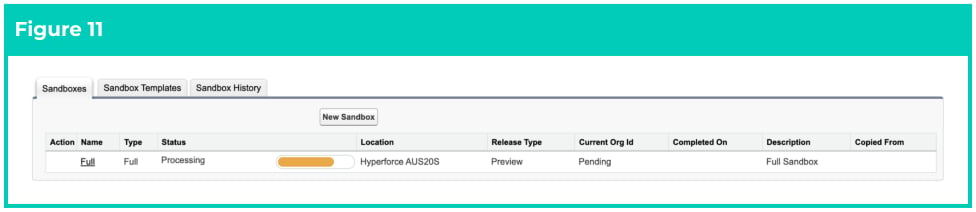
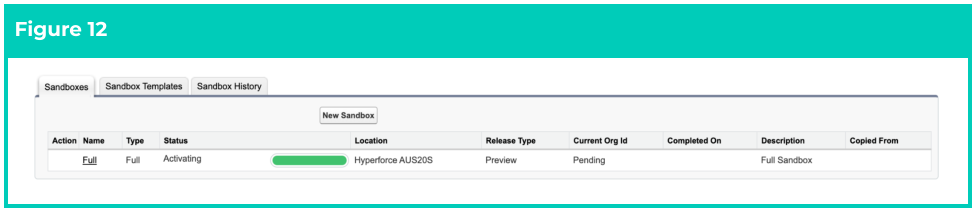
 5. Salesforce will return to the Sandboxes page, showing details of the new Sandbox, with the
creation Status as Pending, which will change to Processing, and then Activating (see Figures 10,
11, and 12).
5. Salesforce will return to the Sandboxes page, showing details of the new Sandbox, with the
creation Status as Pending, which will change to Processing, and then Activating (see Figures 10,
11, and 12).

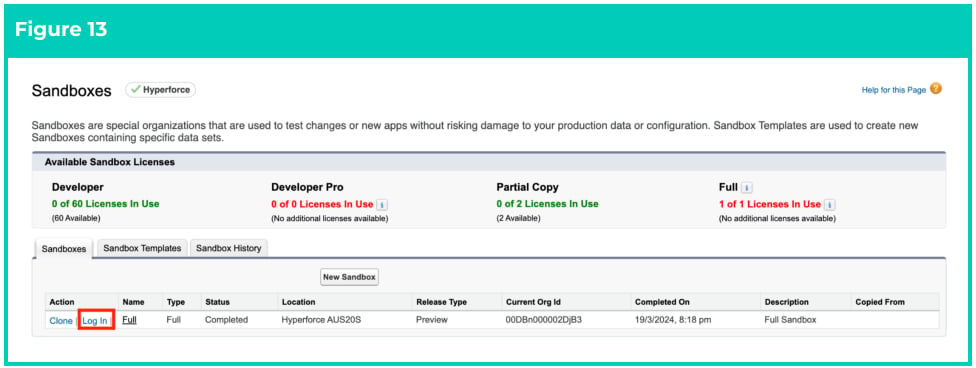
 6. The Status will change to Complete after some time. Click on the **Log In** link (see Figure 13).
 The creation process can take anywhere from 30 mins - 6 hours depending on the amount of data that is
copied down from Production to Sandbox.
After the Sandbox Creation has completed, you’ll be required to log in to the Sandbox using your
Production Username with the additional suffix at the end as used when you created the Sandbox Name
in Step 2 (i.e. [lorelletrain2@2cloudnine.com.Full](mailto:lorelletrain2@2cloudnine.com.Full)), with the same password as Production. Alternatively, if
you click the Login button next to the Sandbox name via the Production Org from **Setup > Environments > Sandboxes**, it should auto-populate the Username and you will need to enter just the password.
## Refresh an existing Sandbox (Full or Partial)
Before conducting a Sandbox refresh, always ensure that all custom metadata and S-objects that are still
in the ‘build and test’ stage are backed up. A refresh can cause data/setup/Metadata loss as the Sandbox
will be replaced with a full copy of the Production Org.
Go to **Setup > Environments > Sandboxes**
1. Select **Refresh** against the name of the Sandbox you wish to refresh. There could be a few
different Sandboxes, some might be Full Sandboxes, and others may be Partial Sandboxes, so
please make sure you select the correct one (see Figure 14).
The creation process can take anywhere from 30 mins - 6 hours depending on the amount of data that is
copied down from Production to Sandbox.
After the Sandbox Creation has completed, you’ll be required to log in to the Sandbox using your
Production Username with the additional suffix at the end as used when you created the Sandbox Name
in Step 2 (i.e. [lorelletrain2@2cloudnine.com.Full](mailto:lorelletrain2@2cloudnine.com.Full)), with the same password as Production. Alternatively, if
you click the Login button next to the Sandbox name via the Production Org from **Setup > Environments > Sandboxes**, it should auto-populate the Username and you will need to enter just the password.
## Refresh an existing Sandbox (Full or Partial)
Before conducting a Sandbox refresh, always ensure that all custom metadata and S-objects that are still
in the ‘build and test’ stage are backed up. A refresh can cause data/setup/Metadata loss as the Sandbox
will be replaced with a full copy of the Production Org.
Go to **Setup > Environments > Sandboxes**
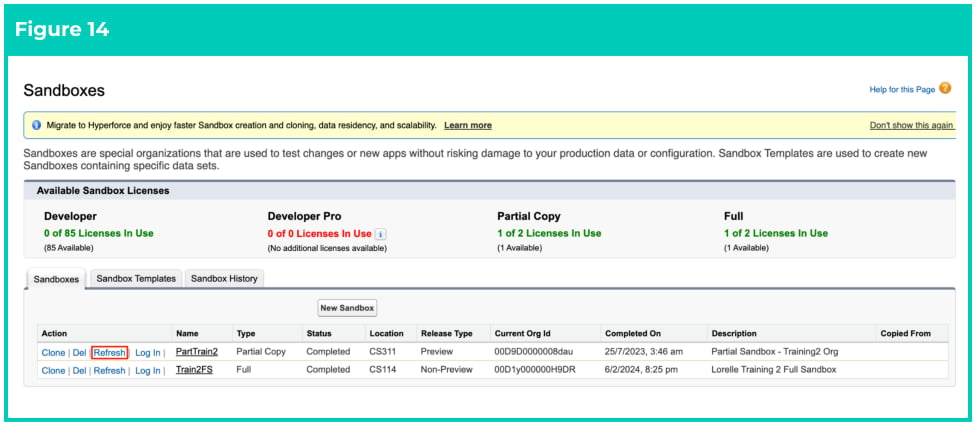
1. Select **Refresh** against the name of the Sandbox you wish to refresh. There could be a few
different Sandboxes, some might be Full Sandboxes, and others may be Partial Sandboxes, so
please make sure you select the correct one (see Figure 14).
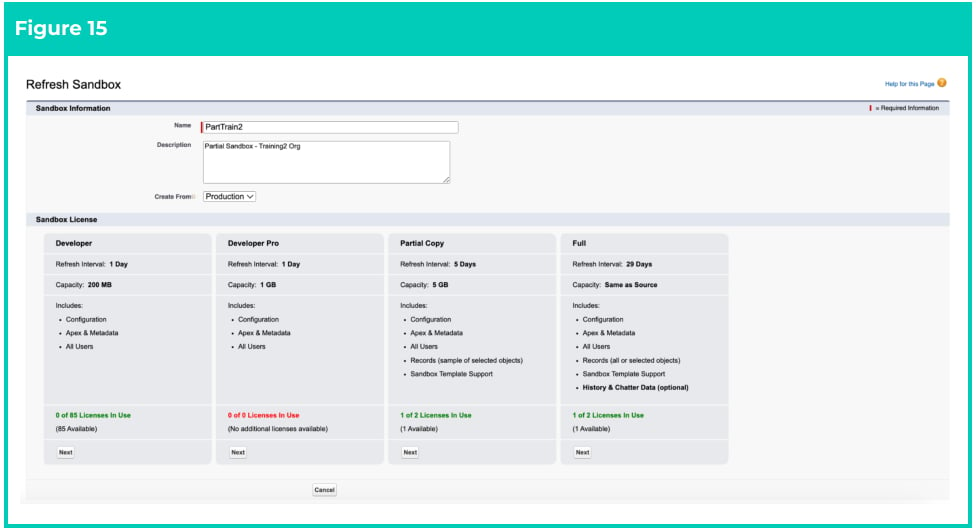
 2. In the Sandbox Information box, you can change the **Name** and the **Description** of the Sandbox if
required (see Figure 15).
3. Populate the **Create From** field with the source Org that you wish to copy:
1. This can be a Production or a Sandbox already created, however the most common is
from Production.
The Create From field defaults to ‘Production’. You can select a Sandbox created
already instead of ‘Production’ if that is more suitable.
4. In the Sandbox License box, click **Next** under the required license type (see Figure 15).
2. In the Sandbox Information box, you can change the **Name** and the **Description** of the Sandbox if
required (see Figure 15).
3. Populate the **Create From** field with the source Org that you wish to copy:
1. This can be a Production or a Sandbox already created, however the most common is
from Production.
The Create From field defaults to ‘Production’. You can select a Sandbox created
already instead of ‘Production’ if that is more suitable.
4. In the Sandbox License box, click **Next** under the required license type (see Figure 15).
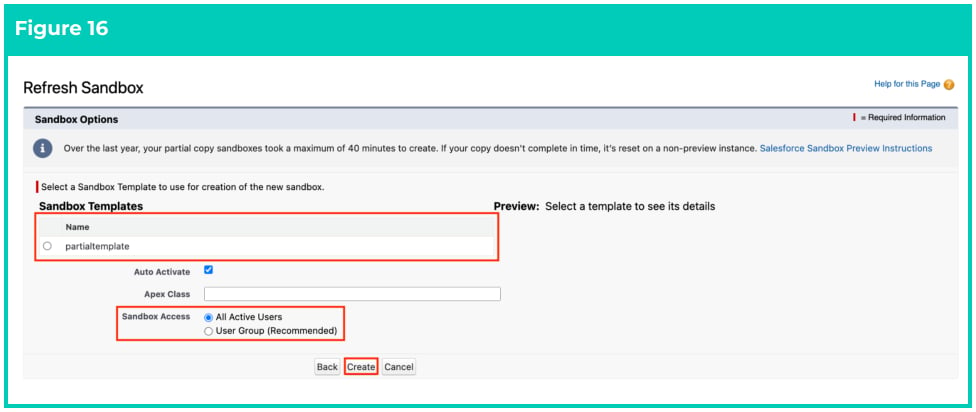
 5. If you selected Partial, complete the steps below (see Figure 16), otherwise skip to step 6:
1. Under **Sandbox Templates**, select an existing Sandbox Template. If a template is not
already there, you’ll need to create a template first.
2. Auto Activate = **True** .
3. Apex Class = **Blank** .
4. In **Sandbox Access**, select either the radio button for All Active Users or User Group
(Recommended), the second option only copies specific Users from a Public Group to
be the only Users set up in the Sandbox.
5. Click **Create** .
6. Now skip to step 7.
5. If you selected Partial, complete the steps below (see Figure 16), otherwise skip to step 6:
1. Under **Sandbox Templates**, select an existing Sandbox Template. If a template is not
already there, you’ll need to create a template first.
2. Auto Activate = **True** .
3. Apex Class = **Blank** .
4. In **Sandbox Access**, select either the radio button for All Active Users or User Group
(Recommended), the second option only copies specific Users from a Public Group to
be the only Users set up in the Sandbox.
5. Click **Create** .
6. Now skip to step 7.
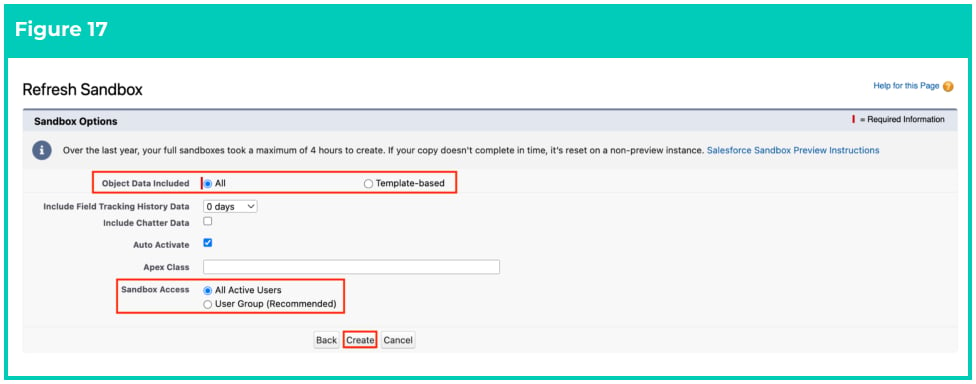
 6. If you selected Full, complete the steps below (see Figure 17):
1. For **Object Data Included**, select the radio button for **All** to ensure no Object data is
missed when refreshing a Full Sandbox. Alternatively, you can select the
**Template-based** radio button, however, you would need to select the Template and
ensure no required Objects are missed.
2. Select the checkbox **Include Field Tracking History Data** to ensure the Field Tracking
History is included in the refresh. If this has been selected, you’ll need to select the
period of time for history tracking to be included from the picklist options available.
3. Select the checkbox **Include Chatter Data** to have this included in the Sandbox.
4. Auto Activate = **True** .
5. **Apex Class** can be left blank.
6. In Sandbox Access, select either the radio button for All Active Users or User Group
(Recommended), the second option only copies specific Users from a Public Group to
be the only Users set up in the Sandbox.
7. Click **Create** .
6. If you selected Full, complete the steps below (see Figure 17):
1. For **Object Data Included**, select the radio button for **All** to ensure no Object data is
missed when refreshing a Full Sandbox. Alternatively, you can select the
**Template-based** radio button, however, you would need to select the Template and
ensure no required Objects are missed.
2. Select the checkbox **Include Field Tracking History Data** to ensure the Field Tracking
History is included in the refresh. If this has been selected, you’ll need to select the
period of time for history tracking to be included from the picklist options available.
3. Select the checkbox **Include Chatter Data** to have this included in the Sandbox.
4. Auto Activate = **True** .
5. **Apex Class** can be left blank.
6. In Sandbox Access, select either the radio button for All Active Users or User Group
(Recommended), the second option only copies specific Users from a Public Group to
be the only Users set up in the Sandbox.
7. Click **Create** .
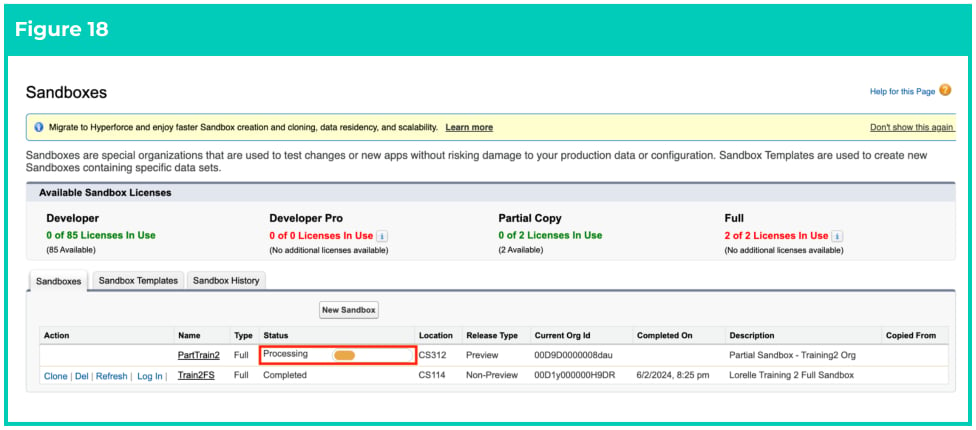
 7. The Status of the Sandbox will change from **Completed** to **Sampling** and then to **Processing** (see
Figure 18).
7. The Status of the Sandbox will change from **Completed** to **Sampling** and then to **Processing** (see
Figure 18).
 The refresh can take anywhere from 30 mins - 6 hours depending on the amount of data that is copied
down to Sandbox.
## Activation
This step is applicable only when the checkbox **Auto Activate** is left blank.
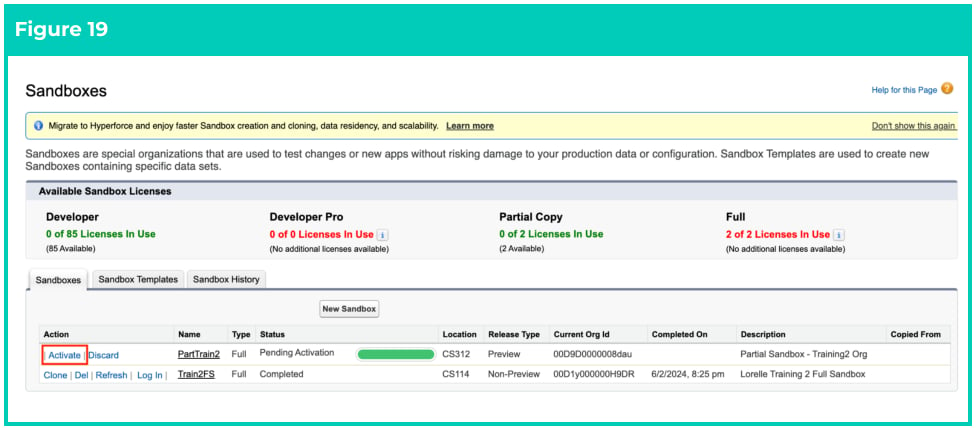
Once the Sandbox has been completed, you will see a new link called Activate on the Sandboxes page. If
Auto Activate was not selected during the creation or refresh process, you will need to activate before you
can use it. To activate, follow the steps below:
1. Click the **Activate** button:
2. In the popup, tick the checkbox where it says ‘I understand the operation I am about to perform’
and click **Activate** (see Figure 19).
The refresh can take anywhere from 30 mins - 6 hours depending on the amount of data that is copied
down to Sandbox.
## Activation
This step is applicable only when the checkbox **Auto Activate** is left blank.
Once the Sandbox has been completed, you will see a new link called Activate on the Sandboxes page. If
Auto Activate was not selected during the creation or refresh process, you will need to activate before you
can use it. To activate, follow the steps below:
1. Click the **Activate** button:
2. In the popup, tick the checkbox where it says ‘I understand the operation I am about to perform’
and click **Activate** (see Figure 19).
 3. The status will change from Pending Activation to **Activating** .
The activation can take anywhere from a few seconds to a few minutes depending on the amount of data
in the Sandbox. Once completed, the status will change from Activating to **Completed** .
Upon completion of the activation, you’ll be required to log in to the Sandbox using your Production
Username with the additional suffix at the end (i.e. [lorelletrain2@2cloudnine.com.Full](mailto:lorelletrain2@2cloudnine.com.Full)) with the same
password as Production.
Alternatively, if you click the Login button next to the Sandbox name via the Production Org from **Setup > Environments > Sandboxes**, it should auto-populate the Username and you will need to enter just the
password.
## Steps to be completed after the Sandbox is refreshed or created
Once the Sandbox has completed the refresh or creation, there are some additional required steps to be
completed to ensure the Sandbox is functioning correctly.
## Password Manager to be updated
If this is a new Sandbox (not a refresh), ensure that you have added the login details to your Password
Manager system (i.e. 1Password, Lastpass, etc). If it’s a refresh, ensure you review the stored password in
case the previous password was changed in the Sandbox.
## Email Deliverability
Go to **Setup > Email > Deliverability**
1. Access Level = select the suitable email delivery setting needed
* **No access** means no emails will be sent.
* **System email only** means only those generated by Salesforce native functions will be
sent, and all others, including those from 2cloudnine templates, will not be sent.
* **All email** means all emails will be sent, including Pay Advices and Invoices from testing
scenarios, potentially being received by clients and Payees
If you select All Emails, you may need to ensure that all the email addresses on
Contacts and Clients are changed to TEST emails, or emails may be sent to REAL
Payees, Clients, and Approvers as copied from the Production Environment.
## Email the User to confirm Sandbox Refresh actioned
As this is often Production copied into Sandbox, all Users and their Passwords will also have been copied
into the Sandbox, therefore, if they have any specific customizations or configurations that are specific to
an Org Instances (i.e. Jitterbit Integrations for Import Tool or GL integrations, any flows that point to a
specific record, etc), these will need to be advised to 2cloudnine to ensure these are updated accordingly
to the Sandbox Org, and not continue to be the Production Org.
Please ensure that you log a case with 2cloudnine to advise of the refresh having been completed, so
they can then ensure the required updates are made.
## User access
The available Users within the Sandbox will depend on the earlier select of All Users or User Group. In
order for any of those Users to be able to login and use this new environment, including Customer
Community Users, they will have been updated to have the additional text of “.invalid” removed from the
end of their email addresses. This is a Salesforce security feature to prevent these Users from accessing
the Sandbox and performing things without the knowledge of the System Administrator. To enable Users
to access the Sandbox, the following steps will need to be completed for each User:
Go to **Setup > Users > Users**
1. Select **Edit** against the User record.
2. Remove “.invalid” from the end of the email address.
3. Scroll down the page to the bottom and select the checkbox **Generate new password and notify user immediately** .
4. Select **Save** .
5. Repeat for each User that requires access to this Sandbox.
The User(s) will receive an email directly from Salesforce asking them to select the link token in the email
and reset their password for this Sandbox.
The User that initiates the Sandbox refresh will have the same email and password as
they have in Production and will receive a notification once the Sandbox refresh is
complete. They are the only user Record that will not require the removal of “.invalid”
from the end of their email.
## Schedule Job Scripts - Packaged
All Scheduled Apex Jobs will need to be deleted and rescheduled after a sandbox refresh. To do this,
follow the below steps:
Locate the required job(s) to be rescheduled from the 2cloudnine Payroll Suite Configuration Guide:
1. Copy the block of scripts to be run.
2. Go to **Setup > Developer Console > Debug > Open Execute Anonymous Window**
3. Delete or comment out any code that is in the window
4. Paste in the copied script
5. Click the **Execute** button.
6. Repeat the above steps until all required scheduled jobs have been scheduled.
The scripts will be scheduled to run at the times indicated in the scripts. To make sure they have been
setup correctly go to **Setup > Environments > Jobs > Scheduled Jobs**
Please refer to the Scheduled Jobs section in the current published version of the [Configuration Guide To 2cloudnine Payroll Suite](https://drive.google.com/file/d/1RtdfwMuXvCelhvZ8Vw63Soi26EUP8z5n/view?usp=sharing) to access the scripts required to be rescheduled.
## Import Tool Settings Custom Setting
As this has most likely been copied from Production, this Org’s Custom Settings will inherit the data from
the Source Org, which will need to be updated if you are wanting to perform any testing of the Integrated
Import Tool.
Go to \*\*Setup > Custom Settings > Import Tool Settings > \*\*Select **Manage** at the Org Level, not at the lower
level > **Edit**
Sandbox API credentials are
1. **API Endpoint URL** [= https://2cloudnine49807.jitterbit.cc/Sandbox/v1.0/2C9PayrollImportSandbox](https://2cloudnine49807.jitterbit.cc/Sandbox/v1.0/2C9PayrollImportSandbox)
2. **API-Key** = 639d5539-e063-4c92-8e3d-5e7104826716
3. **Salesforce Admin Username** = updated as per Integration User within the Sandbox/1password
4. Select **Save** .
## STP Custom Setting
As this has most likely been copied from Production, this Org will default to sending any STP
Lodgements to SuperChoice Production. The STP Custom Setting will need to be updated to send to the
SuperChoice Test environment.
Go to **Setup** - **Custom Settings** - **Aus Extension Configuration** - Select **Manage** at the Org Level, not at
the lower level > **Edit**
1. Ensure the checkbox remains **False** in ALL Sandboxes.
2. Select **Save** .
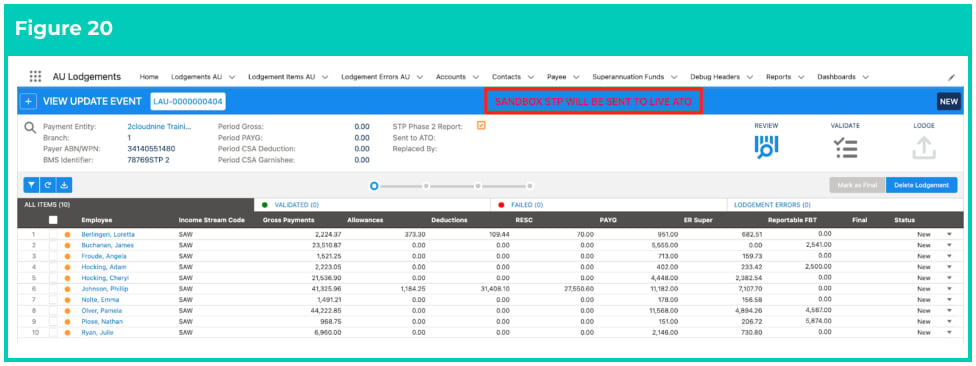
If this is not updated, when Users go to create an STP Lodgement within the Sandbox, the Single Touch
Payroll Manager UI will show the message ‘Sandbox STP will be sent to live ATO’ (see Figure 20),
prompting the necessary change before creating a lodgement in error:
3. The status will change from Pending Activation to **Activating** .
The activation can take anywhere from a few seconds to a few minutes depending on the amount of data
in the Sandbox. Once completed, the status will change from Activating to **Completed** .
Upon completion of the activation, you’ll be required to log in to the Sandbox using your Production
Username with the additional suffix at the end (i.e. [lorelletrain2@2cloudnine.com.Full](mailto:lorelletrain2@2cloudnine.com.Full)) with the same
password as Production.
Alternatively, if you click the Login button next to the Sandbox name via the Production Org from **Setup > Environments > Sandboxes**, it should auto-populate the Username and you will need to enter just the
password.
## Steps to be completed after the Sandbox is refreshed or created
Once the Sandbox has completed the refresh or creation, there are some additional required steps to be
completed to ensure the Sandbox is functioning correctly.
## Password Manager to be updated
If this is a new Sandbox (not a refresh), ensure that you have added the login details to your Password
Manager system (i.e. 1Password, Lastpass, etc). If it’s a refresh, ensure you review the stored password in
case the previous password was changed in the Sandbox.
## Email Deliverability
Go to **Setup > Email > Deliverability**
1. Access Level = select the suitable email delivery setting needed
* **No access** means no emails will be sent.
* **System email only** means only those generated by Salesforce native functions will be
sent, and all others, including those from 2cloudnine templates, will not be sent.
* **All email** means all emails will be sent, including Pay Advices and Invoices from testing
scenarios, potentially being received by clients and Payees
If you select All Emails, you may need to ensure that all the email addresses on
Contacts and Clients are changed to TEST emails, or emails may be sent to REAL
Payees, Clients, and Approvers as copied from the Production Environment.
## Email the User to confirm Sandbox Refresh actioned
As this is often Production copied into Sandbox, all Users and their Passwords will also have been copied
into the Sandbox, therefore, if they have any specific customizations or configurations that are specific to
an Org Instances (i.e. Jitterbit Integrations for Import Tool or GL integrations, any flows that point to a
specific record, etc), these will need to be advised to 2cloudnine to ensure these are updated accordingly
to the Sandbox Org, and not continue to be the Production Org.
Please ensure that you log a case with 2cloudnine to advise of the refresh having been completed, so
they can then ensure the required updates are made.
## User access
The available Users within the Sandbox will depend on the earlier select of All Users or User Group. In
order for any of those Users to be able to login and use this new environment, including Customer
Community Users, they will have been updated to have the additional text of “.invalid” removed from the
end of their email addresses. This is a Salesforce security feature to prevent these Users from accessing
the Sandbox and performing things without the knowledge of the System Administrator. To enable Users
to access the Sandbox, the following steps will need to be completed for each User:
Go to **Setup > Users > Users**
1. Select **Edit** against the User record.
2. Remove “.invalid” from the end of the email address.
3. Scroll down the page to the bottom and select the checkbox **Generate new password and notify user immediately** .
4. Select **Save** .
5. Repeat for each User that requires access to this Sandbox.
The User(s) will receive an email directly from Salesforce asking them to select the link token in the email
and reset their password for this Sandbox.
The User that initiates the Sandbox refresh will have the same email and password as
they have in Production and will receive a notification once the Sandbox refresh is
complete. They are the only user Record that will not require the removal of “.invalid”
from the end of their email.
## Schedule Job Scripts - Packaged
All Scheduled Apex Jobs will need to be deleted and rescheduled after a sandbox refresh. To do this,
follow the below steps:
Locate the required job(s) to be rescheduled from the 2cloudnine Payroll Suite Configuration Guide:
1. Copy the block of scripts to be run.
2. Go to **Setup > Developer Console > Debug > Open Execute Anonymous Window**
3. Delete or comment out any code that is in the window
4. Paste in the copied script
5. Click the **Execute** button.
6. Repeat the above steps until all required scheduled jobs have been scheduled.
The scripts will be scheduled to run at the times indicated in the scripts. To make sure they have been
setup correctly go to **Setup > Environments > Jobs > Scheduled Jobs**
Please refer to the Scheduled Jobs section in the current published version of the [Configuration Guide To 2cloudnine Payroll Suite](https://drive.google.com/file/d/1RtdfwMuXvCelhvZ8Vw63Soi26EUP8z5n/view?usp=sharing) to access the scripts required to be rescheduled.
## Import Tool Settings Custom Setting
As this has most likely been copied from Production, this Org’s Custom Settings will inherit the data from
the Source Org, which will need to be updated if you are wanting to perform any testing of the Integrated
Import Tool.
Go to \*\*Setup > Custom Settings > Import Tool Settings > \*\*Select **Manage** at the Org Level, not at the lower
level > **Edit**
Sandbox API credentials are
1. **API Endpoint URL** [= https://2cloudnine49807.jitterbit.cc/Sandbox/v1.0/2C9PayrollImportSandbox](https://2cloudnine49807.jitterbit.cc/Sandbox/v1.0/2C9PayrollImportSandbox)
2. **API-Key** = 639d5539-e063-4c92-8e3d-5e7104826716
3. **Salesforce Admin Username** = updated as per Integration User within the Sandbox/1password
4. Select **Save** .
## STP Custom Setting
As this has most likely been copied from Production, this Org will default to sending any STP
Lodgements to SuperChoice Production. The STP Custom Setting will need to be updated to send to the
SuperChoice Test environment.
Go to **Setup** - **Custom Settings** - **Aus Extension Configuration** - Select **Manage** at the Org Level, not at
the lower level > **Edit**
1. Ensure the checkbox remains **False** in ALL Sandboxes.
2. Select **Save** .
If this is not updated, when Users go to create an STP Lodgement within the Sandbox, the Single Touch
Payroll Manager UI will show the message ‘Sandbox STP will be sent to live ATO’ (see Figure 20),
prompting the necessary change before creating a lodgement in error:
 ## Reset of Automations to be Active
Upon the refresh of the Sandbox, there may be some automations that should be ‘deactivated’ to ensure
the processes don’t occur (i.e. custom notifications, custom processes to automatically occur, etc). It is
recommended that all automations are reviewed to confirm which should remain active and which
should be deactivated as part of the refresh process.
Go to **Setup > Process Builder**
1. Sort all Process Builder by Active Status.
2. Ensure all that are required are set to a status of ‘Active’.
3. Repeat for each Process Builder which needs to be active.
Go to **Setup > Flows**
1. Sort all Flows by Active Status.
2. Ensure all that are required are set to a status of Active
3. Repeat for each Flow listed that needs to be active.
Go to **Setup > Platform Events**
1. **Edit** and **Save** each Platform Event that needs to be active.
## Publish Sites
A review of all Sites listed will be required to ensure they are published, as they will not retain their
published status from Production:
## Client Portal Site ID
Go to **Setup > Digital Experiences > Settings**
1. Ensure **TRUE** is selected for ‘Allow using standard external profiles for self-registration, user
creation, and login.’
## Employee Community Site
Go to **Setup > Digital Experiences > All Sites**
1. Select **Builder** next to the Employee Community.
2. Wait for the Builder page to display. Once displayed, select **Publish** in the top right **.**3. Select** Publish** in the pop up window (this process may take some time, so please be patient).
3. When completed, select **Got it** from the next pop up window.
4. Close the browser window.
## Approver Community Site (if required)
Go to **Setup > Digital Experiences > All Sites**
1. Select **Builder** next to the Approver Community.
2. Wait for the Builder page to display. Once displayed, select **Publish** in the top right **.**3. Select** Publish** in the pop up window (this process may take some time, so please be patient).
3. When completed, select **Got it** from the next pop up window.
4. Close the browser window.
## Remove Approver Link Tokens (if required)
As the Link Tokens will be associated with the Production Org, they will need to be deleted and later
regenerated to the Sandbox Org.
1. Go to the **Contact** Object.
2. Select a suitable List View for Approvers (i.e. Client Contacts, etc).
3. Review the fields in the List View and ensure the following fields are displayed:
1. **Link Token Expense Claim Submission**
2. **Link Token Timesheet Submission**
4. Ensure the List View has a filter for only one Record Type which will enable inline editing via the
List View, and includes the field Approver Link Token and Expense Claim Link Token if used.
5. Scroll down to select up to the maximum of 200 rows, and then edit the 2 Link Token fields to be
**blank** .
6. Select **Save.**
7. Repeat as needed in maximum blocks of 200 until all Link Tokens are removed.
8. Repeat with the List View filtered on any other Records Types needed.
If there is a high volume of Contact Records requiring the Link Tokens to be edited to
blank, the use of a data loader to replace the Link Token fields with blank values might
be a more suitable use of time.
## Time2Pay Portal Specific Settings - Custom Settings
Go to **Setup** > **Custom Settings** > Select **Manage** next to **Time2Pay Portal Specific Settings** .
1. Select **Edit** for the Community User.
2. Update the Site URL to reflect this new Sandbox Org Site URL (i.e.
[https://lorelletrain2--train2fs.sandbox.my.site.com).](https://lorelletrain2--train2fs.sandbox.my.site.com)
3. This can be located by going to Setup > All Sites, and copying the URL listed for Employee
Training Community.
4. Populate the **Site ID** field by following the steps below:
1. Select the Cogs similar to going to Setup, however, instead select **Developer Console** .
2. Select the **Query Editor** tab near the bottom.
3. Paste the following text and then select the **Execute** button:
***Select id,name from site***
4. Double click the cell for the Employee Community Site ID so that it enables the data
within the cell to be highlighted and copied, and paste into the Site ID field of the Custom
Setting (this is case sensitive, so it must be correct if capital i, lowercase L, or the number
1\).
5. Ensure this Custom Setting is marked as Default = **True** .
6. Select the **Save** button on the Custom Setting.
Please note that there is a need to create only one site to cover both Employee Communities as well as
Invoice creation, therefore, if the Org does not have an Employee Community but does require invoicing
still, then you’ll need to do the above but for the Invoicing Site instead. If you have any queries, please
contact the 2cloudnine E\&T Team.
## Remove Invoice URLs and Link Tokens (if required)
As the Link Tokens will be associated with the Production Org, they will need to be deleted and later
regenerated to the Sandbox Org.
1. Go to the **Invoices** Object.
2. Select a suitable List View for All Invoices.
3. Review the fields in the List View and ensure the following fields are displayed:
1. **Online URL**
2. **Invoice Link Token**
4. Ensure the List View has a filter for the same Record Type which will enable inline editing via the
List View.
5. Scroll down to select up to the maximum of 200 rows, and then edit the 2 Link Token fields to be
blank.
6. Select **Save.**
7. Repeat as needed in maximum blocks of 200 until all Link Tokens are removed.
8. Repeat with the List View filtered on any other Records Types needed.
If there is a high volume of Invoices requiring the 2 fields to be edited to blank, the use
of a data loader option to replace the Link Token and URL with blank values might be a
more suitable use of time.
## Enable Customer Community Login Users (if required)
If you require any of the Customer Community Login Users to access the Community for testing, etc, then
you will need to enable their Users again, following the below steps:
1. Select the **Contact** record who previously had been set up for Customer Community Login User
Licence.
2. From the buttons on the Detail page, select the **Enable Customer User** button.
3. Salesforce will direct you to the Setup Page for this Contact, where the “.invalid” will have
automatically been removed from the end of the email address, and Users can update any fields
on the User record as required.
4. Scroll down to the bottom of the page and ensure the checkbox **Generate new password and notify user immediately** is set to true.
5. Select **Save** .
6. Repeat for each Community User that requires access to the Sandbox Community.
## Regenerate Approver Link Tokens (if required)
If the Org uses Approver Link Tokens, the Link tokens will need to be regenerated for them to be used.
Go to **Setup > Custom Metadata Types > Community Settings > Manage Records > Edit** (next to the
Approver Site)
## Community Base URL
1. Copy exactly as per the URL in this Sandbox from **Setup** - **All Sites** - **Client Approver**, however
please remember IT MUST CONTAIN HTTPS at the start as per this example:
[https://lorelletrain2portal.force.com/Approvers](https://testcomminstall.my.site.com/Approvers)
2. Go to the **Site** .
3. Select the button for **Public Access Settings** (takes you to the Guest User Profile).
4. Scroll down to the bottom of the page, and select the **Related List** for Default Community.
5. Select **Edit** .
6. Select the relevant **Client Approver Community** .
7. Select **Save** .
An Approver with a blank link token will generate to the new Sandbox Community once they have a
Timesheet Submitted for their approval.
## Contact Email Address - .test
To prevent emails from sending to Payees, Client Contacts, etc, you are recommended to update all
Contact Emails to be invalid email addresses, especially if you have updated the email deliverability to be
All Emails.
To update the emails, Users are recommended to:
1. Create a report to export all Contacts and their current emails.
2. By using one of the data loader products available, update all Contact emails to be one of your
own email addresses, or to be updated to an invalid email address.
## Further information
| Document | Document Type | Description |
| ------------------------------------------------------------------------------------ | ------------------------ | --------------------------------------------------------------------------------------------------------------------------------------------------------------------------------------------------------------------------------------------------------------------------------------------------------- |
| Configuration Guide To
## Reset of Automations to be Active
Upon the refresh of the Sandbox, there may be some automations that should be ‘deactivated’ to ensure
the processes don’t occur (i.e. custom notifications, custom processes to automatically occur, etc). It is
recommended that all automations are reviewed to confirm which should remain active and which
should be deactivated as part of the refresh process.
Go to **Setup > Process Builder**
1. Sort all Process Builder by Active Status.
2. Ensure all that are required are set to a status of ‘Active’.
3. Repeat for each Process Builder which needs to be active.
Go to **Setup > Flows**
1. Sort all Flows by Active Status.
2. Ensure all that are required are set to a status of Active
3. Repeat for each Flow listed that needs to be active.
Go to **Setup > Platform Events**
1. **Edit** and **Save** each Platform Event that needs to be active.
## Publish Sites
A review of all Sites listed will be required to ensure they are published, as they will not retain their
published status from Production:
## Client Portal Site ID
Go to **Setup > Digital Experiences > Settings**
1. Ensure **TRUE** is selected for ‘Allow using standard external profiles for self-registration, user
creation, and login.’
## Employee Community Site
Go to **Setup > Digital Experiences > All Sites**
1. Select **Builder** next to the Employee Community.
2. Wait for the Builder page to display. Once displayed, select **Publish** in the top right **.**3. Select** Publish** in the pop up window (this process may take some time, so please be patient).
3. When completed, select **Got it** from the next pop up window.
4. Close the browser window.
## Approver Community Site (if required)
Go to **Setup > Digital Experiences > All Sites**
1. Select **Builder** next to the Approver Community.
2. Wait for the Builder page to display. Once displayed, select **Publish** in the top right **.**3. Select** Publish** in the pop up window (this process may take some time, so please be patient).
3. When completed, select **Got it** from the next pop up window.
4. Close the browser window.
## Remove Approver Link Tokens (if required)
As the Link Tokens will be associated with the Production Org, they will need to be deleted and later
regenerated to the Sandbox Org.
1. Go to the **Contact** Object.
2. Select a suitable List View for Approvers (i.e. Client Contacts, etc).
3. Review the fields in the List View and ensure the following fields are displayed:
1. **Link Token Expense Claim Submission**
2. **Link Token Timesheet Submission**
4. Ensure the List View has a filter for only one Record Type which will enable inline editing via the
List View, and includes the field Approver Link Token and Expense Claim Link Token if used.
5. Scroll down to select up to the maximum of 200 rows, and then edit the 2 Link Token fields to be
**blank** .
6. Select **Save.**
7. Repeat as needed in maximum blocks of 200 until all Link Tokens are removed.
8. Repeat with the List View filtered on any other Records Types needed.
If there is a high volume of Contact Records requiring the Link Tokens to be edited to
blank, the use of a data loader to replace the Link Token fields with blank values might
be a more suitable use of time.
## Time2Pay Portal Specific Settings - Custom Settings
Go to **Setup** > **Custom Settings** > Select **Manage** next to **Time2Pay Portal Specific Settings** .
1. Select **Edit** for the Community User.
2. Update the Site URL to reflect this new Sandbox Org Site URL (i.e.
[https://lorelletrain2--train2fs.sandbox.my.site.com).](https://lorelletrain2--train2fs.sandbox.my.site.com)
3. This can be located by going to Setup > All Sites, and copying the URL listed for Employee
Training Community.
4. Populate the **Site ID** field by following the steps below:
1. Select the Cogs similar to going to Setup, however, instead select **Developer Console** .
2. Select the **Query Editor** tab near the bottom.
3. Paste the following text and then select the **Execute** button:
***Select id,name from site***
4. Double click the cell for the Employee Community Site ID so that it enables the data
within the cell to be highlighted and copied, and paste into the Site ID field of the Custom
Setting (this is case sensitive, so it must be correct if capital i, lowercase L, or the number
1\).
5. Ensure this Custom Setting is marked as Default = **True** .
6. Select the **Save** button on the Custom Setting.
Please note that there is a need to create only one site to cover both Employee Communities as well as
Invoice creation, therefore, if the Org does not have an Employee Community but does require invoicing
still, then you’ll need to do the above but for the Invoicing Site instead. If you have any queries, please
contact the 2cloudnine E\&T Team.
## Remove Invoice URLs and Link Tokens (if required)
As the Link Tokens will be associated with the Production Org, they will need to be deleted and later
regenerated to the Sandbox Org.
1. Go to the **Invoices** Object.
2. Select a suitable List View for All Invoices.
3. Review the fields in the List View and ensure the following fields are displayed:
1. **Online URL**
2. **Invoice Link Token**
4. Ensure the List View has a filter for the same Record Type which will enable inline editing via the
List View.
5. Scroll down to select up to the maximum of 200 rows, and then edit the 2 Link Token fields to be
blank.
6. Select **Save.**
7. Repeat as needed in maximum blocks of 200 until all Link Tokens are removed.
8. Repeat with the List View filtered on any other Records Types needed.
If there is a high volume of Invoices requiring the 2 fields to be edited to blank, the use
of a data loader option to replace the Link Token and URL with blank values might be a
more suitable use of time.
## Enable Customer Community Login Users (if required)
If you require any of the Customer Community Login Users to access the Community for testing, etc, then
you will need to enable their Users again, following the below steps:
1. Select the **Contact** record who previously had been set up for Customer Community Login User
Licence.
2. From the buttons on the Detail page, select the **Enable Customer User** button.
3. Salesforce will direct you to the Setup Page for this Contact, where the “.invalid” will have
automatically been removed from the end of the email address, and Users can update any fields
on the User record as required.
4. Scroll down to the bottom of the page and ensure the checkbox **Generate new password and notify user immediately** is set to true.
5. Select **Save** .
6. Repeat for each Community User that requires access to the Sandbox Community.
## Regenerate Approver Link Tokens (if required)
If the Org uses Approver Link Tokens, the Link tokens will need to be regenerated for them to be used.
Go to **Setup > Custom Metadata Types > Community Settings > Manage Records > Edit** (next to the
Approver Site)
## Community Base URL
1. Copy exactly as per the URL in this Sandbox from **Setup** - **All Sites** - **Client Approver**, however
please remember IT MUST CONTAIN HTTPS at the start as per this example:
[https://lorelletrain2portal.force.com/Approvers](https://testcomminstall.my.site.com/Approvers)
2. Go to the **Site** .
3. Select the button for **Public Access Settings** (takes you to the Guest User Profile).
4. Scroll down to the bottom of the page, and select the **Related List** for Default Community.
5. Select **Edit** .
6. Select the relevant **Client Approver Community** .
7. Select **Save** .
An Approver with a blank link token will generate to the new Sandbox Community once they have a
Timesheet Submitted for their approval.
## Contact Email Address - .test
To prevent emails from sending to Payees, Client Contacts, etc, you are recommended to update all
Contact Emails to be invalid email addresses, especially if you have updated the email deliverability to be
All Emails.
To update the emails, Users are recommended to:
1. Create a report to export all Contacts and their current emails.
2. By using one of the data loader products available, update all Contact emails to be one of your
own email addresses, or to be updated to an invalid email address.
## Further information
| Document | Document Type | Description |
| ------------------------------------------------------------------------------------ | ------------------------ | --------------------------------------------------------------------------------------------------------------------------------------------------------------------------------------------------------------------------------------------------------------------------------------------------------- |
| Configuration Guide To
2cloudnine Payroll Suite v1.7 | Configuration
Guide | This Configuration Guide outlines the ‘out of
the box’ setup of the 2cloudnine Payroll Suite,
including built-in customisations to
customer-required processes and data. Where
customisation is built into the product, we will
cover how to install and configure it correctly. |
| 2cloudnine General Ledger -
Configuration and
Implementation Guide v2.0 | Configuration
Guide | This Configuration Guide outlines the ‘out of
the box’ setup of 2cloudnine General Ledger. |
| 2cloudnine Integrated Import
Tool - Configuration and
Implementation Guide | Configuration
Guide | This Configuration Guide outlines the ‘out of
the box’ setup of the 2cloudnine Integrated
Import Tool. |