

2cloudnine Payroll Integrated Import Tool overview
Packages included in 2cloudnine Payroll Integrated Import Tool
This Configuration Guide to the 2cloudnine Payroll Import Tool Extension covers the following package, which must be installed only after you have completed the Pre-Installation checklist, detailed later in this document. Following this guide in sequence will ensure the correct installation and configuration of the Import Tool Extension package.Important information
Only an authorised Salesforce System Administrator or Partner should be actioning any installation, configuration items, and tasks. There may be compulsory and optional configuration items and tasks that must be completed before and after the package’s installation. These will be highlighted in the checklists provided in this document, and further details will be provided within this document. You are required to complete the installation and configuration of the main 2cloudnine Payroll packages before attempting to install the General Ledger Extension Package. You can do so by following the Configuration Guide To 2cloudnine Payroll Suite steps. This will ensure that any prerequisite/base configuration needed for the Integrated Import Tool has also been completed. The installer will be responsible for ensuring all these configuration items and tasks are completed within a reasonable timeframe of the package being installed. Please familiarise yourself with all of the requirements PRIOR to installing the package and ensure you have sufficient time and resources available. Failing to do so can negatively impact the User experience and stability of 2cloudnine Payroll and Integrated Import Tool. This guide should always be accessed from Salesforce and used via your web browser. This will ensure you are viewing the most recent version of the document. Further, downloading the document and opening it with desktop programs, such as Adobe, has been found to cause errors when copying and using the scripts provided for data updates. These errors do not occur when viewed through a browser.Read first: How to use this configuration guide
What is covered by this configuration guide?
This Configuration Guide outlines the out-of-the-box setup of the 2cloudnine Integrated Import Tool, including built-in customisations to the customer’s required processes and data. Where customisation is built into the product, we will cover how to install and configure it correctly. Where, during the sales process and discovery, it is identified that further customisations outside of those built by the 2cloudnine Integrated Import Tool are required, this would not be covered by the Configuration Guide.Discovery and configuration guides
This Configuration Guide is meant to be used with the Discovery Template. Through Discovery, you will assess the customer’s needs and identify the 2cloudnine Integrated Import Tool requirements and functionality required to meet those needs. Once we have established the required work, we can use the Configuration Guide to determine what configuration needs to be completed.Task types
- General Salesforce Setup
- Custom Settings, Metadata Types and Setting Configuration
- Schedule Jobs
- Baseline Testing
- Data Migration
Task classifications
This Configuration Guide comprises a series of tasks that are either compulsory or optional and must be completed to use the 2cloudnine Integrated Import Tool successfully. Each task is allocated 1 of 3 possible classifications, which are:- Compulsory must be completed regardless of whether the organisation will use the related functionality. For example, it is Compulsory to create and configure an Integration User for use with 2-factor Authentication using 1Password.
- Conditionally Compulsory must be completed if the organisation uses a specific functionality within the 2cloudnine Integrated Import Tool. When a task is conditionally compulsory, we will detail the condition(s) that make it compulsory. For example, if the organisation has already implemented the original version of the Import Tool, field migration will need to be completed for External ID fields.
- Optional tasks will only need to be completed to use an optional feature of the 2cloudnine Integrated Import Tool. In these cases, a Default behaviour(s) is often built into the 2cloudnine Integrated Import Tool. If the organisation wishes to use the Default behaviour(s), they don’t have to do anything else. An optional task will be set where an organisation will not use the Default behaviour(s). Example: According to the organisation’s requirements, modifying the batch size for import objects so that larger quantities of data may be processed simultaneously is optional.
1. Pre-installation
Prerequisites
Before installing the 2cloudnine Integrated Import Tool package, you must (at a minimum) already have 2cloudnine Payroll, 2cloudnine Time2Pay Extension, and the 2cloudnine Data Creation packages installed and configured. Refer to the Configuration Guide for these here:2cloudnine Integration User
As the Payroll Configuration Guide outlines, each organisation must have a 2cloudnine Integrations User in addition to the 2cloudnine Admin User. The Integration user is essential to enabling Import Tool processing. To check whether the Integration User has been created in your Org, complete the following: Go to Setup > Users- Review the Administrator Users and confirm there are two for 2cloudnine: the standard System Admin User and the 2cloudnine Integration User.
- If the Integration User is set up, you don’t need to proceed, but if there is no user, please proceed to step 3.
- Send an email to the 2cloudnine Tech Services Team at usercredentialsinternal@2cloudnine.com to advise them that this organisation requires them to create an Integrations User and provide the 2cloudnine Admin User login username so they can prioritise this.
Before you get started, you will need to know the following
To assist with a successful configuration of your 2cloudnine Integrated Import Tool package, it’s essential to make sure you have already gained the required information for the following questions:- Has a previous version of the Import Tool been installed? If so, is it version v1.20 or prior? If so:
- The customer must be enabled to use the newer user experience.
- The scheduled jobs to set external ID strings will need to be scheduled.
- Does the customer have custom automation for each of the objects imported? If so, consider setting a lower batch size to overcome potential platform errors (CPU timeouts, etc).
- If importing Pay Transactions, check whether the customer needs to override pay multipliers. If so, check the custom setting “Override Pay Multipliers?”
- If the customer has v1.49 or greater installed, then the following custom settings can remain blank:
- 1password Vault Name
- 1password Item Name
2. Installation and configuration checklist
The following checklist summarises the tasks to install and configure the 2cloudnine General Ledger Extension. Each specific task requires more detail, which can be found by following the link to that task. Each task should be completed in the sequence below to ensure seamless installation and configuration of the packages.3. Package installation
Installing packages
Please install the required packages now before completing any further configuration. You must:- Proceed further only once all the required packages have been installed.
- Install the following packages in the suggested sequence below:
Installation process
When you install a managed package, you need to select the correct option of either a), b), or c) below to ensure access to the Package is provided to the Profiles as needed:- Install for Admins Only

- Install for All Users
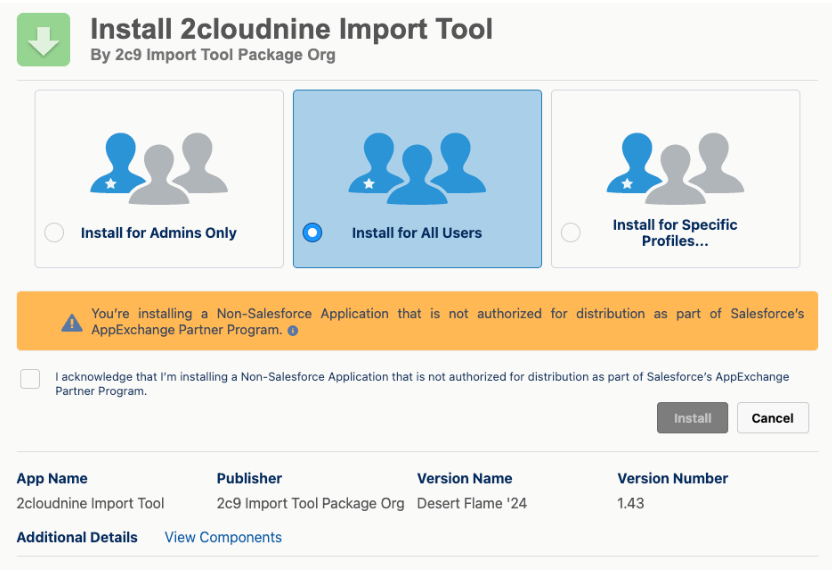
- Install for Specific Profiles - This step allows you to select which profiles you will apply the security to manually. Please note that you must choose the required option carefully, as this step can not be repeated.
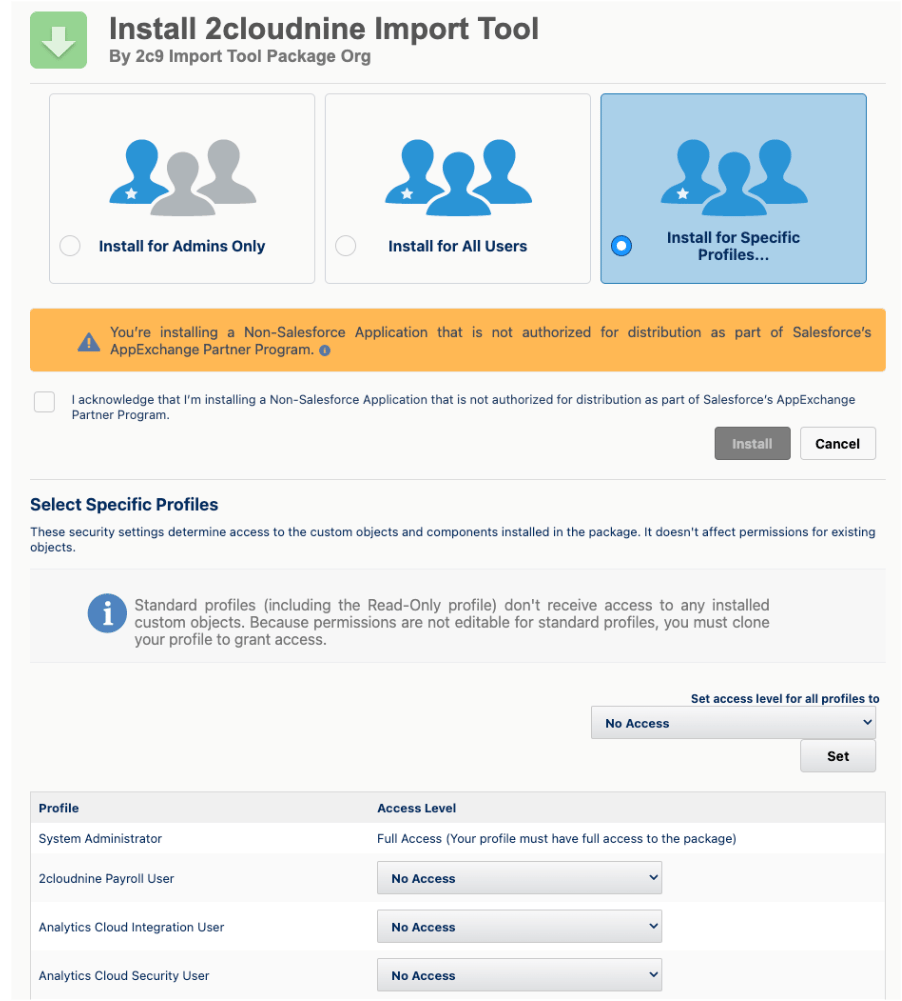
4. Custom settings
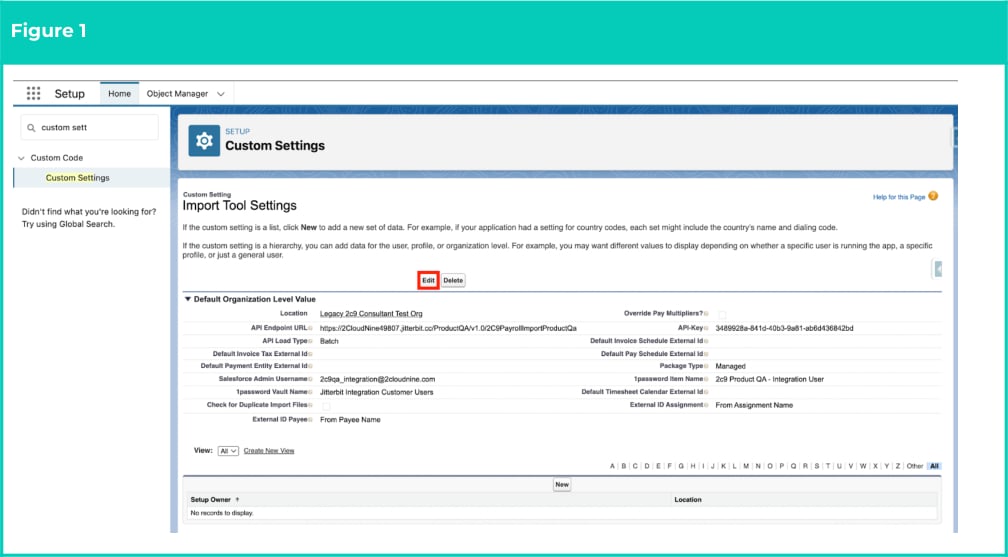
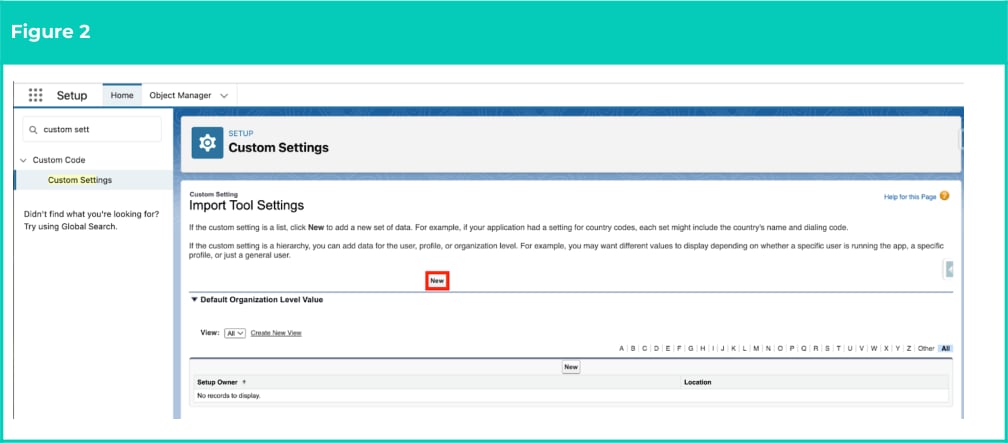
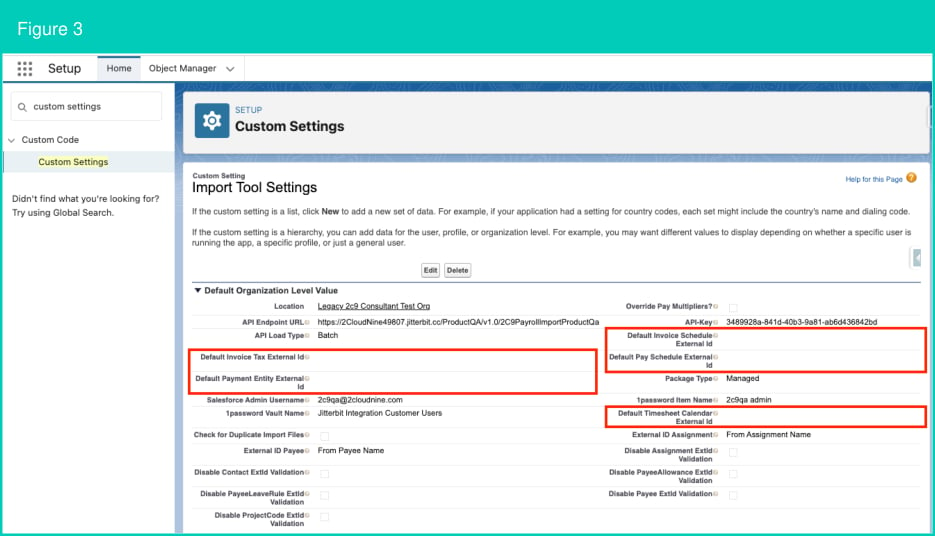
- Go to Setup > Custom Settings.
- Click on the Manage button next to Import Tool Settings.
- If the Tech Services Team has created the Integrated User, click the Edit button (see Figure 1).
- Alternatively, if the Integrated User still needs to be created (and no other Custom Settings have been added for the new Org), click the New button (see Figure 2).
- Populate Custom Settings with the values displayed below:
- API values:
- If configuring in a Production Org:
- API Endpoint URL: https://2cloudnine49807.jitterbit.cc/Production/v1.0/2C9PayrollImport
- API-Key: 11289963-6e8f-42bc-b7da-b5c257638e01
- If configuring in a Sandbox Org:
- API Endpoint URL: https://2cloudnine49807.jitterbit.cc/Sandbox/v1.0/2C9PayrollImportSandbox
- API-Key: 639d5539-e063-4c92-8e3d-5e7104826716
- If configuring in a Production Org:
- API Load Type: Batch
- Package Type: Managed
- Salesforce Admin User Name:
- Go to Setup > Users.
- Copy the name of the 2cloudnine Integration User, e.g. anglicare_integration@2cloudnine.com.
- External ID Payee: enter one of the following values to define whether the External ID used by the Integrated Import Tool for Payee records should be sourced from the related Contact record or the Payee Name:
- From Contact External ID
- From Payee Name
- External ID Assignment: enter one of the following values to define whether the External ID used by the Integrated Import Tool for Assignment records should be sourced from the related Contact record or the Assignment Name:
- From Contact External ID
- From Assignment Name
- API values:
- Configure the following optional settings as required:
- Check for Duplicate Import Files: populate this field to enable validation to check and flag any existing files with the same name as the file that has been uploaded for import.
- Override Pay Multipliers: populate this checkbox field if Pay Rate Multipliers should be overridden to 1 during Pay Transaction Imports.
- Select the checkboxes for any of the following records where validation should not flag external IDs containing special characters during import:
- Disable Contact ExtId Validation
- Disable PayeeLeaveRule ExtId Validation
- Disable ProjectCode Extid Validation
- Disable Assignment ExtId Validation
- Disable PayeeAllowance ExtId Validation
- Disable Payee ExtId Validation
- Check for Manual Timesheet Update: set this custom setting as true if the instance has another integration like Field Service that is responsible for creation/update of timesheet entries, otherwise this can remain unticked.
- Duplicate File Detected
- Allow Duplicate File Import
5. Remote site settings
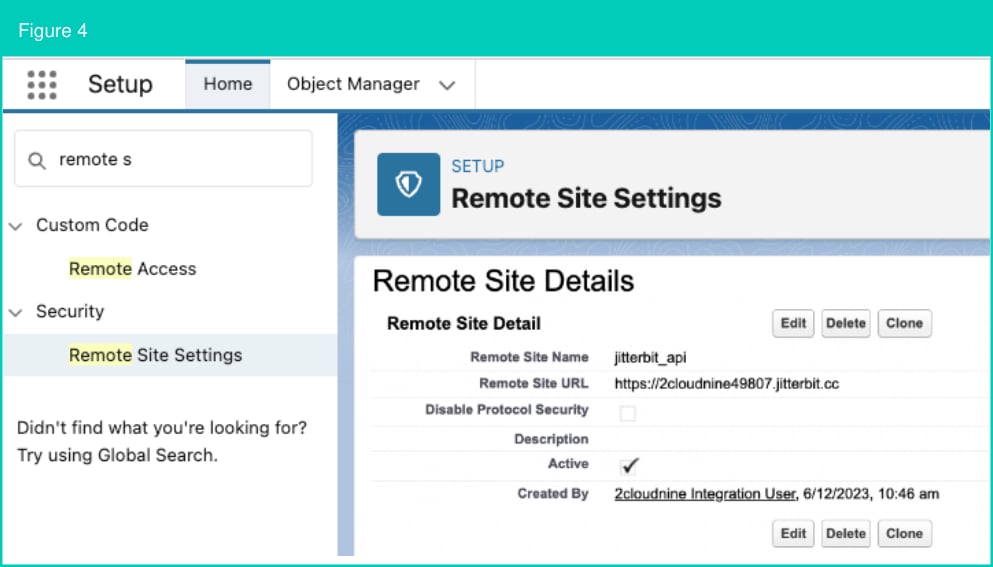
As part of the improvements made within the Integrated Import Tool, users must complete the below configuration to ensure the correct Remote Site is called during the ongoing operations. Go to Setup > Remote Site Settings- Click the New Remove Site button.
- Populate the following values (see Figure 4):
- Remote Site Name: jitterbit_api
- Remote site URL: https://2cloudnine49807.jitterbit.cc/
- Disable Protocol Security: False
- Active: True
- Click the Save button.
6. Batch size settings
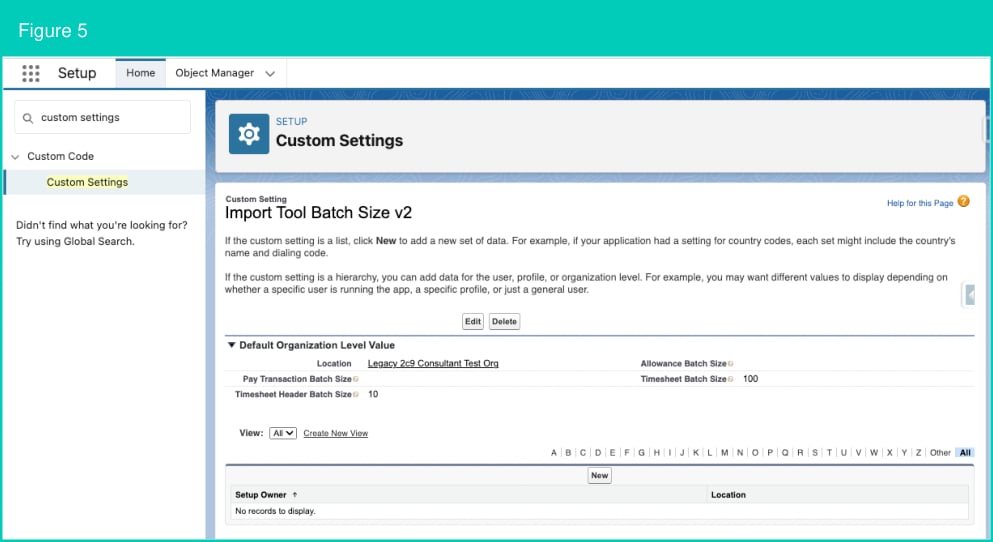
You can modify the batch size of any import objects you deem fit for the org requirements and capability. If left blank, the default batch size = 200. Go to Setup > Custom Settings- Click on the Manage button next to Import Tool Batch Size v2.
- Click on New.
- Populate the desired value (below 200) next to the necessary field(s):
- Allowance Batch Size
- Pay Transaction Batch Size
- Timesheet Batch Size
- Timesheet Header Batch Size
- Click Save.
7. Schedule Apex jobs
Use the below Scripts to create Scheduled jobs that run every 10 minutes to find and populate the External ID used by the Integrated Import Tool for the following Objects:- Timesheet
- Timesheet Entry
- Assignment
- Payee
- Payee Leave Rule
- Payee Allowance
- Project Code
- Copy the block of scripts to be run.
- Select Setup > Developer Console.
- Select Debug > Open Execute Anonymous Window.
- Delete or comment out any code that is in the window.
- Paste in the copied script from below.
- Click the Execute button.
- Repeat the above steps until the last script.
- Once completed:
- Make sure External IDs are loaded for Contacts, Assignments, Payees, etc.
- Update the Import Type picklist field on Imported Records.
- Inform Tech Services to have the Jitterbit recipe connected to the specific Org.
- Schedule records to be updated for all Object types at once; OR
- Schedule records to be updated for individual Object types.
All objects
To create a Scheduled Job to populate the External Id (it) field on all Timesheet, Timesheet Entry, Assignment, Payee, Payee Leave Rule, Payee Allowance and Project Code records every 10 mins, with a batch size of 10, use the following script: Script 1Timesheets
Scheduling the following scripts will enable the External Id (It) field to be regularly updated for Timesheet records. The External Id (it) value will be generated by referencing the related Employee External Id, Assignment External Id and Timesheet End Date fields on Timesheet records, per the below formula:- employeeExternalId + '' + assignmentExternalId + '' + timesheetEndDate
Timesheet entries
Scheduling the following scripts will enable the External Id (It) field to be regularly updated for Timesheet Entry records. The External Id (it) value will be generated by referencing the related Employee External Id, Assignment External Id and Timesheet End Date fields on Timesheet Entry records, per the below formula:- employeeExternalId + '' + assignmentExternalId + '' + timesheetEndDate
Assignments
Scheduling the following scripts enables the External Id (it) field to be regularly updated for Assignment records. The following formula will be used when determining when the External Id (it) field should be updated for Assignment records, as well as the value generated for this field:- IF Import_Tool_Settings__r.External_ID_Assignment__c = ‘From Assignment Name’ THEN <assignmentName>
- IF Import_Tool_Settings__r.External_ID_Assignment__c = ‘From Contact External ID’ THEN <contactExternalId>
- IF Import_Tool_Settings__r.External_ID_Assignment__c = NULL THEN External does not get set
Payees
Scheduling the following scripts enables the External Id (it) field to be regularly updated for Payee records. The following formula will be used when determining when the External Id (it) field should be updated for Payee records, as well as the value generated for this field:- IF Import_Tool_Settings__r.External_ID_Payee__c = ‘From Payee Name’ THEN <assignmentName>
- IF Import_Tool_Settings__r.External_ID_Payee__c = ‘From Contact External ID’ THEN <contactExternalId>
- IF Import_Tool_Settings__r.External_ID_Payee__c = NULL THEN External does not get set
Payee leave rules
Scheduling the following scripts enables the External Id (It) field to be regularly updated for Payee Leave Rule records. The External ID (it) value will be generated by referencing the related Employee External Id and record name fields on Payee Leave Rule records, per the below formula:- employeeExternalId + ’_’ + payeeLeaveRuleName
Payee allowances
Scheduling the following scripts enables the External Id (It) field to be regularly updated for Payee Allowance records. The External ID (it) value will be generated by referencing the related Payee External Id and record name fields on Payee Allowance records, per the below formula:- payeeExternalIdString + ’_’ + payeeAllowanceRecordName
Project codes
Scheduling the following scripts enables the External Id (It) field to be regularly updated for Project Code records. The External ID (it) value will be generated by referencing the related Employee External Id, Assignment External Id and record name fields on Project Code records, per the below formula:- employeeExternalId + '' + assignmentExternalId + '' + projectCodeName;