

Purpose
The purpose of this quick reference guide is to step through the process of creating Allowance Rules, Leave Rules and Allowance Junction Rules within the Interpretation Rule Builder. The intended audience for this document are system administrators / standard users.Steps
Populate Allowance Rules, Leave Rules and Allowance Junction Rules
Interpretation Rules are used to convert Timesheet Entries into Pay Transactions for payment of wages to Payees, taking into account different calculations for the amount of time worked. Interpretation Rules are created using the Interpretation Rule Builder, which consists of a series of dynamic fields that differ based on the Record Type selected. These fields are broken into several sections, some of which are optional, to allow for various interpretation types. See below for an ordered list of the QRGs related to each section of the Interpretation Rule Builder page for Hourly Rate, Shift End Time or Shift Start Time record types:- Populate Hourly Rate Interpretation Rules OR Shift Time Interpretation Rules
- Populate Break Loading and Minimum Rest Rules (optional)
- Populate Split/Broken Shift and Sleepover Rules (optional)
- Populate Allowance, Leave & Allowance Junction Rule Breakpoints (optional)
- Create Breakpoints and Pay Code Caps
Create Allowance Rule Breakpoints
To enable Allowance Rule Interpretation, identify the Allowance Rules section of the Interpretation Rule Builder and follow the below steps.-
Populate the following fields (see Figure 1):
- Click on the Hourly Allowance , Daily Allowance , Weekly Allowance or Frequency Allowance tab.
-
Click on the + Add button.
- A new Breakpoint line will appear with an auto-populated unique identifier in the Name field. This field should not be overwritten unless required.
- To determine the number of units required for the Allowance to be applied, populate the Required field.
- Define the unit of time of the Required field by selecting from the available picklist options in the Type field.
- Define the Pay Code for the Allowance by selecting from the available lookup options in the Pay Code field.
- If partial quantities of the Allowance should be payable when partial hours are worked (i.e. 7.5 hrs worked therefore 7.5 hrs can be applied), select Yes from the available picklist options in the Apply Partial Quantity field.
- If the Allowance’s availability should reset after the amount of time defined in the Required field, select Yes from the available picklist options in the Reset field.
- Click on the + Add button to add a new Allowance to the current Allowance tab, or select another tab to create a different kind of Allowance.
- To remove an Allowance, click on the Trash Can icon next to the corresponding line.
- Repeat Step 1. until all Hourly, Daily, Weekly and/or Frequency Allowances have been populated for this Interpretation Rule.

-
If Shift Logic is enabled, populate the following fields to enable Shift Allowances (see Figure 2):
- Click on the Shift Allowance tab.
-
Click on the + Add button.
- A new Breakpoint line will appear with an auto-populated descriptor in the Name field. This field should not be overwritten unless required.
-
To define the type of calculation to use for Shift Allowance Interpretation, select from the available picklist options in the Type field.
-
If Shift Gap :
- Define the minimum number of Shift Gaps between Timesheet Entries that meet the Minimum Qualifying Threshold for Shift Allowance by populating the Start Threshold field.
- Define the maximum number of Shift Gaps between Timesheet Entries that meet the Minimum Qualifying Threshold before they no longer qualify for the Shift Allowance by populating the End Threshold field.
- To define the minimum number of minutes that qualify a Shift Gap when Interpreting related Split/Broken Shift Timesheet Entries, populate the Minimum Qualifying Threshold field.
-
If Shift Gap :
- To determine the Pay Code that should be applied for the Shift Allowance, select from the available lookup options in the Pay Code field.
- Click on the + Add button to add another Shift Allowance.
- To remove a Shift Allowance, click on the Trash Can icon next to the corresponding line.
- Repeat the above until all Shift Allowances have been populated for this Interpretation Rule.

Shift Allowance Breakpoints are only applicable when Yes has been selected for the Apply Shift Based Interpretation field in General Rule Settings.
Create Leave Rule Breakpoints
To enable Leave Rule Interpretation, identify the Leave Rule Breakpoints section of the Interpretation Rule Builder and follow the below steps.-
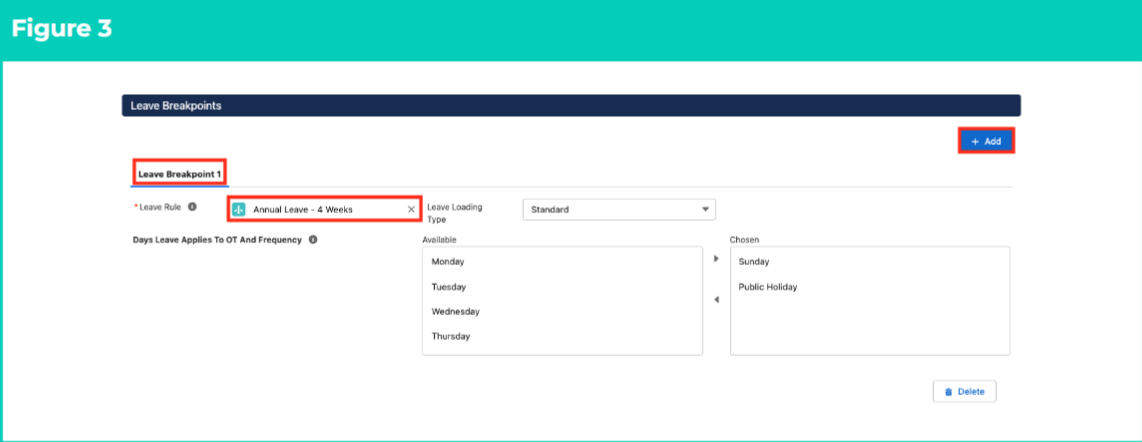
Populate the following fields (see Figure 3):
- Click on the + Add button
- To define the Leave Rule that the Leave Breakpoint applies to, populate the Leave Rule field using the lookup options available.
-
If this is an Shift Time Interpretation Record Type, define the type of Leave Loading to be applied by selecting from the available picklist options in the Leave Loading Type field:
-
Standard - allows standard Leave Loading Pay Code to be defined for the Leave Breakpoint.
- This is the default Leave Loading Type applied to Hourly Interpretation Rule Record Types.
- Shift Loading - allows Leave Loading Pay Codes to be defined according to Start and End Times of Entries related to the Leave Breakpoint.
-
Standard - allows standard Leave Loading Pay Code to be defined for the Leave Breakpoint.
- To determine that Leave Events populated on certain days should be added to the count of Overtime and Frequency hours for the Timesheet Period during interpretation, use the arrow buttons to move days from the Available to the Chosen column in the Days Leave Applies To OT and Frequency field.
-
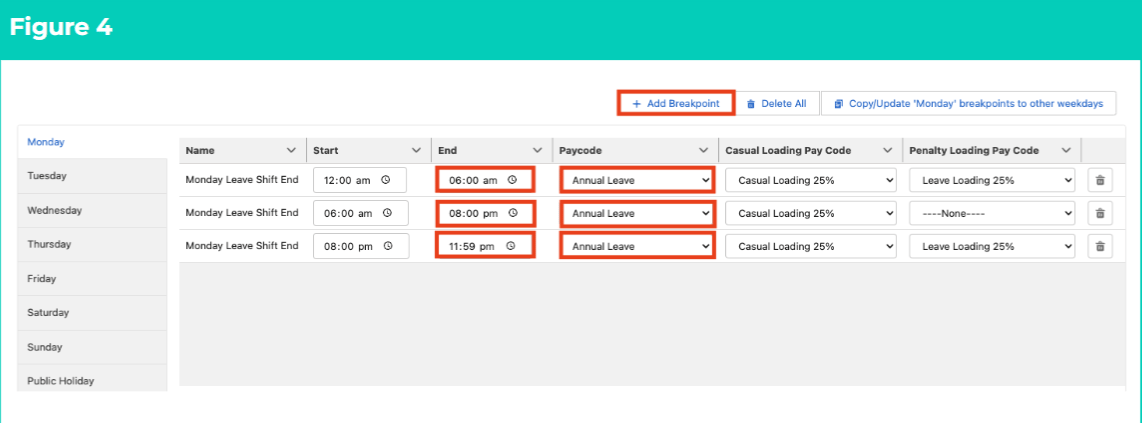
If Shift Loading was selected in the Leave Loading field in Step 4.c., follow this step in the sequence given below (see Figure 4):
- Click on the + Add Breakpoint button.
- As the Start field defaults to 12:00am, and does not need to be populated, define the first Leave Shift Loading Breakpoint that occurs on Mondays from 12:00am by populating the End field.
- To define the Pay Code for the first Leave Shift Loading Breakpoint, populate the Pay Code field using the lookup options available.
- If Casual Loading has been applied to the Interpretation Rule, populate the Casual Loading Pay Code field using the lookup options available.
- If Penalty Loading has been applied to the Interpretation Rule, populate the Penalty Loading Pay Code field using the lookup options available.
- To add the next Leave Shift Loading Breakpoint, click on the + Add Breakpoint button and a new Breakpoint line will be added beneath the first.
- Populate the End and Pay Code fields within the new Breakpoint to define the next Leave Shift Loading Breakpoint for Mondays.
- Repeat the above until 24 hours of Leave Shift Loading Breakpoints have been accounted for Mondays.
- Complete Leave Shift Loading Breakpoints for the rest of the Weekday tabs, or click on the Copy/Update ‘Monday’ Breakpoints to auto-populate Breakpoints from the Monday tab.
- Complete Leave Shift Loading Breakpoints for the rest of the Weekend and Public Holiday tabs.
- If Standard was selected in the Leave Loading field in Step 4.c., follow this step in the sequence given below (see Figure 5):
- To determine the Pay Code for Leave Entries, populate the Pay Code field using the lookup options available.
- To define a Pay Code to be applied when calculating Leave Loading, populate the Leave Loading Pay Code field using the lookup options available.
- If Casual Loading has been applied to the Interpretation Rule, populate the Casual Loading Pay Code field using the lookup options available.
- If Penalty Loading has been applied to the Interpretation Rule, populate the Penalty Loading Pay Code field using the lookup options available.
- To add another Leave Breakpoint, click on the + Add button and a new Leave Breakpoint tab will be added next to the existing Leave Breakpoint tab(s).
- To remove a Breakpoint, click on the Trash Can icon next to the corresponding line.
- Repeat the above until Leave Breakpoints for all Payee Leave Rules related to this Interpretation Rule have been defined.

Create Allowance Junction Rule Breakpoints
To enable an Allowance Breakpoint to be associated with a specific Leave type, or only be payable in conjunction with a specific Timesheet Activity Project Code, identify the Allowance Rules section of the Interpretation Rule Builder and follow the below steps.- Create Breakpoints using the instructions provided in the Create Breakpoints & Pay Code Caps QRG.
All Breakpoints must be populated and created via the Create Breakpoints button before the Allowance Junction Rule Breakpoints will appear.
- To create an Allowance/Leave Junction, populate the following fields (see Figure 6):
- Click on the Allowance/Leave Junction tab.
-
Click on the + Add button.
- A new Breakpoint line will appear with an auto-populated descriptor in the Name field. This field should not be overwritten unless required.
- To define which Allowance Rule the Allowance Junction should be applied to, select from the available picklist options in the Allowance Breakpoint field.
- To define which Leave Rule the Allowance Junction should be applied to, select from the available picklist options in the Leave Header field.
- To add another Allowance Junction Rule, click on the + Add button and a new Allowance/Leave Junction line will be added beneath the first.
- To remove a Breakpoint, click on the Trash Can icon next to the corresponding line.
- Repeat the above until the Allowance/Leave Junction Rules have been defined for all Allowances associated with Leave for this Interpretation Rule.

The Allowance Breakpoint and Leave Header picklist fields are automatically populated with data from the Allowance Rule and Leave Rule Breakpoints, and will not display any values until at least one Allowance and one Leave Breakpoint have been created for the Interpretation Rule.
- To create an Allowance/Timesheet Activity Junction, populate the following fields (see Figure 7):
- Click on the Allowance/Timesheet Activity Junction tab.
-
Click on the + Add button.
- A new Breakpoint line will appear with an auto-populated descriptor in the Name field. This field should not be overwritten unless required.
- To define which Allowance Rule the Allowance Junction should be applied to, select from the available picklist options in the Allowance Breakpoint field.
- To define which Timesheet Activity Project Code the Allowance Junction should be associated with, select from the available picklist options in the Allowance Type field.
- To add another Allowance Junction Rule, click on the + Add button and a new Allowance/Timesheet Activity Junction line will be added beneath the first.
- To remove a Breakpoint, click on the Trash Can icon next to the corresponding line.
- Repeat the above until the Allowance/Timesheet Activity Junction Rules have been defined for all Allowances associated with Timesheet Activities for this Interpretation Rule.

The Allowance Breakpoint picklist field is automatically populated with data from the Allowance Rule Breakpoints, and will not display any values until at least one Allowance Breakpoint has been created for the Interpretation Rule.
Allowance Type is a field available in both the Allowance/Timesheet Activity Junction Breakpoint and the Timesheet Activity Project Code record. To ensure a Breakpoint is associated with the correct Timesheet Activity Project Code, make sure the same Allowance Type value is selected for both records.
- Create Pay Code Caps using the instructions provided in the Create Breakpoints & Pay Code Caps QRG to complete the Interpretation Rule and finalise record creation.
The Interpretation Rule cannot be saved or finalised until all required sections of the Interpretation Rule Builder have been populated, and Breakpoint & Pay Code Cap creation is completed.