

Purpose
The purpose of this quick reference guide is to step through the process of defining and populating the required Breakpoints for Shift Time record types within the Interpretation Rule Builder. The intended audience for this document are system administrators / standard users.Steps
Populate a Shift Time Interpretation Rule
Interpretation Rules determine how Pay Transactions are calculated for Timesheet Entries, according to the amount of time worked, the conditions of work, and any associated entitlements. The Interpretation Rule Builder consists of a series of dynamic fields that differ based on record type, and are broken into several sections. Some sections (and fields) are optional, allowing specific types of working conditions to be catered to. Shift Start Time and Shift End Time Interpretation Rules will assess Timesheet Entries based on the time of day that a work period begins and/or ends. See below for an ordered list of the QRGs related to each section of the Interpretation Rule Builder page for Shift Time record types:- Populate Shift Time Interpretation Rules
- Populate Break Loading and Minimum Rest Rules (optional)
- Populate Split/Broken Shift and Sleepover Rules (optional)
- Populate Allowance, Leave & Allowance Junction Rule Breakpoints (optional)
- Create Breakpoints and Pay Code Caps
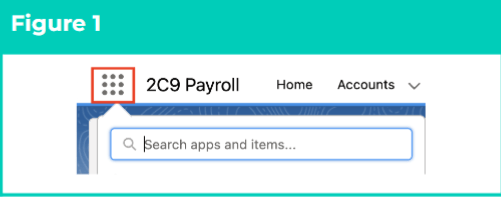
- Click on the App Launcher icon (see Figure 1).
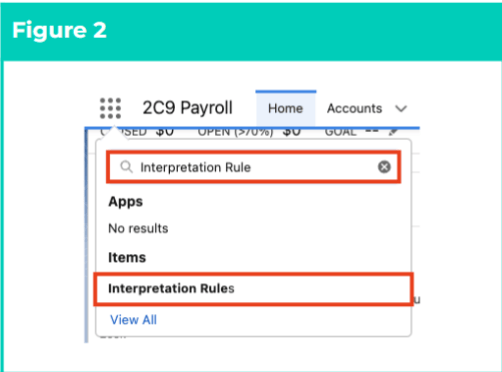
- Go to the Interpretation Rule object by using the Search function (see Figure 2).
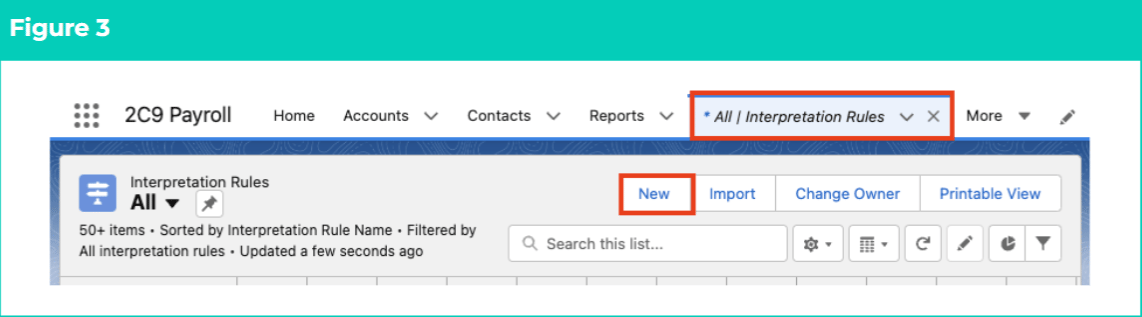
- Click on the New button (see Figure 3).
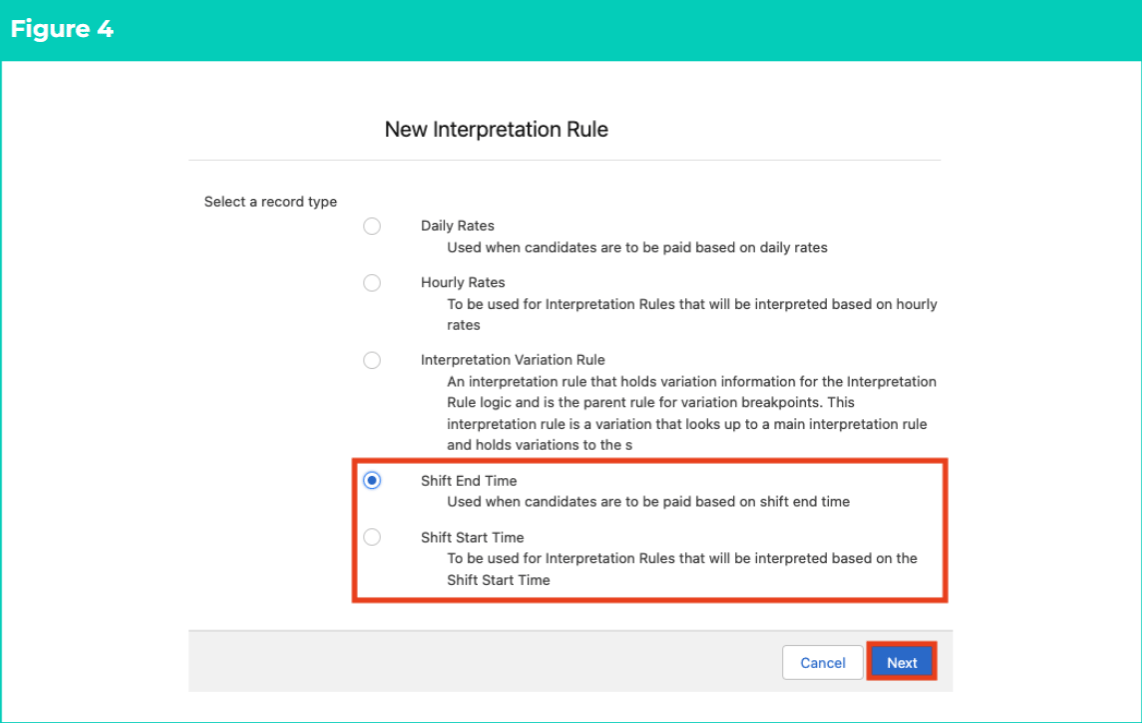
- Select either Shift End Time or Shift Start Time and click on the Next button (see Figure 4).
-
To complete Basic Information for the Interpretation Rule, follow this step in the sequence given below:
-
Populate the following required fields to provide the base details of the Interpretation Rule (see Figure 5):
- Interpretation Rule Name
- Timesheet Frequency
-
Populate the following optional fields as needed (see Figure 5):
- To provide a description used to identify the Interpretation Rule, populate the Short Description field.
- To provide a description used to identify the configuration of the Interpretation Rule, populate the Long Description field.
-
Populate the following required fields to provide the base details of the Interpretation Rule (see Figure 5):
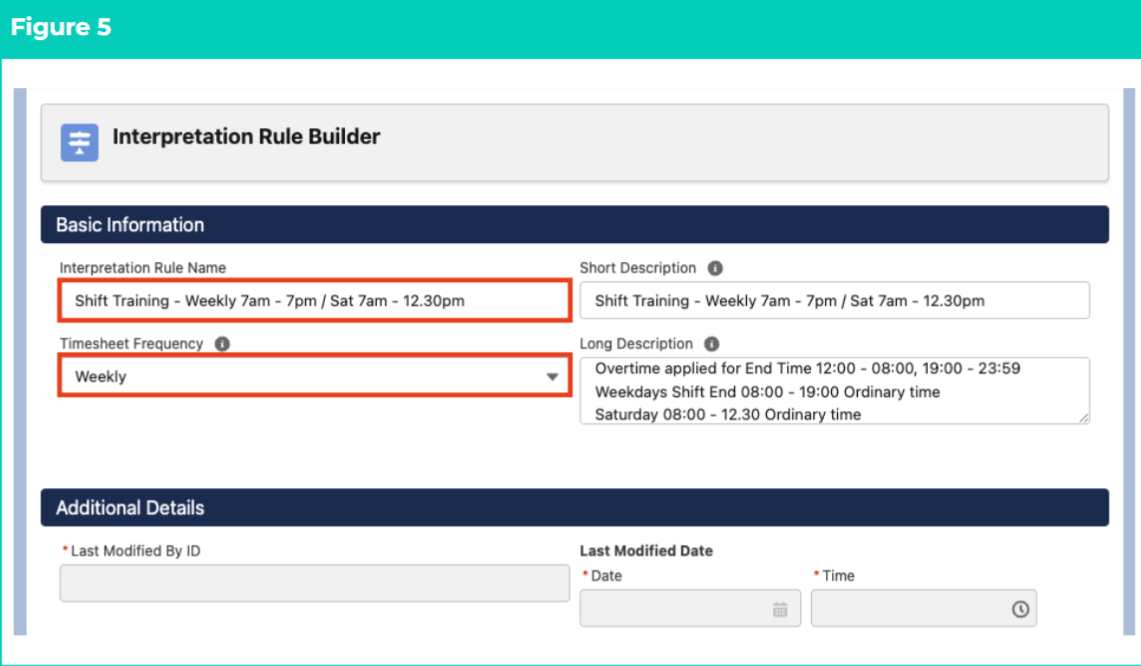
Important Notes(Figure 5)Timesheet Frequency CANNOT be updated once Pay Transactions have been generated using the Interpretation Rule.The fields within the Additional Details section require no input, and will be automatically populated once updates and/or changes to the Interpretation Rule have been saved.
General Rule Settings
This section of the Interpretation Rule Builder defines general conditions applied to Interpretation logic. Some of the selections made in this section of the Builder will impact the fields available in later sections (including Breakpoint fields) due to the dynamic nature of the Interpretation Builder. Populate General Rule Settings for the Interpretation Rule by following the below steps (see Figure 6):- To enter Breakpoints using both Shift Start Times and Shift End Times, select Yes in the Apply Shift End or Shift Start Interpretation field.
-
For Wake Up Interpretation:
- Apply Overtime Breakpoints to Timesheet Entries with a Wake Up Timesheet Activity by selecting Yes in the Apply Wake Up Interpretation field.
- Define the accumulative minimum payable hours for Wake Up Timesheet Activities that occur within the Sleepover Period by populating the Wake Up Minimum Hours field.
-
For Overtime rounding:
- Round up Overtime to the nearest whole hour for Timesheet Entries with a Timesheet Activity by selecting Yes in the Apply OT Round Up Shift Interpretation? field.
- Define the minimum amount of hours payable for OT Round Up Shift Interpretation by populating the Minimum OT Round Up Shift Paid Hours field.
- To enable Interpretation Variations records to be applied, select Yes in the Apply Interpretation Variations? field.
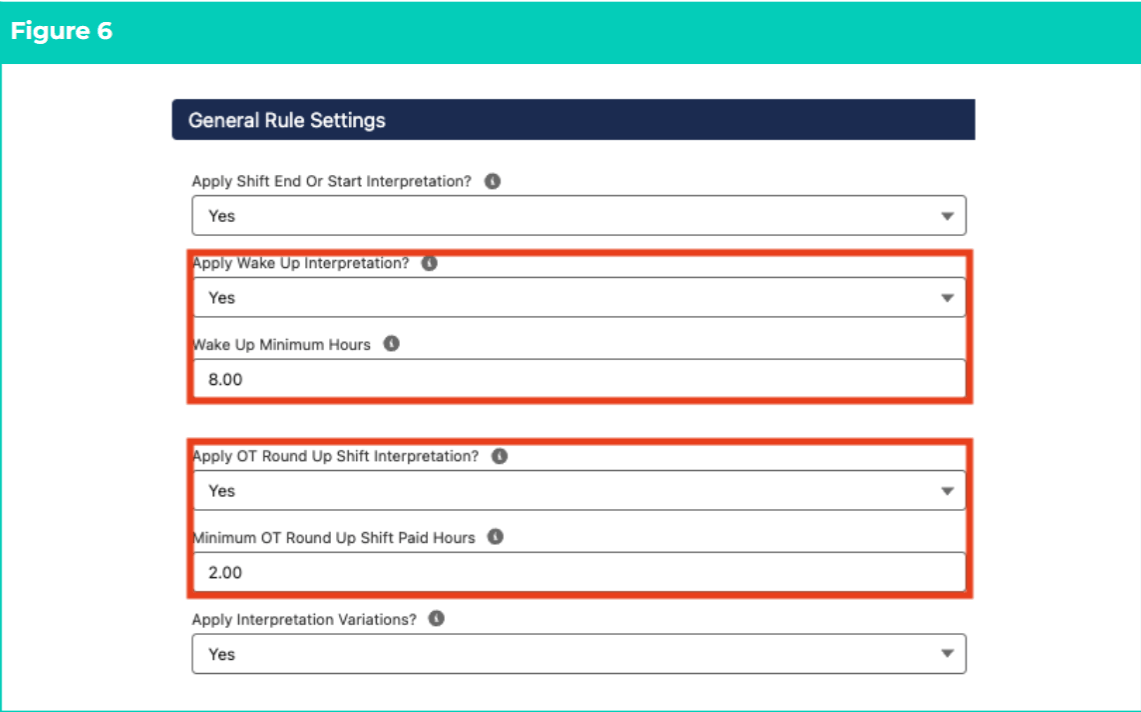
Important Notes(Figure 6)Shift Start or Shift End Interpretation is used to cater to conditions such as paying night shift for all shifts ending before 8am, or starting before 6am.If Shift Start and Shift End Interpretation is NOT applied, only Shift Start OR Shift End Breakpoints will be available, depending on the Record Type selected.Interpretation will only apply Wake Up, OT Round Up or Excursion logic when the corresponding Timesheet Activity Project Code has been populated.Overtime related to the OT Round Up or Wake Up Timesheet Activities will be calculated using Weekday, Weekend or Public Holiday Overtime Breakpoints.
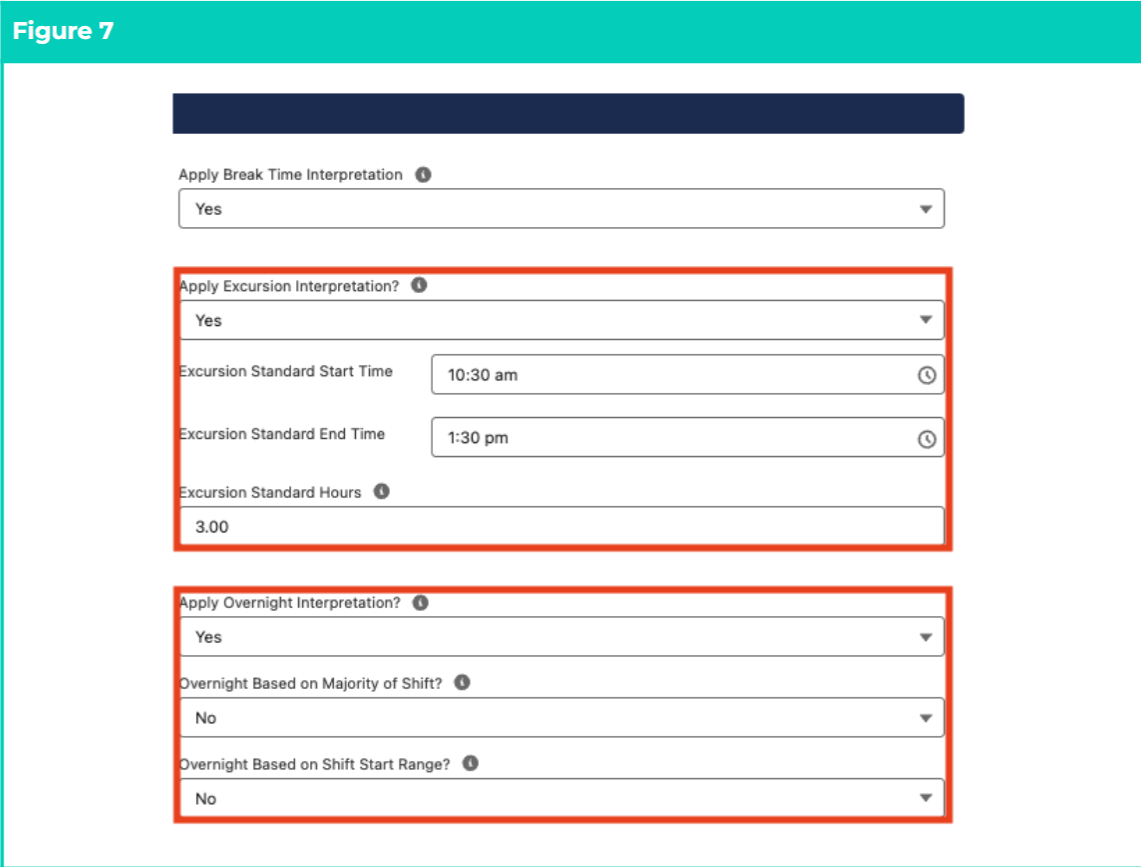
- For Break Time considerations (see Figure 7):
- If Excursions are required:
- Include Excursion Timesheet Activities in ordinary time calculations by selecting Yes in the Apply Excursion Interpretation? field.
- Define when Excursions should begin and cease being Interpreted with ordinary time Pay Codes by populating the Excursion Standard Start Time and Excursion Standard End Time fields.
- Define the amount of hours each day that Excursions can be Interpreted with ordinary time Pay Codes by populating the Excursion Standard Hours field.
- For Overnight Interpretation:
- Apply Overnight Interpretation to breakpoints when Timesheet Entries cross midnight by selecting Yes in the Apply Overnight Interpretation? field.
- To interpret Overnight Timesheet Entries based on the Breakpoint that applies to the majority of the time entered for the day, select Yes in the Overnight Based on Majority of Shift? field
- To interpret Overnight Timesheet Entries based on the Breakpoint that applies to the beginning of the Timesheets Entry, select Yes in the Overnight Based on Shift Start Range? field.
- Define Frequency Breakpoint calculations (see Figure 8):
-
To populate the following fields, use the arrow buttons provided to move days from the Available to Chosen columns.
- Select days where time contributes to Frequency Standard Hours using the Days ‘Frequency’ Breakpoints Accrued field.
- Select days where time contributes to Frequency Overtime Breakpoints once the count of Frequency Standard Hours is exceeded using the Days ‘Frequency’ Breakpoints Accrued field.
- If required, define days where Frequency Overtime Breakpoints will reset to the first Breakpoint, instead of continuing to apply as Overtime from the previous day using the Days Overtime Breakpoints Reset field.
-
To exclude time associated with Overtime Breakpoints from Frequency Standard Hours
- calculations, select the Exclude Overtime from ‘Frequency’ Hours checkbox.
- If using Standard Time with Time Breakpoints:
-
Enable Frequency Breakpoints to be interpreted using Overtime logic by selecting the Include Time BPs in OT - Freq Std Calcs checkbox.
- If Yes , enable Overtime to be included in Daily Standard Hours assessments by selecting the Include Time BPs in OT - Daily Std Calcs checkbox.
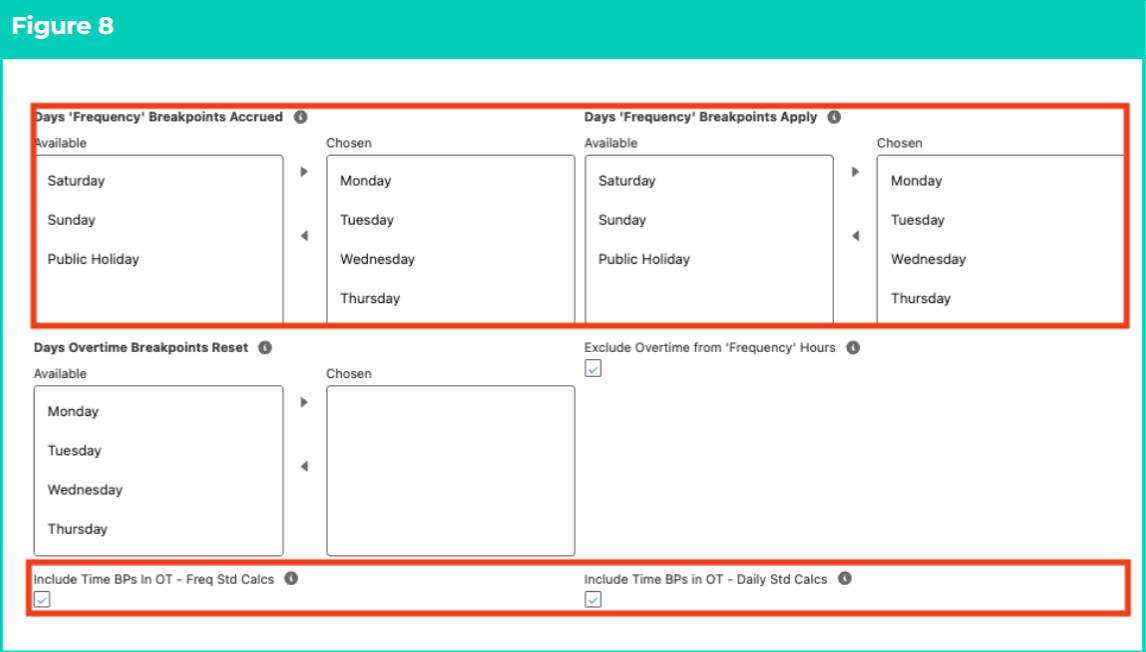
Important Notes(Figure 8)Standard Time with Time Breakpoints may only be selected within Saturday, Sunday and Public Holiday Rules when using the Shift Start or Shift End Record Type. For more information on Time Breakpoints, please refer to the Populate Hourly Rate Breakpoints QRG.
- Apply Shift Logic to Overtime and Minimum Hour calculations by selecting Yes in the Apply Shift Based Interpretation field (see Figure 9).
- To calculate Loadings:
- If separate Pay Transactions should be created when Casual Loading Pay Codes apply, select Yes in the Apply Casual Loading field.
- If separate Pay Transactions should be created when Penalty Loading Pay Codes apply, select Yes in the Apply Penalty Loading field.
- If Dual Leave Loading calculations need to be applied to Leave Breakpoints, select Yes in the Apply Dual Leave Loading Calculations field.
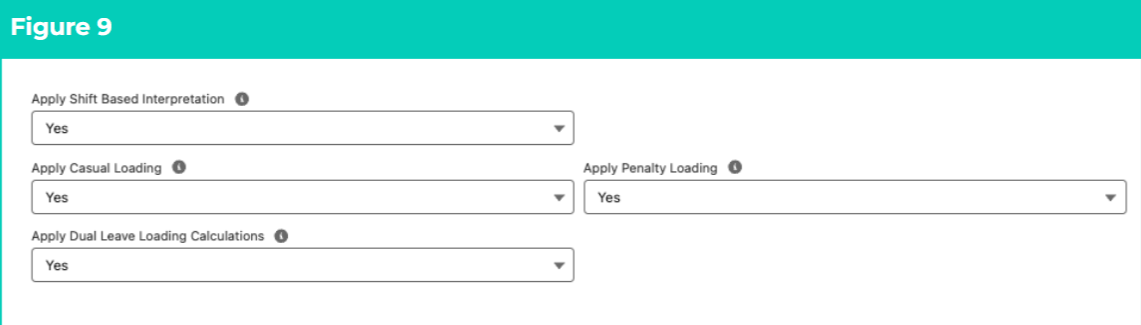
Important Notes(Figure 9)If Apply Shift Based Interpretation is No or blank, Daily Logic will be used to interpret Overtime and Minimum Hours calculations.If Shift Logic is applied, Split/Broken Shift settings will be used to populate the Shift Start Time, Shift Start Date, Shift End Time and Shift End Date fields on Timesheet Entries, enabling interpretation to assess multiple Timesheet Entries as a group. To group shifts according to custom settings or integrations, rather Broken Shift Rules, please speak to your system Administrator.If Yes is selected in the Apply Dual Leave Loading Calculations field, related Payee Leave Rules must also be configured to enable Leave Loading to avoid validation errors during Interpretation.
Break Loading and Minimum Rest Rules
- To define any Break Loading or Minimum Rest logic, follow the instructions provided in the Populate Break Loading & Minimum Rest Rules QRG.
Split/Broken Shift and Sleepover Rules
- To define any Split/Broken Shift or Sleepover logic, follow the instructions provided in the Populate Split/Broken Shift & Sleepover Rules QRG.
Weekday (Monday to Friday) Rules
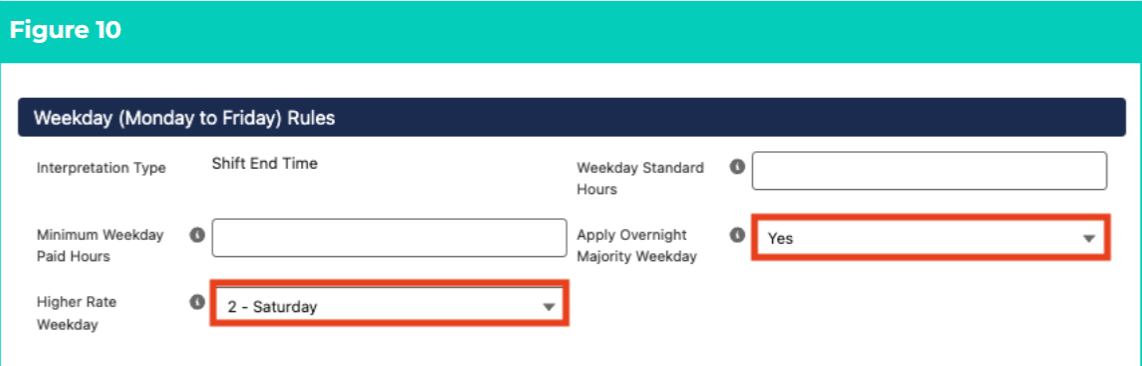
This section of the Interpretation Rule Builder defines Interpretation logic for Weekday Timesheet Entries. Standard Hours and Minimum Paid Hours MUST be populated for Weekday, Saturday, Sunday and Public Holiday Rules. The fields displayed for Weekday Rules will differ depending on whether Overnight Interpretation was applied in General Rule Settings, and if so, which option was selected. If Overnight Interpretation does not apply, please skip to step 21.- For Overnight Based on Majority of Shift , populate the following two fields (see Figure 10):
-
Define the highest available rate for Timesheet Entries split equally across a Weekday and another day by selecting from the available picklist options in the Higher Rate Weekday field:
- 1 - Weekday - lowest available rate
- 2 - Saturday - second available rate
- 3 - Sunday - third available rate
- 4 - Public Holiday - highest available rate
- If Overnight Timesheet Entries should be paid according to the Breakpoint applied to the majority of hours on a Timesheet Entry, select Yes in the Apply Overnight Majority Weekday field.
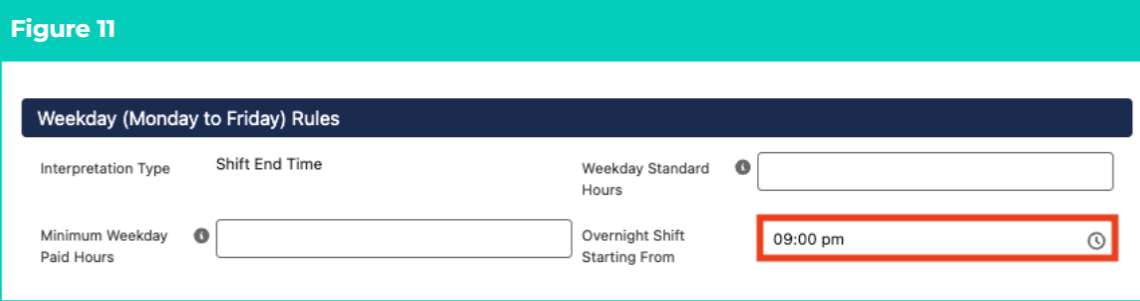
- For Overnight Based on Shift Start Range , define the time that Overnight shifts should begin being interpreted using the next day’s Breakpoint by populating the Overnight Shift Starting From field (see Figure 11).
Figure 11
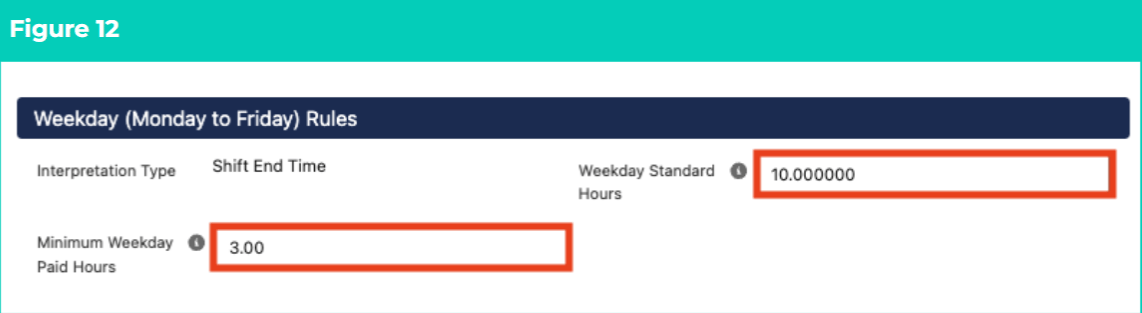
- The Interpretation Type field may not be edited for Shift Time Weekday Rules (see Figure 12).
- To define the minimum hours payable each Weekday, regardless of actual hours populated for Timesheet Entries, populate the Minimum Weekday Paid Hours field.
- To define the maximum hours payable for ordinary time Pay Codes in a single shift (if Shift Logic is applied) or day (if Daily Logic is applied) before Overtime Pay Codes are applied, populate the Weekday Standard Hours field.
Figure 12
End Time Breakpoints
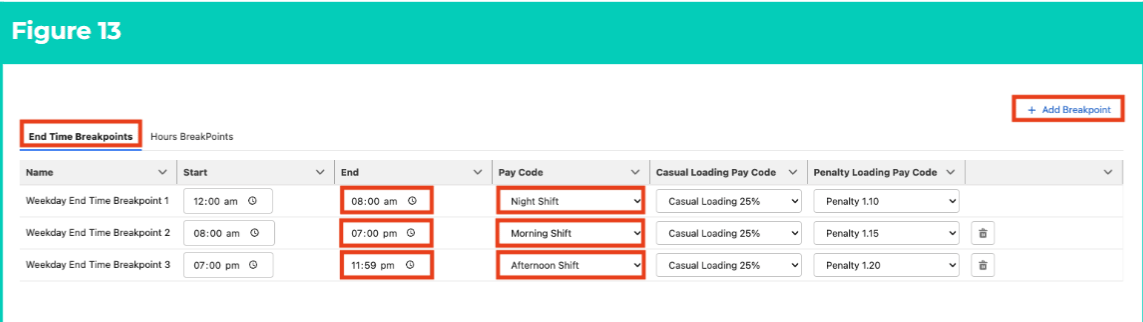
These Breakpoints are mandatory for Weekday Rules in Shift End Time Record Types, unless the Apply Shift End or Start Interpretation field is selected in General Rule Settings. The same applies for Saturday, Sunday and Public Holiday Rules, unless a different kind of Breakpoint is selected from the Interpretation Type field. To populate other Breakpoint types, follow the instructions in Populate Hourly Rate Interpretation Rules QRG.- Follow this step to populate End Time Breakpoints (see Figure 13):
- Click on the End Time Breakpoints tab.
- As the Start field defaults to 12:00am, and does not need to be populated, define the first End Time Breakpoint that occurs during Weekdays from 12:00am by populating the End field.
- Select a Pay Code for the first Shift End Time Breakpoint by populating the Pay Code field using the lookup options available.
-
If Loadings were enabled in General Rule Settings:
- Use the available picklist options to populate the Casual Loading Pay Code and/or Penalty Loading Pay Code fields.
- To add another End Time Breakpoint, click on the + Add Breakpoint button.
- Populate the End and Pay Code fields within the new Breakpoint to define the next Weekday Shift End Time Breakpoint.
- To remove a Breakpoint, click on the Trash Can icon next to the corresponding line.
- Repeat until a full 24 hours of End Time Breakpoints have been populated.
Start Time Breakpoints
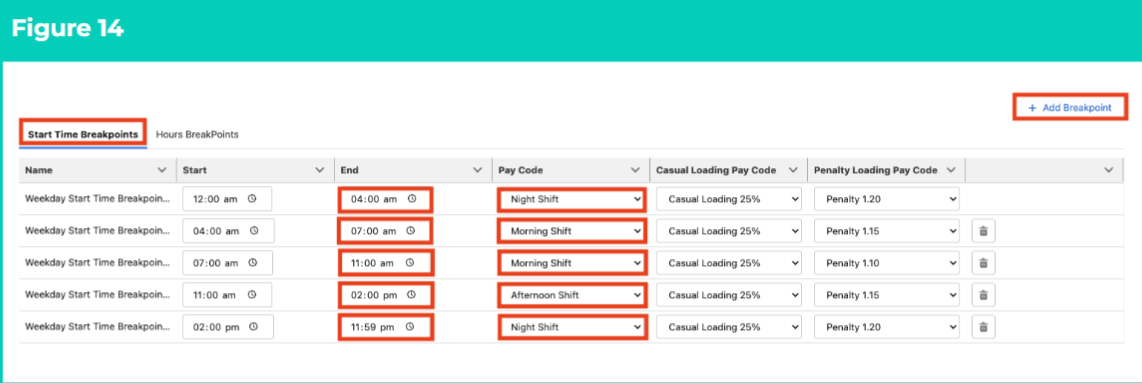
These Breakpoints are mandatory for Weekday Rules in Shift Start Time Record Types, unless the Apply Shift End or Start Interpretation field is selected in General Rule Settings. The same applies for Saturday, Sunday and Public Holiday Rules, unless a different kind of Breakpoint is selected from the Interpretation Type field. To populate other Breakpoint types, follow the instructions in Populate Hourly Rate Interpretation Rules QRG.- Follow this step to populate Start Time Breakpoints (see Figure 14):
- Click on the Start Time Breakpoints tab.
- As the Start field defaults to 12:00am, and does not need to be populated, define the first Start Time Breakpoint that occurs during Weekdays from 12:00am by populating the End field.
- Select a Pay Code for the first Shift Start Time Breakpoint by populating the Pay Code field using the lookup options available.
-
If Loadings were enabled in General Rule Settings:
- Use the available picklist options to populate the Casual Loading Pay Code and/or Penalty Loading Pay Code fields.
- To add another Start Time Breakpoint, click on the + Add Breakpoint button.
- Populate the End and Pay Code fields within the new Breakpoint to define the next Weekday Shift Start Time Breakpoint.
- To remove a Breakpoint, click on the Trash Can icon next to the corresponding line.
- Repeat until a full 24 hours of Start Time Breakpoints have been populated.
End Time and Start Time Breakpoints
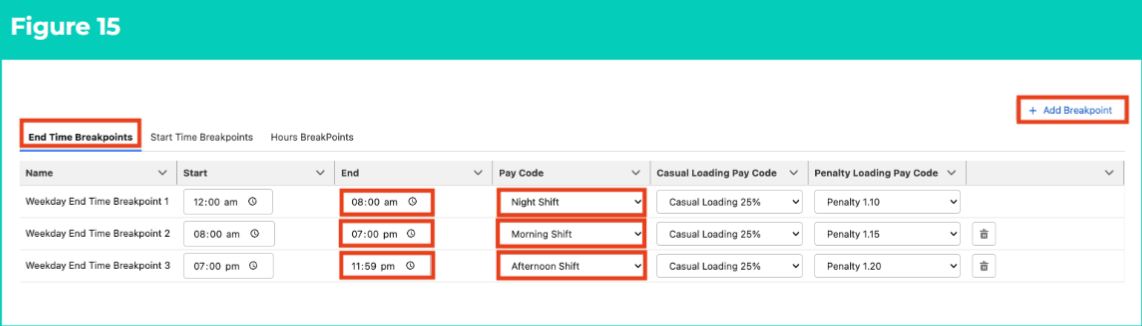
If the Apply Shift End or Start Interpretation field is selected in General Rule Settings, it is mandatory to populate 24 hours of Breakpoints in EITHER the End Time or Start Time Breakpoint tab for Weekday Rules. Additional Breakpoints may be defined in the remaining Time Breakpoint tab. The same applies for Saturday, Sunday and Public Holiday Rules, unless a different kind of Breakpoint is selected from the Interpretation Type field. To populate other Breakpoint types, follow the instructions in Populate Hourly Rate Interpretation Rules QRG. To define End Time and Start Time Breakpoints:- Create Breakpoints for the primary Interpretation Type (see Figure 15):
- Select either End Time Breakpoints or Start Time Breakpoints tab.
- Define the first Breakpoint that occurs from 12:00am by populating the End field.
- Populate Pay Codes for the Breakpoint using the available picklist fields.
- Repeat until a full 24 hours of Breakpoints have been populated.
- Create Breakpoints for the secondary Interpretation Type (see Figure 16):
- Select the remaining Time Breakpoints tab.
- Define the first Breakpoint by populating the Start and End fields using 24 hour format.
- Select Pay Codes for the Breakpoint using the available picklist fields.
- Repeat for any additional Breakpoints required for the secondary Interpretation Type.
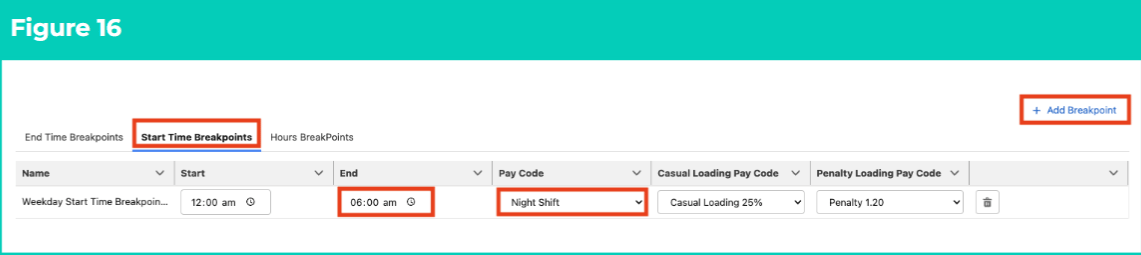
Important Notes(Figures 15 & 16)Refer to the instructions provided in End Time Breakpoints and Start Time Breakpoints for more detailed guidance on how to populate each End Time and Start Time Breakpoint field.
Hours Breakpoints
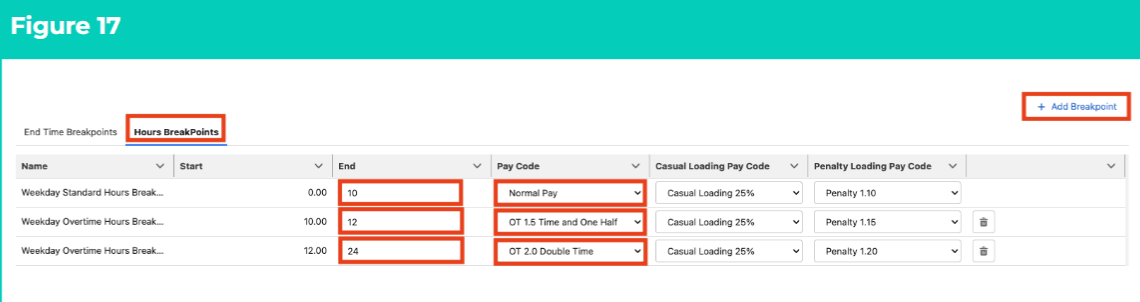
These Breakpoints are mandatory for Weekday, Saturday, Sunday and Public Holiday Rules. A full 24 hours must be populated, and every Breakpoint after the first will represent Overtime.- Follow this step to populate Hours Breakpoints (see Figure 17):
- Click on the Hours Breakpoints tab.
-
As the Start field defaults to 0, and does not need to be populated, define the hours associated with ordinary time Pay Codes by populating the End field.
- Users must remember that Hours Breakpoints will be overridden by Start Time and / or End Time Breakpoints, so this amount is the defined maximum payable with ordinary time Pay Codes.
- Select a Pay Code for the ordinary time Breakpoint by populating the Pay Code field using the lookup options available.
-
If Loadings were enabled in General Rule Settings:
- Use the available picklist options to populate the Casual Loading Pay Code and/or Penalty Loading Pay Code fields.
- To add the first Overtime Hours Breakpoint, click on the + Add Breakpoint button.
- Populate the End and Pay Code fields within the new Breakpoint to define the first Overtime Hours Breakpoint.
- To remove a Breakpoint, click on the Trash Can icon next to the corresponding line.
- Repeat until a full 24 hours of Hours Breakpoints have been populated.
Saturday Rules, Sunday Rules & Public Holiday Rules
- Follow the instructions for Weekday (Monday to Friday) Rules for Saturday, Sunday and Public Holiday sections (see Figure 18).
- Follow the instructions for Shift End Breakpoints and/or Shift Start Breakpoints, as well as Hours Breakpoints, for Saturday, Sunday and Public Holiday sections.
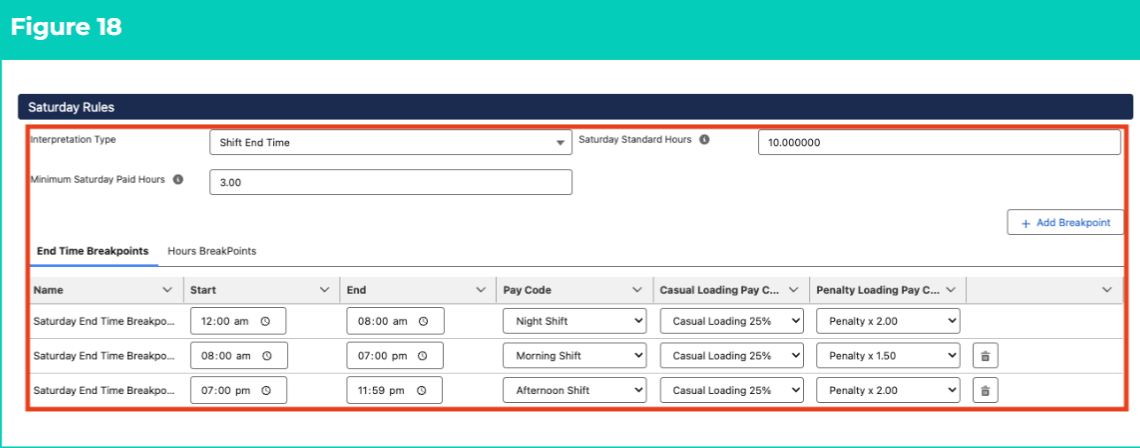
Important Notes(Figure 18)Saturday, Sunday and Public Holiday Rules allow for the selection of different types of Interpretation Breakpoints. Follow the instructions provided in the Populate Hourly Rate Breakpoints QRG if completing Standard Time with Time Breakpoints or Standard Time with Time of Day Breakpoints.Required fields MUST be populated for Weekday, Saturday, Sunday and Public Holiday Rules, regardless of whether regular shifts occur on these days. Breakpoints MUST also be populated to cover a full 24 hours (i.e. 12:00AM - 11:59PM) for Weekdays, Saturdays, Sundays and Public Holidays, and with at least one Pay Code populated for the period.Breakpoints for Public Holiday Rules should reflect the hours an Employee would work if the Public Holiday fell on a day where regular Timesheet Entries were expected, BUT must be associated with the applicable Penalty Pay Code for Public Holiday work.
Frequency Breakpoints
-
Follow this step to populate Frequency Hours Rules (see Figure 19):
- To define the maximum amount of Ordinary Hours payable within the Timesheet Period before Overtime must be paid, populate the Frequency’ Standard Hours field.
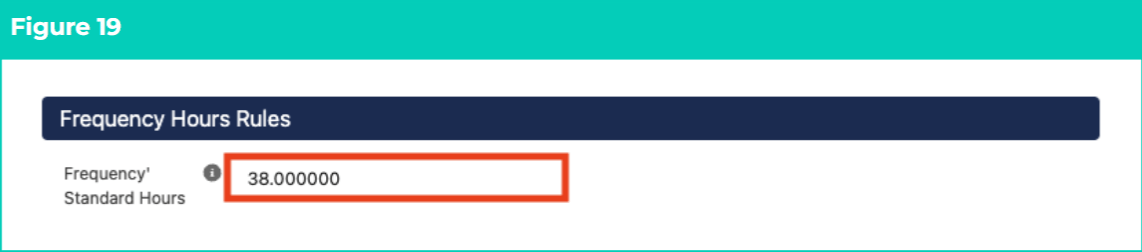
Important Notes(Figure 19)The Interpretation Rule cannot be saved or finalised until Breakpoint & Pay Code Cap creation has been completed.
Allowance Rules, Allowance Junction Rules & Leave Breakpoints
- To define any Allowance Rules or Leave Breakpoints, follow the instructions provided in the Populate Allowance, Leave & Allowance Junction Rule Breakpoints QRG.
- To define Allowances applied in conjunction with certain Payee Leave Rules or Timesheet Activities:
- Populate the Allowance and / or Leave Breakpoints according to the instructions provided in the Populate Allowance, Leave & Allowance Junction Rule Breakpoints QRG.
- Create Breakpoints according to the instructions provided in the Create Breakpoints & Pay Code Caps QRG.
- Populate Allowance Junction Rule Breakpoints according to the instructions provided in the Populate Allowance, Leave & Allowance Junction Rule Breakpoints QRG.
Create Breakpoints & Pay Code Caps
- To complete Frequency Breakpoints and finalise Interpretation Rule creation, follow the instructions provided in the Create Breakpoints & Pay Code Caps QRG.