

Purpose
The purpose of this quick reference guide is to step through the process of creating and managing Shift Records using the Work Schedule Manager. The intended audience for this document are standard Payroll Users.Steps
Entering the Work Schedule into Edit Mode
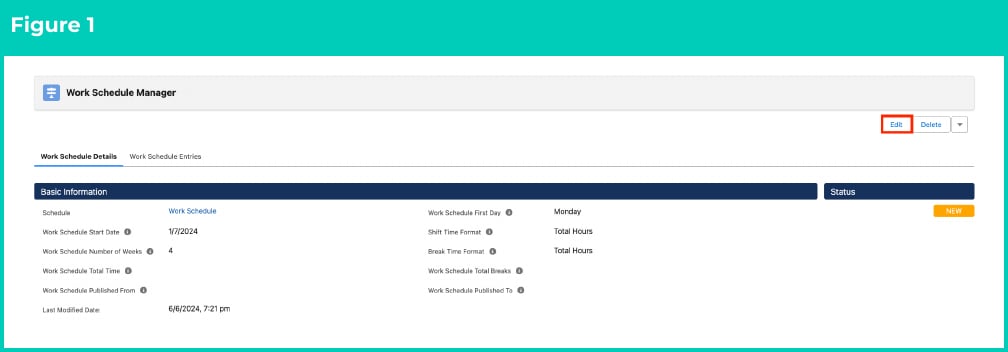
Entering the Work Schedule into Edit Mode will not only allow the Work Schedule to be modified, it also makes functionality to Create Shifts and Add Weeks available for use.- When a Work Schedule with a status of either New or Validated is opened in the Work Schedule Manager, click the Edit button (see Figure 1).
- The Work Schedule will go into Edit Mode. Fields within the main Work Schedule record can be updated and saved. Buttons will be visible for additional functionality (see Figure 2).
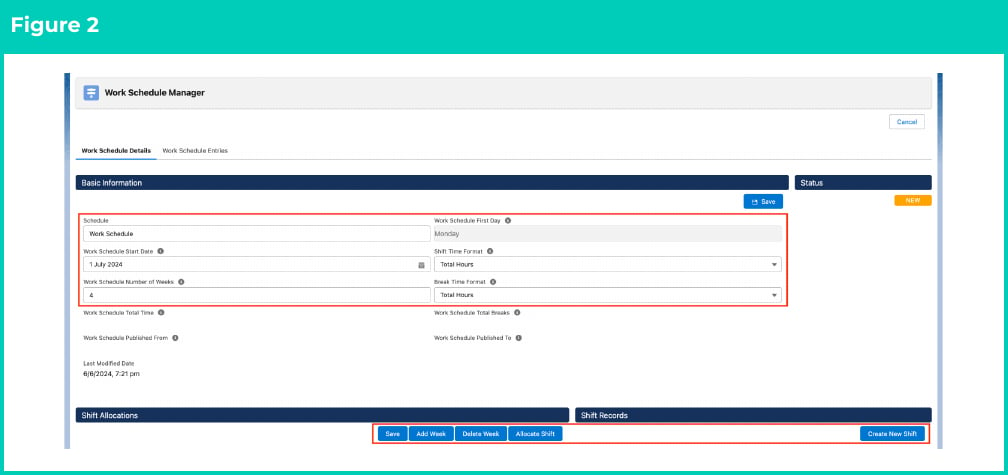
Only the Work Schedules that have the Status of New or Validated can be modified and therefore edited within Edit Mode through the Work Schedule Manager.
Create a Shift Record
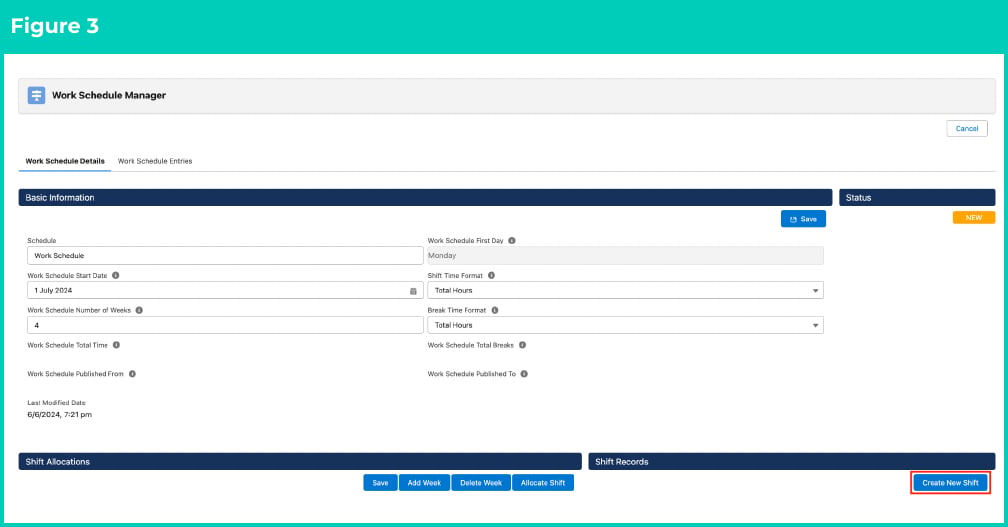
Once the basic Work Schedule record is created, the Shift Records section of the Work Schedule Manager becomes available. Within this section, recent Shift Records can be viewed / modified and new Shift Records can be defined.- Within Work Schedule Edit Mode, click on the Create New Shift button (see Figure 3). The Edit / Add Shift Record page will open to define the further details.
-
Populate the following required fields on the Edit / Add Shift Record page (see Figure 4):
- Schedule Item Name
- Day Off (Yes or No)
- Shift Time Format (must be the same as the Work Schedule record)
- Break Time Format (must be the same as the Work Schedule record)
 For a shift with Day Off set as Yes, the remaining fields within Step 2 are not required. Skip to Step 3.
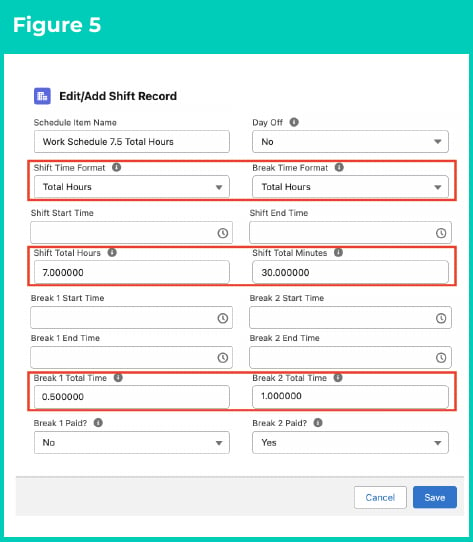
- If the Shift Time Format selected is Total Hours, populate the following fields (see Figure 5):
- Shift Total Hours (the hours component of the Total Hours i.e. if 7.5 hours you would enter 7 hours here)
- Shift Total Minutes (the minutes component of the Total Hours i.e. if 7.5 hours you would enter 30 minutes here)
- If the Break Time Format selected is Total Hours, populate the following fields:
- Break 1 Total Time (in minutes)
- Break 2 Total Time (optional - in minutes)
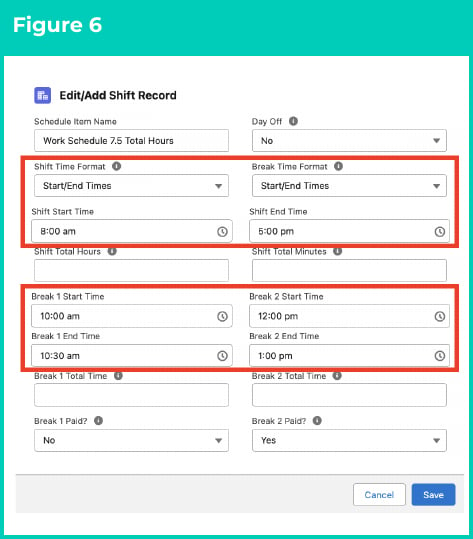
- If the Shift Time Format selected is Start / End Time, populate the following fields (see Figure 6):
- Shift Start Time (in time format)
- Shift End Time (in time format)
- If the Break Time Format selected is Total Hours, populate the following fields:
- Break 1 Start Time (in time format)
- Break 1 End Time (in time format)
- Break 2 Start Time (optional - in time format)
- Break 2 End Time (optional - in time format)
- Break 1 Paid? (Yes/No) (see Figure 7)
- Break 2 Paid? (Yes/No)
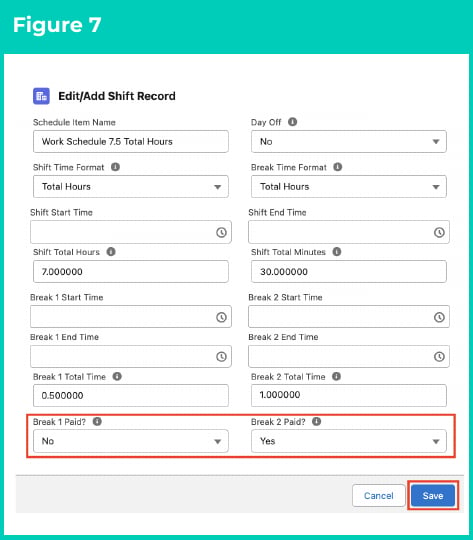
- Click on the Save button.
If Start / End Time was selected for the Shift Time Format, the Shift Total Hours and Shift Total Minutes will be calculated as part of the process of saving the Shift Record. Likewise, the same will occur for the Break 1 Total Time and Break 2 Total Time fields if the Start / End Time was selected for the Break Time Format.The Recent Shifts list displays Shift Records that have been recently created, modified or viewed by the logged-in user.
Manage Shift Records
In addition to creating Shift Records, when the Work Schedule Manager is in Edit Mode, the following functions can be completed to manage Shift Records (see Figure 9).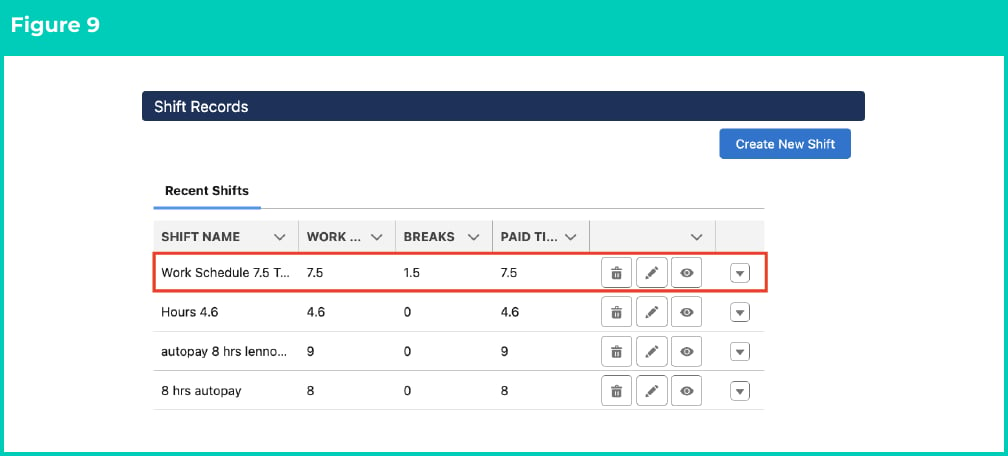
- Navigate to the record to be deleted.
- Click the button. The record selected will be deleted.
- Navigate to the record to be viewed.
- Click the button. The record selected will be opened in read-only mode.
- Navigate to the record to be edited.
- Click the button. The Edit / Add Shift Record page will open.
- Modify / update the Shift Record as required.
- Click the Save button. The changes made to the selected Shift Record will be saved.
Please note that all the shifts are NOT visible in the Recent Shifts screen (as shown above in Figure 9). It shows some of the recent ones only.