

Purpose
The purpose of this user guide is to step through setting up a break rule with its Meal Bands and Rest Bands in the Break attestation tab of the Timesheet Input Manager, and then answering meal and rest break questions on a Timesheet in the Employee Portal, as part of the Utility Extension. The intended audience for this document is System Administrators, who set up break rules, and Standard Users, who answer break questions. A break rule decides which meal and rest break questions a worker is asked on their Timesheet, and how each answer is judged. Each rule holds Meal Bands and Rest Bands, one per shift length, that set what is owed for that length of shift. Only one break rule applies to an Assignment.Important Notes(Before starting)Break attestation requires Utility Extension v1.58 or later. System Administrators who set up break rules need the Timesheet Capture Admin permission set, and workers need the 2cloudnine Employee Community Utility Permission Set.The Timesheet Input Manager must be placed on the Lightning record pages of the records that hold break rules, and the Experience site must be republished after every install or upgrade. Where a meal deadline applies, the Calendar’s Break Entry Format must be Start/End Times. These steps are covered in the Break Capture Configuration and Implementation Guide.
Steps
- Open the Break Attestation Tab
- Create a Break Rule
- Add the Meal Bands
- Add the Rest Bands
- Save the Break Rule
- Check Which Break Rule Applies to an Assignment
- Answer Break Questions on a Timesheet
- Submit the Timesheet
Open the Break Attestation Tab
- Open the Client, Payment Entity, Calendar or Interpretation Rule record that should hold the break rule.
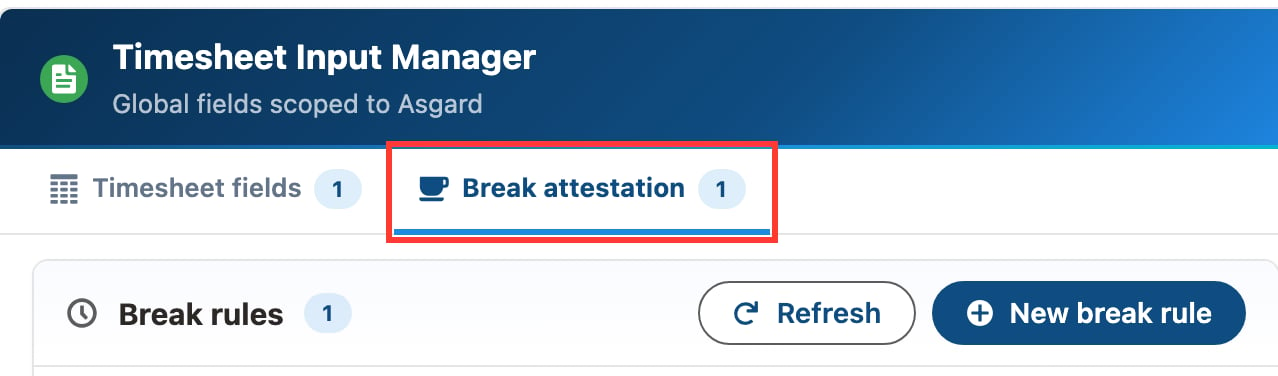
- In the Timesheet Input Manager, click the Break attestation tab (see Figure 1).
- The component has two tabs, Timesheet fields and Break attestation. Each tab shows a count, so it is clear without opening the tab whether a break rule is in place.
- On a Client, Payment Entity, Calendar or Interpretation Rule, the count is the number of break rules the record holds.
Important Notes(Placement of the Timesheet Input Manager)Where the Timesheet Input Manager sits on the record page differs from one Org to another, based on how each Lightning record page has been set up. It may sit in its own tab, in a side column or directly on the page.
Create a Break Rule
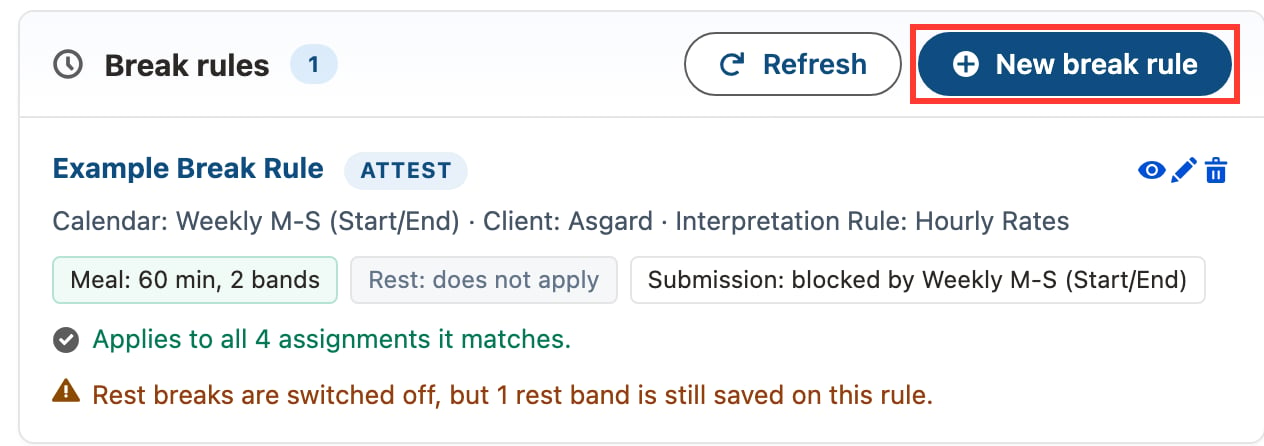
- On the Break attestation tab, click New break rule (see Figure 2).
- The break rule is tied to the record it is created from automatically.
- The editor has up to six sections, each of which can be collapsed. Section 4 is shown only when Rest breaks apply is switched on. One button at the top switches between Collapse all and Expand all. Most settings have help text, and grey text in a box is the wording the worker sees when the box is left blank.
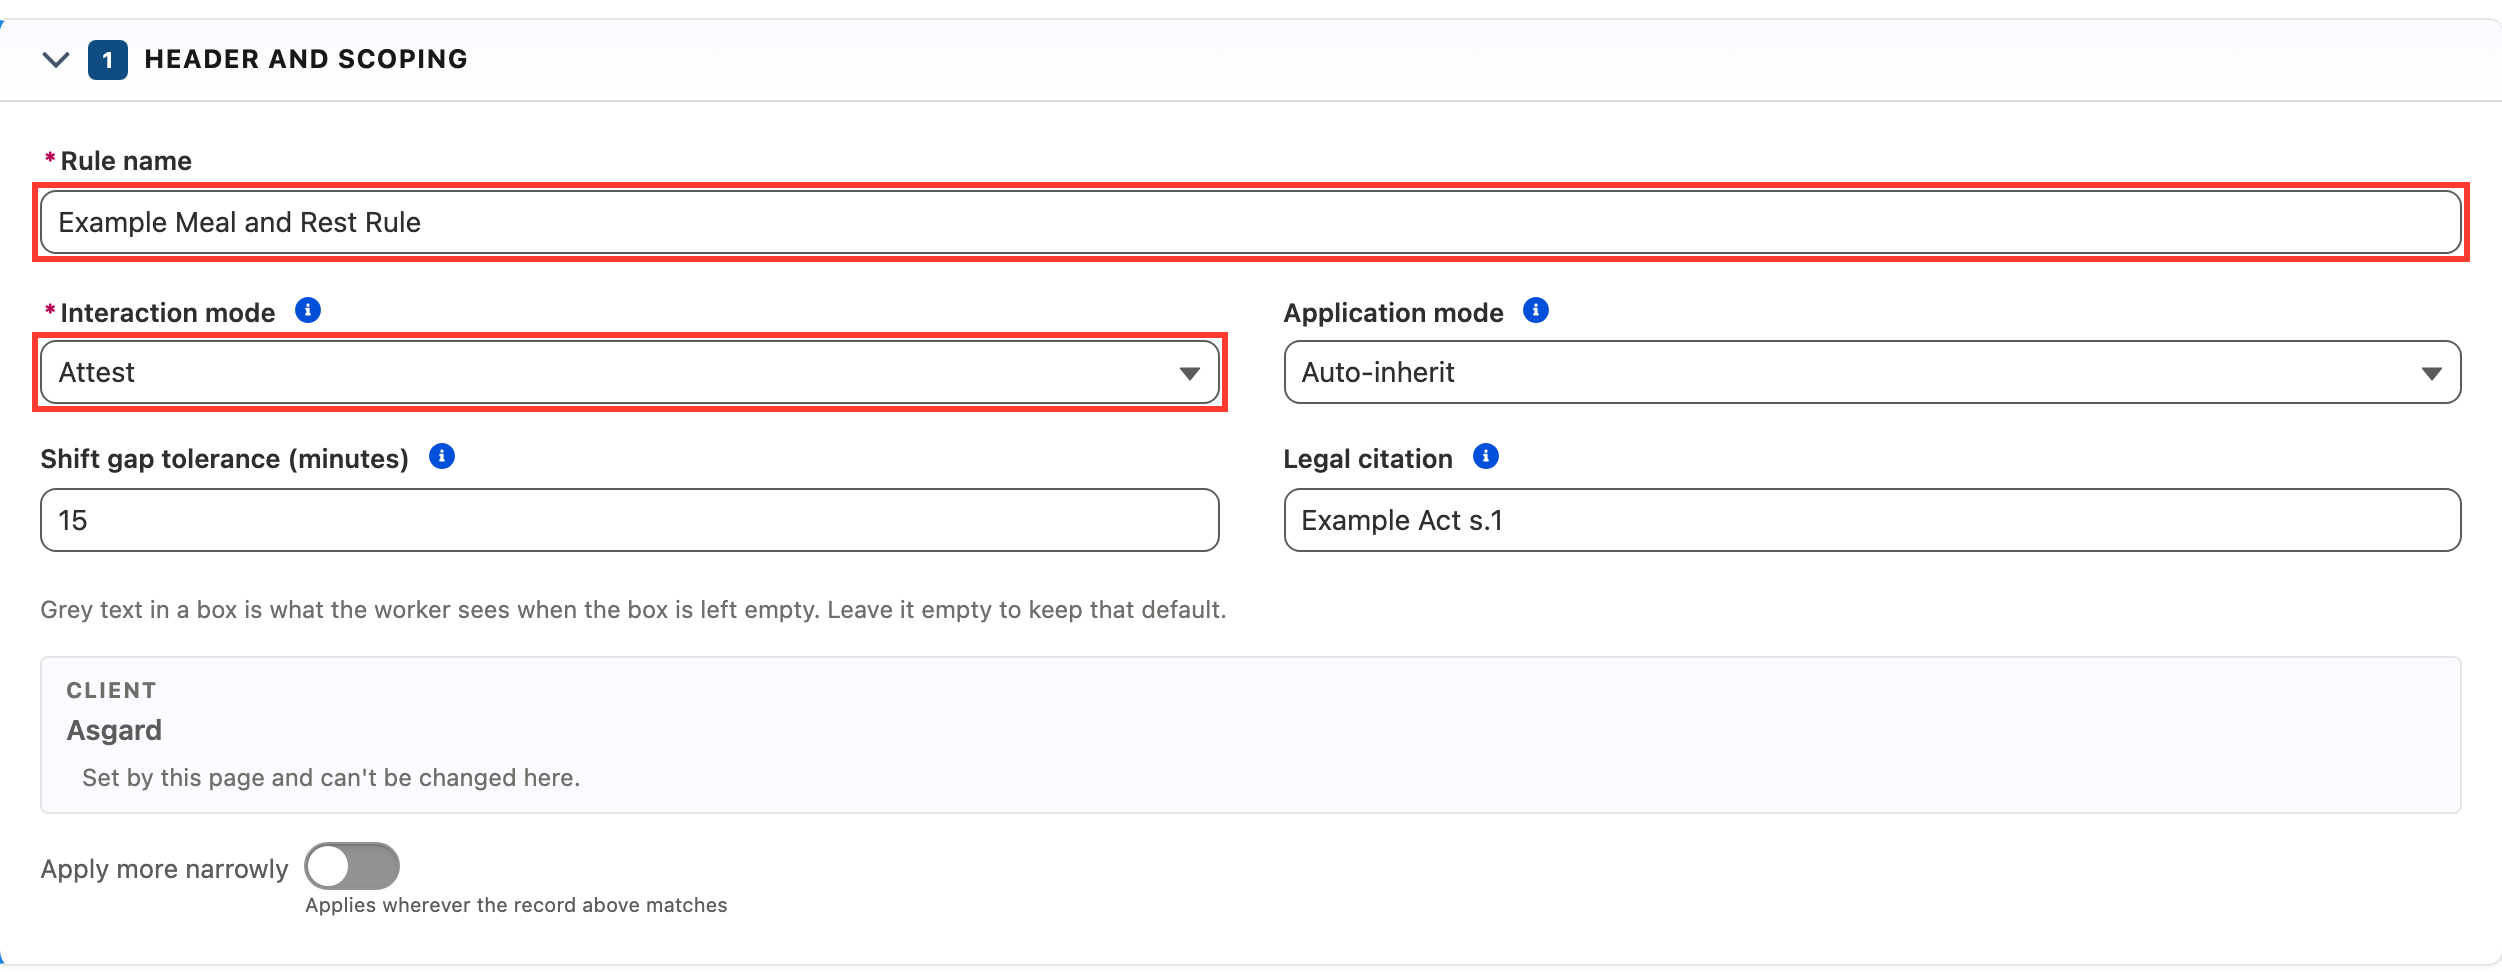
- In section 1. Header and scoping, populate the following required fields (see Figure 3):
- Rule name
- Interaction mode
- Populate the following optional fields as needed (see Figure 3):
- To set the gap at which two entries stop being one shift, update the Shift gap tolerance (minutes) field. It is set to 15 minutes on a new rule.
- To show the worker the award clause or law the rule comes from, populate the Legal citation field.
- To make the rule more specific, switch on Apply more narrowly and add a Client, Payment Entity, Calendar or Interpretation Rule. The record the rule was created from is shown and locked, and its record type is not offered again.
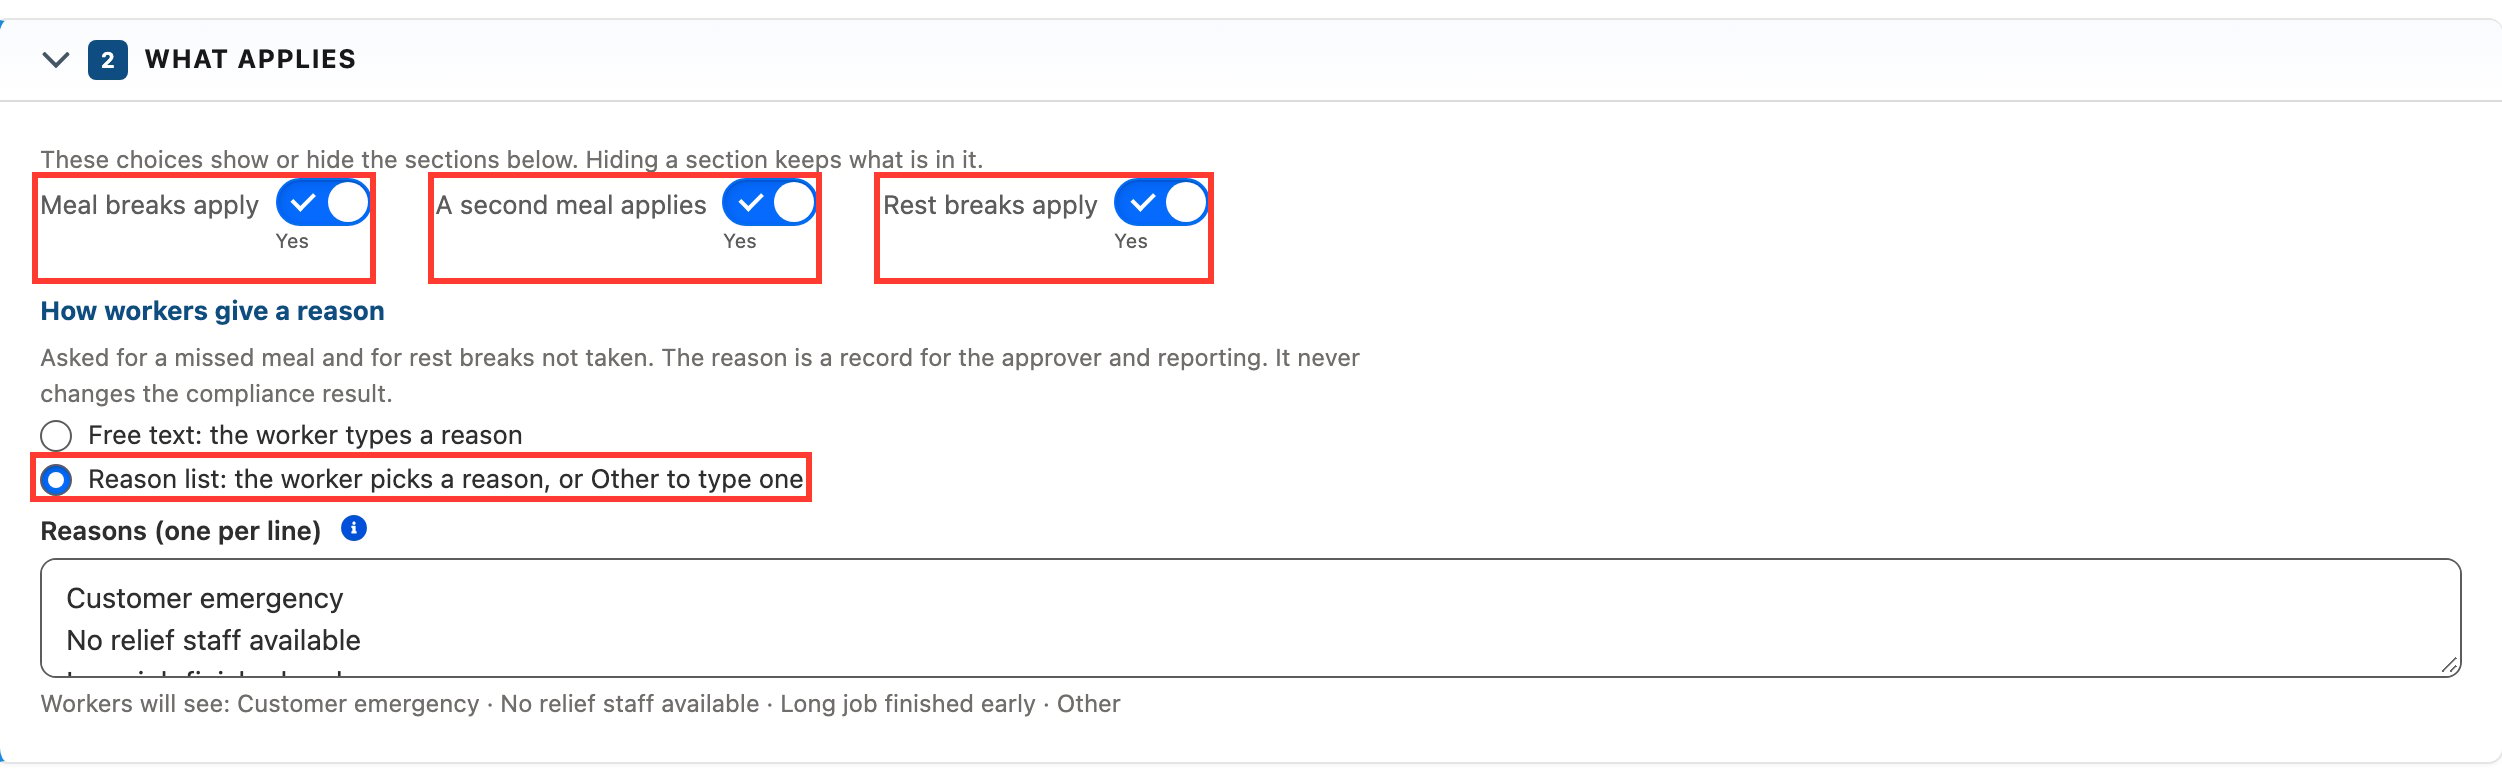
- In section 2. What applies, switch on the breaks that apply under this rule (see Figure 4):
- Meal breaks apply
- A second meal applies
- Rest breaks apply
- Select how a worker explains a missed meal or rest breaks not taken in How workers give a reason (see Figure 4):
- Free text (the default): the worker types a reason.
- Reason list: the worker picks from a list, which always ends with Other. Enter the reasons one per line. If the list is left empty, the editor shows that workers will be asked to type a reason until some are added.
Important Notes(What applies)The three switches show or hide sections 3 and 4 and the second meal columns. Hiding a section keeps what is in it.A reason is a record for the approver and for reporting. It never changes the compliance result.
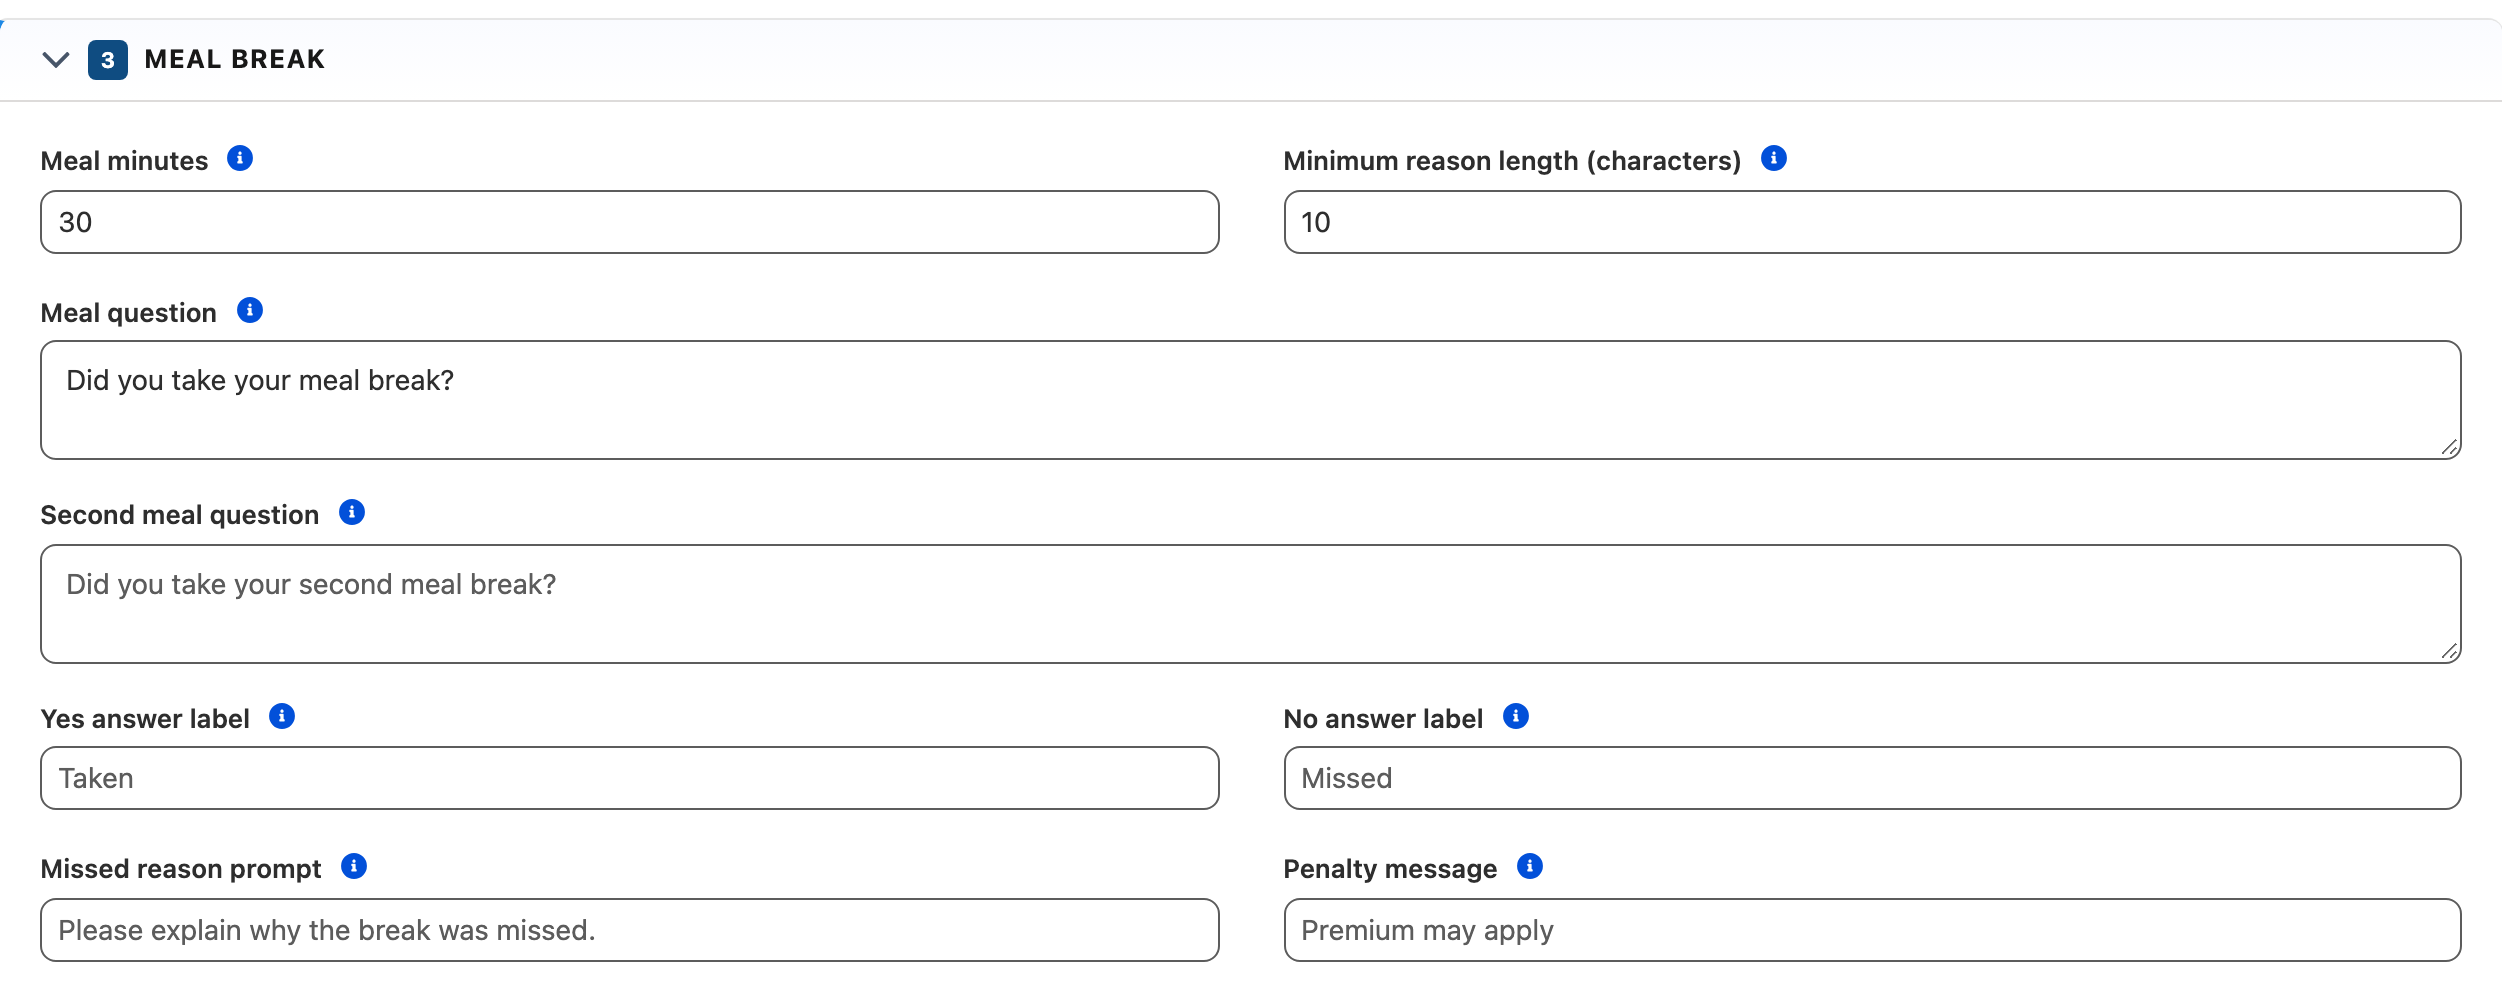
- In section 3. Meal break, populate the following fields as needed (see Figure 5):
- To set the shortest meal break that counts, update the Meal minutes field. It is set to 30 on a new rule. A recorded break this long, started by the band’s deadline, is treated as taken without asking. A shorter one is graded Short. If left blank, any length counts.
- To set the shortest typed reason accepted, populate the Minimum reason length (characters) field. With a reason list, it applies to Other only. If left blank or set to 0, any length is accepted.
- To change the questions the worker sees, populate the Meal question and Second meal question fields. If left blank, no question text is shown for the first meal and “Did you take your second meal break?” is shown for the second.
- To change the wording of the Taken and Missed answers, populate the Yes answer label and No answer label fields. The wording changes, but how the answer is judged does not.
- To show a prompt above the reason box when a meal is missed, populate the Missed reason prompt field. If left blank, “Please explain why the break was missed.” is shown.
- To tell the worker what missing the meal means, populate the Penalty message field. If left blank, “Premium may apply” is shown.
- Where any Meal Band allows a waiver, a Waiver group appears. To change the wording of the Waived answer, populate the Waiver confirm label field.
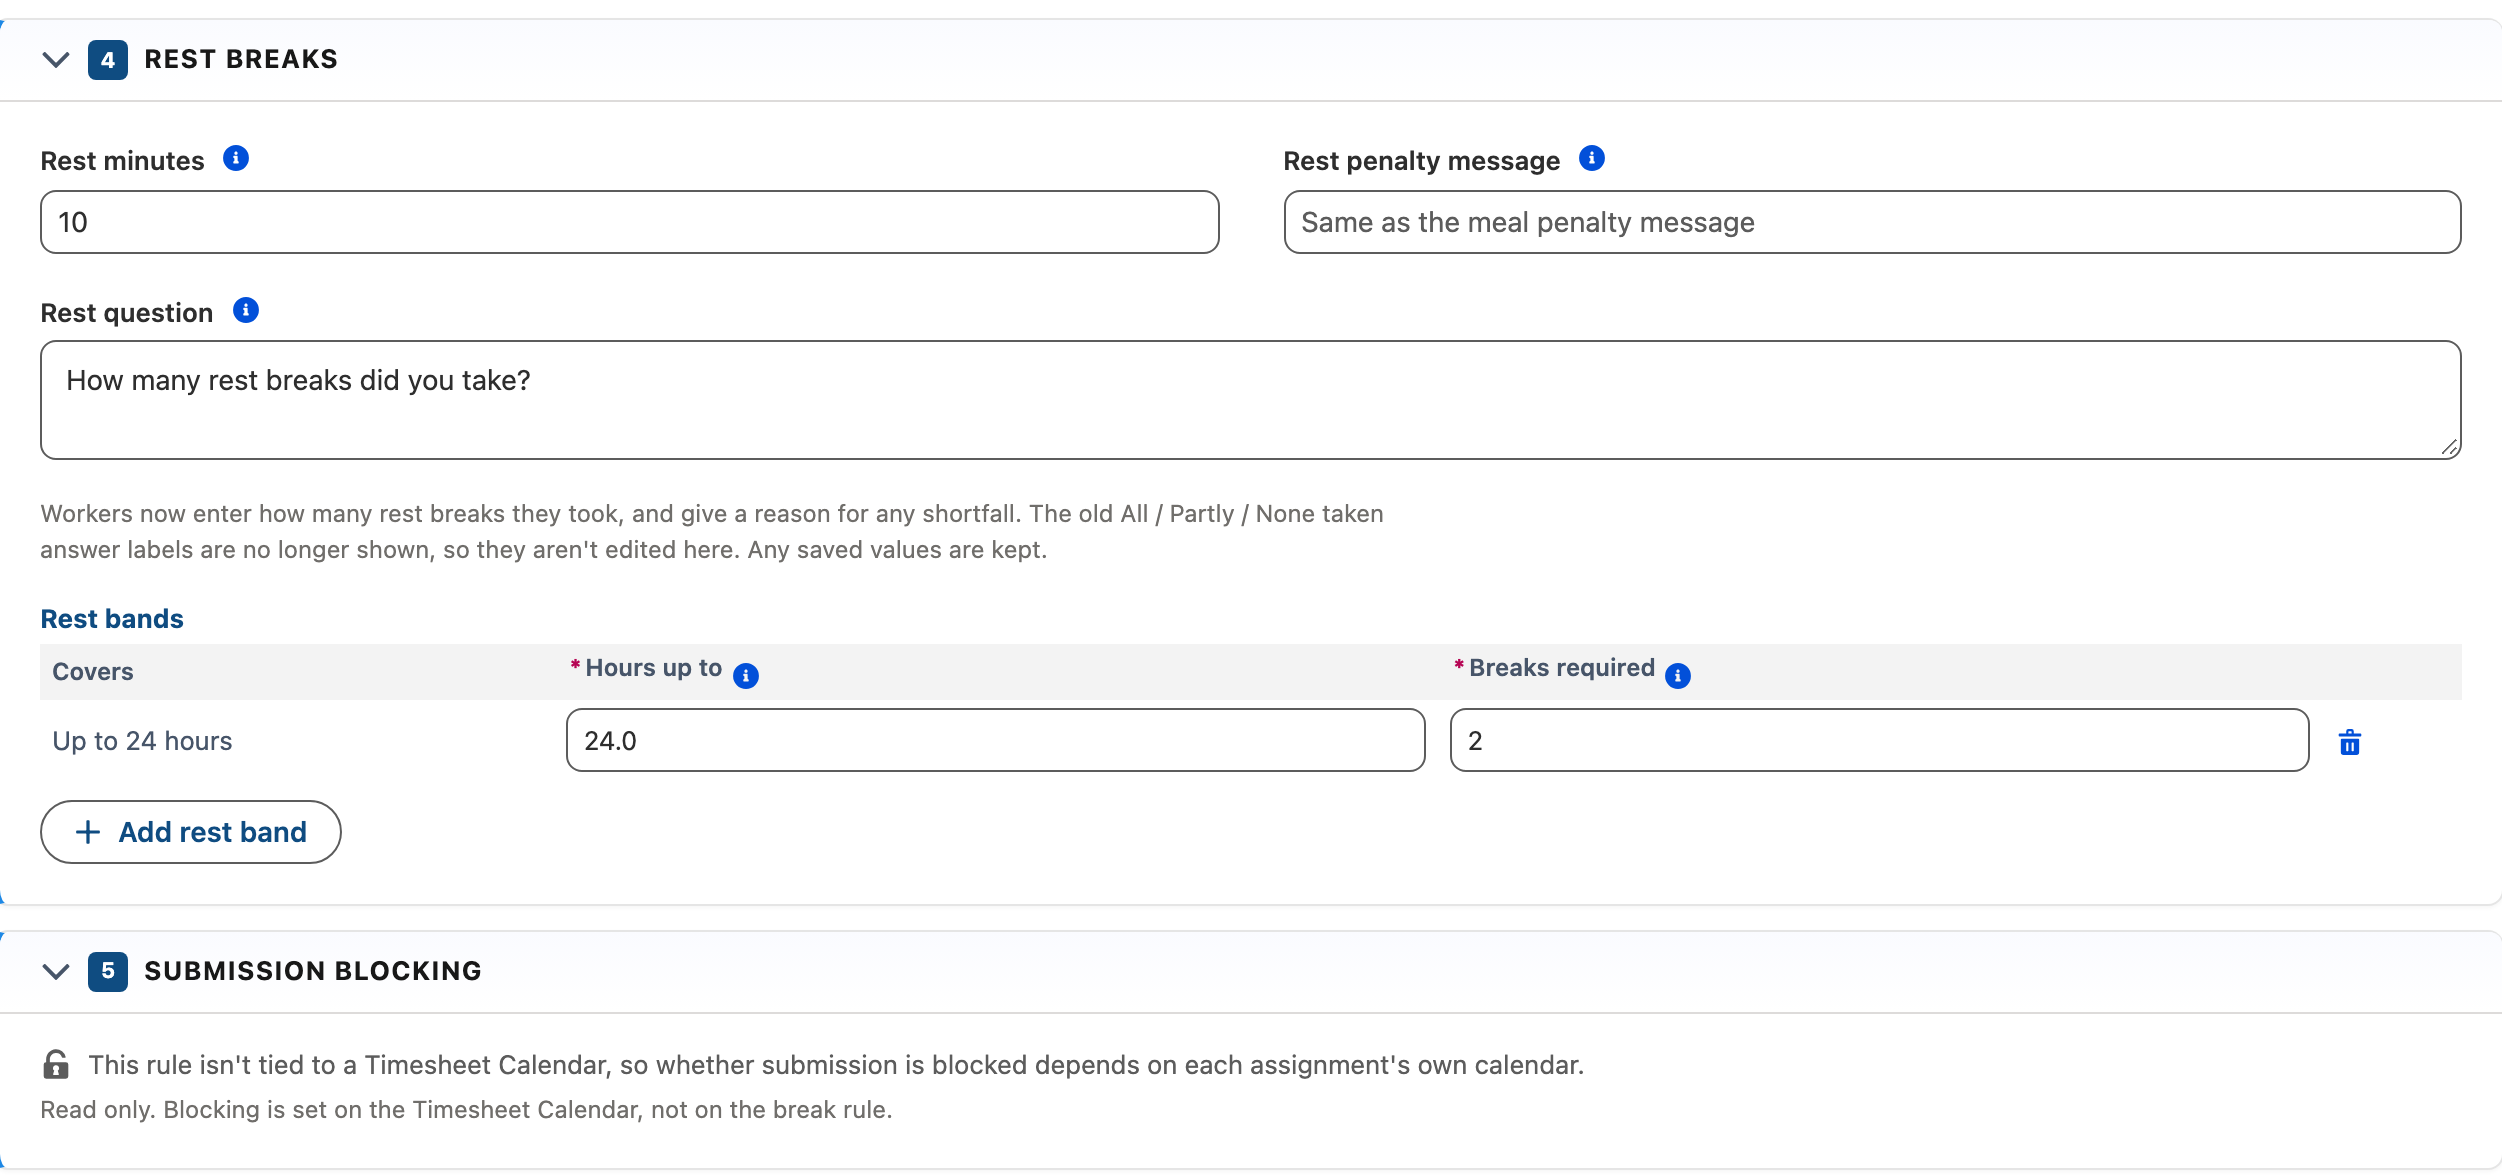
- Where rest breaks apply, in section 4. Rest breaks, populate the following fields as needed (see Figure 6):
- To set the length of one rest break, update the Rest minutes field. It is set to 10 on a new rule. It is used in reporting to work out the rest time owed, and does not change what the worker is asked.
- To change the rest question, populate the Rest question field. Workers answer with a number. If left blank, “How many rest breaks did you take?” is asked.
- The Rest penalty message field is saved on the rule but is not shown to workers, because rest answers are a count.
Important Notes(Rest question wording)A Rest question worded for a yes or no answer should be reworded to ask for a count.
- Review section 5. Submission blocking (see Figure 6). This section is read only and shows whether the rule’s Calendar blocks submission. Blocking is set on the Calendar with the Enforce Break Attestation on Submit checkbox.
Add the Meal Bands
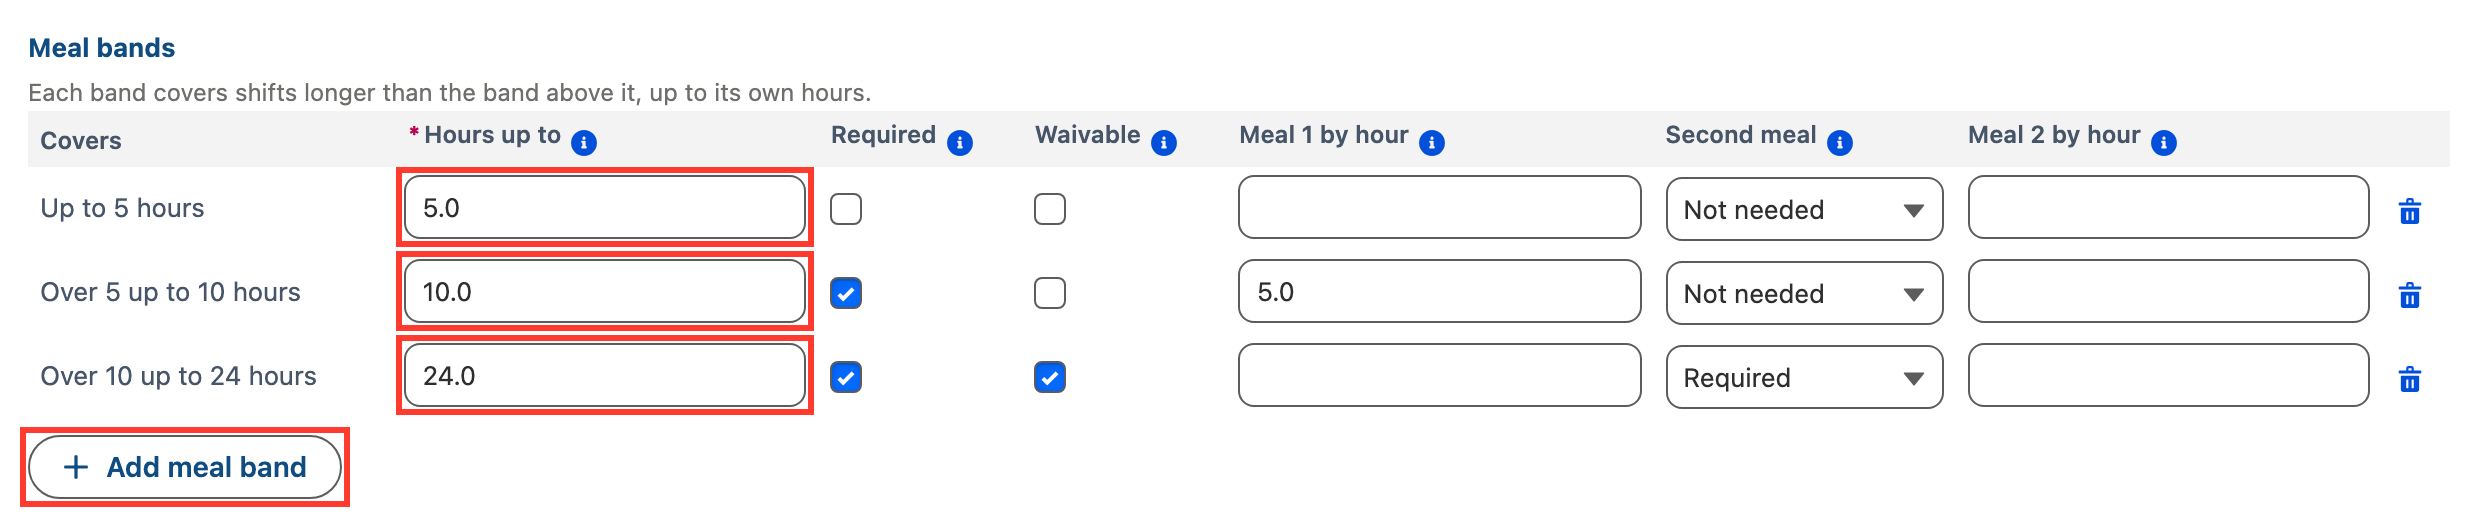
- In section 3. Meal break, under Meal bands, click Add meal band (see Figure 7). A new rule starts with two Meal Bands, and each new row is set to 24 hours. Add or adjust one Meal Band per shift-length band. Each row shows the shift lengths it covers, and overlapping bands are flagged with a warning.
- Populate the Hours up to required field (see Figure 7). This is the longest shift the band covers. Each band starts where the one before ends.
- Populate the following optional fields as needed (see Figure 7):
- Where a first meal is owed, tick the Required checkbox. Leave it unticked for a band short enough that no meal is owed.
- Where the worker may give up the first meal, tick the Waivable checkbox. This governs the first meal only.
- To set how many hours into the shift the first meal must start, populate the Meal 1 by hour field. A later start is graded Late. If left blank, there is no deadline.
- To set whether a second meal is owed, populate the Second meal field with Not needed, Required or Waivable. This field, not the Waivable checkbox, governs whether a second meal can be waived. It is shown when A second meal applies is switched on.
- To set a deadline for the second meal, populate the Meal 2 by hour field.
- Repeat for each shift-length band.
Important Notes(Meal deadlines)The Meal 1 by hour and Meal 2 by hour fields only take effect where the Calendar’s Break Entry Format is Start/End Times.The band used for a shift is the one with the lowest Hours up to that still covers the shift’s total hours. Where a shift is longer than every band, the band with the highest Hours up to applies.
Add the Rest Bands
Rest Bands are only needed where Rest breaks apply is switched on.- In section 4. Rest breaks, under Rest bands, click Add rest band (see Figure 8). Switching on Rest breaks apply adds one Rest Band set to 24 hours and 2 breaks. Each new row is set to 24 hours and 1 break. Add or adjust one Rest Band per shift-length band. Overlapping bands are flagged with a warning.
- Populate the following required fields (see Figure 8):
- Hours up to
- Breaks required
- Repeat for each shift-length band.

Important Notes(Rest Band with no breaks)A Breaks required value of 0 raises no question. This is how a short-shift Rest Band is set up.
Save the Break Rule
- Click Save (see Figure 9).
- Save is unavailable until Rule name is populated. Populate the remaining required fields, Interaction mode, Hours up to on every band and Breaks required on every Rest Band, before saving.
- Other gaps, such as two bands that overlap or a reason list with no reasons, are shown as warnings above the form and do not stop the save.

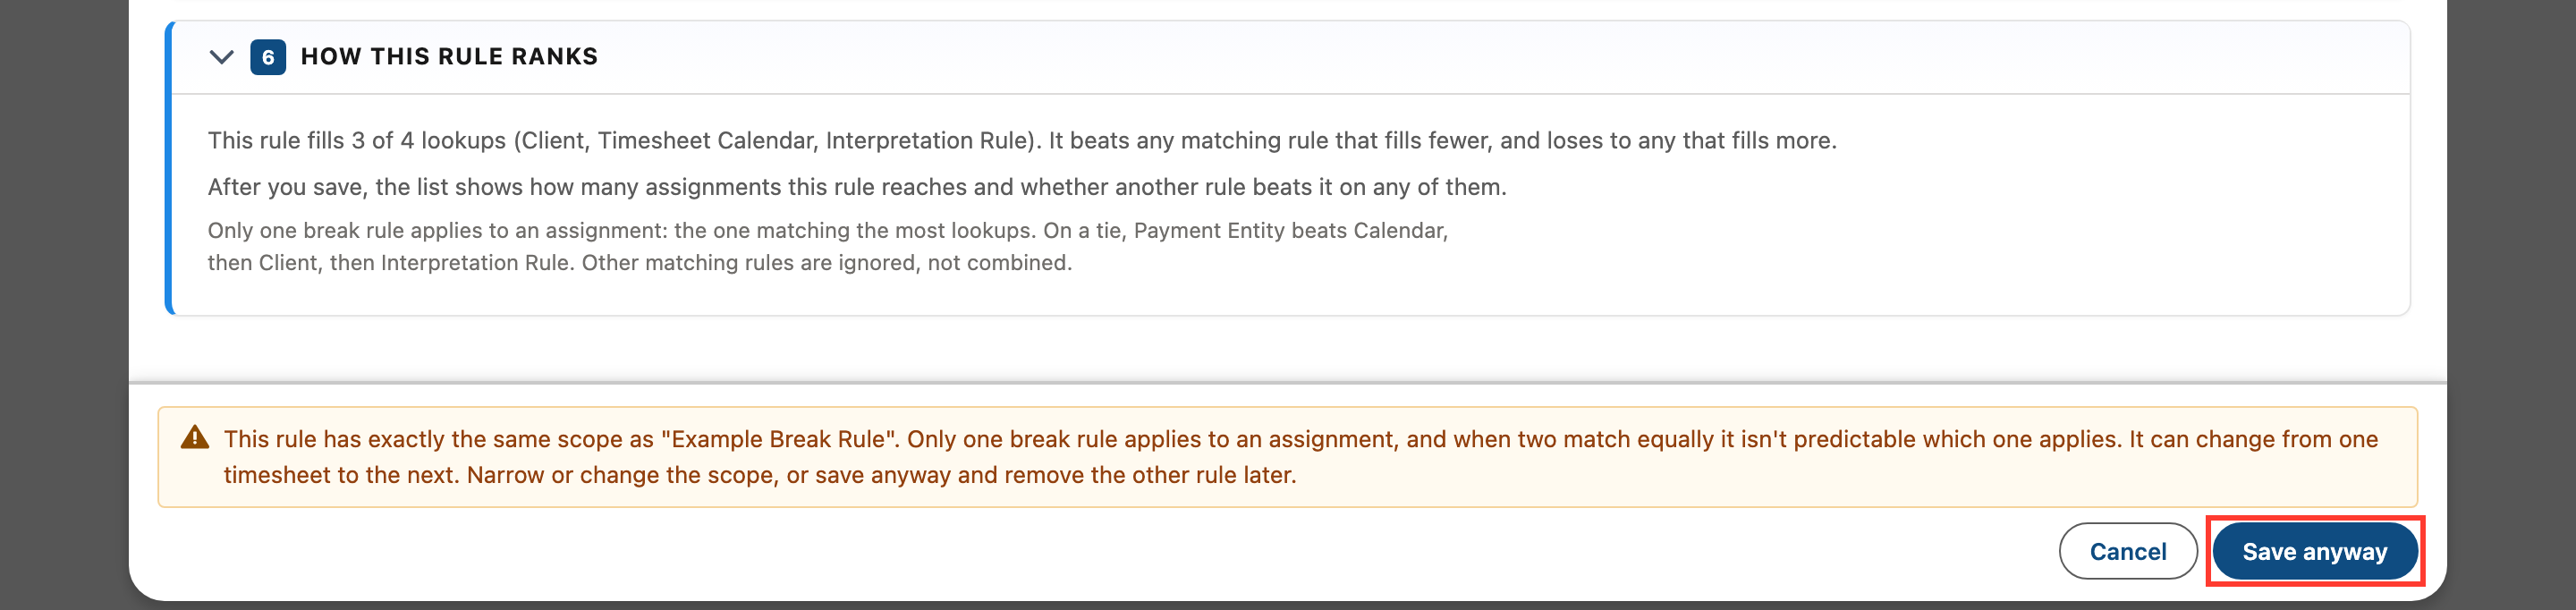
- If another break rule has exactly the same scope, the editor warns before saving and the button changes to Save anyway (see Figure 10). Narrow or change the scope, or click Save anyway and remove the other rule later.
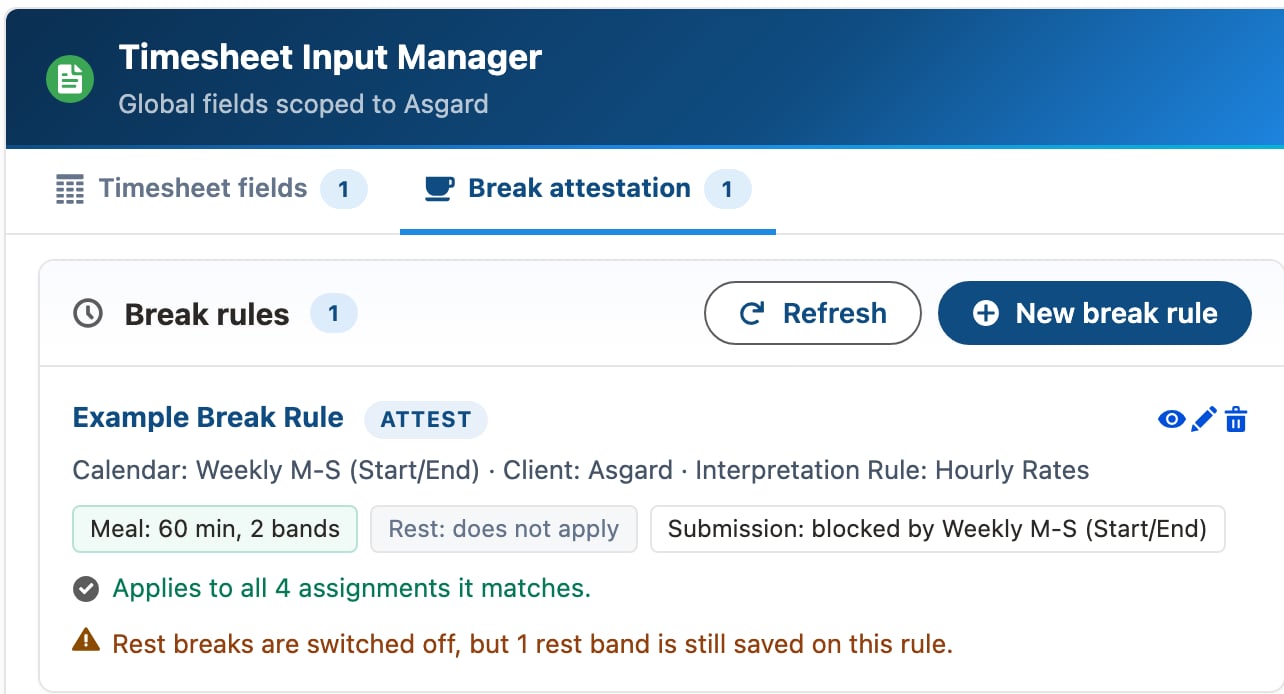
- The rule list on the Break attestation tab shows each break rule and how many Assignments it reaches, for example “Applies to all 4 assignments it matches”, or “Applies to 12 of 14 matching assignments” with the rule that applies on the others named (see Figure 11).
Important Notes(Two rules with the same scope)When two rules match an Assignment equally, it is not predictable which one applies, and it can change from one Timesheet to the next.
Check Which Break Rule Applies to an Assignment
- Open the Assignment record. The Timesheet Input Manager is only shown where it has been added to the Lightning record page the Assignment uses.
- In the Timesheet Input Manager, click the Break attestation tab (see Figure 12). The tab is read only and shows which break rule applies to the Assignment and why, and the rules that were considered and ignored.
- On an Assignment, the count on the tab is 1 when a break rule applies and 0 when none does.
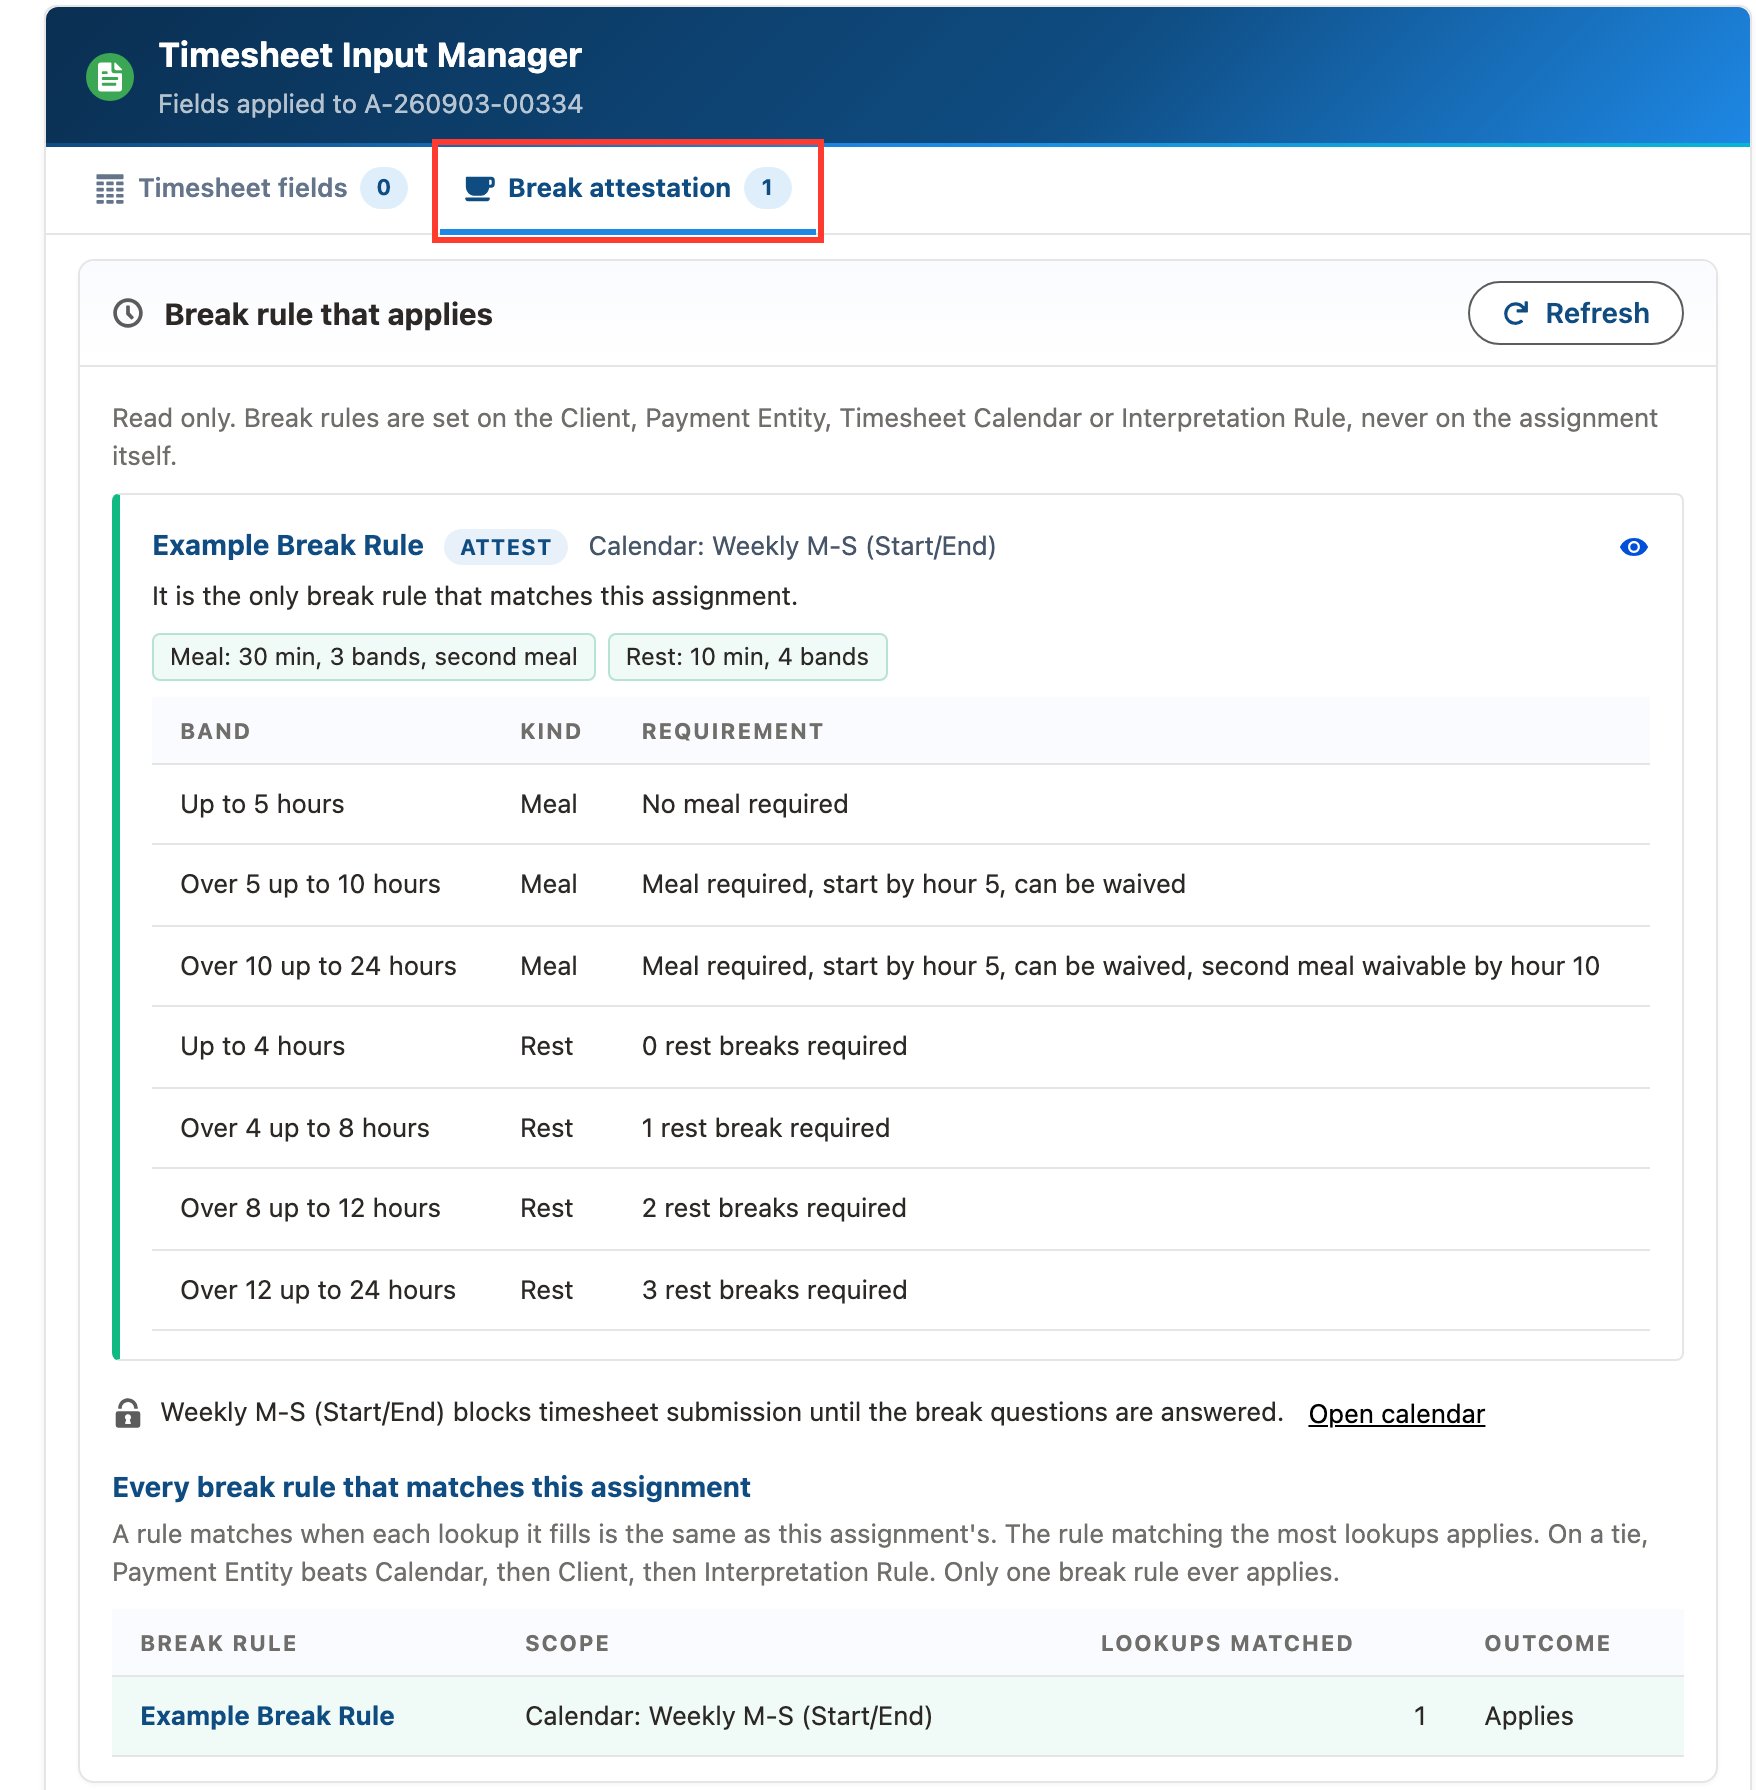
Important Notes(How a rule is chosen)Only one break rule applies to an Assignment: the one matching the most of the Client, Payment Entity, Calendar and Interpretation Rule on the Assignment. On a tie, Payment Entity is chosen over Calendar, then Client, then Interpretation Rule. Where a rule names a record that does not match the Assignment, the rule is not considered at all.
Answer Break Questions on a Timesheet
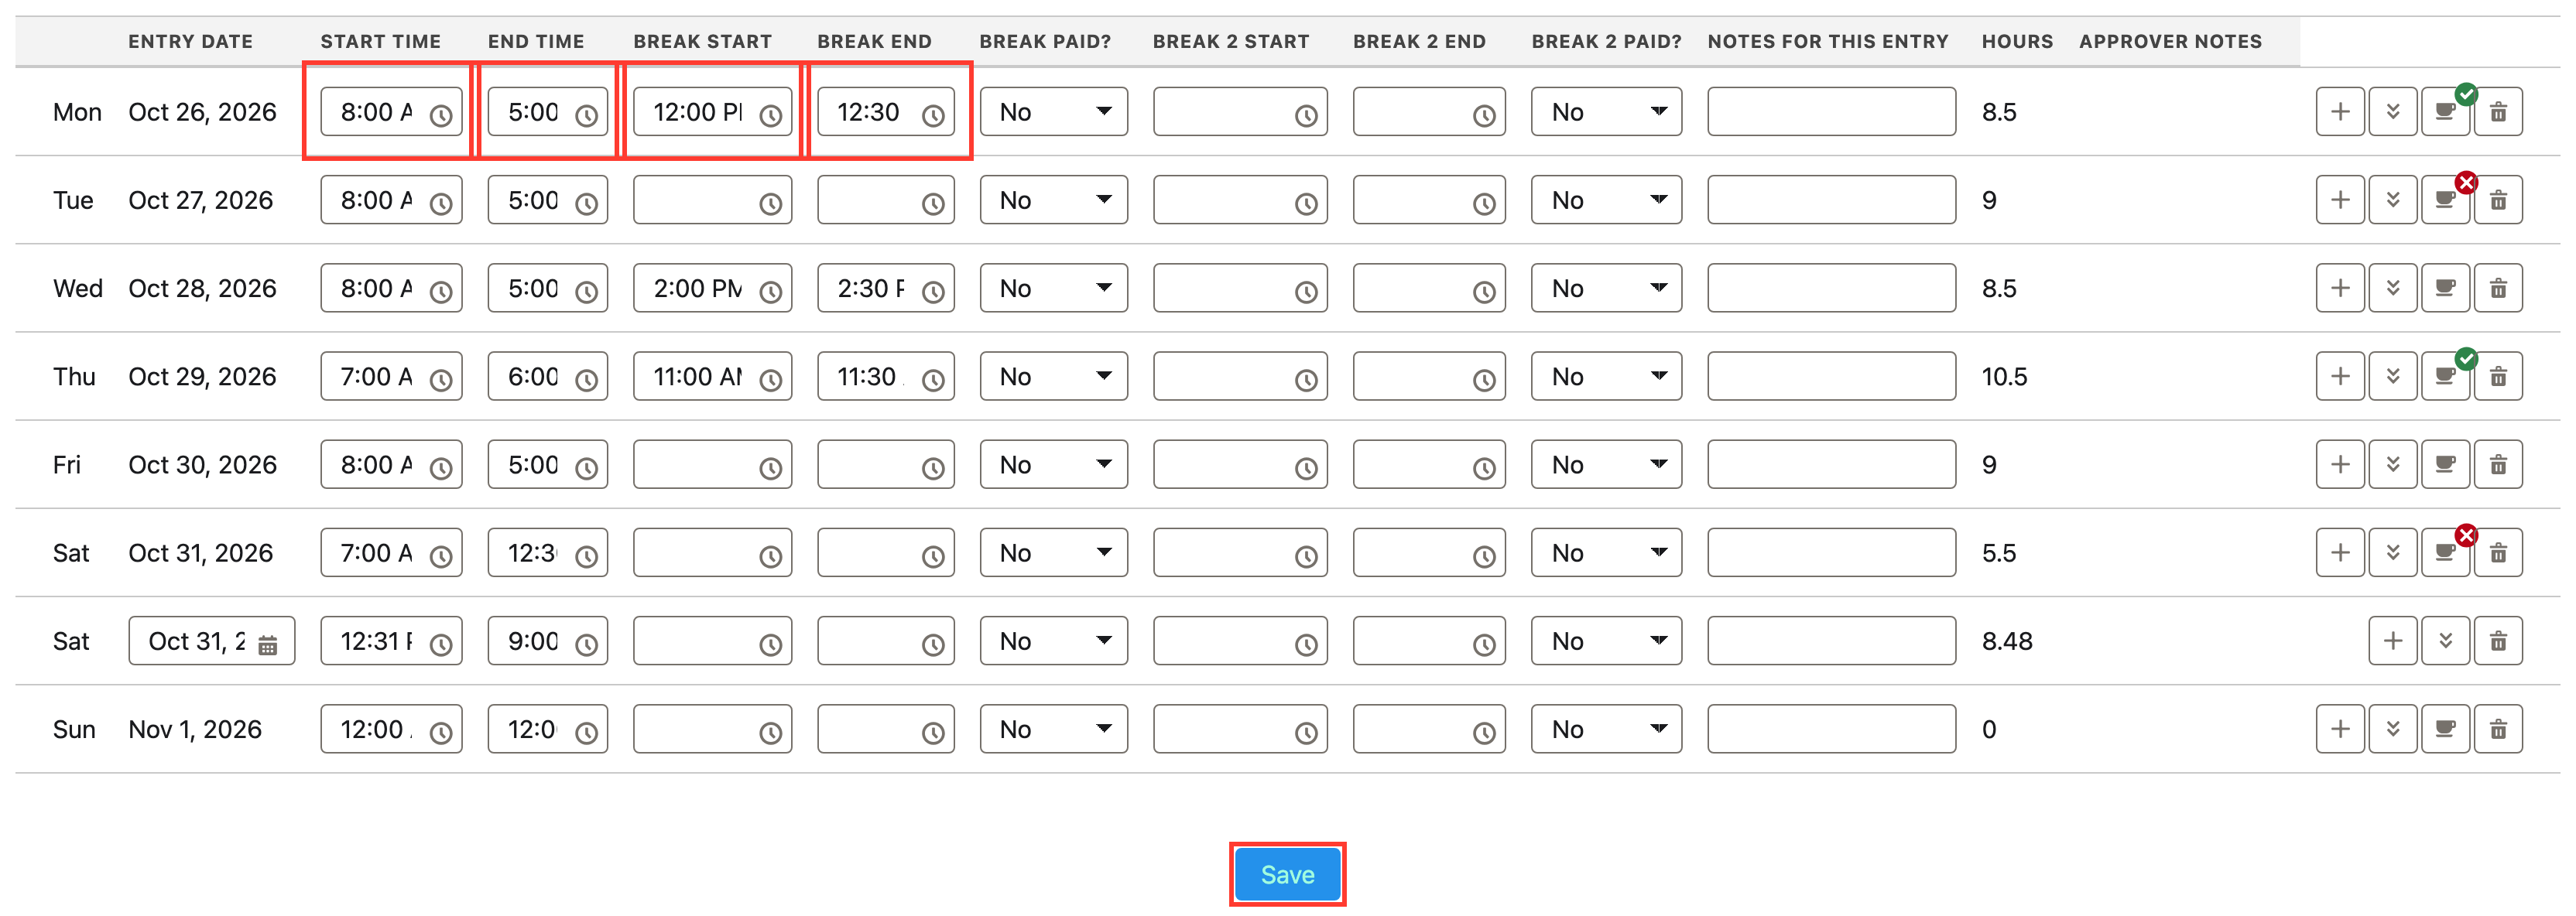
The following steps are completed by workers in the Employee Portal.- Open the Timesheet, enter the shift start and end times and any break start and end times, then click Save (see Figure 13).
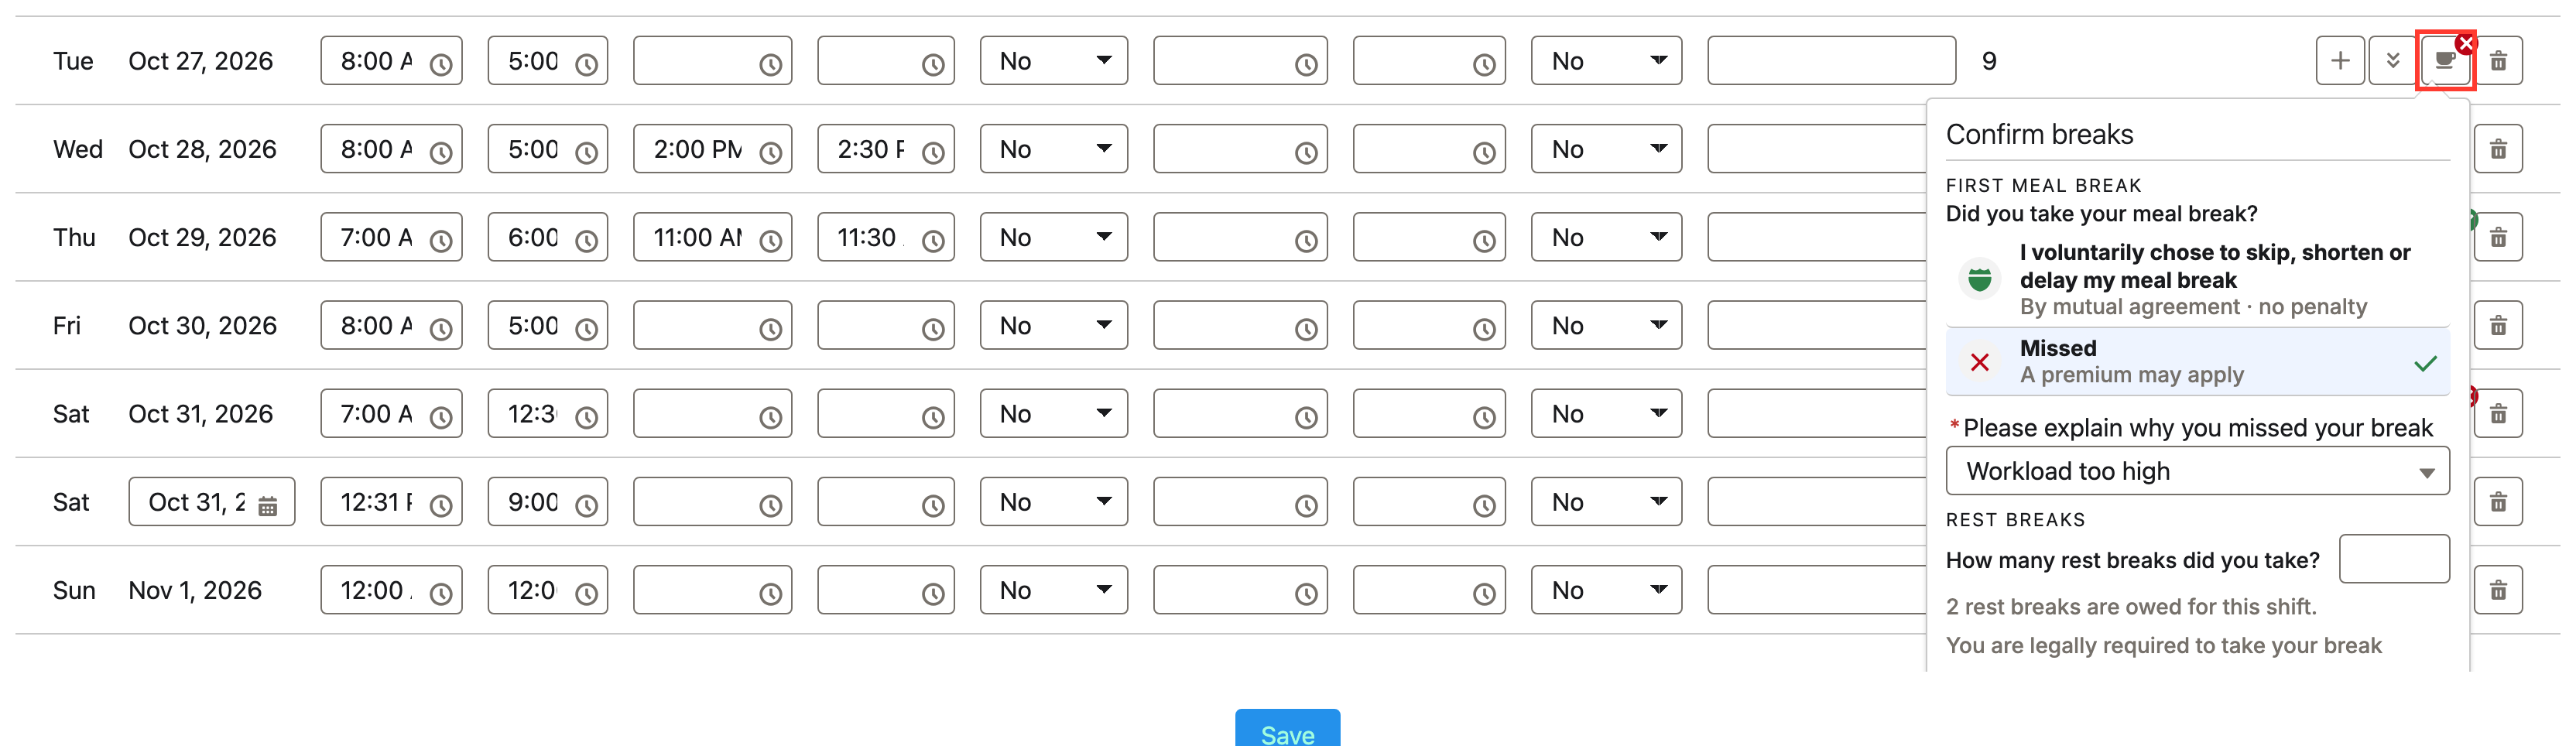
- Click the break icon on the earliest entry of the shift (see Figure 14). The prompt shows only the questions the shift requires. Section headings appear only where there is more than one question.
-
Answer each meal question shown (see Figure 15):
- Where a recorded meal break is long enough and began by the deadline, the meal is not asked. The prompt shows a message such as “Your recorded 30-minute meal break meets the requirement.”
- Where no break was recorded, select Missed, or the waiver answer where the band allows one (its wording is set by Waiver confirm label). Taken is not offered, because there is no break to have taken.
- Where a short or late break was recorded, answer the question as normal. The meal is then graded Short or Late.
- Where rest breaks are owed, enter how many rest breaks were taken, from zero up to the number owed (see Figure 15). The prompt states how many are owed. Rest breaks cannot be waived.
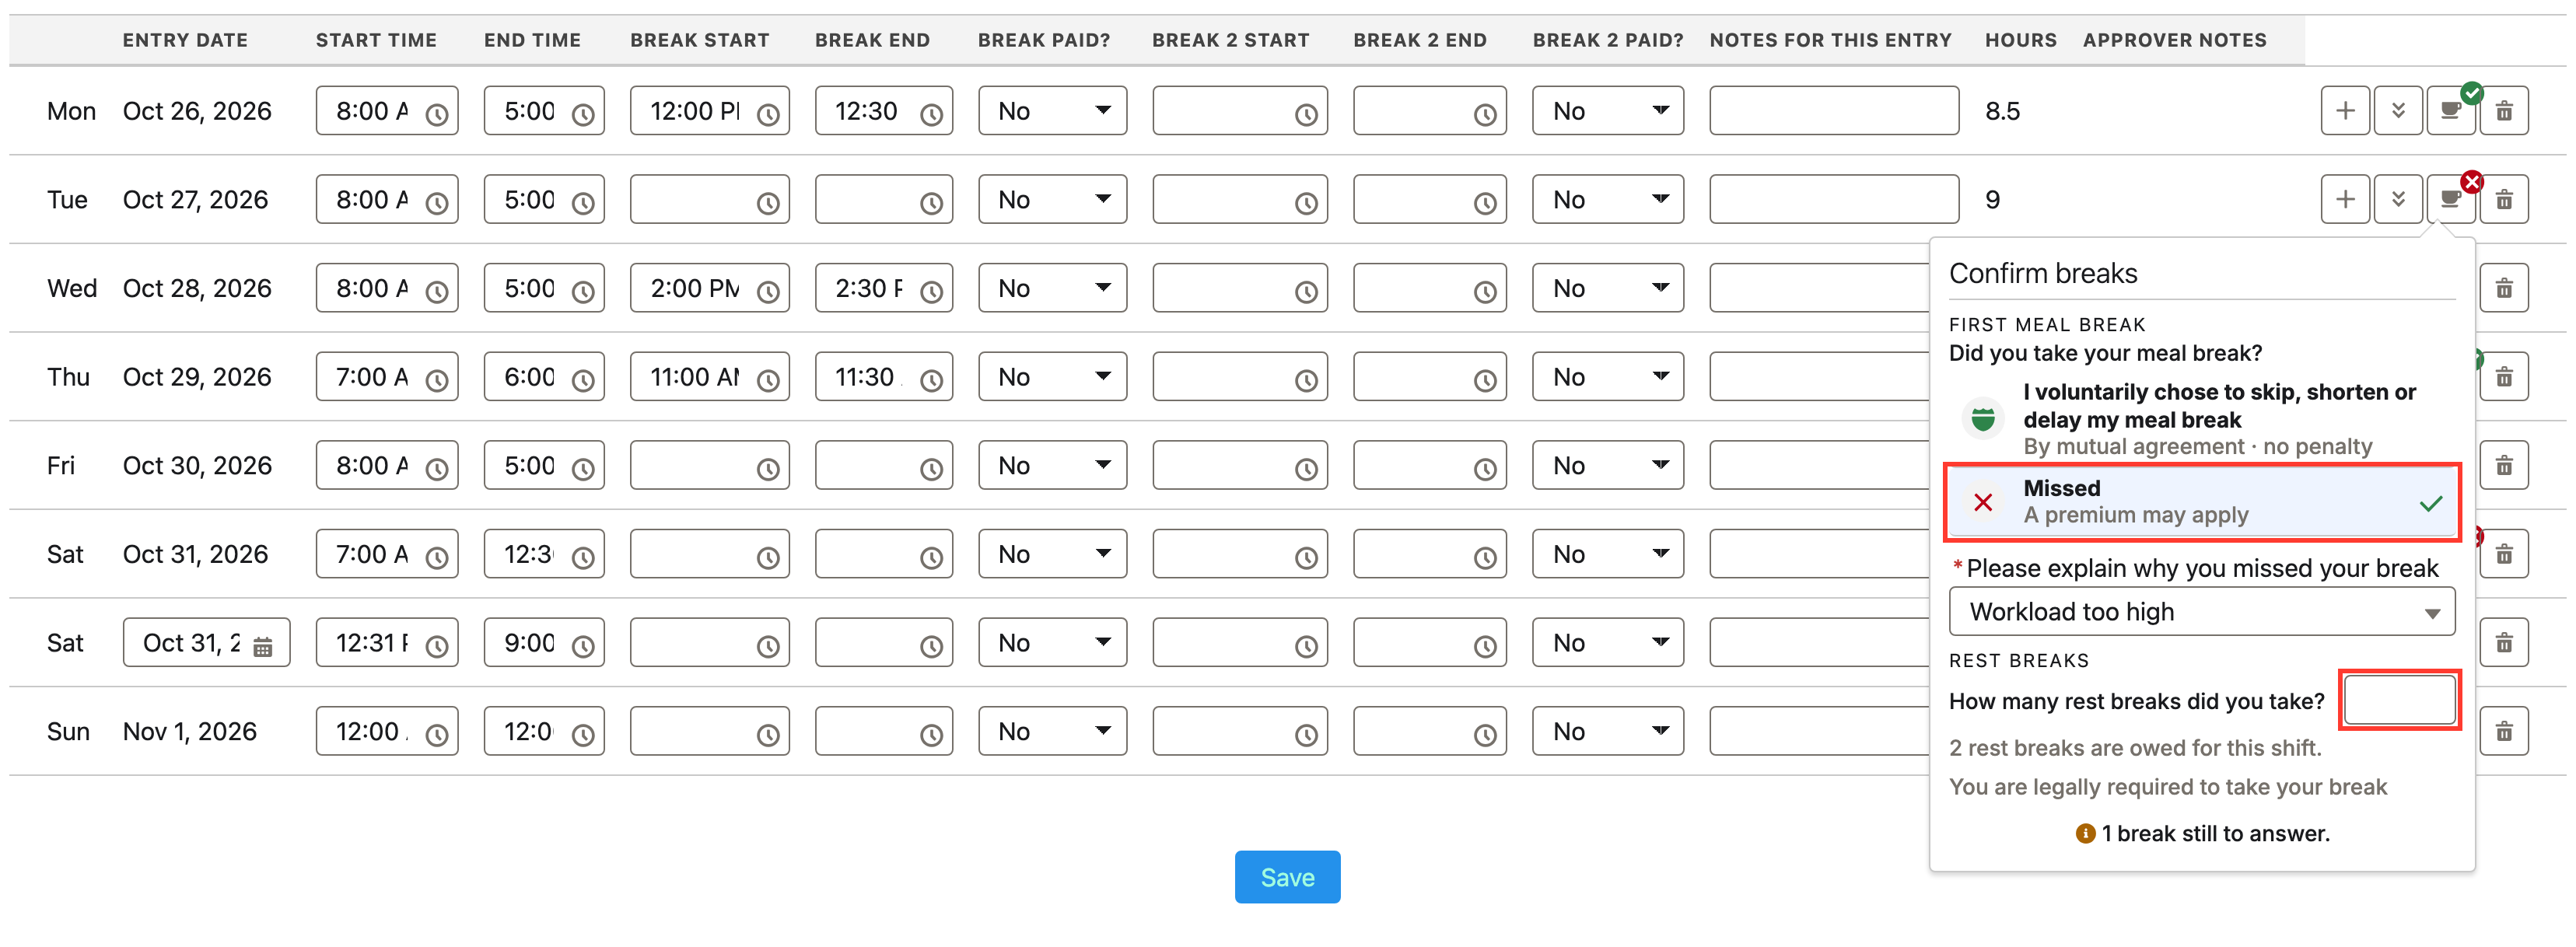
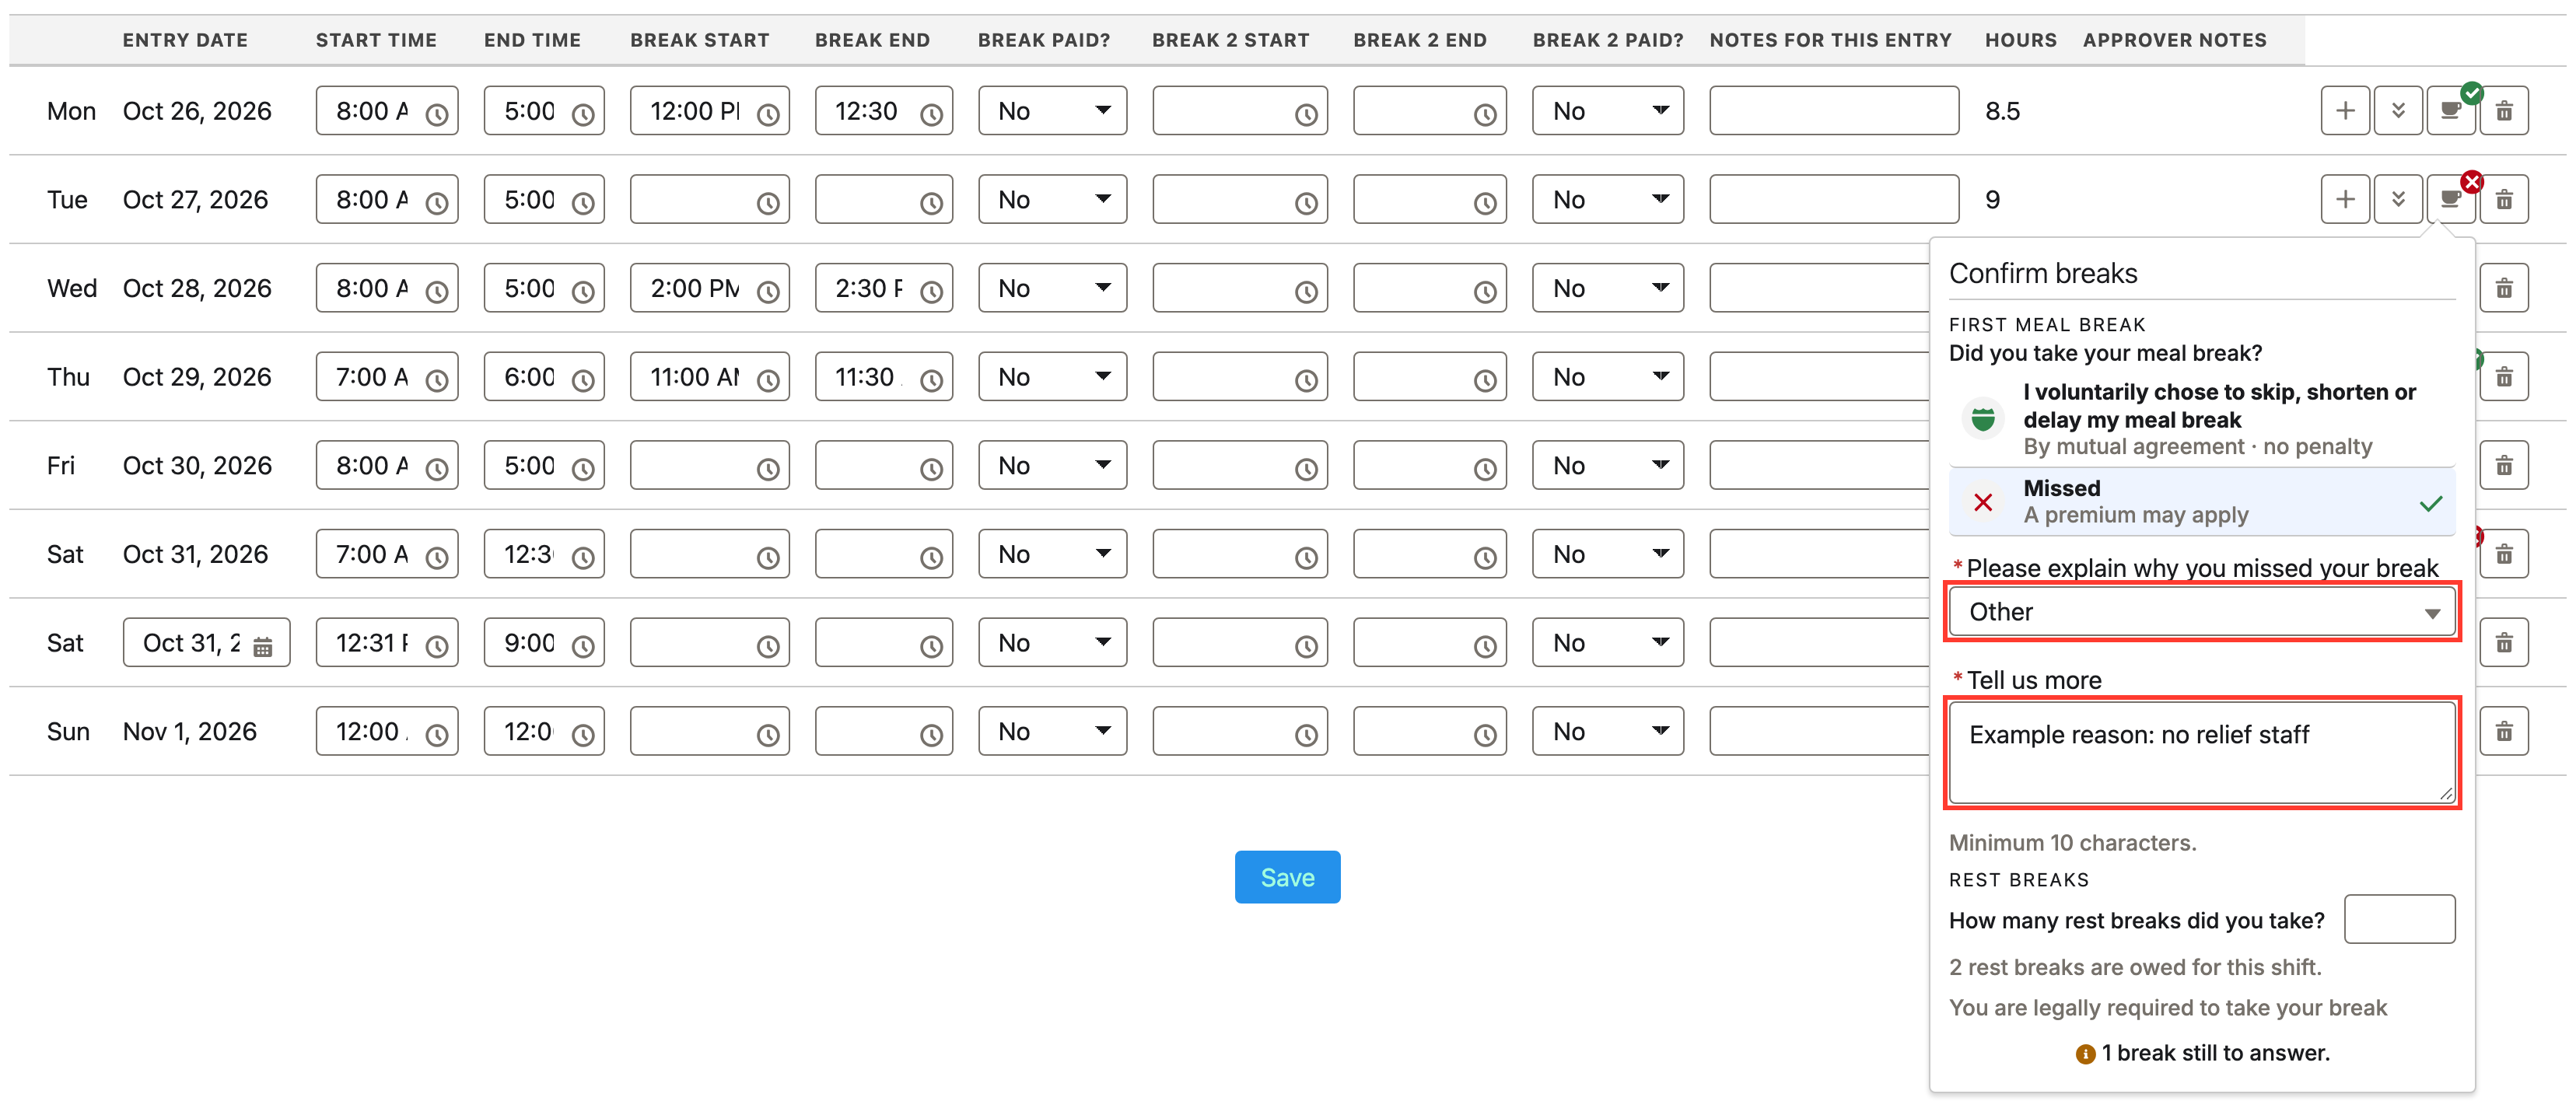
- Where a meal was missed or fewer rest breaks were taken than owed, give a reason (see Figure 16):
- Under Free text, type the reason. It must meet the minimum reason length.
- Under Reason list, choose a reason, or choose Other and type a reason.
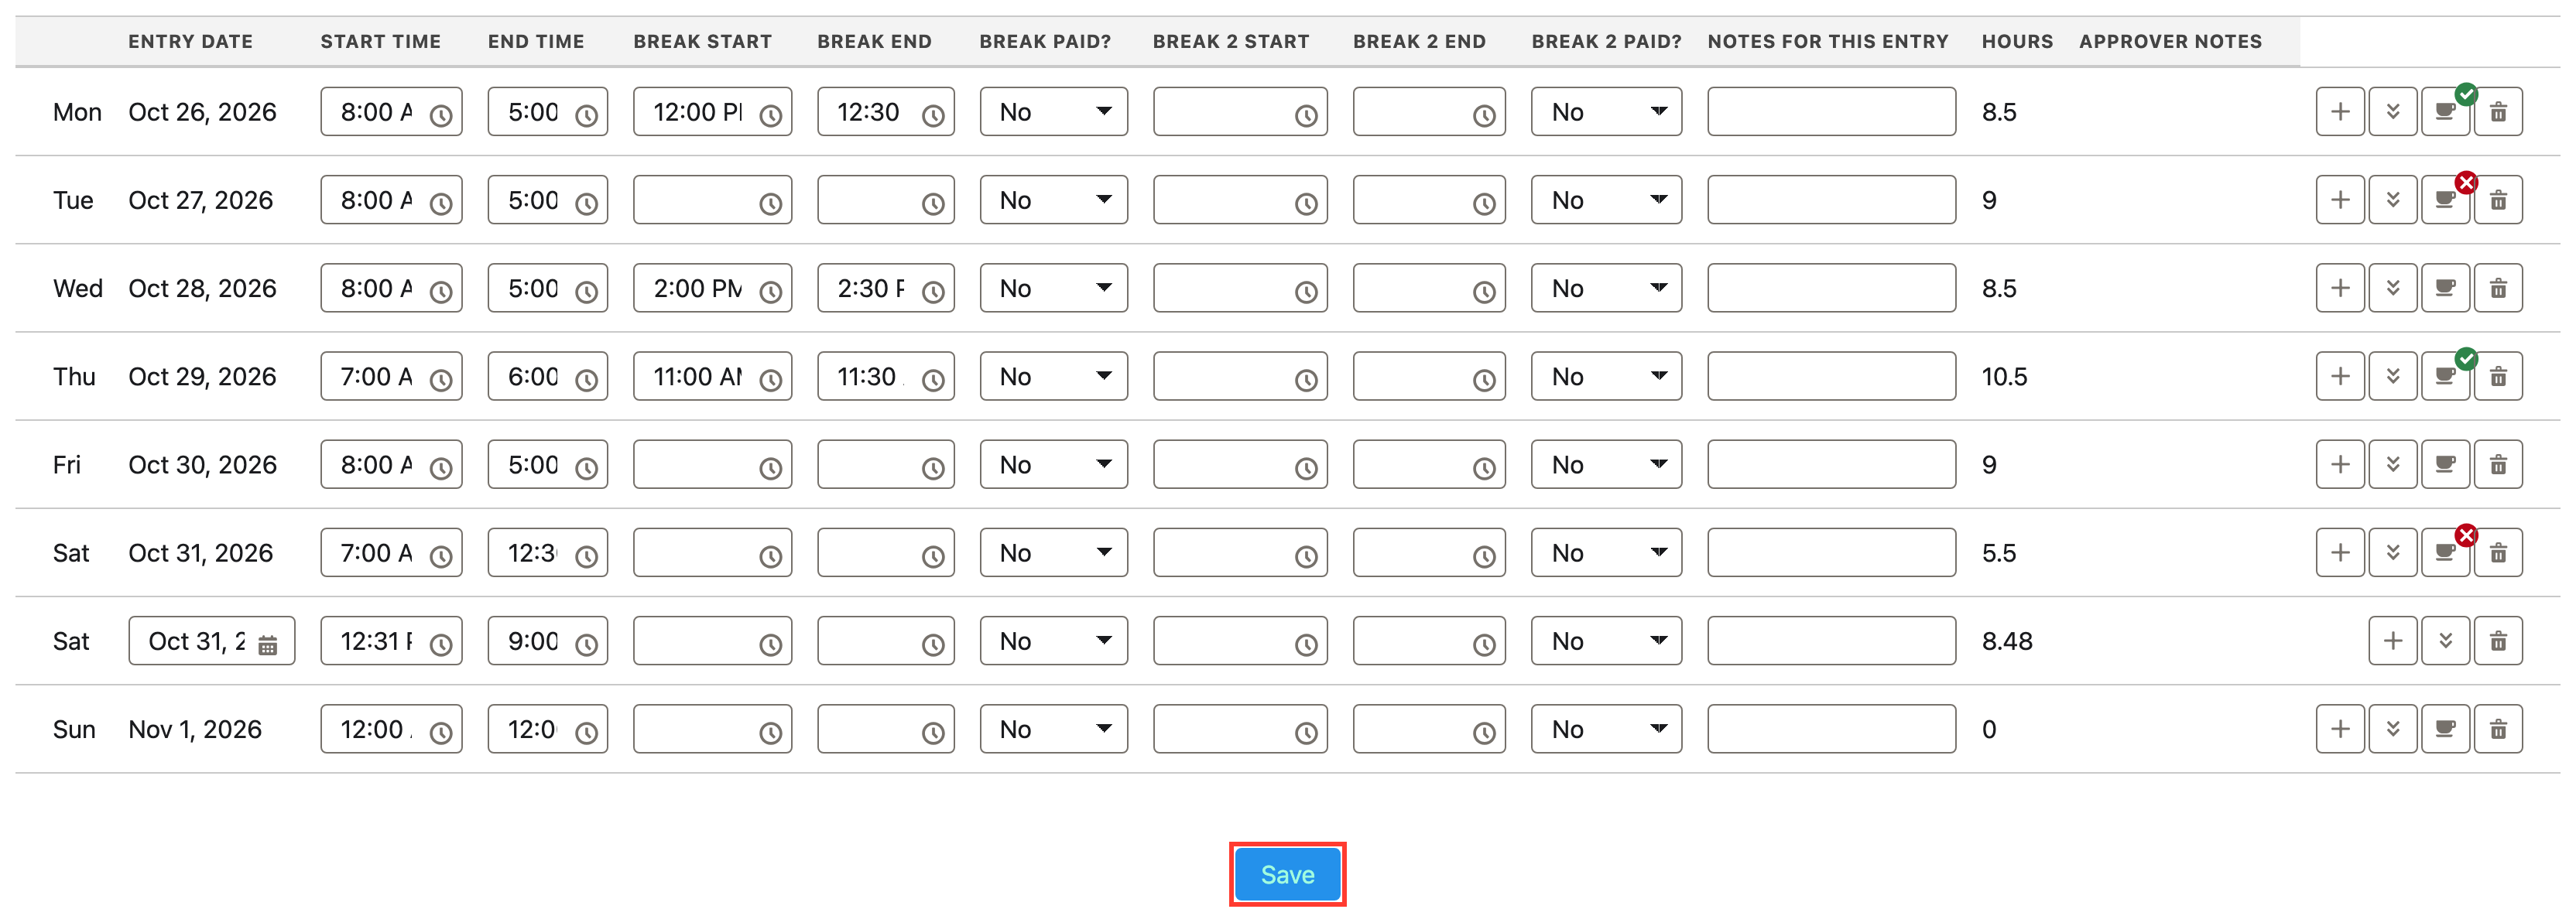
- Close the prompt and click Save (see Figure 17). The answers apply to the whole shift.
Important Notes(Recorded break times)Saying a meal break was taken is not accepted without a recorded break behind it. Enter the break start and end times so the meal can be checked against the rule. A second meal is only read from a recorded break where the second break columns are shown on the Timesheet.
Important Notes(Prompt with no questions)On a shift that owes no breaks, the icon is still shown and opens a prompt stating that no break attestation is required for the shift. This is expected.
Important Notes(Rest breaks answered before v1.58)A rest break previously answered as Partially taken does not record how many breaks were taken, so it opens blank and is asked again.
Submit the Timesheet
- Click Submit (see Figure 18).

- Where a break question is still unanswered, depending on the rule’s Interaction mode and the Calendar’s Enforce Break Attestation on Submit checkbox, either submission is blocked with the message “Answer the outstanding break questions on the timesheet, then submit again.”, or an Attestation reminder lists where break attestation is still needed. Answer the outstanding questions, then submit again.
Important Notes(A missed break can still be submitted)A Timesheet that declares a missed break can be submitted, as long as the question is answered with a reason.