

Read Before Installing
Introduction & Overview
This guide is to be used for the implementation and configuration of the 2cloudnine 3B WFM Integration. In order to be 100% configured you must complete all mandatory steps outlined in this guide (Steps 1-6).Important NotesThe following packages must be installed in the org before you can install the 2cloudnine
3B WFM Integration package. All current links for updated packages can be found in the
configuration guide linked below:
Installing a Package
When you install a managed package you need to select if the security is going to be applied to all profiles or you need to manually select which profiles you will be applying the security to. As the package contains permission sets, we highly recommend installing it only for the System Administrator profile and then using permission sets to grant access to other users. This will only happen on the first install of the product so make sure you select correctly.Configuration
1. Create Unique Records
The 2cloudnine 3B WFM Integration requires the creation of some unique records to be created and configured in a specific way to ensure the integration functions as intended.Timesheet Calendars
As the 2cloudnine 3B WFM Integration is responsible for creating Timesheet and Timesheet Entries, the Timesheet Calendar is used only to control the Timesheet Frequency. The frequency of your Timesheet Calendars should match that of your pay schedules and Interpretation Rules. The following is for a Weekly timesheet. This must be completed for each Timesheet Calendar frequency you require.- Go to the App launcher
- Search for Calendars
- Click New
- Select Timesheet
- Enter information as per the following screenshot.
2. Salesforce Flows
To provide customers with the greatest level of flexibility, some key data points across the various objects must be set using custom automation. Whilst the criteria may differ per customer the following flows must be deployed and configured for the integration to function as intended. Important - The following flows have already been created by 2cloudnine and are available to deploy upon request. If you wish to use the 2cloudnine flows as a base in which you can edit as required, please contact your 2cloudnine consultant.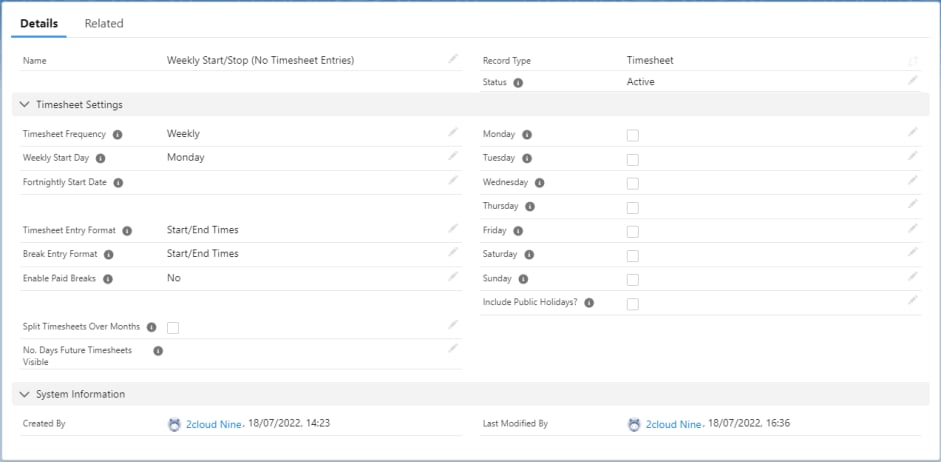
Update Shift on Edit (Mandatory)
This flow is used to update the Shift record on Edit. Its primary purpose is indicating when a shift is to be processed by the integration. The following fields are typically updated using this flow.- Integration Pending - Determines if the shift is to be processed from the integration batch job. Shifts where this is True will be processed.
- Sent to Payroll - Determines if the processed Shift will create the related 2cloudnine Records. If Sent to Payroll is checked and then unchecked and the Shift processed again, only the related Timesheet Entry record is deleted.
- AssignmentString - The default AssignmentString set by the 2cloudnine 3B WFM Integration is ‘2c9 Job Role + Contact’. This default value is set by a trigger on the creation of a Shift record only. In the event a Job Role or Contact is changed on a Shift the flow will ensure the AssignmentString is also updated.
Update Shift Break Times (Mandatory)
This flow is used to update the Shift’s break fields from the related ‘Break’ object. Unlike the 2cloudnine Timesheet Entry, breaks in 3B WFM are captured in a related object called ‘Break’ which allows for more than 2 breaks. This flow runs on the create and edit of Breaks and updates the relevant break 1 and break 2 fields on the Shift. This flow contains logic to accumulate break lengths when there are greater than 2 Shift Breaks.Update Project Code on Create (Mandatory)
This flow is used to set the Record ID of Project Codes where the record type equals ‘Template Level’ OR ‘Timesheet Activity - Template Level’ into the ‘External ID’ field of the created record. When a Shift is processed that contains a Project Code and\or Timesheet Activity, the 2cloudnine 3B WFM Integration first checks if an existing Assignment Level Project Code and\or Timesheet Activity exists. It does this by matching the Shift’s Project Code and\or Timesheet Activity Record ID against the Assignment Levels Project Code and\or Timesheet Activity External ID field. Failure to deploy and activate this flow can result in duplicate Assignment level Project Code and\or Timesheet Activity records being created every time a shift is processed.3. Page Layout Assignments and Required Fields
The 2cloudnine 3B WFM Integration contains page layouts for the Agreement, 3B Job and Shift objects. It is recommended that these page layouts are assigned to the required profiles post installation.
If using the 3B WFM page layouts or a custom page layout the following fields should be
added to the respective page layouts you have in use.
Where a field’s user input is indicated as ‘Required’, it must contain data for the
Integration to work without error. These fields MUST be included and required on the
page layouts or populated using automation to ensure data always exists.
Agreement
Page Layout - 2cloudnine 3B Integration - Agreement
3B Job
Page Layout - 2cloudnine 3B Integration - Job Role
Shift
Page Layout - 2cloudnine 3B Integration - Shift
Assignment
Timesheet
Timesheet Entry
Timesheet Item
4. Permission Set & Sharing Settings
Permission Set
A permission set has been added to the 2cloudnine 3B WFM Integration package which provides access to the minimum objects, fields and record types needed to process the Shift Integration. Important: This permission set contains access to only those fields included within the 2cloudnine 3B WFM Integration package. It is assumed users accessing the objects and other fields from both 3B WFM and 2cloudnine packages will have profile or permission set access as determined by the respective setup of those packages. To assign the permission set to users:- Go to Setup
- Search for Permission Sets
- Select the 2cloudnine 3B Integration permission set
- Select the Manage Assignments button.
- Select the Add Assignments button.
- Select the user(s) you wish to assign the permission set to.
- Select the Assign button.
Sharing Settings
The 2cloudnine 3B WFM Integration uses only standard Salesforce objects and those contained with the 3B WFM and 2cloudnine packages. Where a private sharing model is used within an org, users accessing the package must be provided access to the following objects either via sharing settings or profile/permission set access to View/Modify All. Salesforce- Account
- Contact
- Agreement
- 3B Job
- Shift
- Assignment
- Timesheet
- Timesheet Entry
- Timesheet Item (Master-Detail with Timesheet)
- Project Code
- Calendar
- Rate Calculator
- Interpretation Rule
- Location
- Award Classification and Level
- Payee Allowance Record
5. Scheduled Job
Shift Integration Scheduled Job
The following scheduled job processes all Shift records where ‘Integration Pending is True in 5 minute intervals. To run the script:- Copy the block of script below..
- Select Setup Cog > Development console
- Debug > Open Execute Anonymous window
- Delete or comment out any code that is in the window and paste in the copied script > click the execute button
Error Handling
The 2cloudnine 3B WFM Integration includes two methods of Error Handling: Email Notification The user who invokes the ‘ShiftAssignmentBatch’ apex class will receive an email notification when an error occurs within the batch job. For the scheduled batch class, this will be the user who scheduled the batch job (typically the admin account). Where the class is invoked from another process such as a screenflow, this will be the user who invoked the class. Debug Logs Where the integration fails, a Debug Header and related Debug Logs are created. A single Debug Header is created per processed Batch, with related Debug Logs for each individual failed Shift. For example, if a batch contained 30 Shifts, and within that batch 3 failed, there would be a single Debug Header record with 3 related Debug Logs for the 3 failed Shifts.6. Additional Mandatory Configuration
Payee Record
Any Contact placed into a shift and processed for Integration must have at least 1 Payee record that meets the Payee selection criteria (Refer User Guide). The 2cloudnine 3B WFM Integration includes functionality to support the automated creation of Payee records. If this functionality is not used and where a Payee is not found based upon the Payee selection criteria, the integration will fail and a debug record will be created (see above).Update Picklist Value Access for Record Types
The following picklist values must be added to provide access to the following record types.7. Additional Optional Configuration
Assignment RecordType
The Assignment created by the 2cloudnine 3B WFM Integration will have a default RecordType of ‘Temp’. If a different RecordType is required, an admin can define this in the ‘3B Integration Settings’ custom setting. To set a different Assignment RecordType:- Go to Setup
- Search for Custom Settings
- Locate 3B Integration Settings and select Manage .
- Select Edit (You will need to click New if it is the first time accessing the custom setting).
- Enter the Assignment RecordType ID into the field Assignment Record Type ID .
Integration Batch Sizes
The 2cloudnine 3B WFM Integration utilises 3 separate batch jobs for the creation and updating of Assignment, Timesheets and Timesheet Entries. When processing Shifts, the default batch size used by integration is 200. This can however be updated to process more or less Shifts as determined by the system administrator. To update the default batch sizes:- Go to Setup
- Search for Custom Settings
- Locate 3B Integration Settings and select Manage .
- Select Edit (You will need to click New if it is the first time accessing the custom setting).
- Enter the desired batch size into the fields Batch Size Shift Assignment, Batch