

Overview
Important Information
This guide is intended for certified Salesforce System Administrators and/or suitably trained 2cloudnine Payroll Partners and System Administrators. Only these people should be actioning any installation, configuration items and tasks. Any configuration undertaken without 2cloudnine guidance that interferes with the performance of 2cloudnine Payroll will be addressed on a time and materials basis. Resources for these fixes cannot be guaranteed and will be allocated in the next available time slot. All packages within the release must be installed. There may be compulsory and optional configuration items and tasks that need to be completed prior to and post the installation of the packages. These will be highlighted in the below checklists with further details given within this document. The installer will be responsible for ensuring all these configuration items and tasks are completed within a reasonable timeframe of the packages being installed. Please ensure you have familiarised yourself with all the requirements PRIOR to installing the packages and ensure you have sufficient time and resources available. Failing to do so can negatively impact the user experience and stability of 2cloudnine Payroll.Pre-Installation Checklist
The following items must be completed prior to commencing the installation and configuration of packages within this release.Installation and Configuration Checklist
The following items must be completed in the listed order to install and configure the packages within this release.Installation Links
The installation of the following packages must be completed as part of the Lilly Pilly ‘21 release upgradePre-Installation Items
New Component Review
The Lilly Pilly ‘21 Release contains a number of new components including Objects, Fields and Tabs. A review of the list of components introduced should be conducted to check for duplicates to existing custom components. In some instances, where duplicates exist, the installation/upgrade of the package will not be permitted. The creation of duplicate tabs is an example of this. In these instances the duplicate must be removed prior to attempting to install. This could be completed through either deleting the custom component or, where possible, renaming the Name/API Name of the component. In other instances, the package installation/upgrade will be permitted however the duplicates could cause user confusion and/or custom automation clashes within the org. In these instances, although it is optional, it is highly recommended to delete/rename the component. A list of the new components that should be reviewed are outlined on Appendix 1Custom Automation Review
This release includes new functionality and improvements which may perform duplicate tasks to those configured as custom automations (workflows, process builders, flows, triggers etc) in the organisation. A review of existing custom automation against the functionality outlined on the Release Notes should be completed. Where duplication is identified, it is highly suggested that the custom automation be deactivated or amended. This will assist in preventing processing lag and data corruption as well as prevent things such as notification emails being sent out a number of times.Configuration Items
Pay Employee Leave In Advance
The functionality to allow leave to be paid in advance is optional, however there is required configuration that must be completed regardless of if the function is used. The below configuration steps should be completed:- Update profile/permission sets (Compulsory)
- Update page layouts for new fields (Compulsory)
- Update new fields on existing records (Compulsory)
- Make the new field available in Communities/Experience (Optional)
Update Profile/Permission Sets (Compulsory)
The below fields have had read/edit access added to the following permission sets provided with the package. Where these are in use, the permissions required will be automatically provisioned:- 2cloudnine Payroll Admin
- 2cloudnine Time2Pay All Access
Update Page Layouts for New Fields (Compulsory)
This requirement needs to be completed regardless of if the option to use the functionality is taken.The update of Community/Experience page layouts is outlined in the Make the New Field Available
in Communities/Experienc e section below.
- Go to Setup > Object Manager
- Select Leave Rule (tc9_pr__Leave_Rule__c) > Page Layouts
- Select a page layout that is used for Leave Rule record type
-
Add the following fields to the layout
- Allow Pay In Advance (tc9_pr__Allow_Pay_in_Advance__c)
- Click Save
- Repeat steps 3 to 5 for all page layouts that are used on the Leave Rule object
- Return to the Object Manager
- Select Payee Leave Event (tc9_pr__Payee_Leave_Event__c) > Page Layouts
- Select a page layout that is used for the Leave Take record type
-
Add the following fields to the layout
- Pay In Advance (tc9_pr__Pay_in_Advance__c)
- Advance Pay Start Calendar Period (tc9_pr__Advance_Pay_Start_Calendar_Period__c)
- Advance Pay End Calendar Period (tc9_pr__Advance_Pay_End_Calendar_Period__c)
- Advance Pay Payment Calendar Period (tc9_pr__Advance_Pay_Payment_Calendar_Period__c)
- Click Save
- Repeat steps 9 to 11 for all page layouts that are used for the Leave Take record type
Update New Fields on Existing Records (Compulsory)
To prevent validation errors while processing leave requests and payroll, the new Allow Pay In Advance field (tc9_pr__Allow_Pay_in_Advance__c) must be populated on all current leave rules. To update the field the following steps should be followed:- Run Script 1 defined below through dev console to automatically populate the Allow Pay in Advance field on all Leave Rules with the value of ‘No’
- Manually edit any Leave Rules that require different values than those set by the script```apex
1
Make the New Field Available in Communities/Experience (Optional)
This requirement only needs to be completed if the option to make the functionality available for employee/approver use within Communities/Experience is taken. If not, this item can be skipped. By default, this field is included on both the Employee Community Permission Set and the Approver User Permission Set. Provided these permission sets are applied to the employee Community/Experience users and the approver Community/Experience guest users respectively, the correct permissions to enable the fields use will be automatically provisioned. If the packaged permission sets are not used within the organisation, the access outlined in Appendix 3 must be made available for use either via profiles or custom permission sets.Indicate the Rate that Leave Will Be Paid
The functionality to allow users to indicate the rate at which leave will be paid is optional, however there is required configuration that must be completed regardless of if the function is used. The below configuration steps should be completed:- Update profile/permission sets (Compulsory)
- Update page layouts for new fields (Compulsory)
- Update new fields on existing records (Compulsory)
- Make the new field available in Communities/Experience (Optional)
Update Profile/Permission Sets (Compulsory)
The below detailed fields have had read/edit access added to the following permission sets provided with the package. Where these are in use, the permissions required will be automatically provisioned.- 2cloudnine Payroll Admin
- 2cloudnine Time2Pay All Access
Update Page Layouts for New Fields (Compulsory)
This requirement needs to be completed regardless of if the option to use the functionality is taken.The update of Community/Experience page layouts is outlined in the Make the New Field Available
in Communities/Experienc e section below.
- Go to Setup > Object Manager
- Select Leave Rule (tc9_pr__Leave Rule__c) > Page Layouts
- Select a page layout that is used for any Leave Rule record type
-
Add the following field to the layout
- Available Pay Rates (tc9_pr__Available_Pay_Rates__c)
- Click Save
- Repeat steps 3 to 5 for all page layouts that are used on the Leave Rule object
- Return to the Object Manager
- Select Payee Leave Event (tc9_pr__Payee_Leave_Event__c) > Page Layouts
- Select a page layout that is used for any Leave Take record type
-
Add the following field to the layout
- Selected Pay Rate (tc9_pr__Selected_Pay_Rate__c)
- Click Save
- Repeat steps 9 to 11 for all page layouts that are used for the Leave Take record type
- Return to the Object Manager
- Select Pay Advice Line (tc9_pr__Pay_Advice_Line__c) > Page Layouts
- Select a page layout that is used for any Pay Advice Line record type
-
Add the following fields to the layout
- Leave Rate Multiplier (tc9_pr__Leave_Rate_Multiplier__c)
- Click Save
- Repeat steps 15 to 17 for all page layouts that are used for the Leave Take record type
- Return to the Object Manager
- Select Pay Transaction (tc9_pr__Pay_Transaction__c) > Page Layouts
- Select a page layout that is used for the Payment record type
-
Add the following fields to the layout
- Leave Rate Multiplier (tc9_pr__Leave_Rate_Multiplier__c)
- Quantity by Leave Multiplier (tc9_pr__Quantity_by_Leave_Multiplier__c)
- Click Save
- Repeat steps 21 to 23 for all page layouts that are used for the Leave Take record type
Update New Fields on Existing Records (Compulsory)
To prevent validation errors while processing leave requests and payroll, the new Available Pay Rates field (tc9_pr__Available_Pay_Rates__c ) must be populated on all the current Leave Rules. To update the fields the following steps should be followed:- Run Script 1 defined below through dev console to automatically populate the Available Pay Rates field on all Leave Rules with the value of “Standard Pay”
- Manually edit any Leave Rules that require different values than those set by the script
- Run Script 2 defined below through dev console to automatically populate the Selected Pay Rate field on all Leave Take Payee Leave Event records, that do not have the field populated, with the value of “Standard Pay”
- Manually edit any Payee Leave Events that require different values than those set by the script
Script 1
Script 2
Make the New Field Available in Communities/Experience (Optional)
This requirement only needs to be completed if the option to make the functionality available for employee/approver use within Communities/Experience is taken. If not, this item can be skipped. By default, this field is included on both the Employee Community Permission Set and the Approver User Permission Set. Provided these permission sets are applied to the employee Community/Experience users and the approver Community/Experience guest users respectively, the correct permissions to enable the fields use will be automatically provisioned. If the packaged permission sets are not used within the organisation, the access outlined in Appendix 5 must be made available for use either via profiles or custom permission sets.Update Leave Functionality In Communities/Experience
The functionality to turn Leave sub-tabs on and off within the Employee Community/Experience is optional. This requirement only needs to be completed if the option to use the functionality is taken. If not, this item can be skipped. The below configuration steps should be completed if the functionality is required:- Configure the Communities/Experience Leave tab (Optional)
By default, if this item is skipped, all Leave sub-tabs are turned on.
Configure the Communities/Experience Leave Tab (Optional)
- Go to Setup > Feature Settings > Digital Experiences > All Sites
- Locate the Employee Community/Experience within the All Sites list shown and click on the Builder link alongside it
- Use the Pages drop down to navigate to the page where the Community holds the Emp_Comm_Leave component
- Click on the Emp_Comm_Leave component. The Emp Comm Leave configuration window will appear.
- Use the yes/no picklists within the configuration window to turn the sub-tabs on and off as required
- Close the configuration window
- Click the Preview button to view the page to ensure it is correct and fix any issues required
- Repeat steps 5-7 for all pages where the Emp_Comm_Leave component is used (if any others)
- Click the Publish button to make the changes live
Define Dual Leave Loading Interpretation Rules
The functionality to define and use dual leave loading calculations during Timesheet Interpretation is optional, however there is required configuration that must be completed regardless of if the function is used. The below configuration steps should be completed:- Update profiles/permission sets (Compulsory)
- Update page layouts for new fields (Optional)
- Update new fields on existing records (Optional)
Update Profile/Permission Sets (Compulsory)
The below detailed fields have had read/edit access added to the following Permission Sets provided with the package. Where these are in use, the permissions required will be automatically provisioned.- 2cloudnine Payroll Admin
- 2cloudnine Time2Pay All Access
Update Page Layouts for New Fields (Optional)
This requirement only needs to be completed if the option to use the functionality is taken. If not, this item can be skipped.- Go to Setup > Object Manager
- Select Interpretation Rule (tc9_et__Interpretation_Rule_c) > Page Layouts
- Select a page layout that is used for the Shift End Time or Shift Start Time record types
-
Add the following field to the layout
- Apply Dual Leave Loading (tc9_et__Apply_Dual_Leave_Loading_Calculations__c)
- Click Save
- Repeat steps 3 to 5 for all page layouts that are used on the Shift End Time and Shift Start Time record types
- Return to the Object Manager
- Select Leave Rule (tc9_pr__Leave_Rule__c) > Page Layouts
- Select a page layout that is used for any Leave Rule object
-
Add the following field to the layout
- Apply Dual Leave Loading (tc9_pr__Apply_Dual_Leave_Loading_Calculations__c)
- Click Save
- Repeat steps 9 to 11 for all page layouts that are used for the Leave Rule object
Update New Fields on Existing Records (Optional)
By default, when the Apply Dual Leave Loading field on the Leave Rule and Interpretation Rule records is not populated, they will be treated as if the value selected is “No”. This means that data on existing interpretation rules does not need to be updated to ensure they continue to perform timesheet interpretation with the same logic. If there are existing Leave Rules and Interpretation Rules where the functionality is required, these should be edited via the Interpretation Builder..Apply For Time Off In Lieu Credit in Communities/Experience
The functionality to allow users to submit, approve or reject leave requests for time off in lieu credits through Communities/Experience is optional. This requirement only needs to be completed if the option to use the functionality is taken. If not, these items can be skipped. The below configuration steps should be completed if the functionality is required:- Update profile/permission sets (Optional)
- Update page layouts for new fields (Optional)
- Update new fields on existing records (Optional)
- Make the new functionality available in Communities/Experience (Optional)
Update Profile/Permission Sets (Optional)
The below detailed fields have had read/edit access added to the following permission sets provided with the package. Where these are in use, the permissions required will be automatically provisioned.- 2cloudnine Payroll Admin
- 2cloudnine Time2Pay All Access If the packaged permission sets are not used within the organisation, the access outlined in Appendix 7 must be made available for use either via profiles or custom permission sets.
Update Page Layouts for New Fields (Optional)
This requirement only needs to be completed if the option to use the functionality is taken. If not, this item can be skipped.- Go to Setup > Object Manager
- Select Leave Rule (tc9_pr__Leave_Rule__c) > Page Layouts
- Select a page layout that is used for the Time off In Lieu record type
-
Add the following field to the layout
- Credit Available In Portal (tc9_pr__Credit_Available_in_Portal__c)
- Click Save
- Repeat steps 3 to 5 for all page layouts that are used for Time off In Lieu record type.
Update New Fields on Existing Records (Optional)
By default, where the value of the Credit Available In Portal field is not populated, it will be treated as if the value is “No” and therefore access to the functionality will not be granted to employees and approvers via Communities/Experience. However, if there are existing leave rules where the functionality is required, these should be edited via the standard Salesforce page..Make the New Functionality Available in Communities/Experience (Optional)
By default, this record type is included on both the Employee Community Permission Set and the Approver User Permission Set and, provided these permission sets are applied to the Employee Community Users and the Approver Community Guest Users respectively, the correct permissions to enable the fields use will be automatically provisioned. If the packaged permission sets are not used within the organisation, the access outlined in Appendix 8 must be made available for use either via profiles or custom permission sets.Perform Streamlined Payee Exit Tasks
The new streamlined Payee Exit functionality does not require any configuration and will become available on installation of the package. That said, there have been significant changes to the previous versions of the standard page layouts provided within the package. Below are the details of the suggested changes that could be made to the page layouts used within your organisation.Update Page Layouts(Optional)
This requirement only needs to be completed if the option to use the functionality is taken. If not, this item can be skipped.- Select Payee Exit Calculation (tc9_pr__Payee_Exit_Calculation__c) > Page Layouts
- Select a page layout that is used for the Australia record type
-
Add the following fields to the layout
- AU Working Holiday Maker (tc9_pr__AU_Working_Holiday_Maker__c)
- AU Death Recipient Payee (tc9_pr__AU_Death_Recipient_Payee__c)
- Arrange the sections/fields within the layout as required (See Figure 1 below for the suggested format)
- Click Save
- Repeat steps 3-5 for all page layouts used for the Australia record type
- Select a page layout that is used for the Australia Item record type
-
Add the following fields to the layout
- User Comments (tc9_pr__User_Comments__c)
- AU Contributes to OTE (tc9_pr__AU_Contributes_to_OTE__c)
- Arrange the sections/fields within the layout as required (See Figure 2 below for the suggested format)
- Click Save
- Repeat steps 8-10 for all page layouts used for the Australia Item record type
- Select a page layout that is used for the Australia Mapping record type
-
Add the following fields to the layout
- Mapping Component Type (tc9_pr__Mapping_Component_Type__c)
- Mapping Status (tc9_pr__Mapping_Status__c)
- Arrange the sections/fields within the layout as required (See Figure 3 below for the suggested format)
- Click Save
- Repeat steps 13-15 for all page layouts used for the Australia Mapping record type
- Select a page layout that is used for the Australia Results record type
- Arrange the sections/fields within the layout as required (See Figure 4 for the suggested format)
- Click Save
-
Repeat steps 18-19 for all page layouts used for the Australia record type

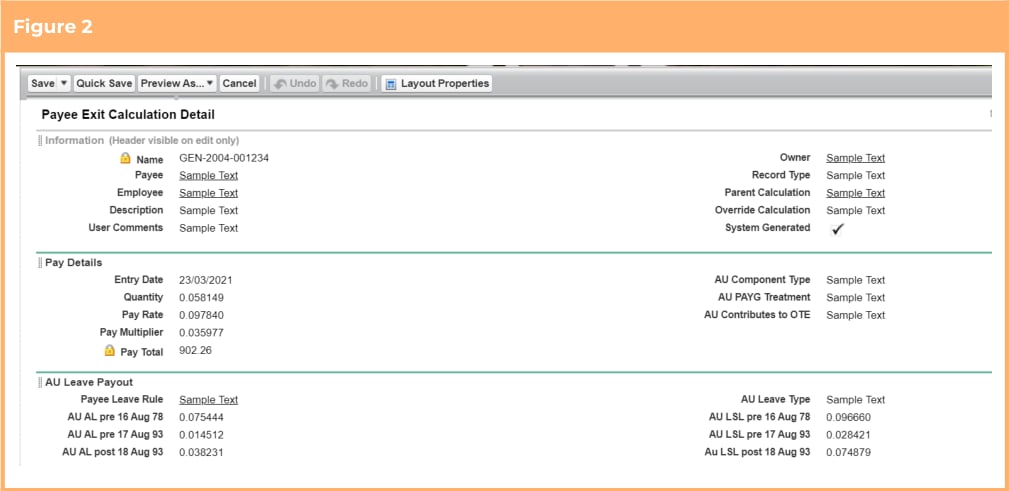
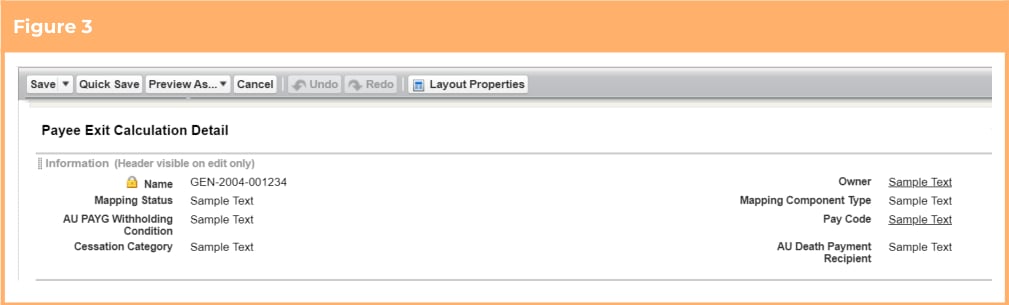
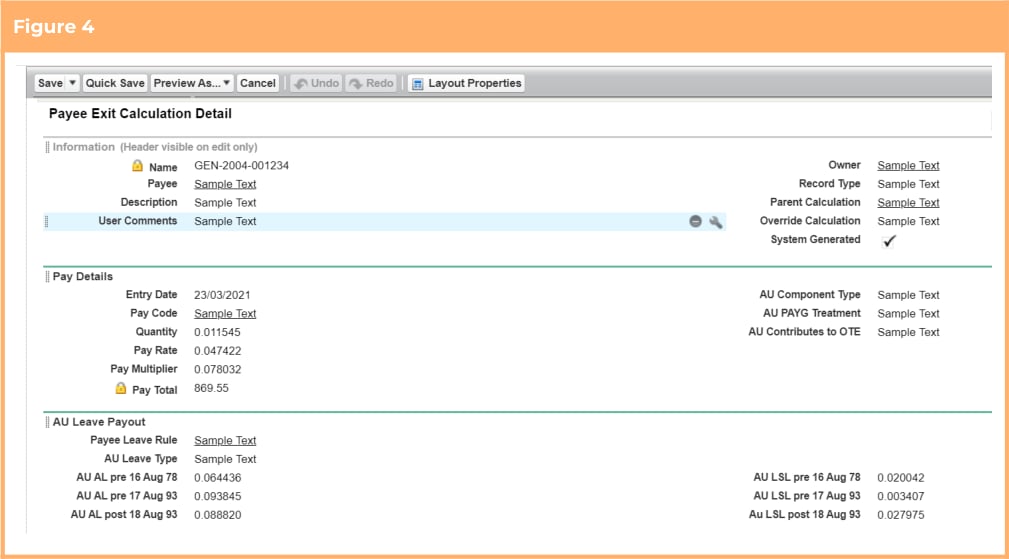
Automate Payee Allowance Records and Assignment Rate Creation
The functionality to automate the creation of Payee Allowance Records and Assignment Rates is optional. This requirement only needs to be completed if the option to use the functionality is taken. If not, these items can be skipped. The below configuration steps should be completed if the functionality is required:- Update profile/permission sets (Optional)
- Update page layouts for new fields (Optional)
- Update new fields on existing records (Optional)
Update Profile/Permission Sets (Optional)
The below detailed fields have had read/edit access added to the following permission sets provided with the package. Where these are in use, the permissions required will be automatically provisioned.- 2cloudnine Payroll Admin
- 2cloudnine Time2Pay All Access
Update Page Layouts for New Fields (Optional)
This requirement only needs to be completed if the option to use the functionality is taken. If not, this item can be skipped.- Go to Setup > Object Manager
- Select Assignment (tc9_pr__Assignment__c) > Page Layouts
- Select a page layout that is used for any Assignment record type excluding the Perm and Temp to Perm record types
-
Add the following fields to the layout
- Assignment Rate Template Group (tc9 pr__Assignment_Rate_Template_Group__c)
- Assignment Rate Template Group Pay Rate (tc9_et__Assignment_Rate_Template_Group_Pay_Rate__c)
- Assignment Rate Template Group Invoice Rate (tc9_et__Assignment_Rate_Template_Group_Inv_Rate__c)
- Payee Timesheet Allowance Template Group (tc9_et__Payee_Timesheet_Allowance_Template_Group__c)
- Click Save
- Repeat steps 3 to 5 for all page layouts that are used on the Assignment object excluding those used for the Perm and Temp to Perm record types
- Return to the Object Manager
- Select Pay Code (tc9_pr__Pay_Code__c) > Page Layouts
- Select a page layout that is used for the Payment or Allowance record types
-
Add the following field to the layout
- Invoice Rate Multiplier (tc9_et__Invoice_Rate_Multiplier__c)
- Click Save
- Repeat steps 8 to 11 for all page layouts that are used for the Payment and Allowance record types
Update New Fields on Existing Records (Optional)
When the Assignment Rate Template Group that is related to an Assignment has the Invoice Rate field populated, the Invoice Rate Multiplier field (tc9_et__Invoice_Rate_Multiplier__c) on the Pay Code is used to calculate default values for the Assignment Rates/Payee Allowance Records created. Existing Payment and Allowance Pay Codes should be updated to populate the Invoice Rate Multiplier otherwise, when the new records are created, the calculated Invoice Rate will be set to be the same as the Pay Rate.Define and Use of Minimum Pay Rates
The functionality to define and use minimum pay rates is optional. This requirement only needs to be completed if the option to use the functionality is taken. If not, these items can be skipped. The below configuration steps should be completed if the functionality is required:- Update profile/permission sets (Optional)
- Update page layouts for new fields (Optional)
- Create a new picklist value for fields (Optional)
- Update new fields on existing records (Optional)
Update Profile/Permission Sets (Optional)
The below detailed fields have had read/edit access added to the following permission sets provided with the package. Where these are in use, the permissions required will be automatically provisioned.- 2cloudnine Payroll Admin
- 2cloudnine Time2Pay All Access
Update Page Layouts for New Fields (Optional)
This requirement only needs to be completed if the option to use the functionality is taken. If not, this item can be skipped.This functionality builds on the Automate Payee Allowance Records and Assignment Rate Creation
item. To function correctly, the Update Page Layouts for New Fields items within that section must also be
completed. Further, the new Minimum Pay Rate object has been packaged with a standard page layout
containing all required fields, so no updates are necessary in relation to this page layout.
- Select Assignment (tc9_pr__Assignment_c) > Page Layouts
- Select a page layout that is used for any Assignment record type excluding the Perm and Temp to Perm record types
-
Add the following fields to the layout
- Award Classification (tc9_et__Award_Classifiation__c)
- Award Level (tc9_et__Award_Level__c)
- Click Save
- Repeat steps 2 to 4 for all page layouts that are used on the Assignment object excluding those used for the Perm and Temp to Perm record types
the functionality includes the creation of 1 new Award Classifications and Levels object
(tc9_et__Award_Classification_and_Levels__c) which has been packaged with a standard page layout
containing all required fields. No updates are necessary in relation to this page layout.
Create a New Picklist Value for Fields (Optional)
This requirement only needs to be completed if the option to use the functionality is taken. If not, this item can be skipped.- Go to Setup > Objects and Fields > Picklist Value Sets
- Select Pay Rate Loading Based On Picklists
- Click the New button in the Values section
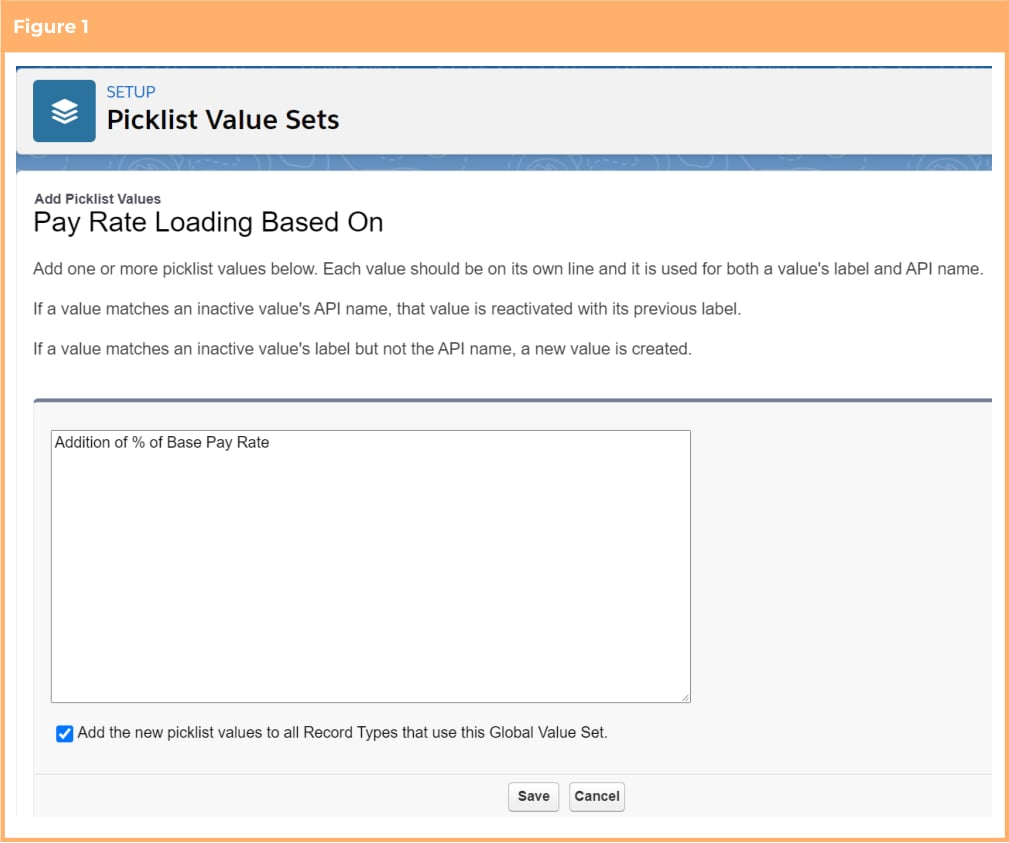
- On the displayed page, add the new value Addition of % of Base Pay Rate
- Check the “Add new picklist value sets to all record types that use this global value set” checkbox (See Figure 1)
- Click Save
Update New Fields on Existing Records (Optional)
This functionality builds on the Automate Payee Allowance Records and Assignment Rate Creation
item. To function correctly, the Update New Fields on Existing Records items within that section must also
be completed.
Create and Allocate Work Schedules Efficiently
The functionality to create and allocate work schedules is optional and is a beta version. Further updates and improvements will be included in the next release. This requirement only needs to be completed if the option to use the beta functionality is taken. If not, these items can be skipped. An updated version of these configuration steps will be included in the next release for those who wish to wait for the non-beta version. The below configuration steps should be completed if opting to trial the beta version:- Update profile/permission sets (Optional)
The functionality includes the creation of objects and record types which have all been packaged
with a standard page layout containing all required fields, so no updates are necessary in respect to these
page layouts.
Update Profile/Permission Sets (Optional)
The below detailed fields have had read/edit access added to the following permission sets provided with the package. Where these are in use, the permissions required will be automatically provisioned.- 2cloudnine Payroll Admin
- 2cloudnine Time2Pay All Access
Apply Work Schedule Information to Payroll
The functionality to apply work schedule information to payroll is optional and is a beta version. Further updates and improvements will be included in the next release. This requirement only needs to be complete if the option to use the beta functionality is taken. If not, these items can be skipped. An updated version of these configuration steps will be included in the next release for those who wish to wait for the non-beta version. The below configuration steps should be completed if the functionality is required:- Update profile/permission sets (Optional)
- Update page layouts for new fields (Optional)
- Create a new picklist value for fields (Optional)
Update Profile/Permission Sets (Optional)
The below detailed fields have had read/edit access added to the following permission sets provided with the package. Where these are in use, the permissions required will be automatically provisioned.- 2cloudnine Payroll Admin
- 2cloudnine Time2Pay All Access
This functionality builds on the Create and Allocate Work Schedules Efficiently . To function correctly,
the Update Profile/Permission Sets items within that section must also be completed.
Update Page Layouts for New Fields (Optional)
This requirement only needs to be completed if the option to use the functionality is taken. If not, this item can be skipped.- Go to Setup > Object Manager
- Select Assignment Rate (tc9_pr__Assignment_Rate__c) > Page Layouts
- Select a page layout that is used for the Remuneration record type
-
Add the following field to the layout
- Auto Pay Calculation Basis (tc9_pr__Auto_Pay_Calculation_Basis__c)
- Click Save
- Repeat steps 3 to 5 for all page layouts that are used for the Remuneration record type
- Return to the Object Manager
- Select Pay Transaction (tc9_pr__Pay_Transaction__c) > Page Layouts
- Select a page layout that is used for the Payment or Allowance record types
-
Add the following field to the layout
- Assignment Schedule (tc9_pr__Assignment_Schedule__c)
- Click Save
- Repeat steps 8 to 11 for all page layouts that are used for the Payment and Allowance record types
- Return to the Object Manager
- Select Timesheet Entry (tc9_et__Timesheet_Entry__c) > Page Layouts
- Select a page layout that is used for Timesheet Entry record type
-
Add the following field to the layout
- Work Schedule Item (tc9_pr__Work_Schedule_Item__c)
- Click Save
- Repeat steps 14 to 17 for all page layouts that are used on the Timesheet Entry object
Create a New Picklist Value for Fields (Optional)
This requirement only needs to be completed if the option to use the functionality is taken. If not, this item can be skipped.- Go to Setup > Object Manager
- Select Assignment Rate (tc9_pr__Assignment_Rate__c) > Fields & Relationships
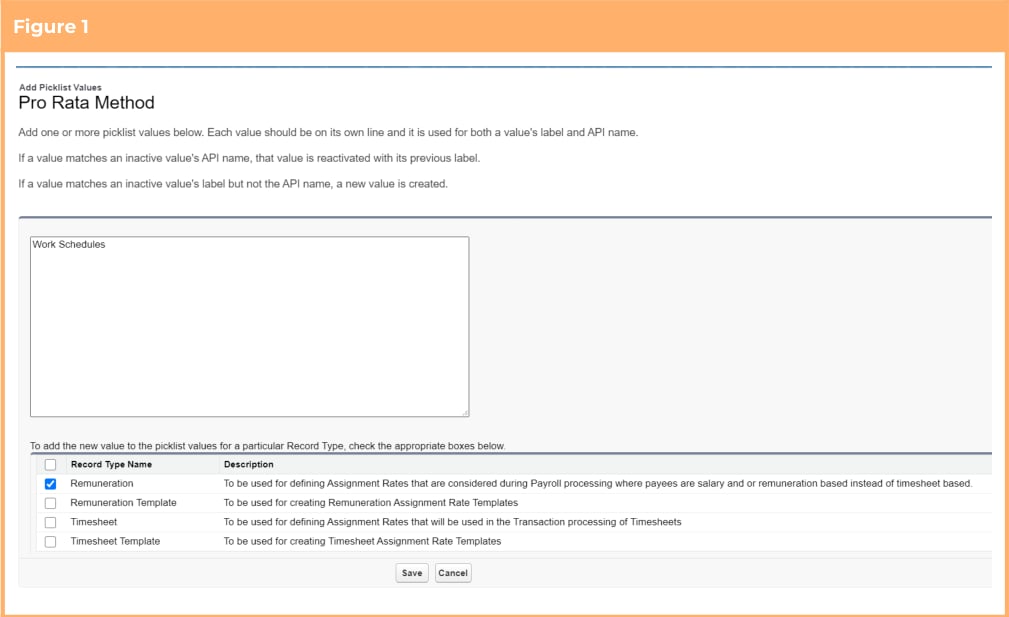
- Select the Pro Rata Method field (tc9_pr__Pro_Rata_Method__c)
- In the values section, click the New button
- On the displayed page add the new value ‘Work Schedule’ and apply it only for the Remuneration record type (See Figure 1)
- Click Save
Extend Minimum Rest or Break Loading Interpretation
The functionality to define separate Pay Codes for Sunday and Public Holiday breakpoints while accessing Minimum Rest or Break Loading Interpretation is optional, however there is required configuration that must be completed regardless of if the function is used. The below configuration steps should be completed:- Update profile/permission set (Compulsory)
- Update page layouts for new fields (Compulsory)
- Update new fields on existing records (Compulsory)
- Populate different Pay Codes for Sundays and Public Holidays (Optional)
Update Profile/Permission Sets (Compulsory)
The below detailed fields have had read/edit access added to the following permission sets provided with the package. Where these are in use, the permissions required will be automatically provisioned.- 2cloudnine Payroll Admin
- 2cloudnine Time2Pay All Access
Update Page Layouts For New Fields (Compulsory)
This requirement needs to be completed regardless of if the option to use the functionality is taken.- Go to Setup > Object Manager
- Select Interpretation Rule (tc9_et__Interpretation_Rule__c) > Page Layouts
- Select a page layout that is used for any Interpretation Rule record type excluding the Daily Rates record type
-
Add the following fields to the page layout
- Days Minimum Rest Hours Apply (tc9_et__Days_Minimum_Rest_Hours_Apply2__c)
- Days Total Span Hours Apply (tc9_et__Days_Total_Span_Hours_Apply2__c)
-
Delete the following fields from the page layout
- DO NOT USE (tc9_et__Days_Minimum_Rest_Hours_Apply__c)
- DO NOT USE (tc9_et__Days_Total_Span_Hours_Apply__c)
- Click Save
- Repeat steps 3 to 5 for all page layouts that are used on the Interpretation Rule object excluding those used for the Daily Rates record type
Update New Fields on Existing Records (Compulsory)
To prevent validation errors while performing Timesheet Interpretation, the new Days Minimum Rest Hours Apply and Days Total Span Hours Apply and fields (tc9_et__Days_Minimum_Rest_Hours_Apply2__c and tc9_et__Days_Total_Span_Hours_Apply2__c respectively) must be populated on all Interpretation Rules. To update the fields, the following steps should be followed:- Run a script through the dev console to automatically populate the Days Minimum Rest Hours Apply field (tc9_et__Days_Minimum_Rest_Hours_Apply2__c). See more details regarding options available below
- Run a script through the dev console to automatically populate the Days Total Span Hours Apply field (tc9_et__Days_Total_Span_Hours_Apply2__c). See more details regarding options available below.
- Manually edit, via the Interpretation Builder, any Interpretation Rules that require different values than those set by the script
- Populate the new Days Minimum Rest Hours Apply field (tc9_et__Days_Minimum_Rest_Hours_Apply2__c) with the value of the old depreciated fields (tc9_et__Days_Minimum_Rest_Hours_Apply__c). To take this option use Script 1 below.
- Populate the Days Minimum Rest Hours Apply field (tc9_et__Days_Minimum_Rest_Hours_Apply2__c) on all Interpretation Rules with the values of ‘Monday, Tuesday, Wednesday, Thursday, Friday, Saturday, Sunday and Public Holiday’ (ignoring the values in the old fields). To take this option use Script 2 below.
- Populate the new Days Total Span Hours Apply field (tc9_et__Days_Total_Span_Hours_Apply2__c) with the value of the old depreciated fields (tc9_et__Days_Total_Span_Hours_Apply2__c). To take this option use Script 3 below.
- Populate the Days Total Span Hours Apply fields (tc9_et__Days_Total_Span_Hours_Apply2__c) on all Interpretation Rules with the values of ‘Monday, Tuesday, Wednesday, Thursday, Friday, Saturday, Sunday and Public Holiday’ (ignoring the values in the old fields). To take this option use Script 4 below.
Script 1
Script 2
Script 3
Script 4
Populate Different Pay Codes for Sundays and Public Holidays (Optional)
By default, the main pay code defined on each Interpretation Breakpoint will be used for all days/public holidays relating to that breakpoint. If you wish to utilise the new functionality and define a different Pay Code for Sundays and/or Public Holidays, you will need to update the breakpoints to set the optional pay codes.Utilise Daily Interpretation Rules for Partial Days
The functionality to define partial day breakpoints in daily Interpretation Rules is optional. This requirement only needs to be completed if the option to use the functionality is taken. If not, these items can be skipped. The below configuration steps should be completed if the functionality is required:- Update profile/permission sets (Optional)
- Update page layouts for new fields (Optional)
- Update new fields on existing records (Optional)
Update Profile/Permission Sets (Optional)
The below detailed fields have had read/edit access added to the following permission sets provided with the package. Where these are in use, the permissions required will be automatically provisioned.- 2cloudnine Payroll Admin
- 2cloudnine Time2Pay All Access
Update Page Layouts for New Fields (Optional)
This requirement only needs to be completed if the option to use the functionality is taken. If not, this item can be skipped.- Go to Setup > Object Manager
- Select Interpretation Rule (tc9_et__Interpretation_Rule__c) > Page Layouts
- Select a page layout that is used for the Daily Rates record type
-
Add the following field to the layout
- Apply Partial Daily Rates field (tc9_et__Apply_Partial_Daily_Rates__c)
- Click Save
- Repeat steps 3 to 5 for all page layouts that are used for the Daily Rates record type
- Return to the Object Manager
- Select Interpretation Breakpoint (tc9_et__Interpretation_Breakpoint__c) > Page Layouts
- Select a page layout that is used for the Daily Rate record type
-
Add the following field to the layout
- Daily Quantity (tc9_et__Daily_Quantity__c)
- Click Save
- Repeat steps 9 to 11 for all page layouts that are used for the Daily Rate record type
Update New Fields on Existing Records (Optional)
By default, daily interpretation rules will continue to operate on the day, or part thereof basis. If you wish to utilise the new functionality to define partial breakpoints for any of your existing daily interpretation rules, you will need to update them via the Interpretation Builder.Pay Partial Allowances
The functionality to define partial allowance breakpoints in Interpretation Rules is optional. This requirement only needs to be completed if the option to use the functionality is taken. If not, these items can be skipped. The below configuration steps should be completed if the functionality is required:- Update profile/permission sets (Optional)
- Update page layouts for new fields (Optional)
- Update new fields on existing records (Optional)
Update Profile/Permission Sets (Optional)
The below detailed fields have had read/edit access added to the following permission sets provided with the package. Where these are in use, the permissions required will be automatically provisioned.- 2cloudnine Payroll Admin
- 2cloudnine Time2Pay All Access
Update Page Layouts for New Fields (Optional)
This requirement only needs to be completed if the option to use the functionality is taken. If not, this item can be skipped.- Go to Setup > Object Manager
- Select Interpretation Breakpoint (tc9_et__Interpretation_Breakpoint__c) > Page Layouts
- Select a page layout that is used for any Allowance record type
-
Add the following field to the layout
- Pay Partial Quantity (tc9_et__Pay_Partial_Quantity__c)
- Click Save
- Repeat steps 3 to 5 for all page layouts that are used for the Allowance record type
Update New Fields on Existing Records (Optional)
By default, allowances will continue to be interpreted on a whole period (hours, days, frequency) basis only. If you wish to utilise the new functionality to pay allowances for partial periods, you will need to update them via the Interpretation BuilderProvide Greater Detail on Pay Advice Documents
The functionality that allows users to choose what level of detail is to be provided on Pay Advice documents is optional, however there is required configuration that must be completed regardless of if the function is used. The below configuration steps should be completed:- Update profile/permission set (Compulsory)
- Update page layouts for new fields (Optional)
- Create a new picklist value for fields (Optional)
- Update new fields on existing records (Optional)
- Update the Pay Advice Detail Level on Pay Schedules (Optional)
Update Profile/Permission Sets (Compulsory)
The below detailed fields have had read/edit access added to the following permission sets provided with the package. Where these are in use, the permissions required will be automatically provisioned.- 2cloudnine Payroll Admin
- 2cloudnine Time2Pay All Access
Update Page Layouts for New Fields (Optional)
This requirement only needs to be completed if the option to use the functionality is taken. If not, this item can be skipped.- Go to Setup > Object Manager
- Select Pay Advice Line (tc9_pr__Pay_Advice_Line__c) > Page Layouts
- Select a page layout that is used for any Pay Advice Line record type
-
Add the following fields to the layout
- Project Code (tc9_pr__Project_Code__c)
- Click Save
- Repeat steps 3 to 5 for all page layouts that are used on the Pay Advice Line object
- Return to the Object Manager
- Select Project Code > Page Layouts
- Select a page layout that is used for any Assignment Project Code record type
-
Add the following field to the layout
- Pay Advice Description (tc9_pr__Pay_Advice_Description__c)
- Click Save
- Repeat steps 9 to 11 for all page layouts that are used on the Assignment Project Code record type
Create a New Picklist Value for Fields (Optional)
This requirement only needs to be completed if the option to use the functionality is taken. If not, this item can be skipped.- Go to Setup > Objects Manager
- Select Schedule (tc9_pr__Schedule__c) > Fields & Relationships
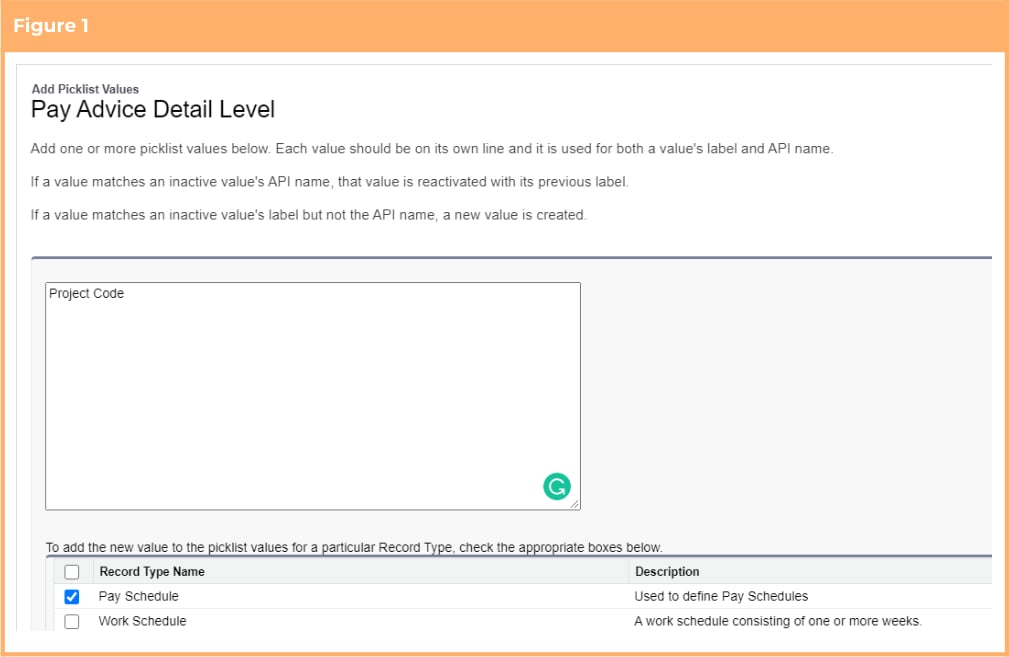
- Select the Pay Advice Detail Level field (tc9_pr__Pay_Advice_Detail_Level__c)
- In the values section, click the New button
- On the displayed page, add the new value Project Code and apply it only for the Pay Schedule record type (See Figure 1)
- Click Save
Update New Field on Existing Records (Optional)
This requirement only needs to be completed if the option to use the functionality is taken. If not, this item can be skipped. When Pay Advice documents are created with the corresponding Detail Level set to be “Project Code”, the value held in the Project Code’s Pay Advice Description field is displayed on the Pay Advice. To ensure there is a value to be used on the Pay Advice documents the Pay Advice Description field should be populated. To update the fields the below steps should be followed:- Run Script 1 defined below through dev console to automatically populate the field on all current Project Codes with the Project Code Name
- Manually edit any Project Codes that require different values than those set by the script
Script 1
Update the Pay Advice Detail Level on Pay Schedules (Optional)
To enable Pay Advice documents to be created at the Project Code level, the Pay Advice Detail Level must be set to the Project Code option. Any Pay Schedules that require the new level of detail should be updated directly via the standard page.Set a Custom Pay Advice Footer
The functionality to set a custom Pay Advice Footer is optional. This requirement only needs to be completed if the option to use the functionality is taken. If not, these items can be skipped. The below configuration steps should be completed if the functionality is required:- Update profile/permission Sets (Optional)
- Update page layouts for new fields (Optional
- Update new fields on existing records (Optional)
Update Profile/Permission Sets (Optional)
The below detailed fields have had read/edit access added to the following permission sets provided with the package. Where these are in use, the permissions required will be automatically provisioned.- 2cloudnine Payroll Admin
- 2cloudnine Time2Pay All Access
Update Page Layouts for New Fields (Optional)
This requirement only needs to be completed if the option to use the functionality is taken. If not, this item can be skipped.- Go to Setup > Object Manager
- Select Pay Advice Template (tc9_pr__Pay_Advice_Template__c) > Page Layouts
- Select a page layout that is used for any Pay Advice Template record type
-
Add the following fields to the layout
- Text Footer (tc9_pr__Text_Footer__c)
- Position - Footer (tc9_pr__Position_Footer__c)
- Colour Footer Text (tc9_pr__Colour_Footer_Text__c)
- Click Save
- Repeat steps 3 to 5 for all page layouts that are used on the Pay Advice Template object
Update New Fields on Existing Records (Optional)
By default, Pay Advice documents will continue to generate without the custom footer. If you wish to utilise the new custom footer functionality, you will need to update the relevant fields on the associated Pay Advice Templates.Define a Default Pay Advice Message
The functionality to set a default Pay Advice message is optional. This requirement only needs to be completed if the option to use the functionality is taken. If not, these items can be skipped. The below configuration steps should be completed if the functionality is required:- Update profile/permission sets (Optional)
- Update page layouts for new fields (Optional)
Update Profile/Permission Sets (Optional)
The below detailed fields have had read/edit access added to the following permission sets provided with the package. Where these are in use, the permissions required will be automatically provisioned.- 2cloudnine Payroll Admin
- 2cloudnine Time2Pay All Access
Update Page Layouts for New Fields (Optional)
This requirement only needs to be completed if the option to use the functionality is taken. If not, this item can be skipped.- Go to Setup > Object Manager
- Select Pay Advice Template (tc9_pr__Pay_Advice_Template__c) > Page Layouts
- Select a page layout that is used for any Pay Advice Template record type
-
Add the following fields to the layout
- Text Pay Advice Message (tc9_pr__Text_Pay_Advice_Message__c)
- Click Save
- Repeat steps 3 to 5 for all page layouts that are used on the Pay Advice Template object
Mark Pay Advice Templates as Active or Inactive
The functionality to mark Pay Advice Templates as Active or Inactive is compulsory and all the below configuration steps should be completed:- Update profile/permission set (Compulsory)
- Update page layouts for new fields (Compulsory)
- Update new fields on existing records (Compulsory)
Update Profile/Permission Sets (Compulsory)
The below detailed fields have had read/edit access added to the following permission sets provided with the package. Where these are in use, the permissions required will be automatically provisioned.- 2cloudnine Payroll Admin
- 2cloudnine Time2Pay All Access
Update Page Layouts for New Fields (Compulsory)
This requirement needs to be completed regardless of if the option to use the functionality is taken.- Go to Setup > Object Manager
- Select Pay Advice Template (tc9_pr__Pay_Advice_Template__c) > Page Layouts
- Select a page layout that is used for any Pay Advice Template record type
-
Add the following field to the layout
- Available for Use (tc9_pr__Available_for_Use__c)
- Click Save
- Repeat steps 3 to 5 for all page layouts that are used on the Pay Advice Template object
Update New Fields on Existing Records (Compulsory)
When the Pay Advice documents are created, the Available for Use field will determine if the Pay Advice Templates can be used. To ensure Pay Advice documents can continue to generate without error, the existing Pay Advice Templates should be updated to populate the new field. To update the fields the following steps should be followed:- Run Script 1 defined below through dev console to automatically set the Available For Use field to be “Yes”
- Manually edit any Pay Advice Templates that need to be made inactive.
Script 1
Consolidate Multiple Pay Advice Amounts in a Payment File
The functionality to consolidate multiple Pay Advice amounts in a Payment File is optional. This requirement only needs to be completed if the option to use the functionality is taken. If not, these items can be skipped. The below configuration steps should be completed if the functionality is required:- Update profile/permission set (Optional)
- Update page layouts for new fields (Optional)
- Update new fields on existing records (Optional)
Update Profile/Permission Sets (Optional)
The below detailed fields have had read/edit access added to the following permission sets provided with the package. Where these are in use, the permissions required will be automatically provisioned.- 2cloudnine Payroll Admin
- 2cloudnine Time2Pay All Access
Update Page Layouts for New Fields (Optional)
This requirement only needs to be completed if the option to use the functionality is taken. If not, this item can be skipped.- Go to Setup > Object Manager
- Select Payee (tc9_pr__Payee__c) > Page Layouts
- Select a page layout that is used for any Payee record type
-
Add the following fields to the layout
- Payment Consolidation (tc9_pr__payment_consolidation__c) *
- Click Save
- Repeat steps 3 to 5 for all page layouts that are used on the Payee object
- Return to the Object Manager
- Select Payment File Line (tc9_pr__Payment_File_Line__c) > Page Layouts
- Select a page layout that is used for any Payment File Line record type
-
Add the following fields to the layout
- Payment Consolidation (tc9_pr__payment_consolidation__c)
- Click Save
- Repeat steps 9 to 11 for all page layouts that are used on the Payment File Line object
- The Payment Consolidation field (Payment_Consolidation__c) on Payee is an existing field that was previously unused so it may not have been added to page layouts. It is detailed here to ensure the correct permission is given for the functionality.
Update New Field on Existing Records (Optional)
This requirement only needs to be completed if the option to use the functionality is taken. If not, this item can be skipped. By default, the Payment Consolidation will be processed as “Separated”, which is set as default option at the package level. This means that in most instances, the field will be populated and, on the occasions it is not, the Payment File functionality will continue to operate without error. That said, if the option to use the functionality is undertaken, you may choose to ensure the field on the Payee is populated so the setting is clearer to the user. To update the field the following steps should be followed:- Run Script 1 defined below through dev console to automatically set the Payment Consolidation field on any Payees where it is not populated to be “Separated”
- Manually edit any Payee records that need to be made “Consolidated”
Script 1
Automatically Assign Defined Permission Sets to Community Users
The functionality to automatically assign defined permission sets to community users is optional, however if the optional functionality to auto create community users introduced in v1.84 is in use, the auto assignment to permission sets must also be set up. The below configuration steps should be completed if the functionality is required:- Populate the Time2pay Portal Permission Sets Configuration custom setting (Optional)
Populate the Time2pay Portal Permission Sets Configuration Custom Setting (Optional)
This requirement only needs to be completed if the option to use the functionality is taken. If not, this item can be skipped.- Go to Setup > Custom Code > Custom Setting
- Locate the Time2pay Portal Permission Set custom setting and click on the Manage link alongside it
- Click the New button
-
Populate the following fields
- Name Give the record a useful name that will help identify which Profile Name/Permission Set Combination is set up. This name must be unique.
- Portal Profile Name Defines the Profile Name that will be used to identify which permission sets will be automatically assigned during community user creation and update. The value in this field must match an existing User Profile’s Name.
- Permission Set API Name Defines the Permission set that will be automatically assigned during community user creation and update. The value in this field must match the API Name of the Permission.
- Click Save
- Repeat steps 3 to 5 for all Profile/Permission Set combinations required.
There can be multiple records created per Profile. Where there are multiple records created for a
profile, it will result in multiple permission sets being assigned to Users.
Customised Invoice Grouping
The functionality to use Custom Invoice Group By IDs is optional. This requirement only needs to be completed if the option to use the functionality is taken. If not, these items can be skipped. The below configuration steps should be completed if the functionality is required:- Update profile/permission sets (Optional)
- Update page layouts for new fields (Optional)
- Create a new picklist value for fields (Optional)
Update Profile/Permission Sets (Optional)
The below detailed fields have had read/edit access added to the following permission sets provided with the package. Where these are in use, the permissions required will be automatically provisioned.- 2cloudnine Payroll Admin
- 2cloudnine Time2Pay All Access
Update Page Layouts for New Fields (Optional)
This requirement only needs to be completed if the option to use the functionality is taken. If not, this item can be skipped.- Go to Setup > Object Manager
- Select Assignment (tc9_pr__Assignment__c) > Page Layouts
- Select a page layout that is used for any Assignment record type excluding the Employee record type
-
Add the following fields to the layout
- Custom Invoice Group by ID (tc9_et__Custom_Invoice_group_by_id__c)
- Click Save
- Repeat steps 3 to 5 for all page layouts that are used on the Assignment object excluding those used for the Employee record type
Create a New Picklist Value for Fields (Optional)
This requirement only needs to be completed if the option to use the functionality is taken. If not, this item can be skipped.- Go to Setup > Objects and Fields > Picklist Value Sets
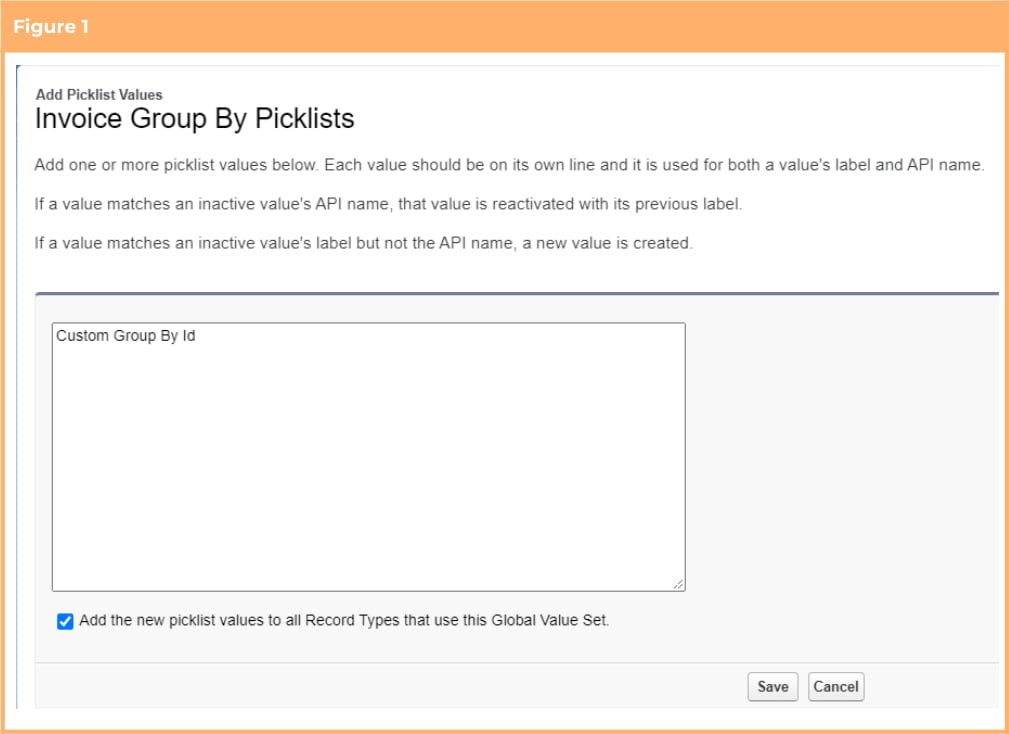
- Select Invoice Group By Picklists
- Click the New button in the Values section
- On the displayed page, add the new value Custom Group By Id
- Check the “Add new picklist value sets to all record types that use this global value set” checkbox (See Figure 1)
- Click Save
Include Expense Receipts/Evidences as Attachments with Invoice Emails
The functionality to include expense receipts/evidence as attachments with invoice emails is optional. This requirement only needs to be completed if the option to use the functionality is taken. If not, these items can be skipped. The below configuration steps should be completed if the functionality is required:- Update Profile/Permission Sets (Optional)
- Update page layouts for new fields (Optional)
- Update new fields on existing records (Optional)
Update Profile/Permission Sets (Optional)
The below detailed fields have had read/edit access added to the following permission sets provided with the package. Where these are in use, the permissions required will be automatically provisioned.- 2cloudnine Payroll Admin
- 2cloudnine Time2Pay All Access
Update Page Layouts for New Fields (Optional)
This requirement only needs to be completed if the option to use the functionality is taken. If not, this item can be skipped.- Go to Setup > Object Manager
- Select Invoice Setting (tc9_et__Invoice_Setting__c) > Page Layouts
- Select a page layout that is used for the Payroll Items record type
-
Add the following field to the layout
- Exp Claim Attachments with Invoice (tc9_et__Exp_Claim_Attachments_with_Invoice__c)
- Click Save
- Repeat steps 3 to 5 for all page layouts that are used on the Payroll Items record type
Update New Field on Existing Records (Optional)
To send Expense receipts/evidence with Invoice emails, the Exp Claim Attachments with Invoice field must be set to the “Yes” option in the Invoice Setting. Any Invoice Settings that require this should be updated directly via the standard page.Make ‘Funding Requirement’ Mandatory
The functionality to make the Funding Requirement a mandatory field on the Create Pay Batch page is optional. The below configuration steps should be completed if the functionality is required:- Turn on functionality via custom setting (Optional)
Turn On Functionality via Custom Setting (Optional)
This requirement only needs to be completed if the option to use the functionality is taken. If not, this item can be skipped.- Go to Setup > Custom Code > Custom Setting
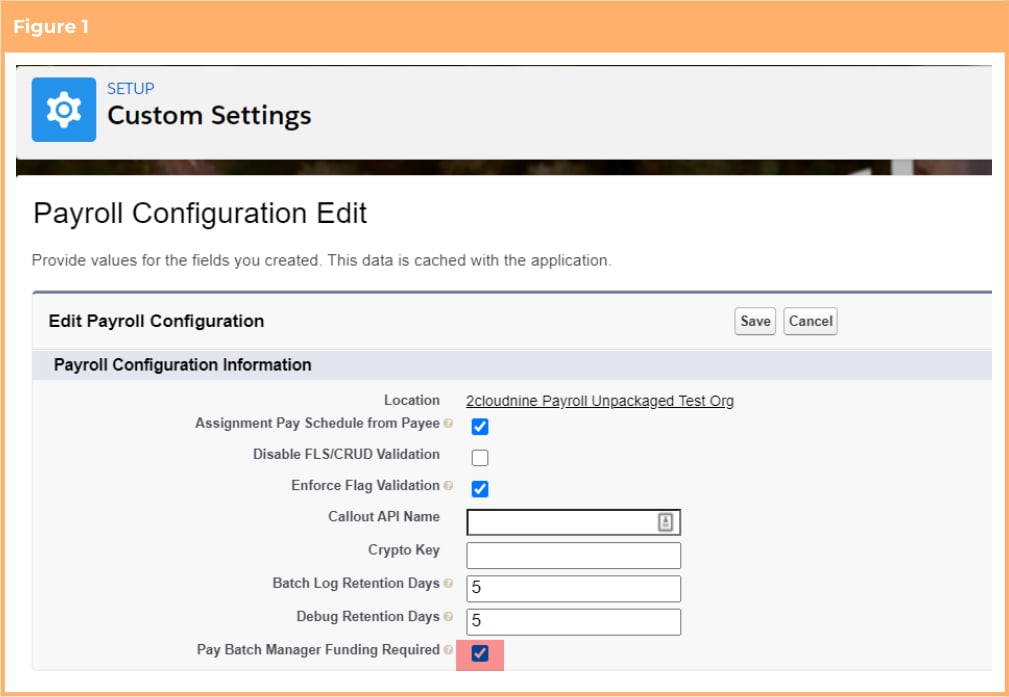
- Locate the Payroll Configuration custom setting and click on the Manage link alongside it
- Click the Edit button
- Set the Pay Batch Manager Funding Required checkbox field to be checked as “True” (See Figure 1)
- Click Save
Adhere to SuperStream Requirements
The introduction of the Super Fund validation is a compulsory validation that will come into effect on installation of the package. To prevent validation errors occurring during the payroll processing, the below configuration steps should be completed:- Check and Update data on existing records (Compulsory)
Check and Update Data On Existing Records (Compulsory)
A check of current, existing Payee Withholding records should be completed to ensure that the Superannuation Fund is populated and, where not, corrective action should be taken. To make this process easier, a new list view on the Payee Withholding object, No Super Fund, has been created. This will list any AU Super records that have not expired and do not have the superannuation fund populated. From this list view the following corrective action should be taken:- Where the Pay Batch Event Processing Status is ‘New’ (see column in list view), the record can be edited directly.
- Where the Pay Batch Event Processing Status is not ‘New’, the Payee Withholding record has already been applied to a payroll therefore can not be updated. You will need to expire the existing record and create a new one with the Superannuation Fund populated.
Customise Communities/Experience Terminology
The functionality to customise terminology used within Communities/Experience is optional. If required, system administrators can add Translations/Overrides against individual Custom Labels and the changes will be reflected within both the Employee and Approver Communities/Experience. The below configuration steps should be completed if the functionality is required:- Override/translate custom labels (Optional)
Override/Translate Custom Labels (Optional)
This requirement only needs to be completed if the option to use the functionality is taken. If not, this item can be skipped.- Use the table provided in Appendix 23 to search for the out of the box terminology used within Communities/Experience and establish the custom label that needs to be updated to change it
- Go to Setup > User Interface > Custom Labels
- Locate the custom label you wish to override/translate and click the Name link (not the Edit link alongside it)
- On the displayed page, scroll down to the Local Translations/Overrides section and click the New Local Transactions/Overrides button
- Populate the required fields
- Click Save
- Repeat steps 1 to 6 until all overrides / translations required are completed
Appendix 1
Below is a list of component included within the Lilly Pilly ‘21 ReleaseObject
Object Fields
Object Record Types
Custom Setting
Custom Setting Fields
tc9_et.External_IDPlatform Events
Platform Event Fields
Page Layout
Compact Layouts
Lightning Pages
Global Value Sets
Tabs
Buttons and Links
List Views
- These components have been included in the Lilly Pilly Release, however the related functionality will be introduced in future releases.
Appendix 2
The below table defines the access that must be granted to Internal Users for new components introduced for the functionality to allow leave to be paid in advance.Users Key
- User 1 - Users who will create/update Leave Rules
- User 2 - Users who will create/update Payee Leave Events
- User 3 - Users who will process payroll
Minimum Access Key
- R - Read
- C - Create
- E - Edit
- A - Assigned
Appendix 3
The below table defines the access that must be granted to Experience/ Communities Users for new components introduced for the functionality to allow leave to be paid in advance.Users Key
- User 1 - Employee Community Users
- User 2 - Approver Community Guest User
Minimum Access Key
- R - Read
- C - Create
- E - Edit
- A - Assigned
Appendix 4
The below table defines the access that must be granted to Internal Users for new components introduced for the functionality to allow users to indicate the rate at which leave will be paid.Users Key
- User 1 - Users who will create/update Leave Rules
- User 2 - Users who will create/update Payee Leave Events
- User 3 - Users who will process payroll
Minimum Access Key
- R - Read
- C - Create
- E - Edit
- A - Assigned
Appendix 5
The below table defines the access that must be granted to Experience/Communities Users for new components introduced for the functionality to allow users to indicate the rate at which leave will be paid.Users Key
- User 1 - Employee Community Users
- User 2 - Approver Community Guest User
Minimum Access Key
- R - Read
- C - Create
- E - Edit
- A - Assigned
Appendix 6
The below table defines the access that must be granted to Internal Users for new components introduced for the functionality to define and use dual leave loading calculations during Timesheet Interpretation.Users Key
- User 1 - Users who will create/update Leave Rules
- User 2 - Users who will create/update Interpretation Rules
- User 3 - Users who will be processing Timesheets through Interpretation Rules
Minimum Access Key
- R - Read
- C - Create
- E - Edit
- A - Assigned
Appendix 7
The below table defines the access that must be granted to Internal Users for new components introduced for the functionality to allow users to submit, approve, reject leave requests credit for time off in lieu through Communities/Experience.Users Key
- User 1 - Users who will create/update Leave Rules
Minimum Access Key
- R - Read
- C - Create
- E - Edit
- A - Assigned
Appendix 8
The below table defines the access that must be granted to Experience/Communities Users for new components introduced for the functionality to allow users to submit, approve, reject leave requests credit for time off in lieu through Communities/Experience.Users Key
- User 1 - Employee Community Users
- User 2 - Approver Community Guest User
Minimum Access Key
- R - Read
- C - Create
- E - Edit
- A - Assigned
Appendix 9
The below table defines the access that must be granted to Internal Users for new components introduced for the functionality to automate the creation of Payee Allowance Records and Assignment Rates.Users Key
- User 1 - Users who will create/update Assignment Rate Templates
- User 2 - Users who will create/update Payee Allowance Templates
- User 3 - Users who will create/update Pay Codes
- User 4 - Users who will create/update Assignments
Minimum Access Key
- R - Read
- C - Create
- E - Edit
- A - Assigned
Appendix 10
The below table defines the access that must be granted to Internal Users for new components introduced for the functionality to define and use minimum pay rates.Users Key
- User 1 - Users who will create/update Award Classifications and Levels
- User 2 - Users who will create/update Minimum Pay Rates
- User 3 - Users who will create/update Assignments
Minimum Access Key
- R - Read
- C - Create
- E - Edit
- A - Assigned
Appendix 11
The below table defines the access that must be granted to Internal Users for new components introduced for the functionality to create and allocate work schedules.Users Key
- User 1 - Users who will create/edit Work Schedules
- User 2 - Users who will allocate work schedules to assignments
Minimum Access Key
- R - Read
- C - Create
- E - Edit
- A - Assigned
Appendix 12
The below table defines the access that must be granted to Internal Users for new components introduced for the functionality to apply work schedule information to payroll.Users Key
- User 1 - Users that create/update Assignment Rates
- User 2 - Users who generate Timesheets
- User 3 - Users who will be processing Timesheets through Interpretation Rules
- User 4 - Users who will process payroll
Minimum Access Key
- R - Read
- C - Create
- E - Edit
- A - Assigned
Appendix 13
The below table defines the access that must be granted to Internal Users for new components introduced for the functionality to define separate Pay Codes for Sunday and Public Holiday breakpoints, while accessing Minimum Rest or Break Loading InterpretationUsers Key
- User 1 - Users who will create/update Interpretation Rules
- User 2 - Users who will be processing Timesheets through Interpretation Rules
Minimum Access Key
- R - Read
- C - Create
- E - Edit
- A - Assigned
Appendix 14
The below table defines the access that must be granted to Internal Users for new components introduced for the functionality to define partial day breakpoints in daily Interpretation Rules.Users Key
- User 1 - Users who will create/update Interpretation Rules
- User 2 - Users who will be processing Timesheets through Interpretation Rules
Minimum Access Key
- R - Read
- C - Create
- E - Edit
- A - Assigned
Appendix 15
The below table defines the access that must be granted to Internal Users for new components introduced for the functionality to define partial allowance breakpoints in Interpretation Rules.Users Key
- User 1 - Users who will create/update Interpretation Rules
- User 2 - Users who will be processing Timesheets through Interpretation Rules
Minimum Access Key
- R - Read
- C - Create
- E - Edit
- A - Assigned
Appendix 16
The below table defines the access that must be granted to Internal Users for new components introduced for the functionality to define partial allowance breakpoints in Interpretation Rules.Users Key
- User 1 - Users who will create/update Assignment Project Codes
- User 2 - Users who will process payroll
Minimum Access Key
- R - Read
- C - Create
- E - Edit
- A - Assigned
Appendix 17
The below table defines the access that must be granted to Internal Users for new components introduced for the functionality to set a custom pay advice footer.Users Key
- User 1 - Users who will create/update Pay Advice Templates
- User 2 - Users who will process payroll
Minimum Access Key
- R - Read
- C - Create
- E - Edit
- A - Assigned
Appendix 18
The below table defines the access that must be granted to Internal Users for new components introduced for the functionality to set a default Pay Advice message.Users Key
- User 1 - Users who will create/update Pay Advice Templates
- User 2 - Users who will process payroll
Minimum Access Key
- R - Read
- C - Create
- E - Edit
- A - Assigned
Appendix 19
The below table defines the access that must be granted to Internal Users for new components introduced for the functionality to mark Pay Advice Templates as Active or Inactive.Users Key
- User 1 - Users who will create/update Pay Advice Templates
- User 2 - Users who will process payroll
Minimum Access Key
- R - Read
- C - Create
- E - Edit
- A - Assigned
Appendix 20
The below table defines the access that must be granted to Internal Users for new components introduced for the functionality to consolidate multiple Pay Advice amounts in a Payment File.Users Key
- User 1 - Users who will create/update Payee records
- User 2 - Users who will process payroll (and create the Payment File)
Minimum Access Key
- R - Read
- C - Create
- E - Edit
- A - Assigned
- The Payment Consolidation field (Payment_Consolidation__c) on Payee is an existing field that was previously unused so may not have been added to profiles/permission sets. It is detailed here to ensure the correct permission is given for the functionality.
Appendix 21
The below table defines the access that must be granted to Internal Users for new components introduced for the functionality to use Custom Invoice Group By IDs.Users Key
- User 1 - Users who will create/update Assignments
- User 2 - Users who will create/update Pay Transactions (via Timesheet Interpretation, Payroll Processing or Invoiceable Fees)
- User 3 - Users who will create invoices
Minimum Access Key
- R - Read
- C - Create
- E - Edit
- A - Assigned
Appendix 22
The below table defines the access that must be granted to Internal Users for new components introduced for the functionality to include expense receipts/evidence as attachments with invoice emails.Users Key
- User 1 - Users who will create/update Invoice Settings
- User 2 - Users who will create/update Invoices
- User 3 - Users who will send invoice emails
Minimum Access Key
- R - Read
- C - Create
- E - Edit
- A - Assigned