

Packages Included in Field Service Extension
This Configuration Guide to the 2cloudnine Payroll Field Service Extension covers the Field Service Extension package, which must be installed only after you have successfully completed the Pre-Installation checklist, detailed later in this document. Following this guide in sequence will ensure the correct installation and configuration of the Field Service Extension Package.
Important Information
Only an authorised Salesforce System Administrator, 2cloudnine Consultant or 2cloudnine Partner should
be actioning any installation, configuration items, and/or related tasks.
There may be compulsory and optional configuration items and tasks that need to be completed pre and
post-installation of the package. These will be highlighted in the checklists provided in this document,
with further details given within this document.
It is required that you complete the installation and configuration of the main 2cloudnine Payroll
packages before attempting to install the Field Service Extension Package. You can do so by following
the steps given in the Configuration Guide To 2cloudnine Payroll Suite. This will ensure that any
prerequisite/base configuration needed for the Field Service Extension has also been completed.
The installer will be responsible for ensuring all these configuration items and tasks are completed within
a reasonable timeframe of the package being installed. Please ensure you have familiarised yourself with
all of the requirements before installing the package and ensure you have sufficient time and resources
available. Failing to do so can negatively impact the User experience and stability of 2cloudnine Payroll
and Field Service Extension
This guide should always be accessed from Salesforce and used via your web browser. This will ensure
you are viewing the most recent version of the document. Further, downloading the document and
opening it within desktop programs, such as Adobe, has been found to cause errors when copying and
using the scripts provided for data updates. These errors do not occur when viewed through a browser.
Read First: How to Use this Configuration Guide
What is covered by this Configuration Guide?
This Configuration Guide outlines the ‘out of the box’ setup of 2cloudnine Field Service Extension. During the sales process and discovery, where it is identified that the need for further customisations outside of those built by the 2cloudnine Field Service Extension will be required, this would not be covered by this Configuration Guide.Task Types
- General Salesforce Setup
- Custom Settings, Metadata Types, and Setting Configuration
- Wizards and Scripts
- Schedule Jobs
- Records Creation
- Page Layouts and Other User Interfaces
- Base Data / Records Set Up
- Baseline Testing
- Security Set Up
- Data Migration
Tasks
This Configuration Guide is made up of a series of tasks that are either compulsory or optional, that must be completed to successfully use the 2cloudnine Field Services. Each task is allocated 1 of 3 possible classifications which are:- Compulsory must be completed regardless of whether the organisation will use the related functionality.
- Conditionally Compulsory must be completed if the organisation is choosing to use a specific functionality within 2cloudnine Field Services. When a task is Conditionally Compulsory we will detail the condition(s) that makes it compulsory. If an Org will not be using the specified functionality, they will not have to complete the task.
- Optional tasks will only need completing to use an optional feature of 2cloudnine Field Services.
### Responsible Parties
Due to the nature of the Field Service Extension, the responsibility of completing the tasks outlined may fall to either Field Service Partners, or 2cloudnine Consultants. Successful Field Service data integration requires Object configuration and Record maintenance be completed for both Field Service and 2cloudnine Payroll data. The Installation and Configuration checklist provides an overview of each task required, as well as identifying the responsible party.- Field Service Partners are responsible for the Field Service Object configuration, Record creation, and Record maintenance activities necessary to enable integration.
- 2cloudnine Consultants are responsible for the Payroll and Field Service Extension Object configuration, Record creation, and Record maintenance activities necessary to enable integration.
1. Pre-Installation
If you are installing into a pre-existing Salesforce org or creating a new Salesforce org, there are pre-installation tasks that must be completed before the 2cloudnine Field Service Extension package is installed. The following checklist summarises the tasks that are to be performed. A higher level of detail on what is required can be found by following the link to each specific task.Field Service Prerequisites
Once Field Service is enabled, you gain access to a suite of standard objects that you can find in Setup and as Tabs within Salesforce. These objects contain the core Field Service features, including Work Orders and Service Appointments. The Field Service Managed Package builds on these core features and includes:- A Guided Setup tool that assists creating Field Service records and customising settings.
- A dynamic scheduling console that gives dispatchers and supervisors a bird’s-eye view of all team members and scheduled appointments.
- A scheduling optimizer that allocates resources to appointments in the most efficient way possible by accounting for worker skill level, travel time, location, and other factors.
- Scheduling policies and triggers that help you customise your scheduling model and display preferences.
- Enable Field Service
- Install the Field Service Managed Package
- Manage Field Service Permissions
Field Service Licence Provision Check
Field Service Licences need to be provisioned in the Production Org before the Field Service Extension Package is installed. You might also require a Sandbox refresh if installing into a Sandbox created before the Community Licences were provisioned. Go to Setup > Company Information- Scroll down to ‘User Licences’.
- Confirm ‘Field Service’ is listed, the number provisioned, used, and remaining.
Field Service Enabled Check
Please review the Org to ensure Field Service is enabled by following the steps below: Go to Settings > Field Service Settings- The screen should indicate that Field Service is enabled.
2cloudnine Prerequisites
Before you can install the 2cloudnine Field Service Extension package, you must (at a minimum) already have 2cloudnine Payroll, 2cloudnine Time2Pay Extension, 2cloudnine Payroll Communities/Experience Extension and the 2cloudnine General Ledger Extension packages installed and configured. Refer to the Configuration Guide for these here:2. Installation and Configuration Checklist
The following checklist summarises the tasks that are to be performed to install and configure 2cloudnine Payroll. A higher level of detail on what is required can be found by following the link to each specific task. Each task should be completed in the sequence below to ensure seamless installation and configuration of the packages.| Task | Requirement | Completed |
|---|---|---|
| Package Installation | ||
| Install 2cloudnine Field Service Extension | Compulsory | |
| Installation Process | Compulsory | |
| Custom Settings | ||
| Configure Field Service Custom Settings | Compulsory | |
| Custom Metadata | ||
| Create New Managed Records for Field Service Permission Sets | Compulsory | |
| Update Field Service Page Layouts | ||
| Expense | Compulsory | |
| Resource Absence | Compulsory | |
| Service Resource | Compulsory | |
| Time Sheet | Compulsory | |
| Time Sheet Entry | Compulsory | |
| User | Compulsory | |
| Update 2cloudnine Page Layouts | ||
| Contact | Compulsory | |
| Leave Rule | Compulsory | |
| Payee | Compulsory | |
| Payee Leave Event | Compulsory | |
| Timesheet | Compulsory | |
| Timesheet Entry | Compulsory | |
| Timesheet Item | Compulsory | |
| Scheduled Jobs | ||
| Integration for Field Service Time Sheets | Compulsory | |
| Assign Field Service Permissions | ||
| Assign User Permissions | Compulsory | |
| Sandbox Refresh | ||
| Sandbox Refresh | Optional | |
3. Package Installation
Installing Packages
Please make sure to install the required packages now before completing any further configuration. You must only proceed further once all the required packages have been installed.Installation Process
When you install a managed package, you need to select the correct option of either a), b) or c) below, to ensure access to the Package is provided to the Profiles as needed:- Install for Admins Only
- Install for Specific Profiles - To manually select which Profiles you will be applying the security to.
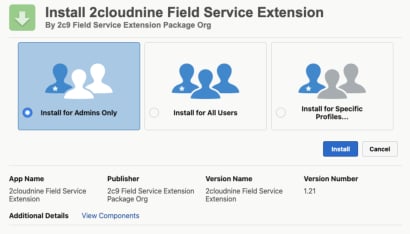
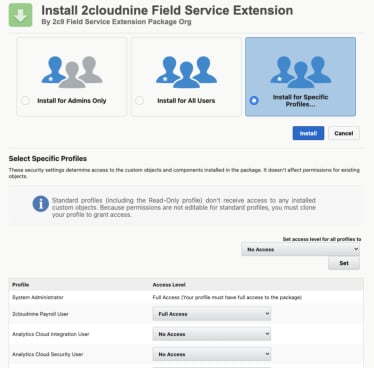
4. Custom Settings
Within the 2cloudnine packages are a variety of Custom Settings which enable Users to have a smoother experience of switching functionality on or off as required in an Org, or to provide required data as needed for some components to work.Populate Field Service Integration Custom Settings
Go to Setup > Custom Settings > Field Service Integration Configuration > Manage- Click on the New button to update the values for the Field Service Integration Configuration at an Org Wide level (selecting the New button underneath the black line will only apply changes to the logged in User).
- Populate the Field Service Integration Configuration Information fields as follows:
- Default : TRUE
- Exclude First Travel of the Day : [TRUE/FALSE]
- Exclude Last Travel of the Day : [TRUE/FALSE]
- Owner of Service Resource: When populated with a valid 18 character User Id the Owner of any inserted/updated Service Record will be populated with this value.
- Payee Owner is Service Resource Owner: If checked, the Service Resource Owner will be set to be the same as the Payee Owner.
- Profile Name : Nominate the preferred Profile Name, according to Client requirements (i.e. ‘Standard Platform User’ or ‘Service Resource - Mobile User (Community Plus)’.
- Resource Abscence Record Type : A valid Developer Name of the Record Type for the Resource Absence set during the integration of the 2cloudnine Payee Leave Events.
- Resource Absence End Time : The default End Time of a Resource Absence (in the format {HH: MM})
- Resource Absence Start Time : The default Start Time of a Resource Absence (in the format {HH: MM})
- Timesheet Entry Break Threshold : The break threshold for joining Timesheet Entries during the integration process in minutes.
- Timesheet Entry Gap Threshold : The threshold for joining Timesheet Entries during the integration process in minutes.
- Travel Merge Threshold : The travel threshold for joining Timesheet Entries during the integration process in minutes.
- Use Existing User : If set to TRUE, integration will perform validation each time a new Service Resource is created. If an existing User is identified for the Service Resource via a lookup to the Contact, the records will be automatically related.
- Once you’ve updated the necessary fields, click on the Save button.
5. Custom Metadata
Create New Managed Records for Field Service Permission Sets
Go to Setup > Custom Metadata Types > FS Permission Set > Manage Records- Click on the New button and create two new records according to the following values:
- Label : 2cloudnine Field Service Integration - Base
- FS Permission Set Name (API Name of the Permission Set): X2cloudnine_Field_Service_Integration (this auto populates)
- Permission Set Id : [the record Id of the X2cloudnine_Field_Service_Integration]
- Permission Set Name (API Name of the Permission Set): X2cloudnine_Field_Service_Integration
- Label : 2cloudnine Field Service Integration - Full Access
- FS Permission Set Nam e (API Name of the Permission Set): X2cloudnine_Field_Service_Integration_Full_Access (this auto populates)
- Permission Set Id : [the record Id of the X2cloudnine_Field_Service_Integration_Full_Access]
- Permission Set Name (API Name of the Permission Set): X2cloudnine_Field_Service_Integration_Full_Access
- Click on the Save button.
Configure Field Service Batch Size
- Go to Setup > Custom Metadata Types > Field Service Batch Size > Manage Records
- Click on the New button and populate the following fields:
- Label : Batch_TimesheetIntegration
- Field Service Batch Size Name : Batch_TimesheetIntegration
- Batch Size : 50
- Click on the Save button.
6. Update Field Service Page Layouts
Updates to Field Service Page Layouts are required for the following Objects, to ensure the Field Service Extension is able to reference the necessary fields during data integration. Due to the inherent variance between each implementation of the Field Service package, 2cloudnine Administrators will need to work with Field Service Partners to identify which specific Page Layouts require update for each Object. Failing to add the necessary 2c9 fields to the correct Page Layouts for each of the following Objects will cause data integration to fail, as the required data will not be available for reference. Please ensure fields are added to ALL Page Layouts containing Field Service data referenced during integration. For a comprehensive list of all data referenced by the Field Service Extension, and the corresponding functionality, please refer to the Field Mapping tables available in the Field Service Extension Administrator Guide.Expense
Go to Setup > Object Manager > Expense (Standard Object, not Custom Object) > Page Layouts- Select Expense Layout from the list of available Page Layouts.
- Add the following Related List to the Page Layout:
- Pay Condition Allocation
- Click on the Save button.
- Repeat for all remaining Page Layouts as required.
Resource Absence
Go to Setup > Object Manager > Resource Absence > Page Layouts- Select Resource Absence Layout from the list of available Page Layouts.
- Add a new Section to the bottom of the Page Layout.
- In Section Name, enter 2cloudnine Information .
- Select the OK button.
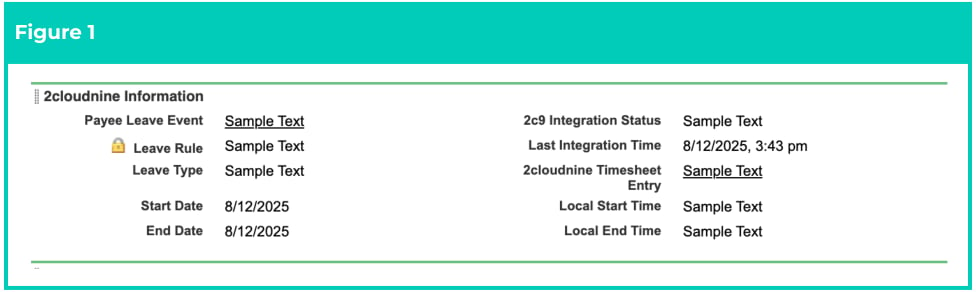
- Add the following fields to the new Section on the Page Layout (see Figure 1):
- Payee Leave Event (tc9_efs__Payee_Leave_Event__c)
- Leave Rule (tc9_efs__Leave_Rule__c)
- Leave Type (tc9_efs__Leave_Type__c)
- Start Date (tc9_efs__Start_Date__c)
- End Date (tc9_efs__End_Date__c)
- 2c9 Integration Status (tc9_efs__Integration_Status__c)
- Last Integration Time (tc9_efs__Last_Integration_Time__c)
- 2cloudnine Timesheet Entry (tc9_efs__Timesheet_Entry_Id__c)
- Local Start Time (tc9_efs__Local_Start_Time__c)
- Local End Time (tc9_efs__Local_End_Time__c)
- Click on the Save button.
- Repeat for all remaining Page Layouts as required.
Service Resource
Go to Setup > Object Manager > Service Resource > Page Layouts- Select Service Resource Layout from the list of available Page Layouts.
- Add the following field to the Information section of the Page Layout:
- Employee (tc9_efs__Employee__c)
- Click on the Save button.
- Repeat for all remaining Page Layouts as required.
Important Notes(Service Resource Page Layout Updates)For Orgs using LWC Page Layouts, please ensure this field is added to the Custom LWC.
Time Sheet
Go to Setup > Object Manager > Time Sheet > Page Layouts- Select Time Sheet Layout from the list of available Page Layouts.
- Add a new Section to the bottom of the Page Layout.
- In Section Name, enter 2cloudnine Information .
- Select the OK button.
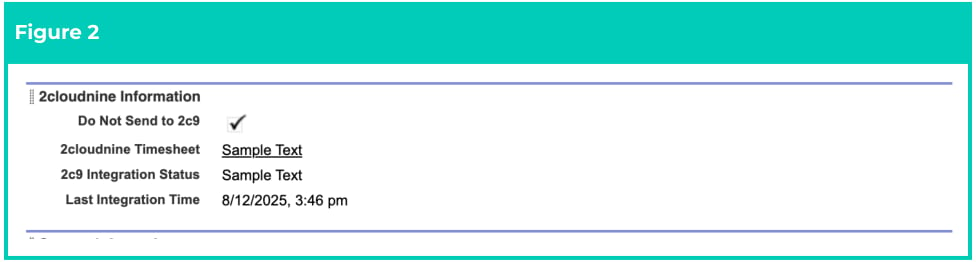
- Add the following fields to the new Section on the Page Layout (Figure 2):
- Do Not Send to 2c9 (tc9_efs__Do_Not_Send__c)
- 2cloudnine Timesheet (tc9_efs__Timesheet__c)
- 2c9 Integration Status (tc9_efs__Integration_Status__c)
- Last Integration Time (tc9_efs__Last_Integration_Time__c)
- Click on the Save button.
- Repeat for all remaining Page Layouts as required.
Time Sheet Entry
Go to Setup > Object Manager > Time Sheet Entry > Page Layouts- Select Time Sheet Entry Layout from the list of available Page Layouts.
- Add a new Section to the bottom of the Page Layout.
- In Section Name, enter 2cloudnine Information .
- Select the OK button.
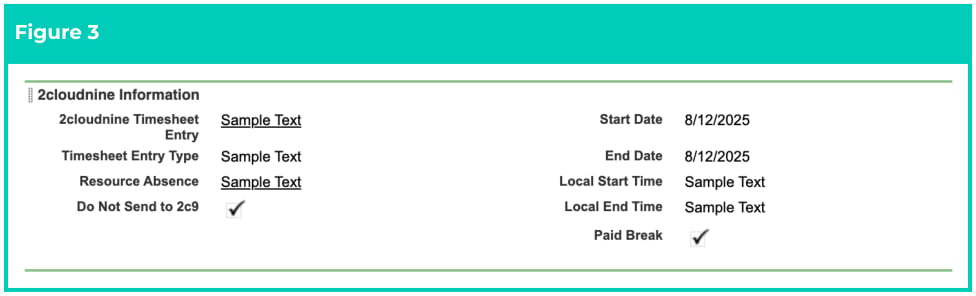
- Add the following fields to the new Section on the Page Layout:
- Add the following fields to the Information section of the Page Layout (Figure 3):
- 2cloudnine Timesheet Entry (tc9_efs__X2c9_Timesheet_Entry__c)
- Timesheet Entry Type (tc9_efs__Timesheet_Entry_Type__c)
- Resource Absence (tc9_efs__Resource_Absence__c)
- Do Not Send to 2c9 (tc9_efs__Do_Not_Send__c)
- Start Date (tc9_efs__Timesheet_Entry_Type__c)
- End Date (tc9_efs__Timesheet_Entry_Type__c)
- Local Start Time (tc9_efs__Timesheet_Entry_Type__c)
- Local End Time (tc9_efs__Timesheet_Entry_Type__c)
- Paid Break (tc9_efs__Paid_Break__c)
- Click on the Save button.
- Repeat for all remaining Page Layouts as required.
User
Go to Setup > Object Manager > User > Page Layouts- Select User Page Layouts from the list of available Page Layouts.
- Add the following Related List to the Additional Information section of the Page Layout:
- Employee Id (Employee_Id__c)
- Click on the Save button.
7. Update 2cloudnine Page Layouts
Updates to 2c9 Payroll Page Layouts are required for the following Objects, to ensure the Field Service Extension can reference the necessary fields during data integration. For a comprehensive list of all data referenced by the Field Service Extension, and the corresponding functionality, please refer to the Field Mapping tables available in the Field Service Extension Administrator Guide.Contact
Go to Setup > Object Manager > Contact > Page Layouts > Page Layout Assignment- Select the Page Layout used for the Record Type Employee
- Add the following Related Lists to the Page Layout:
- Service Resources
- Click on the Save button.
- Repeat for any remaining Page Layouts, as required
Leave Rule
Go to Setup > Object Manager > Timesheet Entry > Page Layouts- Select TC9PR Leave Rule Layout from the list of available Page Layouts.
- Add the following field to the Information section of the Page Layout:
- Leave Type (tc9_efs__Leave_Type__c)
- Click on the Save button.
- Repeat for any remainingPage Layouts, as required.
Payee
Go to Setup > Object Manager > Payee > Page Layouts- Select TC9PR Payee Layout from the list of available Page Layouts.
- Add the following required field to the Information section of the Page Layout:
- Service Resource (tc9_efs__Service_Resource__c)
- Add the following optional field to the Information section of the Page Layout:
- Create Service Resource (tc9_efs__Create_Service_Resource__c)
- Click on the Save button.
- Repeat for any remaining Page Layouts, as required.
Payee Leave Event
Go to Setup > Object Manager > Payee Leave Event > Page Layouts- Select TC9PR Payee Leave Event Layout from the list of available Page Layouts.
- Add the following field to the Information section of the Page Layout:
- Field Service Last Integration Time (tc9_efs__Field_Service_Last_Integration_Time__c)
- Click on the Save button.
- Repeat for any remaining Page Layouts as required, EXCLUDING the Community User Page Layout.
Timesheet
Go to Setup > Object Manager > Timesheet > Page Layouts- Select Time2Pay Timesheet from the list of available Page Layouts.
- Add the following Field to the Page Layout:
- FS Timesheet Id
- Add the following Related List to the Page Layout:
- Time Sheets
- Click on the Save button.
- Repeat for any remaining Page Layouts, as required.
Timesheet Entry
Go to Setup > Object Manager > Timesheet Entry > Page Layouts- Select Time2Pay Timesheet Entry from the list of available Page Layouts.
- Add the following field to the Information section of the Page Layout:
- Leave Type (tc9_efs__Leave_Type__c)
- Add the following Related Lists to the Page Layout:
- Resource Absences
- Time Sheet Entries
- Click on the Save button.
- Repeat for any remaining Page Layouts, as required.
Timesheet Item
Go to Setup > Object Manager > Timesheet Item > Page Layouts- Select TC9ET Timesheet Item Layout from the list of available Page Layouts.
- Add the following Related Lists to the Page Layout:
- FS Timesheet (tc9_efs__FS_Timesheet__c)
- FS Expense (tc9_efs__FS_Expense__c)
- Pay Condition (tc9_efs__FS_Pay_Condition__c)
- Click on the Save button.
- Repeat for any remaining Page Layouts, as required.
8. Scheduled Jobs
Integration for Field Service Time Sheets
Below is the script required to integrate Field Service Time Sheets. If it is not already configured, it must be manually set as a Scheduled Job. To schedule scripts:- Copy the block of script to be scheduled.
- Select Setup > Developer Console
- Select Debug > Open Execute Anonymous Window
- Delete or comment out any code that is in the window
- Paste in the copied script from below.
- Click the Execute button.
Script for Integration of Field Service Time Sheets
Script for Bulk Creation of Resource Absences
9. Assign Field Service Permissions
Permissions for Field Service Objects should be managed by the Field Service Implementation Partner, and are not maintained by 2cloudnine. Please refer to Pre-Installation activity Manage Field Service Permissions for more information on this subject.Assign Field Service Permissions
To provide suitable access for troubleshooting and general support of the Field Service Extension, assign one of the following Permission Sets to the appropriate 2cloudnine User:- Base Access
- Permission Set : 2cloudnine Field Service Integration - Base
- Description : Provides the base level required access to use 2cloudnine Field Service Integration. This Permission Set assumes that you have the 2cloudnine Time2Pay and 2cloudnine Payroll Permission Set assigned.
- Full Access
- Permission Set : 2cloudnine Field Service Integration - Full Access
- Description : Provides the full access to use 2cloudnine Field Service Integration. You do not need any other Permission Set assigned to the User to use 2cloudnine Field Service Integration.
Add Assignments
- Select the checkboxes next to the appropriate User(s)
- Select the Next button.
- Select the radio button of No Expiration, or Specify the expiration date and select the expiration period from the available options.
- Select the Assign button.
- Select the Done button.
Assignments > Add Assignments
- Select the checkboxes next to the appropriate User(s)
- Select the Next button.
- Select the radio button of No Expiration or Specify the expiration date and select the expiration period from the available options.
- Select the Assign button.
- Select the Done button.
- Sandbox Refresh**