

Purpose
The 2cloudnine Bullhorn for Salesforce (BH4SF) Integration provides a flexible and seamless solution for integrating the Bullhorn for Salesforce (BH4SF) and 2cloudnine Payroll. Its primary purpose is the creation and updating of 2cloudnine Assignments from the BH4SF Job and Closing Report objects. With the 2cloudnine BH4SF Integration a recruiter is able to manage their temp and perm employees using BH4SF and have the data seamlessly flow to 2cloudnine. Middle and back office functions are then able to pick up and manage this data without a need to interact with the BH4SF records. The purpose of this user guide is to provide instructions related to the setup, functionality and processing of the Integration. The intended audience for this document is system administrators, front/middle/back officer users.Configuration Steps
Installation and Core Setup
Please refer to the 2cloudnine BH4SF Configuration & Implementation Guide.Assignment Templates
The 2cloudnine BH4SF Integration uses Assignment Templates to streamline the assignment of default values to Assignments. These templates enable key middle and back office data to be efficiently assigned to a Job, and then automatically applied to both Temp and Perm Assignments.Assignment Template Types
Assignment Templates are records on the 2cloudnine Assignment object, using the ‘Template’ record type. While there is only one ‘Template’ record type, we categorise templates based on their relationship to other records, as this affects how each type is created and used:- Global Assignment Templates – Linked to a Global Account (e.g., a Payment Entity)
- Client Assignment Templates – Linked to a specific Client Account
- Job Assignment Templates – Linked directly to a Job record
Template Job Type Picklist
A key field on the Assignment object is the ‘Template Job Type’ picklist. This field plays a crucial role in the functionality of Assignment Templates by:- Controlling field visibility on the ‘Template’ Lightning page and the ‘Middle Office’ tab on the Job record—ensuring only relevant fields (Temp or Perm) are shown to users.
- Filtering template visibility when selecting a template on a Job—e.g., Temp Jobs will only display Temp Assignment Templates.
- Determining Invoice Settings that are displayed on the Job’s Middle Office tab and automatically managed based on changes. For example, a Temp Assignment Template will surface the relevant Payroll Items Invoice Settings.
Global Assignment Templates
Global Assignment Templates are predefined “Template” Assignment records linked to a parent template Account. These templates can be automatically copied to Accounts, streamlining setup and ensuring consistency. Global Assignment templates are typically configured with more broad Assignment data such as Payment Entities and Invoice Settings such as Invoice Entities and Payment Terms.Why Use Global Assignment Templates?
- Reduces administrative effort when onboarding new Accounts.
- Improves data integrity by maintaining consistent default values.
- Flexible setup—an org can have:
- A single global Assignment Template.
- Multiple templates linked to one or more Template Accounts.
Client Assignment Templates
All active clients must have at least one Client Assignment Template that can be applied to Jobs. Client Assignment Templates typically contain client-specific details that differ from global templates. These may include: Schedules, Timesheet Calendars, Client specific Invoice Settings. The process to create client templates depends on whether or not global templates have been configured in your org.With Global Templates
If Global Templates are configured, the process is automated and seamless. On the Account record, a picklist field labeled ‘Assignment Template Group’ determines the source of the templates. When a user selects a value, the system automatically clones all Assignment Templates and related Invoice Settings from the defined Template Account. (Refer to the Global Templates configuration.) For example, if an org is set up with Global Templates and the Template Account has four Assignment Templates, selecting a value in the picklist will result in all four templates being cloned and linked to the new Account, providing it with its own set of templates. Once the Client Assignment Templates are created, users should review and update them with client-specific details.Any newly created global Assignment templates will not automatically apply to Accounts
assigned to that global Account. To apply new templates to existing Accounts, users can
simply update the ‘Assignment Template Group’ picklist to NULL and then back to the
prior value. The system will clone only those templates that do not yet exist.
With Global Templates - Child Records
Another advantage of Global Templates is that new Accounts can clone Assignment Templates from a Parent Account. If a user selects ‘Parent’ in the ‘Assignment Template Group’ picklist, the system will automatically:- Identify the Parent Account from the ‘Parent’ lookup field.
- Clone all Assignment Templates from the Parent Account to the new Account.
Without Global Templates
If Global Templates are not used, each Client Assignment Template must be manually created for each Account. If a Job is created before a Client Assignment Template has been created, no middle office data can be configured on the Job Template. To manually create a new default Client Assignment template:- Go to your client record and select the related list tab.
- Click the ‘New’ button on the ‘Assignments’ related list.
- Select the ‘Template’ record type.
- Enter all default information and select ‘Save’ (Note - The client is automatically related to this template).
New Job Assignment Templates
When a new job is created, the system will check if the related Account has any existing Assignment Templates. If only one Assignment Template exists, it will be automatically cloned and linked to the Job via the ‘Assignment Template’ lookup. The Job is also stamped on the 2c9 Assignment in the “Job” lookup field establishing a 1-to-1 relationship between the Assignment Template and the BH4SF Job. If a client has multiple Assignment Templates, the user must manually select the appropriate template for the Job. This can be done by navigating to the ‘Middle Office’ tab on the Jobs Lightning record page, where they will be prompted to choose a template from the related Account (see Figure 1).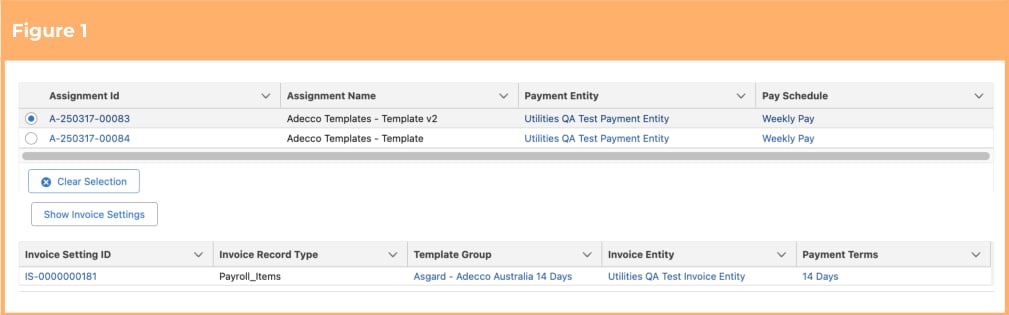
Example ScenarioA new Job role for a client is created in the system and a Job Assignment Template is automatically
created from the default Client template.The recruiter knows some of the values from the default client template need to be updated so they
select the ‘Middle Office’ tab on the Job and change the default values such as Interpretation Rule and
Timesheet Approver and click Save.The Job Assignment Template now contains updated values from the default client template which will
now be used as the default on all created child Assignments.
Both New and Cloned Job Assignment Templates (See below) will not copy the values;
Rate Calculator Template, Award Classification and Award Level. This is to protect users
accidentally utilising Job Rate Calculator Templates from other jobs. If this was not done a
user could very easily forget to change the Rate Calculator on a cloned Job and
commence making rate changes that could impact incorrect live Assignments.
Cloned Job Assignment Templates
When an existing Job is cloned, instead of using the Client Assignment template, the 2cloudnine BH4SF Integration will instead clone the Assignment Template related to the source Job. This means any values that were updated on the previous jobs Assignment template will now automatically be applied to the new Job. This ensures front office users are able to easily utilise previous versions of templates and not have to update them each time for the same job.The field ‘Assignment Template’ on the Job record must remain on the page layout at all
times for the Cloned Job functionality to work. This is because the standard Salesforce
‘Clone’ button only copies fields that are displayed on the page layout. Removing this field
will treat it as blank and always default to the Client template.
Example ScenarioA client requests a new Job for a role in which the recruiter has previously placed.
Instead of creating a new Job, the recruiter searches for the previous Job and ‘Clones’ the record.When the new Job is cloned, the previous Job Assignment template is also cloned and related to the
new Job. The front office user views the ‘Middle Office’’ tab on the job but unlike last time when it was a
new role, they do not need to make any updates to the default values.
Updating Job Assignment Templates
Job Assignment templates are updated using the ‘Middle Office’ tab on the Job record page. This update is managed via a screenflow which is embedded into the lightning record page (See figure 2). When a new Assignment is created it will automatically inherit all the default values from the Job Assignment Template at the time of creation. This means any changes to the Job Assignment Template will only apply to the template and any newly created Assignments. Any existing Assignments that need to inherit the template change can be managed using a separate update process (See below).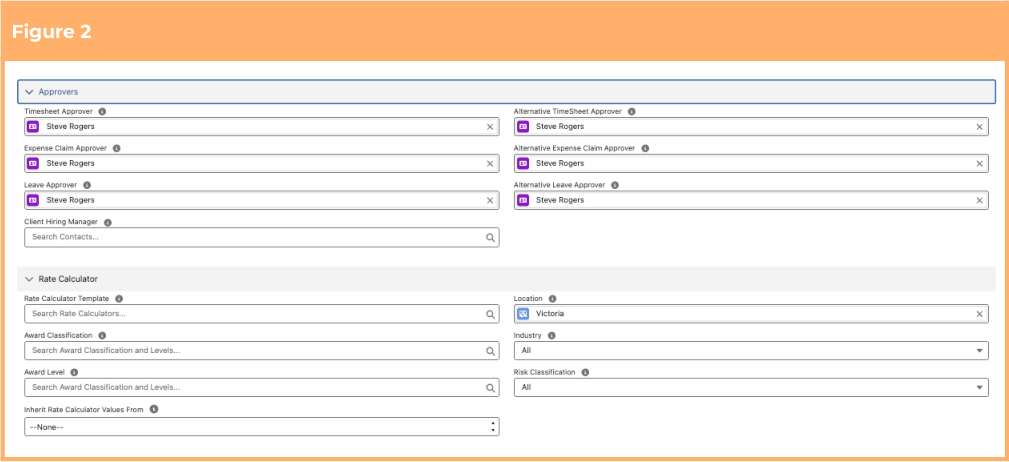
Changing Job Assignment Templates
Whilst Job Assignment Templates can be updated post creation, there may be a need to select a new client template, for example the incorrect template was initially selected. To do this, users can simply select the ‘Middle Office’ tab and from within the screenflow select the ‘Change Template’ button. Once a selection is made a new Job Assignment template will be created and related to the Job.Archiving Assignment Templates
Assignment Templates in 2cloudnine serve as a point-in-time reference for the creation of downstream Employee Assignments. Once Employee Assignments have been generated from an Assignment Template, the template no longer has any control over those Assignments. As a result, it is safe to consider archiving or deleting Assignment Templates, particularly Job Assignment Templates, to help reduce clutter and improve the usability of Assignment records in the system. Before proceeding with deletion, please consider the following:- Confirm that all required downstream data has already been generated from the Assignment Template.
- Understand that deleting a template will not impact any existing Employee Assignments or related records.
- Check for any current or future use of the template (e.g., for reporting or historical reference).
Invoice Settings Templates
In addition to Assignment Templates, the 2cloudnine BH4SF integration also utilises Invoice Settings Templates for the management of Invoice Settings. Like Assignment Templates, Invoice Settings Templates can also be defined globally, client specific and Job/Assignment specific.Global Invoice Settings Templates
Global Invoice Settings Templates are a template record that contain global Invoice Settings. These Templates are then related to the global Template Assignments (see above) using the ‘Invoice Setting Template Group’ lookup meaning each global Assignment Template can have its own set of Invoice Settings. Refer to the Configuration & Implementation Guide for the creation of your customer orgs global invoice settings template.A unique Invoice Setting Template Group is not required for each global Assignment
Template. For example if a template Account had 5 Assignment templates but the invoice
settings are the same for each, only 1 Invoice Setting Template Group and related Invoice
Settings is required. This template group can then be applied to each Assignment
template.
Client Invoice Settings Templates
When a client Assignment Template is cloned from a global Assignment template, the system will also automatically clone the related ‘Invoice Settings Template Group’ and related Invoice Settings, and relate them to the new client Account. This means each new Account receives its own set of Invoice Setting Template Groups and related Invoice Settings. Once cloned, users are then able to update any required client specific invoice settings such as the Payment Terms.Job Invoice Settings Templates
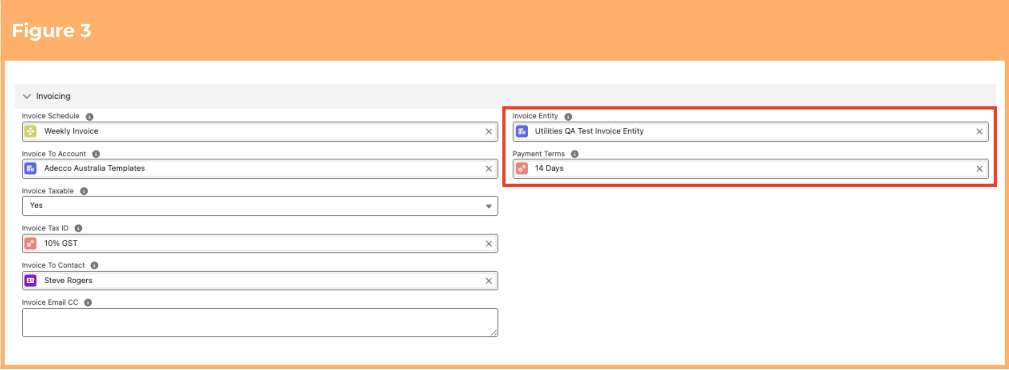
Unlike Job Assignment Templates, the ‘Invoice Settings Template Group’ related to the template Assignment is not cloned when a new Job is created. This is intentional, as invoices are grouped by Invoice Settings—creating Invoice Settings for every Job would disrupt this grouping logic. Instead, the cloned Job Assignment Template retains its relationship to the client template’s Invoice Settings Template Group. If a customer needs to modify Invoice Settings for a specific Job, the 2cloudnine BH4SF integration provides automation to handle this. Within the ‘2c9 - Assignment Template Manager’ screen flow, the system:- Retrieves the Invoice Setting linked to the Job’s Assignment Template > Invoice Settings Template Group, based on the Job Type (e.g., for a ‘Temp’ Job, it retrieves ‘Payroll_Items’; for a ‘Perm’ Job, ‘Invoiceable_Fees’).
- Displays key Invoice Setting fields, such as Invoice Entity, Invoice Group By and Payment Terms (see Figure 3).
- Check for existing Invoice Settings at the Account level with the updated values. If found, the Job Assignment Template is updated to reference the existing Invoice Settings Template Group.
- If no matching Invoice Settings are found, the system will clone the Invoice Settings Template Group and related settings from the Job Assignment Template, applying the user’s changes.
If a customer wants the ability to change more invoice setting related information at a job
level, the ‘2c9 - Assignment Template Manager’ flow can be updated to include any
additional fields. The flow will also need to be updated to check if these have changed and
if settings already exist.
ExampleScenario 1 – New Payment TermsA new temp job is created, and a client Assignment Template is applied. The user notices that the
Payment Terms are set to 14 days, but an agreement has been made with the client to change them to
21 days for this specific job. To reflect this change, the user updates the Payment Terms in the job and
selects ‘Update’.The system searches for existing Invoice Settings related to the Account with 21-day Payment Terms but
does not find any. As a result, it automatically clones the existing Invoice Settings Template Group and
related Invoice Settings, updating the Payment Terms to 21 days for Payroll Items only.Once the new Invoice Settings Template Group is created, the system updates the Assignment
Template to reference it. From this point forward, any Assignments created from this Job will
automatically inherit the new template group with 21-day Payment Terms.Scenario 2 – Existing Payment TermsA different user creates a temp job with the same requirement to change the Payment Terms to 21 days.
The user updates the Payment Terms in the job and selects ‘Update Template’. This time, the system
identifies an existing Invoice Setting for 21-day Payment Terms related to the Account. Instead of
creating a new template, the system updates the Assignment Template to reference the already existing
Invoice Settings Template Group. As a result, any Assignments created from this Job will automatically
inherit the existing 21-day Payment Terms.
Assignment Invoice Settings Templates
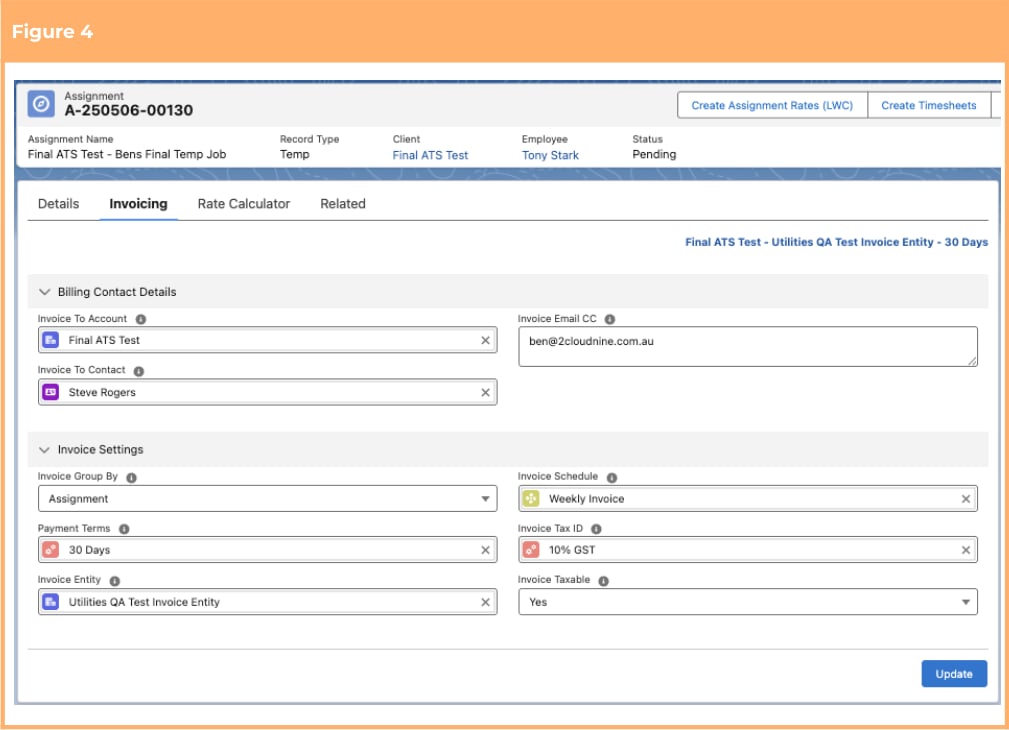
When an Assignment is created from the ‘2cloudnine BH4SF Integration’, the ‘Invoice Settings Template Group’ related to the Job’s Assignment Template is automatically applied to the Assignment. Using the same logic as the Job-level Invoice Settings Template Group, users can modify invoice-related data at the Assignment level. This is done via the ‘Invoicing’ tab on the Assignment Lightning page, which exposes the same invoice-related flow data as the Job (see figure 4).. If a user updates non–Invoice Settings fields (e.g. Invoice Schedule), the corresponding field on the Assignment is simply updated. However, if the user modifies Invoice Settings data (e.g. Payment Terms), the flow logic will:- Check whether an Invoice Settings Template Group with the updated values already exists at the
Account level.
- If found, the Assignment Template is updated to reference the existing Invoice Settings Template Group.
- If not found, the system clones the Assignments Invoice Settings Template Group and applies the user’s changes.
BH4SF Job Record
The 2cloudnine BH4SF Integration has been specifically designed so that all middle and back office data is held on the Job Assignment Template and not the BH4SF job record. The only 2cloudnine fields on the BH4SF Job record are the “Assignment Template” which is automatically updated from system automation and the “Rate Calculator” lookup. As noted above, all other middle and back office information related to a job is held on the Assignment Template which is accessed via the “Middle Office” tab.BH4SF Closing Report (Placement)
From an integration perspective, the BH4SF Closing Report is often referred to as the “handoff” object, as it acts as the junction between the front office and the middle office. By default, the 2cloudnine BH4SF integration uses the Closing Report to trigger the creation of a 2cloudnine Assignment. However, how the Closing Report is utilised after this point depends on whether the record type is Temp or Perm.Temp
For Temp placements, Assignment Templates are used to define middle and back office data. As a result, the Closing Report does not hold this data once the Assignment has been generated. This means that, from a middle and back office perspective, the Closing Report serves little to no ongoing purpose. However, whether it remains in use depends on customer requirements:- Some customers choose to retain the Closing Report as the source of truth for the front office—especially when front office workflows or automation rely on it.
- Others prefer to deprecate the Closing Report post-Assignment creation and rely solely on the 2cloudnine Assignment for both front and back office functions.
If customers opt to remove the Closing Report for the ongoing management of
Assignments, it is still required in the initial creation of the Assignment for key handoff
data including the Client, Employee and Start and End Dates.
Closing Report Lightning Page
The integration includes a Closing Report Lightning Page featuring a tab labeled “Payroll & Invoicing”. This tab utilises a Quick Action layout tied to the related Assignment whereby front office users can edit middle and back office data directly from the Closing Report (see Figure 5). While this Lightning Page is included as part of the standard 2cloudnine BH4SF integration components, its use is only recommended in cases where the customer explicitly prefers that front office users do not navigate to the 2cloudnine Assignment to manage middle office data. This Lightning Page comes with several limitations, including the inability to manage Invoice Settings and a lack of visibility into key middle office data—such as Timesheets—that may be valuable to front office users.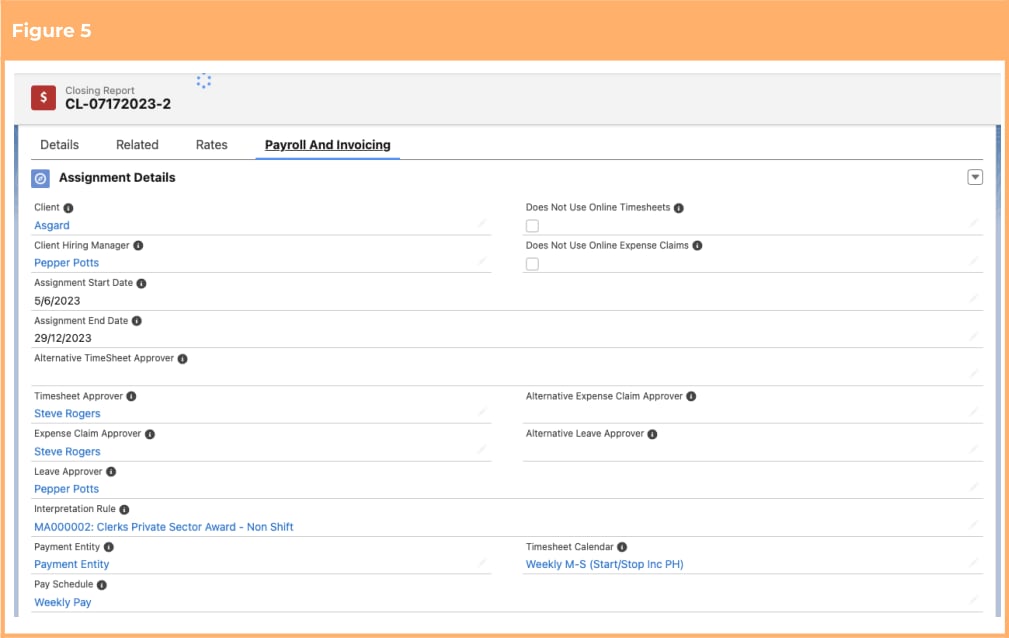
Date Data Synchronisation
While the Closing Report doesn’t hold middle/back office data, the Start Date and End Date fields are critical, as they must align with the corresponding fields on the Assignment. To ensure this, two record-triggered flows (one on the Closing Report and one on the Assignment) monitor and sync date changes between the two objects. These flows include logic to prevent changes that would conflict with existing Timesheets. For example: If a front office user attempts to move the Closing Report’s End Date earlier, but hours have already been captured for that period, the flow will trigger an error and block the update.Perm
Perm placements are handled differently. Unlike Temp, the Closing Report is typically required due to BH4SF’s native invoice functionality for permanent placements. While a 2cloudnine Assignment is still created for Perm placements, it is not the primary record used for salary or fee management. Instead, it serves the following purposes:- Ensures correct invoice-related settings are applied.
- Enables Invoiceable Fees to be created and linked correctly to the Assignment.
- Can be utilised for GL purposes
Auto Create Perm Fee
The 2cloudnine BH4SF integration includes functionality to automatically generate a Perm Invoiceable Fee and related Pay Transaction from a 2cloudnine Assignment. On the Assignment Template, the Auto Create Perm Fee picklist field provides two options:- Assignment Start Date
- Invoice Date
2cloudnine Assignment
The creation of 2cloudnine Assignments—including both Temp and Perm Assignments—is initiated from the BH4SF Closing Report, which can be triggered either automatically or manually. This process is controlled by the related Assignment Template via the Auto Create Assignments Yes/No picklist field. If ‘Yes’, on the creation of a Closing Report, a related Assignment will automatically be created. If ‘No’ or NULL an Assignment will not be automatically created. Users can however manually initiate the creation of the Assignment by selecting Yes on the picklist field Trigger Assignment Creation on the Closing Report record. Once created, the 2cloudnine Assignment is automatically created and the Assignment related to the Closing Report via an ‘Assignment’ lookup. The Placement is also updated on the Assignment record in the lookup field ‘Placement’ creating a 1-1 relationship between the Placement and the Assignment. As outlined above, the Assignment record inherits its field values from a combination of the Job Assignment Template and the related Closing Report on creation. Once created, the management of the Assignment ongoing will be based upon the customers preference of utilising the Closing Reports or directly within the 2cloudnine Assignment. Refer to the Object and Fields mapping section for the full list of integrated fields.If an Assignment is removed from a Closing Report via the Assignment lookup, the
2cloudnine BH4SF integration will automatically create a new Assignment and relate it to
the Closing Report. This however will not delete the old Assignment which will remain in
the system orphaned from a Closing Report. In the event a scenario requires a new
Assignment we strongly recommend using the Delete Placement and Assignment
functionality (See below) as this has considerations to existing payroll and invoice data.
Mass Assignment Updates
Customers often need to perform bulk updates to Assignments in response to changes further upstream. These updates may range from straightforward modifications, such as updating Timesheet Approvers, to more complex changes like adjusting Interpretation Rules. To support this, the 2cloudnine BH4SF integration provides native Salesforce functionality that enables users to manage and update Assignments directly from the BH4SF Job record. On the BH4SF Job Lightning Page, under the ‘Middle Office’ tab, there is a sub-tab labelled Manage Assignments . This tab includes two dynamic related lists—one for Temp Assignments and one for Perm Assignments. The visibility of these lists is automatically determined by the record type of the Assignment. Each related list includes an Update Assignment button. Clicking this launches the appropriate quick action—either Update_Temp_Assignment or Update_Perm_Assignment . These actions are configured with layouts that include commonly updated fields, such as the Assignment’s Start and End Dates, and Timesheet Approvers. These layouts can be tailored to meet specific customer requirements, allowing for flexible mass management of Assignments.Payee Records
The 2cloudnine BH4SF Integration automates the creation and selection of the appropriate Payees for 2cloudnine Assignment records. This functionality is especially important in organisations with multiple Payment Entities, as Employees may work across different entities, each requiring distinct Payee records. Additionally, the auto-create feature simplifies the Payee onboarding process for customers who do not initiate Payee setup earlier in the recruitment process.Payee Selection
When an Assignment is created the 2cloudnine BH4SF integration will search for Payees where the Payee>Payment Entity is the same as the Job Assignment Template > Payment Entity. If a matching Payee record exists it will be related to the Payee record on the Assignment. If no matching Payee record is found the system will either automatically create one (see below) or display an error that the Placement cannot be created without a Payee record.Auto Create Payee
The option to automate the creation of Payee records is defined by the field Auto Create Payee located on the Job > Assignment Template. This Yes/No picklist when set to Yes will be automatically created by the 2cloudnine BH4SF Integration and related to the Assignment. Refer to the Object and Fields mapping section for the full list of integrated fields.Deleting Closing Reports and Assignments
In order to protect critical backoffice data from being deleted or orphaned, the 2cloudnine BH4SF Integration includes buttons on both the Closing Report and Assignment page used for the deletion of the records. The “Delete Placement & Assignment” button on the Closing Report page and the “Delete Assignment & Placement” on the Assignment page both check if the Assignment has related Pay Transactions and if so prevent the deletion of both records. If no Pay Transactions are found, the delete functionality will successfully delete both the Closing Report and Assignment records.Invoiceable Fee Screenflow
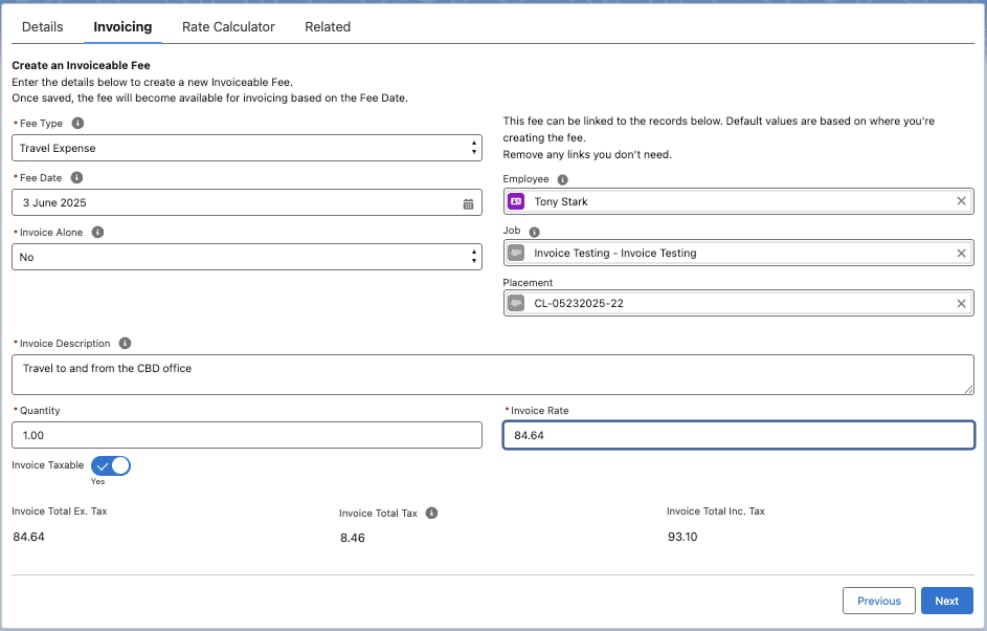
The 2cloudnine BH4SF Integration introduces enhanced functionality that allows users to generate Invoiceable Fee and related Pay Transaction records directly from the Job, Closing Report, and Assignment objects. This seamlessly integrates the fee process into the BH4SF ATS. By launching the ‘2c9 - Manage Invoice Settings’ screen flow and selecting the ‘Create Fee’ button, users are taken to the ‘2c9 - Create Invoiceable Fee Screen’ (see Figure 6). Within this flow, users can enter all necessary fee details, which are automatically calculated (see Figure 7). Upon selecting ‘Next,’ the flow automatically creates the Invoiceable Fee and its related Pay Transaction record, making them immediately available for invoicing based on the fee date. Permanent placement fees will be assigned the record type ‘Permanent Placement,’ while all other fees will use the ‘FEE’ record type.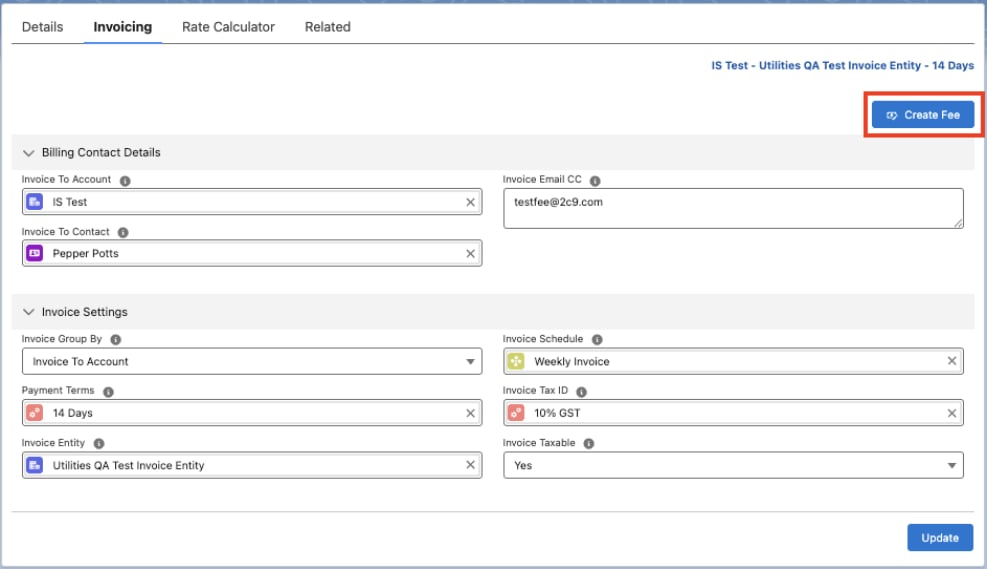
Object and Field Mappings
Assignment
The following table shows all field mappings for the creation and update of Assignment records.Closing Report
The following table shows the fields that are updated on the Closing Report record when a change is made to the relevant Assignment field.Payee
The following table provides the field mapping for the automated creation of Payee records.- The PAYG Default template is created from the Data Creation Package.