

Overview
Important Information
Only your authorised Salesforce System Administrator or Partner should be actioning any installation, configuration items, and related tasks. Installing the Import Tool v 1.43 (or higher) package must only be actioned if the Integrated Import Tool is required. Implementing it will require assistance from the Integration Team. The 2cloudnine Payroll Package & Time2Pay Extension Package within this release must be updated if they are already being used. There may be compulsory and optional configuration items and tasks that need to be completed pre and post the installation of the packages. These will be outlined in the checklists below, with further details given within this document. The installer will be responsible for ensuring all these configuration items and tasks are completed within a reasonable timeframe of the packages being installed. Please ensure you have familiarised yourself with all of the requirements before installing the packages and that you have sufficient time and resources available. Failing to do so can negatively impact the User experience and stability of 2cloudnine Payroll. This guide should always be opened and used via your web browser. This will ensure you are viewing the most recent version of the document. Further, downloading the document and opening it with desktop programs, such as Adobe, has been found to cause errors when copying and using the scripts provided for data updates. These errors do not occur when viewed through a browser.Pre-Installation Checklist
The following items are highly recommended to be completed before commencing the installation and configuration of packages within this release.Icons
Please refer to the legend below when referencing the icons used throughout the document: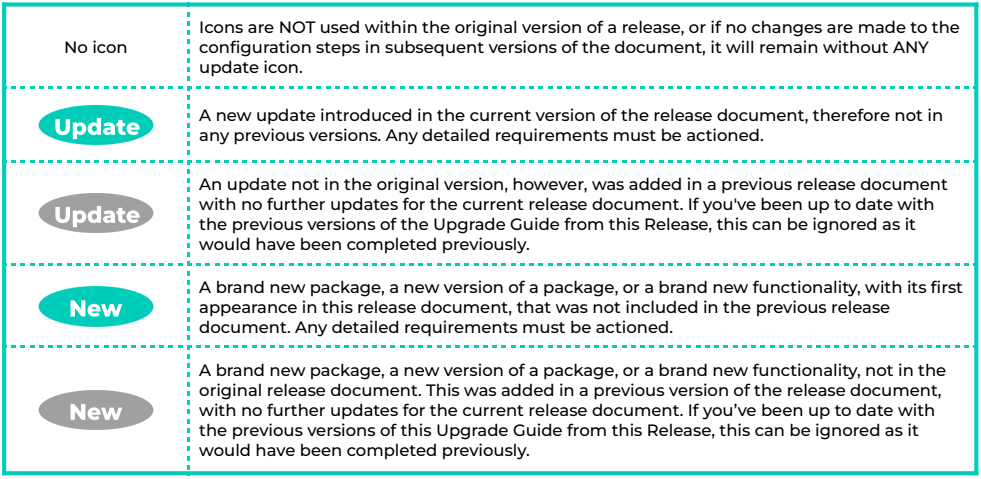
Installation and Configuration Checklist
The following items must be completed in the listed order to install and configure the packages within this release.Package Installation
The installation of the following packages must be completed as part of the Eucalyptus ‘25 release upgrade.Dependencies
This version of the Eucalyptus Release contains multiple packages that have been updated, with some packages having dependencies on other packages. Any packages that have been listed as Compulsory in the Installation and Configuration checklist must be updated, and this should be done in the sequence given in the checklist.Configuration Items
Updates to the 2025/2026 PAYG Tables for STSL, Lump Sums A, B, D, and ETP Rates Update EOFY
The update, which allows users to pay PAYG employees based on the 2025/2026 tax rates is compulsory, and all of the following configuration steps must be completed. Please note, this update also includes the new STSL Withholding calculations, which have been published by the ATO and are mandatory for Payroll calculations on and after 24 September 2025. Configuration steps:- Complete the Setup Payroll Process (Compulsory)
Complete the Setup Payroll Process (Compulsory) Update
This configuration also completes the configuration for the Adhere to the 2025/2026
Superannuation Changes and 2026 Public Holiday Available Via Bulk Data Creation sections below. You
must run the Setup Payroll regardless of whether you have completed it previously.
- Go to App Launcher
- Select the Setup Payroll item.
- If the Setup Payroll Process has already been run in the Org, you’ll be taken directly to the appropriate page for performing the update required.
- If the Setup Payroll Process has not previously been run in the Org, it will start the whole process, and the new updates will be included along with the other records created.
- Follow the online instructions to complete the Setup Payroll Process.
- Once this is done, the process is complete and provides you with a summary of the changes made. Make sure both ‘Withholding Rules September 2025’ and ‘Public Holidays (2026)’ are included in the list. This depends on whether you have completed the setup previously or not. If they are not included, run the Setup Payroll Process again.
Adhere to the 2025/2026 Superannuation Changes Update
The update, which allows users to adhere to the 2025/2026 Superannuation changes to the SGC rate and threshold amounts, is Compulsory, however, the configuration steps that need to be completed are grouped together with the configuration steps for Updates to the 2025/2026 PAYG Tables for STSL, Lump Sums A, B, and D, and ETP Rates. After you have completed the configuration outlined in the above section, this item is also complete.2026 Public Holidays Available Via Bulk Data Creation Update
The update that allows users to install the 2026 Public Holidays is Compulsory, however, the configuration steps that need to be completed are grouped together with the configuration steps for Updates to the 2025/2026 PAYG Tables for STSL, Lump Sums A, B, and D and ETP Rates. After you have completed the configuration outlined in the above section, this item is also complete.At the time of this release, the Victorian state public holiday for the ‘Friday before the AFL Grand
Final had not been proclaimed yet for 2026, and, as such, it has not been included in the Bulk Data
Creation for Public Holiday. If it is proclaimed for 2026, and it applies to one of your organisations
Calendars, it will need a Calendar Period record created manually.
Updates to Payment Detail Page Layouts Update
The Eucalyptus ‘25 Release includes the following enhancements to the Page Layouts in addition to the ones provided in the previous release cycle (available further down within this document). The configuration below is optional: Configuration steps:- Payment Detail (Optional)
Payment Detail (Optional) Update
The following Page Layout updates are Optional: Go to Setup - Object Manager - Payment Detail - Page Layouts- Select TC9PR Payment Detail Payee AUS Bank Layout .
- Remove the following fields from the Page Layout:
- Payment Method
- Click Save .
- Repeat the above steps for the following Page Layouts:
- TC9PR Payment Detail Payee Cash Layout
- TC9PR Payment Detail Payee Cheque Layout
- TC9PR Payment Detail Payee INTL Bank Layout
- TC9PR Payment Detail Payment Entity Layout
- Click Save .
2cloudnine View Setup Permission Set
With recent changes to security features introduced, it has been discovered that there are times when a non-System Admin User encounters issues with Invoice PDF or Pay Advice PDFs. To resolve the issues, we have packaged a new Permission Set, however, the following configuration needs to be applied to existing orgs to replicate it: Configuration steps:- View Setup and Configuration (Conditionally Compulsory)
- Click the New button.
- Enter a suitable name in the Label field, such as 2cloudnine View Setup Permission Set, and select Enter to auto-populate the API Name.
- Provide a description by populating the Description field.
- To ensure the Permission Set is available now, skip the checkbox Session Activation Required .
- Skip the step of assigning a Licence to this Permission Set so it can be assigned to Users regardless of the Licence they are on. If it’s associated with a specific License, it can only include the permission and settings entitled by that License.
- Click on the Save button.
- Select System Permissions .
- Select the Edit button, and scroll down to select the checkbox View Setup and Configuration (this may also tick the checkbox for View Roles and Role Hierarchy) .
- Click the Save button.
Run Script for Payee Exit Update
To ensure that existing Payee Exit Calculations are not paid again in a future Pay Batch, a script must be run as provided below. Configuration steps:- Run Script for Payee Exit (Compulsory)
Run Script for Payee Exit (Compulsory) Update
Go to Setup - Developer Console > Debug > Open Execute Anonymous Window- Paste in the copied script from the script box below.
- Click the Execute button.
Enhancement to easily create non-packaged Public Holiday Calendars
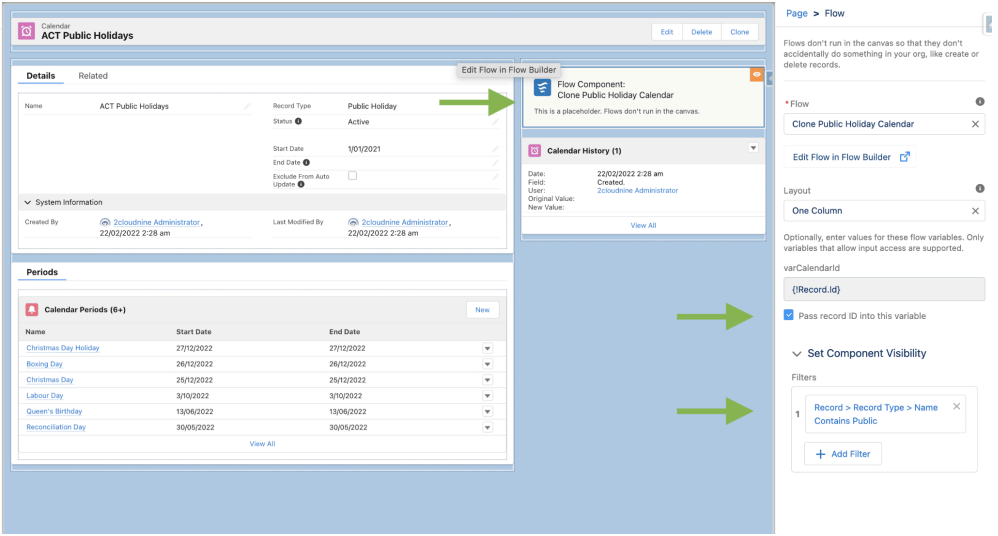
An optional component can be added to the Public Holiday Lightning Page Layout, enabling Users to clone an existing Public Holiday Calendar and its related Calendar Periods, to assist with the creation of non-packaged Public Holiday Calendars. Users are required to enter the date from which they wish to clone the related Calendar Periods and set it as the Start Date of the new Public Holiday Calendar. The ‘Clone Calendar Periods From’ date will automatically default to either 1 Jan of the current year, or the Start Date of the Calendar being cloned, whichever date is closest to today’s date. Users are also required to enter the name of the new Public Holiday Calendar. To configure this within existing Orgs, follow the steps below:- Go to Calendar Object.
- Open any Public Holiday Calendar record.
- Select the Cogs icon (like you do to go to Setup), but select Edit Page.
- Go to the Flow Component in the list of Components and drag it onto the page in the desired area.
- In the Flow field, enter Clone Public Holiday Calendar and select it as it becomes available in the lookup.
- Tick true on the checkbox Pass record ID into this variable .
- Select Set Component Visibility, and select the button Add Filter.
- In the Filter Type, select Advanced.
- Select the Field button, and in the popup, select the dropdown arrows to select the listed values of Record - Record Type - Name - and select the Done button.
- Ensure the Operator field is showing Contains.
- In the Value field, type ‘Public’.
- Select the Done button, then click the Save button at the top, and then the Activation button, and assign this as the Org Default, or as required to ensure this is visible on all Public Holiday Calendar records.
Page Layout Updates
The Eucalyptus ‘25 Release includes new enhancements to the Page Layouts. Some of these Page Layout updates are Compulsory, while others are optional. Please refer to the details below for more information about these updates. Configuration steps:- Update Payroll Page Layouts
Update Payroll Page Layouts
The Compulsory Page Layouts below must be updated for all the Orgs, whereas the Optional Page Layout updates only need to be completed if the option to use this functionality is taken. To incorporate these enhancements, follow the steps below:Employee (Compulsory) New
The following Page Layout updates are Compulsory: Go to Setup > Object Manager > Contact > Page Layouts- Select TC9PR Employee Layout .
- Add the following fields to the Page Layout, at the bottom right of the Contact Information
section:
- Primary Payee Record
- Click Save .
Award Classifications and Award Levels (Optional)
The below Page Layout updates are Optional, but must be applied where Orgs have transitioned to the new Minimum Pay Rates functionality: Go to Setup > Object Manager > Award Classifications and Levels > Page Layouts- Select Award Classifications and Levels Layout .
- Remove the following fields from the Page Layout:
- Status
- Click Save .
Employer Id Junction (Optional)
A new Page Layout for the Superannuation Employer ID Junction Object has now been included in the package, and it is recommended to assign it as the default in all Orgs: Go to Setup - Object Manager - Superannuation Fund - Page Layouts- Click the Page Layout Assignment button, then the Edit Assignments button.
- Click the Record Type Employer Id Junction, which should highlight all rows below.
- In the Picklist for Page Layout To Use, select TC9PR Employer ID Junction .
- Click Save .
Employment Cost (Optional)
The below Page Layout updates are Optional, however are highly recommended for all Orgs using Rate Calculators: Go to Setup > Object Manager > Employment Cost > Page Layouts- Select any Employment Cost Page Layout.
- Go to the Mobile & Lightning Actions components, and add the following to the Page Layout:
- Employment Cost Manager
- Click Save .
- Repeat the above steps for all available Page Layouts.
Employment Cost Item (Optional)
The below Page Layout updates are Optional, however, are highly recommended for all Orgs using Rate Calculators: Go to Setup > Object Manager > Employment Cost Item > Page Layouts- Select any Employment Cost Item Page Layout.
- Remove the following buttons from the Page Layout:
- Clone
- Click Save .
- Repeat the above steps for all available Page Layouts.
- Go to the List View Button Layout, select Edit, and untick the checkbox “New [New]”
- Click Save .
Lodgement Item AU (Compulsory)
The Page Layout for Lodgement Item AU requires updating to include the ETP Taxable Amount and ETP Non Taxable Amount fields, which provide greater visibility of ETP amounts reported via STP. To complete this, please follow the steps detailed below: Go to Setup - Object Manager - Lodgement Item AU - Page Layouts- Click the Page Layout Assignments button.
- Select the page layout assigned to the STP - ETP Record Type (i.e. TC9EAU STP2 ETP Layout).
- Add the following field to the Page Layout, underneath the Payee ETP Payment Date field, within
the ETP Details section:
- ETP Taxable Amount
- ETP Non Taxable Amount
- Click Save .
Minimum Pay Rate (Optional)
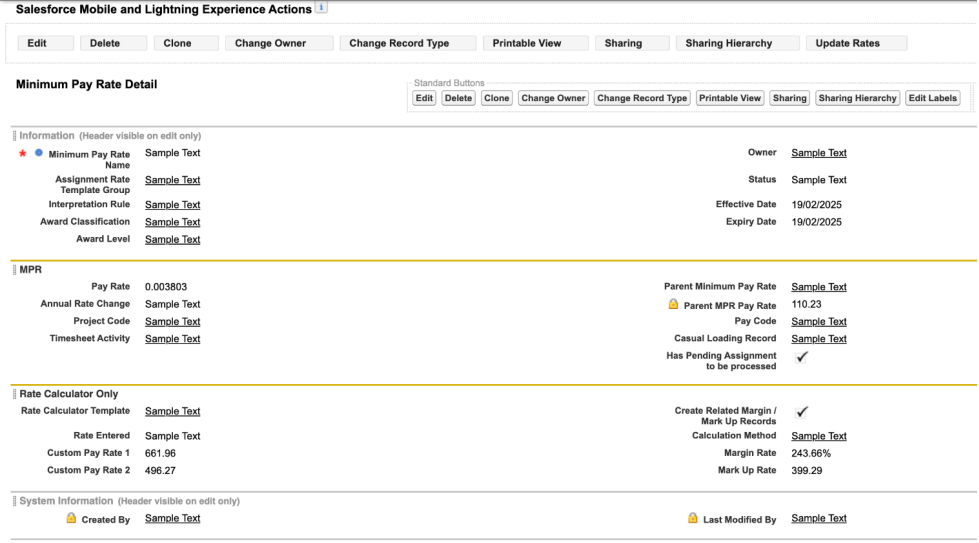
The below Page Layout updates are Optional, but must be applied where Orgs have transitioned to the new Minimum Pay Rates functionality: Go to Setup > Object Manager > Minimum Pay Rate > Page Layouts- Select Time2Pay Minimum Pay Rate Layout .
- Add the following fields to the Page Layout, at the bottom right of the Information section:
- Parent Minimum Pay Rate
- Project Code
- Timesheet Activity
- Click Save .
- Minimum Pay Rates
- Assignment Rates
- Mark Up/Margin Rate Records
- Rate Calculator Rates
- Minimum Pay Rate History
Pay Schedule (Compulsory)
The Page Layout for Pay Schedule requires updating to include the new field of Payroll Jurisdiction. To complete this, please follow the steps detailed below. Go to Setup > Object Manager > Schedule > Page Layouts- Click the Page Layout Assignments button.
- Select the page layout assigned to the Pay Schedule Record Type (i.e. TC9ET Pay Schedule Layout ).
- Add the following fields to the Page Layout, underneath the field Finalise Based On:
- Payroll Jurisdiction
- Click Save .
Pay Transaction (Compulsory)
The Page Layout for Pay Transaction requires updating to include the new field of ETP PAYG Type, which makes the ETP PAYG Pay Transactions more easily identifiable in the Manual Adjustments UI of the Pay Batch Manager. To complete this, please follow the steps detailed below. Go to Setup - Object Manager - Pay Transaction - Page Layouts- Click the Page Layout Assignments button.
- Select the page layout assigned to the Withholding - ETP PAYG Record Type (i.e. Time2Pay Pay Transaction - Withholding - PAYG, ETP PAYG, HELP and SFSS).
- Add the following field to the Page Layout, underneath the PAYG field, within the Withholding
section:
- ETP PAYG Type
- Click Save .
Payee Aggregate (Compulsory)
The Page Layout for Leave Accrual record types of Payee Aggregates requires compulsory updating to include the new Leave Balance Offset field. To complete this, please follow the steps detailed below: Go to Setup - Object Manager - Payee Aggregate - Page Layouts- Click the Page Layout Assignments button.
- Select the page layout assigned to the Record Type Leave Accruals (i.e. TC9PR Payee Aggregate Leave Layout ).
- Add the following field to the Page Layout, underneath the field Leave Taken, within the Leave
Aggregates section:
- Leave Balance Offset
- Add the following field to the Page Layout, underneath the field Leave Taken Days, within the
Leave Aggregates section:
- Leave Balance Offset Days
- Click Save .
Payee Pay Batch (Compulsory)
The Payee Pay Batch Object includes new fields that are compulsory to be added to the Page Layout. Go to Setup - Object Manager - Payee Pay Batch - Page Layouts- Select TC9PR Pay Batch Item Layout .
- Add the following two fields under the section Deductions (add one field under each of the
existing fields):
- STP2 CSA Deductions (tc9_prSTP2_CSA_Deductionsc)
- STP2 CSA Garnishees (tc9_prSTP2_CSA_Garnisheesc)
- Navigate to the ETPs Page Section and add/update the fields as displayed below in the left-hand
column:
- Non Taxable ETPs
- ETP Non Taxable B
- ETP Non Taxable D
- ETP Non Taxable N
- ETP Non Taxable O
- ETP Non Taxable P
- ETP Non Taxable R
- ETP Non Taxable S
- ETP Non Taxable T
- Navigate to the ETPs Page Section and add/update the fields as displayed below in the
right-hand column:
- Taxable ETPs
- ETP Taxable B
- ETP Taxable D
- ETP Taxable N
- ETP Taxable O
- ETP Taxable P
- ETP Taxable R
- ETP Taxable S
- ETP Taxable T
- Select Save .
Timesheet Entry (Optional)
The below Page Layout updates are Optional, but must be applied where Orgs are using the Shift logic for interpretations: Go to Setup > Object Manager > Timesheet Entry > Page Layouts- Select Time2Pay Timesheet Entry .
- Add the following fields to the Page Layout, underneath the Entry Details section:
- Shift Start Time
- Shift Start Date
- Shift End Time
- Shift End Date
- Once the fields have been added, ensure that all these fields are set to READ ONLY.
- Click Save .
Update Batch Job for Pay Advices
To ensure 2cloudnine will use the latest improvements to the Pay Advices Scheduled Job, the existing Scheduled Job must be deleted and then rescheduled. Configuration steps:- Delete existing Scheduled Job (Compulsory)
- Set a New Scheduled Job (Compulsory)
Delete existing Scheduled Job (Compulsory)
IMPORTANT: The configuration below is compulsory, however before deleting, please review the scheduled frequency of the jobs, and if they are different from the times listed below in Script 1, it is recommended to take a screenshot of them to ensure that when they are rescheduled, they reflect the same frequency as the existing one. Go to Setup - Environments - Jobs - Scheduled Jobs- Scroll down the list of scheduled jobs until you locate all that contain PayAdvice (i.e.
- Select the Del button next to these Scheduled Jobs listed, and then select OK from the pop-up.
- Repeat for all Pay Advices jobs scheduled.
Set a New Scheduled Job (Compulsory)
If you have deleted the existing Scheduled Jobs for Pay Advices, they need to be rescheduled so that they use the latest updates to the code. Please identify if the scheduled jobs are the same frequency as listed in the script, and ensure the frequency is as per the original jobs. Go to Setup - Developer Console- Debug - Open Execute Anonymous Window
- Delete or comment out any code that is in the window
- Paste in the copied script from the script box below.
- Click the Execute button.
Disable Assignment Record Type Validations (Optional)
The configuration below is Optional. If you have an integration within your Org which utilises Template Record Types, you may require the validations to be disabled to save the Assignments. If this is occurring within your Org, System Administrators will be required to populate the new Custom Setting as detailed below: Go to Setup - Custom Settings- Click Manage next to Disable Assignment RecordType Validation .
- Click the New button.
- Enter the Developer Name in the Name field.
- Enter the Record Id of the Custom Record Type of Assignment for which 2cloudnine validations are to be ignored.
- Click Save .

Update the Help text for the Total Deduction Limit field (Compulsory)
This configuration to update the Help text for the Total Deduction Limit field on the Payee Deduction Template Object is Compulsory. To update the Help Text, please follow the steps below: Go to Setup > Object Manager > Payee Deduction Template > Fields & Relationships- Click on the field Total Deduction Limit .
- Click the Edit button.
- In the field Help Text, replace the existing text with “Defines an upper limit to the deduction amount that can be withheld for the deduction. When deductions are calculated, the deduction amount withheld will be adjusted to ensure this amount is not exceeded. If blank, no limit applies.”.
- Click Save .
Enable Pay Batch Manager Hard Delete (Optional)
An optional custom setting has been added to enable the hard deletion of Pay Batches. Once the data is deleted, it is not sent to the Recycle Bin. Therefore, the deleted records cannot be restored. To enable the setting: Go to Setup - Custom Settings- Click Manage next to Payroll Configuration .
- Click the Edit button.
- Tick the checkbox next to the Enable Pay Batch Hard Delete field to make sure that it’s enabled.
- Click Save .
Update Report Type and Package the ETP Review Report (Compulsory)
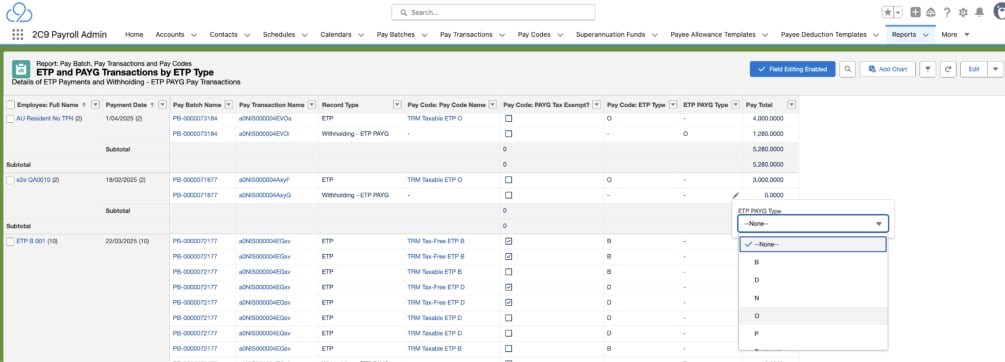
The configuration below is Compulsory. A new report has been created to review the ETP Pay Transactions and the Withholding ETP PAYG Transactions by ETP PAYG Type, for Consultants to use to update the ETP PAYG Type field on Pay Transactions for Withholding. To complete, please follow the steps below:- Go to Reports .
- Run the ETP and PAYG Transactions by ETP Type report.
- Review the ETP PAYG Type field on each Pay Transaction with Record Type Withholding - ETP PAYG .
- If the ETP PAYG Type field is blank on the Withholding - ETP PAYG Pay Transaction, populate it with the same value as the one in the Pay Code: ETP Type column (do not update any values in the Pay Code: ETP Type column).
- Ensure you don’t have any Pay Transactions in the report with Record Type Withholding - ETP PAYG where the ETP PAYG Type column is blank.
Assign Reconciliation Permission Set to Users (Conditionally Compulsory)
A new Permission Set has been created for Payroll Users using the Reconciliation functionality. To assign this Permission Set to Users, follow the steps below: Go To Setup > Permission Sets- Open the new Permission Set 2cloudnine Payroll Reconciliation .
- Select the Manage Assignments button and click the Add Assignment button.
- Select the checkboxes of the various Users who require this Permission Set to be assigned to them, and select the Next button.
- Select the radio button for No Expiry Date and select the Assign button.
- Assignment Summary will show the confirmation of the successful and failed assignments of the Permission Sets to the Users selected.
Appendix 1
The table below defines the access that must be granted to Internal Users for new components introduced to provide further enhancements to the Pay Batch Manager. Users Key
Minimum Access Key
Appendix 2
The table below defines the access that must be granted to Internal Users for new components introduced to provide further enhancements to Payee Exit. Users Key
Minimum Access Key
Appendix 3
The table below defines the access that must be granted to Internal Users for new components introduced to provide further enhancements to Assignments. Users Key
Minimum Access Key
Appendix 4
The table below defines the access that must be granted to Internal Users for new components introduced to provide further enhancements to the Rate Calculator. Users Key
Minimum Access Key
Appendix 5
The table below defines the access that must be granted to Internal Users for new components introduced to provide further enhancements to the Invoicing function. Users Key
Minimum Access Key
Appendix 6
The table below defines the access that must be granted to Internal Users for new components introduced to provide further enhancements to Assignments using Custom Settings. Users Key
Minimum Access Key
Appendix 7
The table below defines the access that must be granted to Internal Users for new components introduced to provide further enhancements to STP2 reporting and error handling. Users Key
Minimum Access Key