

Overview
Important Information
Only your authorised Salesforce System Administrator or Partner should be actioning any installation, configuration items and tasks. All packages within the release must be installed. There may be compulsory and optional configuration items and tasks that need to be completed pre and post the installation of the packages. These will be highlighted in the below checklists, with further details given within this document. The installer will be responsible for ensuring all these configuration items and tasks are completed within a reasonable timeframe of the packages being installed. Please ensure you have familiarised yourself with all of the requirements PRIOR to installing the packages and ensure you have sufficient time and resources available. Failing to do so can negatively impact the User experience and stability of 2cloudnine Payroll. This guide should always be opened and used via your web browser. This will ensure you are viewing the most recent version of the document. Further, downloading the document and opening it with desktop programs, such as Adobe, has been found to cause errors when copying and using the scripts provided for data updates. These errors do not occur when viewed through a browser.Pre-Installation Checklist
The following items are highly recommended to be completed prior to commencing the installation and configuration of packages within this release.Installation and Configuration Checklist
The following items must be completed in the listed order to install and configure the packages within this release.Installation Links
The installation of the following packages must be completed as part of the Banksia ‘21 release upgrade.Pre-Installation Items
New Component Review
The Banksia ’21 release contains a number of new components including Objects, Fields and Buttons. A review of the list of components introduced should be conducted to check for Salesforce limits and duplicates of existing custom components. Please note for the Banksia release, there have been new lookup fields introduced on multiple objects. Full details for the lookup fields included can be found in Appendix 1, however, the below table provides a per object summary.
Upon review of the lookups that already exist on this object in your organisation, if you find that you are going to exceed Salesforce limits, we suggest logging a case with Salesforce to have your organisation’s limit increased.
In some instances, where duplicates exist, the installation / upgrade of the package will not be permitted. In these instances, the duplicates must be removed prior to attempting to install it. This could be completed through either deleting the custom component or, where possible, renaming the Name / API Name of the component.
In other instances, the package installation / upgrade will be permitted, however, the duplicates could cause user confusion and/or custom automation clashes within the org. In these instances, although it is optional, it is highly recommended to delete / rename the component.
When deleting a component, Salesforce does not permanently delete them for 15 days so although they are deleted for the user, they do still exist within the organisation. To remove the component completely, switch to classic view, which shows components that have not been permanently deleted, and delete it from there.
A list of all the new components that should be reviewed are outlined in Appendix 1
Configuration Items
Create and Allocate Work Schedules Efficiently
The functionality to create and allocate work schedules is optional and was released as a beta version in the Lilly Pilly ‘21 release. The non-beta version is now available. If the configuration of the beta version was already complete for the Lilly Pilly ‘21 Release, these items can be skipped The below configuration steps should be completed if the functionality is required:- Update profile / permission sets (Optional)
- Update page layouts for new field(s) (Optional)
- Add Lightning Web Components to lightning record page(s) (Optional)
Update Profile / Permission Sets (Optional)
The fields associated with this item have had read / edit access added to the following permission sets provided with the package. Where these are in use, the permissions required will be automatically provisioned.- 2cloudnine Payroll Admin
- 2cloudnine Time2Pay All Access
Update Page Layouts for New Field(s) (Optional)
This requirement only needs to be completed if the option to use the functionality is taken. If not, this item can be skipped.- Go to Setup > Object Manager
- Select Assignment Schedule (tc9_pr__Assignment_Schedule__c) > Page Layouts
- Select any page layout that is used for the Assignment Schedule object
- Add the following field(s) to the layout
- View Work Schedule Calendar (View_Work_Schedule_Calendar__c)
- Click Save
- Repeat steps 3 to 5 for all page layouts that are used for the Assignment Schedule object
Add Lightning Web Components to lightning record page(s) Optional
With the Work Schedule functionality, a new Lighting Web Component showing the Work Schedule Calendar, on a per Assignment basis has been provided. This can be added to Assignment Lightning Record pages as required. If not required, this item can be skipped.- Go to Setup > Object Manager
- Select Assignment (tc9_pr__Assignment__c) > Lightning Record Pages
- Select the required page layout
- Click in the Clone / Edit button
- Move the following Lightning Web Component onto the page
- Assignment Work Schedule Calendar (tc9_pr.Assignment_Work_Schedule_Calendar)
- Apply any component visibility settings / filters required
- Click Save
- Repeat steps 2 to 7 for all Lightning Record Pages on the Assignment object required
Apply Work Schedule Information to Payroll
The functionality to apply work schedule information to payroll is optional and was released as a beta version in the Lilly Pilly ‘21 release. The non-beta version is now available. If the configuration of the beta version was already complete for the Lilly Pilly ‘21 Release, these items can be skipped. The below configuration steps should be completed if the functionality is required:- Update profile / permission sets (Optional)
- Update page layouts for new field(s) (Optional)
- Create a new picklist value for field(s) (Optional)
Update Profile / Permission Sets (Optional)
The fields associated with this item have had read / edit access added to the following permission sets provided with the package. Where these are in use, the permissions required will be automatically provisioned.- 2cloudnine Payroll Admin
- 2cloudnine Time2Pay All Access
Update Page Layouts for New Field(s) (Optional)
This requirement only needs to be completed if the option to use the functionality is taken. If not, this item can be skipped.- Go to Setup > Object Manager
- Select Assignment Rate (tc9_pr__Assignment_Rate__c) > Page Layouts
- Select any page layout that is used for the Remuneration record type
- Add the following field(s) to the layout
- Auto Pay Calculation Basis (tc9_pr__Auto_Pay_Calculation_Basis__c)
- Click Save
- Repeat steps 3 to 5 for all page layouts that are used for the Remuneration record type
- Return to the Object Manager
- Select Pay Transaction (tc9_pr__Pay_Transaction__c) > Page Layouts
- Select any page layout that is used for the Payment or Allowance record types
- Add the following field(s) to the layout
- Assignment Schedule (tc9_pr__Assignment_Schedule__c)
- Click Save
- Repeat steps 8 to 11 for all page layouts that are used for the Payment and Allowance record types
- Return to the Object Manager
- Select Timesheet Entry (tc9_et__Timesheet_Entry__c) > Page Layouts
- Select any page layout that is used for the Timesheet Entry object
- Add the following field(s) to the layout
- Work Schedule Item (tc9_pr__Work_Schedule_Item__c)
- Click Save
- Repeat steps 14 to 17 for all page layouts that are used for the Timesheet Entry object
Create a New Picklist Value for Fields (Optional)
This requirement only needs to be completed if the option to use the functionality is taken. If not, this item can be skipped.- Go to Setup > Object Manager
- Select Assignment Rate (tc9_pr__Assignment_Rate__c) > Fields & Relationships
- Select the Pro Rata Method field (tc9_pr__Pro_Rata_Method__c)
- In the values section, click the New button
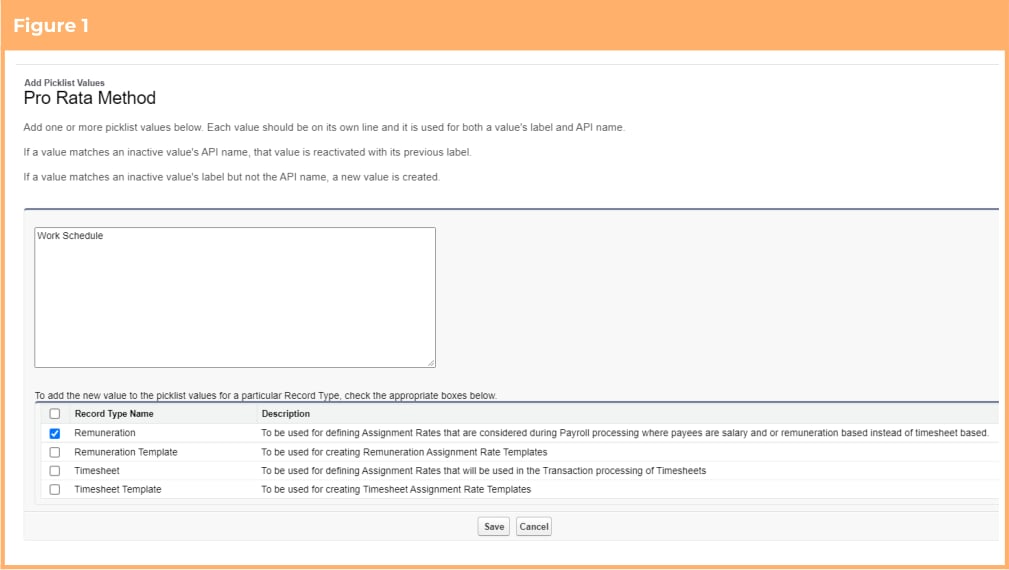
- On the displayed page add the new value ‘Work Schedule’ and apply it only for the Remuneration record type (See Figure 1)
- Click Save
Introduction of the Work Schedule Manager
The functionality to use the Work Schedule Manager is optional, however, if the optional Work Schedules functionality introduced in the Lilly Pilly ‘21 release is in use, the below configuration steps must be completed:- Update profile / permission Sets (Conditionally Compulsory)
- Update page layouts for new field(s) (Conditionally Compulsory)
Update Profile / Permission Sets (Conditionally Compulsory)
The fields associated with this item have had read / edit access added to the following permission sets provided with the package. Where these are in use, the permissions required will be automatically provisioned.- 2cloudnine Payroll Admin
- 2cloudnine Time2Pay All Access
Update Page Layouts for New Field(s) (Conditionally Compulsory)
This requirement needs to be completed regardless of whether the option to use the functionality is taken.- Go to Setup > Object Manager
- Select Schedule (tc9_pr__Schedule__c) > Page Layouts
- Select any page layout that is used for the Work Schedule record type*
- Add the following field(s) to the layout:
- Work Schedule Manager (tc9_pr__Work_Schedule_Manager__c)
- Click Save
- Repeat steps 3 to 5 for all page layouts that are used for the Work Schedule record type
Extend Work Schedules to Handle Half Day Leave Events
The functionality to allow work schedules to handle half day leave events is optional, however, if the optional Work Schedules functionality introduced in the Lilly Pilly ‘21 release is in use, the below configuration steps must be completed:- Update profile / permission Sets (Conditionally Compulsory)
- Update page layouts for new field(s) (Conditionally Compulsory)
- Update Experience(Communities) page layouts for new field(s) (Optional)
Update Profile / Permission Sets (Conditionally Compulsory)
The fields associated with this item have had read / edit access added to the following permission sets provided with the package. Where these are in use, the permissions required will be automatically provisioned.- 2cloudnine Payroll Admin
- 2cloudnine Time2Pay All Access
Update Page Layouts for New Field(s) (Conditionally Compulsory)
This requirement needs to be completed regardless of whether the option to use the functionality is taken.- Go to Setup > Object Manager
- Select Payee Leave Event (tc9_pr__Payee_Leave_Event__c) > Page Layouts
- Select any page layout that is used for the Leave Take record type*
- Add the following field(s) to the layout:
- Part Day Override (tc9_pr__Part_Day_Override__c)
- Click Save
- Repeat steps 3 to 5 for all page layouts that are used for the Leave Take record type
Update Experience (Communities) Page Layouts for New Field(s) (optional)
Making the below field available on the Employee and Approver Experience / Communities is optional. This requirement only needs to be completed if the option is taken to make the functionality available to Experience (Communities) users. If not, this item can be skipped.- Go to Setup > Object Manager
- Select Payee Leave Event (tc9_pr__Payee_Leave_Event__c) > Page Layouts
- Select any page layout that is used by the Community Profile for the Leave Take record type
- Add the following field(s) to the layout:
- Part Day Override (tc9_pr__Part_Day_Override__c)
- Click Save
- Repeat steps 3 to 5 for all page layouts that are used by the Community Profile for the Leave Take record type
Improvements for Publishing and Unpublishing Work Schedules
The functionality to enable users to Publish and Unpublish Work Schedule records is optional, however, if the optional Work Schedules functionality introduced in the Lilly Pilly ‘21 release is in use, the below configuration steps must be completed:- Update page layouts for new button(s) (Conditionally Compulsory)
- Update new field(s) on existing records (Conditionally Compulsory)
Update Page Layouts for New Button(s) (Conditionally Compulsory)
This requirement needs to be completed if the optional Work Schedules functionality introduced in the Lilly Pilly ‘21 release is in use.- Go to Setup > Object Manager
- Select Schedule (tc9_pr__Schedule__c) > Page Layouts
- Select any page layout that is used for the Work Schedule record type*
- Add the following button(s) to the layout
- Unpublish (tc9_pr.Unpublish__c)
- Click Save
- Repeat steps 3 to 5 for all page layouts that are used for the Work Schedule record type.
Update new field(s) on existing records (Conditionally Compulsory)
To prevent validation errors while publishing Work Schedules and processing payroll, the Work Schedule Publish From (tc9_pr__Work_Schedule_Published_From__c) cannot be earlier than the Work Schedule Start Date (tc9_pr__Work_Schedule_Start_Date__c). Existing Work Schedule records will need to be updated to ensure they meet these validation requirements.Populate Default Values on Existing Timesheets From Work Schedules
The functionality to update existing Timesheets with the values held on Work Schedules is optional, however, if the optional Work Schedules functionality introduced in the Lilly Pilly ‘21 release is in use for Timesheet generation, the below configuration steps must be completed:- Set new schedule job(s) (Optional)
Set New Scheduled Job(s) (Optional)
Confirm that there are existing scheduled jobs to Generate Timesheets. If not, run Script 1 defined below through the Developer Console Execute Anonymous Window to set the required scheduled jobs.Script 1
Meet Stapled Superannuation Legislative Requirements New
Although the requirement to meet Stapled Super requirements is legislative, the use of the Stapled Super functionality provided within 2cloudnine Payroll is optional. This requirement only needs to be completed if the option to use the functionality is taken. If not, these items can be skipped.- Update page layouts for new button(s)(Optional)
Update Page Layouts for New Button(s) (Optional)
This requirement only needs to be completed if the option to use the functionality is taken. If not, this item can be skipped.- Go to Setup > Object Manager
- Select Payee (tc9_pr__Payee__c) > Page Layouts
- Select any page layout that is used for the Payee record type*
- Add the following button(s) to the layout
- Stapling Super (tc9_eau_Super_Stapling__c) - this button can be found in the Mobile & Lightning Actions section
- Click Save
- Repeat steps 3 to 5 for all page layouts that are used for the Payee record type.
- Page layouts used by external users, such as those used for Employee Experience (Communities) and Approver (Communities) do not need to be included in the above update. If a change to one of these layouts is required, it will be listed as a separate configuration item.
New Deduction Calculation Type
The functionality to utilise extended deduction rate type calculations is compulsory, and all the below configuration steps must be completed:- Create a new picklist value for field (Compulsory)
Create a New Picklist Value For Field(s) (Compulsory)
This requirement must be completed.- Go to Setup > Object Manager
- Select Payee Deduction Template (tc9_pr__Payee_Deduction_Template__c) > Fields & Relationships
- Select the Deduction Rate Type field (tc9_pr__Deduction_Rate_Type__c)
- In the values section, click the New button
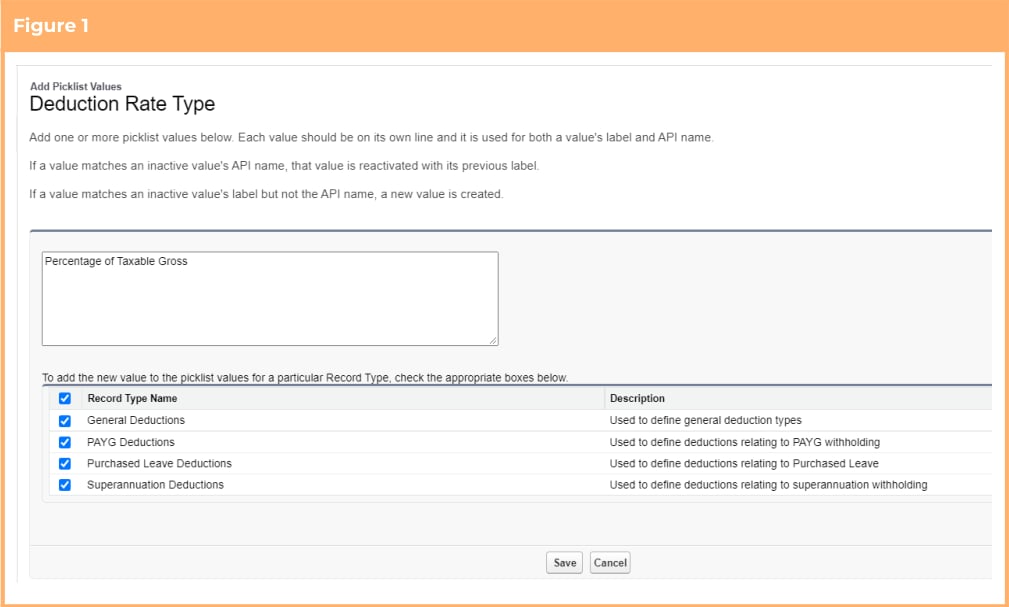
- On the displayed page add the new value ‘Percentage of Taxable Gross’
- Click Save
- Return to Object Manager
- Select Payee Deduction Record (tc9_pr__Payee_Deduction_Record__c) > Fields & Relationships
- Select the Deduction Rate Type field (tc9_pr__Deduction_Rate_Type__c)
- In the values section, click the New button
- On the displayed page add the new value ‘Percentage of Taxable Gross’ and apply it for all available deduction record types (See Figure 1)
- Click Save
Customise the Payee Pay Batch’s Total Quantity Calculation
The functionality to customise the Payee Pay Batch’s Total Quantity calculations is compulsory and all the below configuration steps must be completed:- Update profile / permission Sets (Compulsory)
- Update page layouts for new field(s) (Compulsory)
- Update new field(s) on existing records (Compulsory)
Update Profile / Permission Sets (Compulsory)
The fields associated with this item have had read / edit access added to the following permission sets provided with the package. Where these are in use, the permissions required will be automatically provisioned.- 2cloudnine Payroll Admin
- 2cloudnine Time2Pay All Access
Update Page Layouts for New Field(s) (Compulsory)
This requirement must be completed:- Go to Setup > Object Manager
- Select Pay Code (tc9_pr__Pay_Code__c) > Page Layouts
- Select any page layout that is used for the Payment, Allowance, Expense, ETP or Lump Sum record types*
- Add the following field(s) to the layout
- Contributes to Total Quantity (tc9_pr__Contributes_to_Total_Quantity__c)
- Click Save
- Repeat steps 3 to 5 for all page layouts that are used for the Payment, Allowance, Expense, ETP and Lump Sum record types
Update New Field(s) on Existing Records (Compulsory)
To prevent validation errors while creating / editing Pay Codes and processing payroll, the new Contributes to Total Quantity (tc9_pr__Contributes_to_Total_Quantity__c) must be populated on all current Pay Codes. To update the field the following steps should be followed:- Run Script 1 defined below through the Developer Console Execute Anonymous Window to automatically populate the Contributes to Total Quantity field on all Payment Pay Codes to be True (checked)
- Manually edit any Payment Pay Codes that require different values than those set by the script.
Script 1
Improved Overnight Interpretation Capability
The functionality to allow improved interpretation logic for overnight shifts is optional. This requirement only needs to be completed if the option to use the functionality is taken. If not, these items can be skipped. The below configuration steps should be completed if the functionality is required:- Update profile / permission Sets (Optional)
- Update page layouts for new field(s) (Optional)
- Update new field(s) on existing records (Optional)
Update Profile / Permission Sets (Optional)
The fields associated with this item have had read / edit access added to the following permission sets provided with the package. Where these are in use, the permissions required will be automatically provisioned.- 2cloudnine Payroll Admin
- 2cloudnine Time2Pay All Access
Update Page Layouts for New Field(s) (Optional)
This requirement only needs to be completed if the option to use the functionality is taken. If not, this item can be skipped.- Go to Setup > Object Manager
- Select Interpretation Rule (tc9_et__Interpretation_Rule__c) > Page Layouts
- Select any page layout that is used for the Shift Start Time, Shift End Time or Interpretation Variation Rule record types*
- Add the following field(s) to the layout
- Overnight Based on Shift Start Range (tc9_et__Overnight_Based_on_Shift_Start_Range__c)
- Overnight Based on Majority of Shift? (tc9_et__Overnight_Based_on_Majority_of_Shift__c)
- Overnight Weekday Shift Starting from (tc9_et__Overnight_Weekday_Shift_Starting_from__c)
- Overnight Monday Shift Starting from (tc9_et__Overnight_Monday_Shift_Starting_from__c)
- Overnight Tuesday Shift Starting from (tc9_et__Overnight_Tuesday_Shift_Starting_from__c)
- Overnight Wednesday Shift Starting from (tc9_et__Overnight_Wednesday_Shift_Starting_from__c)
- Overnight Thursday Shift Starting from (tc9_et__Overnight_Thursday_Shift_Starting_from__c)
- Overnight Friday Shift Starting from (tc9_et__Overnight_Friday_Shift_Starting_from__c)
- Overnight Saturday Shift Starting from (tc9_et__Overnight_Saturday_Shift_Starting_from__c)
- Overnight Sunday Shift Starting from (tc9_et__Overnight_Sunday_Shift_Starting_from__c)
- Overnight PH Shift Starting from (tc9_et__Overnight_Public_Holiday_Shift_Starting_from__c)
- Apply Overnight Majority Weekday (tc9_et__Apply_Overnight_Majority_Weekday__c)
- Apply Overnight Majority Monday (tc9_et__Apply_Overnight_Majority_Monday__c)
- Apply Overnight Majority Tuesday (tc9_et__Apply_Overnight_Majority_Tuesday__c)
- Apply Overnight Majority Wednesday (tc9_et__Apply_Overnight_Majority_Wednesday__c)
- Apply Overnight Majority Thursday (tc9_et__Apply_Overnight_Majority_Thursday__c)
- Apply Overnight Majority Friday (tc9_et__Apply_Overnight_Majority_Friday__c)
- Apply Overnight Majority Saturday (tc9_et__Apply_Overnight_Majority_Saturday__c)
- Apply Overnight Majority Sunday (tc9_et__Apply_Overnight_Majority_Sunday__c)
- Apply Overnight Majority Public Holiday (tc9_et__Apply_Overnight_Majority_Public_Holiday__c)
- Higher Rate Weekday (tc9_et__Higher_Rate_Weekday__c)
- Higher Rate Monday (tc9_et__Higher_Rate_Monday__c)
- Higher Rate Tuesday (tc9_et__Higher_Rate_Tuesday__c)
- Higher Rate Wednesday (tc9_et__Higher_Rate_Wednesday__c)
- Higher Rate Thursday (tc9_et__Higher_Rate_Thursday__c)
- Higher Rate Friday (tc9_et__Higher_Rate_Friday__c)
- Higher Rate Saturday (tc9_et__Higher_Rate_Saturday__c)
- Higher Rate Sunday (tc9_et__Higher_Rate_Sunday__c)
- Higher Rate Public Holiday (tc9_et__Higher_Rate_Public_Holiday__c)
- Click Save
- Repeat steps 3 to 5 for all page layouts that are used for the Shift Start Time, Shift End Time and Interpretation Variation Rule record types
Update New Field(s) on Existing Records (Optional)
During timesheet interpretation, if you wish to utilise the new overnight functionality to define if an overnight shift should be paid at the following day’s rate based on when the shift starts, or if it will be paid based on the breakpoint that the majority of the hours fall within, you will need to update the relevant Interpretation Rules, via the Interpretation Builder, to provide the required information.Define Alternative Pay Code for Saturday Frequency Breakpoints
The functionality to allow users to define alternate pay codes for Saturday frequency breakpoints is optional. This requirement only needs to be completed if the option to use the functionality is taken. If not, these items can be skipped. The below configuration steps should be completed if the functionality is required:- Update profile / permission Sets (Optional)
- Update page layouts for new field(s) (Optional)
- Update new field(s) on existing records (Optional)
Update Profile / Permission Sets (Optional)
The fields associated with this item have had read / edit access added to the following permission sets provided with the package. Where these are in use, the permissions required will be automatically provisioned.- 2cloudnine Payroll Admin
- 2cloudnine Time2Pay All Access
Update Page Layouts for New Field(s) (Optional)
This requirement only needs to be completed if the option to use the functionality is taken. If not, this item can be skipped.- Go to Setup > Object Manager
- Select Interpretation Breakpoint (tc9_et__Interpretation_Breakpoint__c) > Page Layouts
- Select any page layout that is used for the Frequency Hours Breakpoint record type*
- Add the following field(s) to the layout
- Saturday Pay Code (tc9_et__Saturday_Pay_Code__c)
- Click Save
- Repeat steps 3 to 5 for all page layouts that are used for the Frequency Hours Breakpoint record type
Update New Field(s) on Existing Records (Optional)
During timesheet interpretation, if you wish to utilise the new functionality and define a different rate to be paid for Saturdays when the actual hours are extended beyond normal frequency hours, you will need to update the relevant Interpretation Rules, via the Interpretation Builder, to add a Saturday Pay Code.Ability to Override the ATO Income Classification Application New
The functionality to allow users to override the ATO Income Classification at an Opening Balance and Pay Transaction level is compulsory and all the below configuration steps must be completed: The below configuration steps will be completed by a 2cloudine Payroll consultant as scheduled:- Update profile / permission Sets (Compulsory)
- Update page layouts for new field(s) (Compulsory)
- Create a new picklist value for field(s) (Compulsory)
Update Profile / Permission Sets (Compulsory)
The fields associated with this item have had read / edit access added to the following permission sets provided with the package. Where these are in use, the permissions required will be automatically provisioned.- 2cloudnine Payroll Admin
- 2cloudnine Time2Pay All Access
Update Page Layouts for New Field(s) (Compulsory)
This requirement must be completed.- Go to Setup > Object Manager
- Select Payee Opening Balance (tc9_pr__Payee_Opening_Balance__c) > Page Layouts
- Select any page layout that is used for the Payee Opening Balance object*
- Add the following field(s) to the layout
- ATO Income Classification (tc9_pr__ATO_Income_Classification__c)
- Click Save
- Repeat steps 3 to 5 for all page layouts that are used for the Payee Opening Balance object
- Return to the Object Manager
- Select Pay Transaction (tc9_pr__Pay_Transaction__c) > Page Layouts
- Select any page layout that is used for the Payment, Allowance, Expense, ETP or Lump Sum record types*
- Add the following field(s) to the layout
- Override ATO Income Classification (tc9_pr__Override_ATO_Income_Classification__c)
- Click Save
- Repeat steps 9 to 11 Select for all page layout that is used for the Payment, Allowance, Expense, ETP or Lump Sum record types
- Page layouts used by external users, such as those used for Employee Experience (Communities) and Approver (Communities) do not need to be included in the above update. If a change to one of these layouts is required, it will be listed as a separate configuration item.
Create a New Picklist Value for Field(s) (Compulsory)
This requirement must be completed.- Go to Setup > Objects and Fields > Picklist Value Sets
- Select ATO Income Classification
- Click the New button in the Values section
- On the displayed page, add the new value Not Reportable
- Check the “Add new picklist value sets to all record types that use this global value set” checkbox
- Click Save
Define Opening Balances as Employer Additional Superannuation New
The functionality to allow users to define Opening Balances as Employer Additional Superannuation is compulsory and all the below configuration steps must be completed: The below configuration steps will be completed by a 2cloudine Payroll consultant as scheduled- Update profile / permission Sets (Compulsory)
- Update page layouts for new field(s) (Compulsory)
Update Profile / Permission Sets (Compulsory)
The fields associated with this item have had read / edit access added to the following permission sets provided with the package. Where these are in use, the permissions required will be automatically provisioned.- 2cloudnine Payroll Admin
- 2cloudnine Time2Pay All Access
Update Page Layouts for New Field(s) (Compulsory)
This requirement must be completed.- Go to Setup > Object Manager
- Select Payee Opening Balance (tc9_pr__Payee_Opening_Balance__c) > Page Layouts
- Select any page layout that is used for the Withholding - Superannuation record type*
- Add the following field(s) to the layout
- Employer Additional Super (tc9_pr__Employer_Additional_Super__c)
- Click Save
- Repeat steps 3 to 5 for all page layouts that are used for the Withholding - Superannuation record type
- Page layouts used by external users, such as those used for Employee Experience (Communities) and Approver (Communities) do not need to be included in the above update. If a change to one of these layouts is required, it will be listed as a separate configuration item.
View Key Information Directly From Payee Aggregate Records New
The functionality to allow users to view key information directly from the Payee Aggregate records is compulsory and all the below configuration steps must be completed: The below configuration steps will be completed by a 2cloudine Payroll consultant as scheduled- Update profile / permission Sets (Compulsory)
- Update page layouts for new field(s) (Compulsory)
Update Profile / Permission Sets (Compulsory)
The fields associated with this item have had read / edit access added to the following permission sets provided with the package. Where these are in use, the permissions required will be automatically provisioned.- 2cloudnine Payroll Admin
- 2cloudnine Time2Pay All Access
Update Page Layouts for New Field(s) (Compulsory)
This requirement must be completed.- Go to Setup > Object Manager
- Select Payee Aggregate (tc9_pr__Payee_Aggregate__c) > Page Layouts
- Select any page layout that is used for the Payee Aggregate object*
- Add the following field(s) to the layout
- Employee (tc9_pr__Employee_Name__c)
- Payment Entity (tc9_pr__Payment_Entity__c)
- Pay Schedule (tc9_pr__Pay_Schedule__c)
- Finalise Calendar Period (tc9_pr__Finalise_Calendar_Period__c)
- Pay Batch Type (tc9_pr__Pay_Batch_Type__c)
- Payment Date (tc9_pr__Payment_Date__c)
- Maximum Payroll Date (tc9_pr__Maximum_Payroll_Date__c)
- Calculation Version (tc9_pr__Calculation_Version__c)
- Leave Rule (tc9_pr__Leave_Rule__c)
- Leave Type (tc9_pr__Leave_Type__c)
- Date Time Finalised (tc9_pr__Date_Time_Finalised__c)
- Click Save
- Repeat steps 3 to 5 for all page layouts that are used for the Payee Aggregate object
- Page layouts used by external users, such as those used for Employee Experience (Communities) and Approver (Communities) do not need to be included in the above update. If a change to one of these layouts is required, it will be listed as a separate configuration item.
General Updates to the Interpretation Builder Pages and Functionality
The general improvements to the Interpretation Builder pages and functionality are compulsory and all the below configuration steps must be completed:- Update profile / permission Sets (Compulsory)
- Update page layouts for new field(s) (Compulsory)
- Confirm / update new, edit and clone button configuration (Compulsory)
- Update Data for Existing Records (Compulsory)
Update Profile / Permission Sets (Optional)
The fields associated with this item have had read / edit access added to the following permission sets provided with the package. Where these are in use, the permissions required will be automatically provisioned.- 2cloudnine Payroll Admin
- 2cloudnine Time2Pay All Access
Update Page Layouts for New Field(s) (Compulsory)
This requirement must be completed:- Go to Setup > Object Manager
- Select Interpretation Breakpoint (tc9_et__Interpretation_Breakpoint__c) > Page Layouts
- Select any page layout that is used for the Leave Breakpoint record type*
- Add the following field(s) to the layout
- Leave Header (tc9_et__Leave_Header__c)
- Click Save
- Repeat steps 3 to 5 for all page layouts that are used for the Leave Breakpoint record type
- Return to the Object Manager
- Select Interpretation Rule (tc9_et__Interpretation_Rule__c) > Page Layouts
- Select any page layout that is used for the Interpretation Rule object*
- Add the following field(s) to the layout
- Variation Record Type (tc9_et__Variation_Record_Type__c)
- Click Save
- Repeat steps 8 to 11 for all page layouts that are used for the Interpretation Rule object
Confirm / Update New, Edit and Clone Button Configuration (Compulsory)
The New, Edit and Clone buttons used on the Interpretation Rule object are configured to open the Interpretation Builder. Follow the below instructions to ensure the correct configuration is applied:- Go to Setup> Object Manager
- Select Interpretation Rule (tc9_et__Interpretation_ Rule__c) > Buttons, Links and Actions
- Navigate to the New button and select Edit
- Ensure that the following values are defined
- Salesforce Classic Override = No override (use default)
- Lightning Experience Override = Lighting Component tc9_et:AwardBuilder
- Mobile Override = Lighting Component tc9_et:AwardBuilder
- Skip record type selection page = False
- Click the Save button
- Navigate to the Edit button and select Edit
- Ensure that the following values are defined
- Salesforce Classic Override = No override (use default)
- Lightning Experience Override = Lighting Component tc9_et:AwardBuilder
- Mobile Override = Lighting Component tc9_et:AwardBuilder
- Click the Save button
- Navigate to the Clone button and select Edit
- Ensure that the following values are defined
- Salesforce Classic Override = Visualforce page CloneInterpretation
- Click the Save button
Update Data for Existing Records (Compulsory)
Along with the improvements introduced with the Interpretation Builder, the updates included a change to how Leave Breakpoints are stored by the Interpretation Builders. Now, the Leave Header Breakpoint is stored in the relevant Leave Breakpoint via a lookup field. Although this update does not change the functionality for the user, to prevent errors occurring whilst modifying existing Interpretation Rules and/or during Timesheet Interpretation, the existing Interpretation Rules must have the correct Leave Header identified on the Leave Breakpoints. To check and update the data on existing records the following steps should be followed:- Run Script 1 defined below through the Developer Console Execute Anonymous Window to create any required Leave Header Interpretation Breakpoints
- Run Script 2 defined below through the Developer Console Query Editor to confirm that there are no Leave Breakpoints that do not have an assigned Leave Header Breakpoint.
- If the query returns no results, all records are updated. No further steps need to be completed
- If the query returns 1 or more results, the records identified will need to be updated manually. Proceed to step 3
- For each Interpretation Rule identified in Step 2, manually update by completing the following
- Go to the Interpretation Rule > Leave Breakpoints
- Identify the 2 Leave Breakpoints that match the following criteria
- Record Type = Leave Breakpoint
- Breakpoint Type = Leave Header
- Leave Rule > Record Type = Annual Leave
- Rename the identified records with a name that will make them easy to select in a lookup field
- Return to the Interpretation Rule > Leave Breakpoints
- Identify the Leave Breakpoints that match the following criteria
- Record Type = Leave Breakpoint
- Breakpoint Type contains Standard Leave
- Leave Rule > Record Type = Annual Leave
- Populate the Leave Header lookup field with a Leave Header identified in step b. All Standard Leave Breakpoints must be allocated to the same Leave Header
- Return to the Interpretation Rule > Leave Breakpoints
- Identify the Leave Breakpoints that match the following criteria
- Record Type = Leave Breakpoint
- Breakpoint Type contains Shift Leave
- Leave Rule > Record Type = Annual Leave
- Populate the Leave Header lookup field with the other Leave Header identified in step b.
- Run Script 2 defined below through the Developer Console Query Editor again to confirm that all the required manual updates are complete. The query should return no results. If results are returned, repeat step 3 until there are no results returned
Script 1
Script 2
Custom Set the Owner of Pay Transactions Records
The functionality to assign specific users as Pay Transaction record Owners is optional. This requirement only needs to be completed if the option to use the functionality is taken. If not, these items can be skipped. The below configuration steps should be completed if the functionality is required:- Update the Time2pay Ext Main Settings custom setting (Optional)
Update the Time2pay Ext Main Settings Custom Setting (Optional)
This requirement only needs to be completed if the option to use the functionality is taken. If not, this item can be skipped.- Go to Setup > Custom Setting
- Locate the Time2pay Ext Main Settings custom setting and click on the Manage link alongside it
- Click the Edit button
- Populate the Record Owner by choosing one of the following 3 values:
- Default When set to Default or the custom setting is left blank, the default Owner is set as the user who created the Pay Transaction records.
- Client When set to Client, the Owner is set as the Account Owner of the Client record that is related to the Assignment. If the Client record Account Owner is blank, then the Default Owner defined above will apply.
- Assignment When set to an Assignment, the Owner is set as the Owner of the Assignment record. If the Assignment record Owner is blank, then the Default Owner defined above will apply.
- Click Save
Update to Timesheet related Pay Transactions for Payee Leave Events New
The feature of populating the Payee Leave Event field on the Pay Transaction with the value on the related Timesheet Entry is compulsory and all the below configuration steps must be completed:- Update new field(s) on existing records (Compulsory)
Update New Field(s) on Existing Records (Compulsory)
To populate the Payee Leave Event field on existing Pay Transactions with the values defined in the related Timesheet Entry record, you will need to run the below script as mentioned. The update provided to populate the Payee Leave Event field on the Pay Transactions record will occur as they are created. Existing Pay Transaction records will need to be updated to ensure there is no missing data in the future. To update the field, the following steps should be followed:- Run Script 1 defined below through the Developer Console Execute Anonymous Window to automatically update the Payee Leave Event on the Pay Transaction from the Timesheet Entry
Script 1
Provide Greater Detail on Pay Advice Documents
The feature of enabling users to split casual loading and penalty loading Pay Transactions separately on Pay Advice records is optional, however, there is a required configuration regardless of if the function is used. The below configuration steps must be completed:- Update profile / permission sets (Compulsory)
- Update page layouts for new field(s) (Optional)
- Update new field(s) on existing records (Compulsory)
Update Profile / Permission Sets (Compulsory)
The fields associated with this item have had read / edit access added to the following permission sets provided with the package. Where these are in use, the permissions required will be automatically provisioned.- 2cloudnine Payroll Admin
- 2cloudnine Time2Pay All Access
Update Page Layouts For New Field(s) (Optional)
This requirement only needs to be completed if the option to use the functionality, or the functionality to Provide Greater Detail on Invoice Documents, is taken. If not, this item can be skipped.- Go to Setup > Object Manager
- Select Interpretation Rule (tc9_et__Interpretation_Rule__c) > Page Layouts
- Select any page layout that is used for the Hourly Rates, Shift Start Time, Shift End Time or Interpretation Variation Rule record types*
- Add the following fields to the layout
- Apply Casual Loading (Apply_Casual_Loading__c)
- Apply Penalty Loading (Apply_Penalty_Loading__c)
- Click Save
- Repeat steps 3 to 5 for all page layouts that are used for the Hourly Rates, Shift Start Time, Shift End Time and Interpretation Variation Rule record types
- Return to the Object Manager
- Select Interpretation Breakpoints (tc9_et__Interpretation_Breakpoint__c) > Page Layouts
- Select any page layout that is used for the Interpretation Breakpoints object excluding those used for the Allowance and Pay Code Cap record types*
- Add the following fields to the layout
- Casual Loading Pay Code (tc9_et__Casual_Loading_Pay_Code__c)
- Penalty Loading Pay Code (tc9_et__Penalty_Loading_Pay_Code__c)
- Click Save
- Repeat steps 9 to 11 for all page layouts that are used for the Interpretation Breakpoint object excluding those used for the Allowance and Pay Code Cap record types
Update New Field(s) on Existing Records (Compulsory)
With the introduction of the functionality to display casual loading, penalty loading and/or leave loading as separate lines on a Pay Advice, a change was made to where leave loading information is stored by the Interpretation Builders. Previously, this was stored on leave loading breakpoints. Now, leave loading information will be stored on the standard leave breakpoints. Although this update does not change the functionality for the user, to prevent errors occurring during timesheet interpretation, the existing Interpretation Rules must have the leave loading updated to be held on the correct breakpoints. Furthermore, to use the functionality, any relevant Interpretation Rules will need to be updated via the Interpretation Builder to define the additional pay codes required for the casual loading and/or penalty loading pay transactions. To update the fields, the following steps should be followed:- Run Script 1 defined below through the Developer Console Execute Anonymous Window to automatically transfer the Leave Loading information from the Leave Loading Breakpoint to the Leave Breakpoint, and delete the existing Leave Loading Breakpoints
- Manually edit any Interpretation Rules, via the Interpretation Builder, to define the additional pay codes required for the casual loading, penalty loading and/or leave loading pay transactions
Script 1
Provide Greater Detail on Invoice Documents
The feature of enabling users to split casual loading and penalty loading pay transactions separately on Invoice records is optional. This requirement only needs to be completed if the option to use the functionality is taken. If not, these items can be skipped. The below configuration steps should be completed if the functionality is required:- Update profile / permission sets (Optional)
- Update page layouts for new field(s) (Optional)
- Update new field(s) on existing records (Optional)
Update Profile / Permission Sets (Optional)
The fields associated with this item have had read / edit access added to the following permission sets provided with the package. Where these are in use, the permissions required will be automatically provisioned.- 2cloudnine Payroll Admin
- 2cloudnine Time2Pay All Access
Update Page Layouts For New Field(s) (Optional)
This requirement only needs to be completed if the option to use the functionality is taken. If not, this item can be skipped.- Go to Setup > Object Manager
- Select Invoice Setting (tc9_et__Invoice_Setting__c) > Page Layouts
- Select any page layout that is used for the Payroll Items record type*
- Add the following fields to the layout
- Split Loading Pay Transactions (tc9_et__Split_Loading_Pay_Transactions__c)
- Click Save
- Repeat steps 3 to 5 for all page layouts that are used for the Payroll Items record type
Update New Field(s) on Existing Records (Optional)
For users to utilise this option to display casual loading or penalty loading as separate lines on the client invoice documents, the relevant Invoice Settings will need to have the new Split Loading Pay Transactions field (tc9_et__Split_Loading_Pay_Transactions__c) set to ‘Yes’.Provide Greater Detail on a Timesheet’s Invoice Backing Sheet
The functionality to allow greater details on a Timesheet’s invoice backing sheet is optional. This requirement only needs to be completed if the option to use the functionality is taken. If not, these items can be skipped. The below configuration steps should be completed if the functionality is required:- Update profile / permission Sets (Optional)
- Update page layouts for new field(s) (Optional)
- Update new field(s) on existing records (Optional)
Update Profile / Permission Sets (Optional)
The fields associated with this item have had read / edit access added to the following permission sets provided with the package. Where these are in use, the permissions required will be automatically provisioned.- 2cloudnine Payroll Admin
- 2cloudnine Time2Pay All Access
- 2cloudnine Time2Pay Standard Online Invoice permission set
Update Page Layouts for New Field(s) (Optional)
This requirement only needs to be completed if the option to use the functionality is taken. If not, this item can be skipped.- Go to Setup > Object Manager
- Select Invoice Setting (tc9_et__Invoice_Setting__c) > Page Layouts
- Select any page layout that is used for the Payroll Items record type*
- Add the following field(s) to the layout
- Enable Full Approval History (tc9_et__Enable_Full_Approval_history__c)
- Click Save
- Repeat steps 3 to 5 for all page layouts that are used for the Payroll Items record type
Update New Field(s) on Existing Records (Optional)
To display the entire history of the Timesheet entry record, the Enable Full Approval History field must be set to “Yes” in the Invoice Settings record. Any Invoice Setting that requires this should be updated directly via the standard record page.Enable Bulk Delete of Timesheets
The functionality to allow employees to bulk delete Timesheets and their related records from the Assignment record is optional. This requirement only needs to be completed if the option to use the functionality is taken. If not, these items can be skipped. The below configuration steps should be completed if the functionality is required:- Update profile / permission Sets (Optional)
- Update page layouts for new field(s) (Optional)
- Update new field(s) on existing records (Optional)
Update Profile / Permission Sets (Optional)
The fields associated with this item have had read / edit access added to the following permission sets provided with the package. Where these are in use, the permissions required will be automatically provisioned.- 2cloudnine Payroll Admin
- 2cloudnine Time2Pay All Access
Update Page Layouts for New Field(s) (Optional)
This requirement only needs to be completed if the option to use the functionality is taken. If not, this item can be skipped.- Go to Setup > Object Manager
- Select Assignment (tc9_pr__Assignment__c) > Page Layouts
- Select any page layout that is used for the Assignment object excluding those used for the Employee, Perm and Temp to Perm record types
- Add the following fields to the layout
- Allow Delete Approved Timesheets (tc9_et__Allow_Delete_Approved_Timesheets__c)
- Allow Delete Submitted Timesheets (tc9_et__Allow_Delete_Submitted_Timesheets__c)
- Add the following Action (under the Mobile & Lightning Action options) to the layout
- Bulk Delete Timesheets and Related Records (tc9_et.Bulk_Delete_Timesheets_and_Related_Records)
- Click Save
- Repeat steps 3 to 6 for all page layouts that are used for the Assignment object excluding those used for the Employee, Perm and Temp to Perm record types
Update New Field(s) on Existing Records (Optional)
To utilise bulk delete functionality to delete Submitted or Approved timesheets and their related records, the Allow Delete Submitted Timesheets and/or Allow Delete Approved Timesheets fields (tc9_et__Allow_Delete_Submitted_Timesheets__c and tc9_et__Allow_Delete_Approved_Timesheets__c respectively) on the related Assignment must be set as “Yes”. Existing Assignment records can be updated to have these fields set to “Yes”. However, it is recommended that they are left blank or as “No” and the fields are populated on a case by case basis at the time a bulk delete is required, to prevent submitted and approved timesheets from being deleted in error.Further Streamline Payee Allowance and Assignment Rate Updates
The functionality to use the extended version of Payee Allowance, Assignment Rate and Minimum Pay Rate Automation is optional. This requirement only needs to be completed if the option to use the functionality is taken. If not, these items can be skipped. The below configuration steps should be completed if the functionality is required:- Update profile / permission Sets (Optional)
- Update page layouts for new field(s) (Optional)
- Set up new scheduled job(s) (Optional)
Update Profile / Permission Sets (Optional)
The fields associated with this item have had read / edit access added to the following permission sets provided with the package. Where these are in use, the permissions required will be automatically provisioned.- 2cloudnine Payroll Admin
- 2cloudnine Time2Pay All Access
Update Page Layouts for New Field(s) (Optional)
This requirement only needs to be completed if the option to use the functionality is taken. If not, this item can be skipped.- Go to Setup > Object Manager
- Select Minimum Pay Rate (tc9_et__Minimum_Pay_Rate__c) > Page Layouts
- Select any page layout that is used on the Minimum Pay Rate object
- Add the following field(s) to the layout
- Has Pending Assignment to be Processed (tc9_et__Has_Pending_Assignment_to_be_processed__c)
- Click Save
- Repeat steps 3 to 5 for all page layouts that are used for the Minimum Pay Rate object
- Return to the Object Manager
- Select Assignment Rate (tc9_pr__Assignment_Rate__c) > Page Layouts
- Select any page layout that is used on the Assignment Rate object*
- Add the following field(s) to the layout
- Has Pending Assignment to be Processed (tc9_et__Has_Pending_Assignment_to_be_processed__c)
- Click Save
- Repeat steps 8 to 11 for all page layouts that are used for the Assignment Rate object
- Return to the Object Manager
- Select Assignment (tc9_pr__Assignment__c) > Page Layouts
- Select any page layout that is used for the Temp record type*
- Add the following field(s) to the layout
- Has Pending Assignment Rate Temp Group (tc9_et__Has_Pending_Assignment_Rate_Temp_Group__c)
- Has Pending Min Pay Rate (tc9_et__Has_Pending_Min_Pay_Rate__c)
- Has Pending Payee Allowance Temp Group (tc9_et__Has_Pending_Payee_Allowance_Temp_Group__c)
- Add the following button(s) to the layout
- Assignment Rate Automation (tc9_et.Assignment_Rate_Automation)
- Click Save
- Repeat steps 15 to 18 for all page layouts that are used for the Temp record types
- Go to Setup > Object Manager
- Select the required Object (that is related to an Assignment (tc9_pr__Assignment__c)) > Page Layouts
- Select the required page layout*
- Add the following button(s) to the Assignment related list on the layout
- Assignment Rate Automation (tc9_et.Assignment_Rate_Automation_List)
- Click Save
- Repeat steps 2 to 5 for all page layouts that require the related list button added.
Set New Scheduled Job(s) (Optional)
- Run Script 1 defined below through the Developer Console Execute Anonymous Window to set up a scheduled job for the Minimum Pay Rate Automation process
Script 1
Update to Terminology Customisation of Experience (Communities)
The functionality to customise terminology used within Experience (Communities) is optional. This requirement only needs to be completed if the option to use the functionality is taken. If not, these items can be skipped. The below configuration steps should be completed if the functionality is required:- Override / translate custom labels (Optional)
Override / Translate Custom Labels (Optional) Update
This requirement only needs to be completed if the option to use the functionality is taken. If not, this item can be skipped.- Go to Setup > User Interface > Custom Labels
- On the displayed page, navigate to the Custom Label that needs to be overridden
- Click on the Edit link along side the Custom Label
- On the page that opens, scroll to the Local Translations / Overrides section and click on the New Local Translation button
- Populate the required fields
- Click Save
- Repeat steps 2 to 6 until all overrides / translations required are completed
Control if Leave Credits Are Available in Experience (Communities) New
The functionality to define if leave credits are available in Experience (Communities) is compulsory and all the below configuration steps must be completed:- Update profile / permission sets (Compulsory)
- Update page layouts for new fields (Optional)
- Update Data for Existing records (Optional)
Update Profile / Permission Sets (Compulsory)
The fields associated with this item have had read / edit access added to the following permission sets provided with the package. Where these are in use, the permissions required will be automatically provisioned.- 2cloudnine Payroll Admin (internal users)
- 2cloudnine Time2Pay All Access (internal users)
- Approver User Permission Set (approver users)
Update Page Layouts for New Fields (Optional)
This requirement only needs to be completed if the option to use the functionality is taken. If not, this item can be skipped.- Go to Setup > Object Manager
- Select Leave Rule (tc9_pr__Leave_Rule__c) > Page Layouts
- Select any page layout that is used for the Leave Rule object*
- Add the following field to the layout
- Credit Available In Portal (tc9_pr__Credit_Available_in_Portal__c)
- Click Save
- Repeat steps 3 to 5 for all page layouts that are used for the Leave Rule object
Update Data for Existing Records (Optional)
By default, where the value of the Credit Available In Portal field is not populated, it will be treated as if the value is “No” and therefore access to the functionality will not be granted to employees and approvers via Experience (Communities). However, if there are existing Leave Rules where the functionality is required, these should be edited via the standard Salesforce page.Define Experience (Communities) Access to Future Dated Timesheets New
The functionality to define if future dated Timesheets are visible via Experience (Communities) is optional. This requirement only needs to be completed if the option to use the functionality is taken. If not, these items can be skipped. The below configuration steps should be completed if the functionality is required:- Update profile / permission sets (Optional)
- Update page layouts for new field(s) (Optional)
- Update data for existing records (Optional)
Update Profile / Permission Sets (Optional)
The fields associated with this item have had read / edit access added to the following permission sets provided with the package. Where these are in use, the permissions required will be automatically provisioned.- 2cloudnine Payroll Admin
- 2cloudnine Time2Pay All Access
Update Page Layouts for New Field(s) (Optional)
This requirement only needs to be completed if the option to use the functionality is taken. If not, this item can be skipped.- Go to Setup > Object Manager
- Select Calendar (tc9_pr__Calendar__c) > Page Layouts
- Select a page layout that is used for any Timesheet Calendar record type*
- Add the following field(s) to the layout
- No_Days_Future_Timesheets_Visible (tc9_et__No_Days_Future_Timesheets_Visible__c)
- Click Save
- Repeat steps 3 to 5 for all page layouts that are used by the Timesheet Calendar record type
- Page layouts used by external users, such as those used for Employee Experience (Communities) and Approver (Communities) do not need to be included in the above update. If a change to one of these layouts is required, it will be listed as a separate configuration item.
Update Data for Existing Records (Optional)
If the functionality to provide access to future dated timesheets is required, existing Timesheet Calendars should have their No. Days Future Timesheets Visible (tc9_et__No_Days_Future_Timesheets_Visible__c) field updated as required.Automatically Update the Primary Payee on the Contact Records
The functionality to automatically populate the Primary Payee lookup on the Contact is standard functionality and will always apply. The use of the populated field is optional. This requirement only needs to be completed if the option to use the functionality is taken. If not, these items can be skipped. The below configuration steps should be completed if the functionality is required:- Update profile / permission sets (Optional)
- Update page layouts for new field(s) (Optional)
- Update data for existing records (Optional)
Update Profile / Permission Sets (Optional)
The fields associated with this item have had read / edit access added to the following permission sets provided with the package. Where these are in use, the permissions required will be automatically provisioned.- 2cloudnine Payroll Admin
- 2cloudnine Time2Pay All Access
Update Page Layouts for New Field(s) (Optional)
This requirement only needs to be completed if the option to use the functionality is taken. If not, this item can be skipped.- Go to Setup > Object Manager
- Select Contact (tc9_pr__Contact__c) > Page Layouts
- Select a page layout that is used for any Employee record type*
- Add the following field(s) to the layout
- Primary Payee Record (tc9_pr__Primary_Payee_Record__c)
- Click Save
- Repeat steps 3 to 5 for all page layouts that are used by the Employee record type
Update Data for Existing Records (Optional) Update
The update provided to populate the Primary Payee lookup field on the Contact record will occur when the Primary Payee field on a Payee record related to the Contact is populated / updated. Although it is not compulsory, we recommend updating the data on existing Contact records to ensure there is no missing data in the future.Automatically Update the Primary Payee on the Contact Records
The functionality to automatically populate the Primary Payee lookup on the Contact is standard functionality and will always apply. The use of the populated field is optional. This requirement only needs to be completed if the option to use the functionality is taken. If not, these items can be skipped. The below configuration steps should be completed if the functionality is required:- Update profile / permission sets (Optional)
- Update page layouts for new field(s) (Optional)
- Update data for existing records (Optional)
Update Profile / Permission Sets (Optional)
The fields associated with this item have had read / edit access added to the following permission sets provided with the package. Where these are in use, the permissions required will be automatically provisioned.- 2cloudnine Payroll Admin
- 2cloudnine Time2Pay All Access
Update Page Layouts for New Field(s) (Optional)
This requirement only needs to be completed if the option to use the functionality is taken. If not, this item can be skipped.- Go to Setup > Object Manager
- Select Contact (tc9_pr__Contact__c) > Page Layouts
- Select a page layout that is used for any Employee record type*
- Add the following field(s) to the layout
- Primary Payee Record (tc9_pr__Primary_Payee_Record__c)
- Click Save
- Repeat steps 3 to 5 for all page layouts that are used by the Employee record type
Update Data for Existing Records (Optional)
The update provided to populate the Primary Payee lookup field on the Contact record will occur when the Primary Payee field on a Payee record related to the Contact is populated / updated. Although it is not compulsory, we recommend updating the data on existing Contact records to ensure there is no missing data in the future. To update the data on existing records the following steps should be followed:- Run Script 1 defined below through the Developer Console Query Editor to establish how many records need to be updated. The number of rows returned is the number of records requiring the update.
- Run Script 2 defined below through the Developer Console Execute Anonymous Window to populate the Primary Payee lookup on the Contact record.
- Run Script 1 defined below through the Developer Console Query Editor again to confirm that there are no records remaining that need to be updated. If the data is correct the query should return no results.
Script 1
Script 2
General Page Layout Updates to Payment Details and Pay Code
The updates to the Payment Details page layout is compulsory and all the below configuration steps must be completed:- Update existing layouts to remove field(s) (Compulsory)
- Update existing layouts to add / modify existing field(s) (Optional)
Update Page Layouts to Remove Field(s) (Compulsory)
This requirement must be completed.- Go to Setup > Object Manager
- Select Payment Detail (tc9_pr__Payment_Detail__c) > Page Layouts
- Select any page layout that is used for the Payment Detail object*
- Remove the following field(s) from the layout
- Payment Method (tc9_pr__Payment _Method__c)
- Click Save
- Repeat steps 3 to 5 for all page layouts that are used for the Payment Details object.
Update Page Layouts to Add / Modify Field(s) (Optional)
This requirement only needs to be completed if Pay Codes are created or modified using Bulk Data Creation. If not, this item can be skipped.- Go to Setup > Object Manager
- Select Pay Code (tc9_pr__Pay Code__c) > Page Layouts
- Select any page layout that is used for the Payment, Allowance, Deduction or Expenses record types*
- Add the following field(s) to the layout
- Pay Advice Description (tc9_pr__Pay _Advice_Description__c)
- Pay Advice Sort Order (tc9_pr__Pay_Advice_Sort_Order__c)
- Update the field settings so the following fields are no longer required fields
- Invoice Taxable (tc9_et__Invoice _Taxable__c)
- ATO Income Classification (tc9_et_ATO_Income_Classification__c)
- Click Save
- Repeat steps 3 to 6 for all page layouts that are used for the Payment, Allowance, Deduction or Expenses record types
Appendix 1
Below is a list of new components included within the Banksia ‘21 Release Object
Object Fields
Page Layout
Lightning Pages
Global Value Sets
Tabs
Action
List Views
Custom Notifications
Appendix 2
The below table defines the access that must be granted to Internal Users for new components introduced for the functionality to create and allocate work schedules.Appendix 3
The below table defines the access that must be granted to Internal Users for new components introduced for the functionality to apply work schedule information to payroll.Appendix 4
The below table defines the access that must be granted to Internal Users for new components introduced for the Work Schedule Manager functionality.Appendix 5
The below table defines the access that must be granted to Internal Users for new components introduced for the functionality to extend work schedules to handle part day leave eventsAppendix 6
The below table defines the access that must be granted to Internal Users for new components introduced for the functionality to customise the payee pay batch’s total quantity calculationsAppendix 7
The below table defines the access that must be granted to Internal Users for new components introduced to improve the overnight interpretation processing capabilities.Appendix 8
The below table defines the access that must be granted to Internal Users for new components introduced for the functionality to define an alternative pay code for Saturday frequency breakpoints.Appendix 9
The below table defines the access that must be granted to Internal Users for new components introduced for the functionality to allow users to override the ATO Income Classification at an Opening Balance and Pay Transaction level.Appendix 10
The below table defines the access that must be granted to Internal Users for new components introduced for the functionality to define Opening Balances as Employer Additional Superannuation.Appendix 11
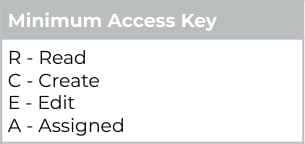
The below table defines the access that must be granted to Internal Users for new components introduced for the functionality to view key information directly from Payee Aggregate Records| Type | Name | User 1 | User 2 | User 3 | User 4 |
|---|---|---|---|---|---|
| Object | Payee Aggregate (tc9_pr__Pay_Aggregate__c) | R/C/E | |||
| Field | Employee (tc9_pr__Employee_Name__c) | R | |||
| Field | Payment Entity (tc9_pr__Payment_Entity__c) | R | |||
| Field | Pay Schedule (tc9_pr__Pay_Schedule__c) | R | |||
| Field | Finalise Calendar Period (tc9_pr__Finalise_Calendar_Period__c) | R | |||
| Field | Pay Batch Type (tc9_pr__Pay_Batch_Type__c) | R | |||
| Field | Payment Date (tc9_pr__Payment_Date__c) | R | |||
| Field | Maximum Payroll Date (tc9_pr__Maximum_Payroll_Date__c) | R | |||
| Field | Calculation Version (tc9_pr__Calculation_Version__c) | R | |||
| Field | Leave Rule (tc9_pr__Leave_Rule__c) | R | |||
| Field | Leave Type (tc9_pr__Leave_Type__c) | R | |||
| Field | Date Time Finalised (tc9_pr__Date_Time_Finalised__c) | R | |||
 |