

Read First: How to Use this Configuration Guide
What is covered by this Configuration Guide?
This Configuration Guide outlines the ‘out of the box’ setup of 2cloudnine Utilities Extension, including built-in customisations to customer-required processes and data. Where customisation is built into the Package, we will cover how to install and configure. Where, during the sales process and discovery, it is identified that further customisations outside of those built and contained within 2cloudnine Utilities Extension Package will be required, this will not be covered by this Configuration Guide.Task Types
- General Salesforce Setup
- Custom Settings, Metadata Types, and Setting Configuration
- Wizards and Scripts
- Schedule Jobs
- Page Layouts and Other User Interfaces
- Base Data / Records Set Up
- Baseline Testing
- Security Set Up
- Data Migration
Task Classifications
This Configuration Guide is made up of a series of tasks that are either compulsory or optional, which must be completed to successfully utilise 2cloudnine Utilities. Each task is allocated 1 of 3 possible classifications, which are:- Compulsory must be completed regardless of whether the organisation will use the related functionality. Example: It is a Compulsory task to set up at least one Profile, with a License Type of ‘Salesforce Platform’ to use with 2cloudnine Utilities.
- Conditionally Compulsory must be completed if the organisation is choosing to use a specific functionality within 2cloudnine Utilities. When a task is Conditionally Compulsory, we will detail the condition(s) that make it compulsory. Example: If the organisation is going to use the 2cloudnine Utilities functionality to generate and submit their STP reporting to the ATO, it is a Conditionally Compulsory task to create Authorised Contacts for all Payment Entities that they will be using the functionality to lodge for. If the organisation does not use the functionality, the Users will not have to complete the task.
- Optional tasks will only need to be completed to use an optional feature of 2cloudnine Utilities. In these cases, there is often a Default behaviour(s) built into 2cloudnine Utilities. If the organisation wishes to use the Default behaviour(s), they don’t have to do anything else. Where an organisation is not going to use the Default behaviour(s), an optional task will be set.
Disclaimer (Must Read)
The 2cloudnine Utility Extension is a managed Package providing Customers with the ability to increase functionality and provide general usability enhancements that are not yet available in our managed Payroll, Time2Pay, General Ledger, and Community Packages. The Utility Extension is available to all 2cloudnine Customers as an optional installation and is not supported under your standard 2cloudnine Support Agreement. Any questions or issues relating to the Utility Extension must be referred to your Salesforce Administrator. Whilst every endeavour has been made to ensure optimal performance of the available Components, it is the responsibility of the clients installing the Package to perform all adequate testing, including any load testing. The Utility Extension leverages Fields and Components from our standard Managed Packages but does not undergo the same rigorous QA process. This means 2cloudnine does not guarantee any future upgrades to our 2cloudnine Managed Packages will not have an adverse impact on functionality provided in the Utility Extension. It is the responsibility of each Customer installing all new 2cloudnine Packages to also consider the Utility Extension in their Package testing. Where a new 2cloudnine Managed Package includes functionality superseding that in the Utility Extension, all effort will be made to communicate this as part of our Release Notes. It will however be the responsibility of the Customer to disable any respective Components from the Utility Extension. As a Managed Package, the Utility Extension can be upgraded. Any new Releases of the Utility Extension Package that contain upgraded Components will automatically apply upon installation. The installer must ensure that any necessary information/data is provided to 2cloudnine in a timely manner and ensure there is adequate time and resources within the organisation to effectively test the installed functionality. None of the components included in the Utility Extension Package should be activated within a Production org until it is sufficiently tested in an up-to-date Sandbox. Please ensure you have read and understood this disclaimer before installing the Utility Extension Package into your Sandbox and Production environments.Functionality Index
The following table lists the functionalities available in the Utilities Extension.Introduction & Overview
This Configuration Guide to 2cloudnine Utilities covers the steps to install the Utilities package and related configuration steps for various Utilities functionalities. The following functionalities are covered in this document:- ATO Kilometres
- Create Employee Specific Rate Calculator (Batch Class)
- Customisable Community Components
- Employee Payroll Onboarding
- PO Management
- Reminder Notifications
- Timesheet Email Approvals
- Community Select Payee
- Timesheet Adjustments
Pre-Installation
Prerequisites
2cloudnine Payroll, 2cloudnine Time2Pay, 2cloudnine Communities and 2cloudnine Aus Extension must be installed in the org before you can install the 2cloudnine Utilities Extension. All current links for updated Packages can be found in the configuration guide linked below:| Package | Installation Link |
|---|---|
| 2cloudnine Payroll | Configuration Guide To 2cloudnine Payroll |
| 2cloudnine Payroll Time2Pay Extension | |
| 2cloudnine Communities Extension | |
| 2cloudnine Aus Extensions |
Installing the Package
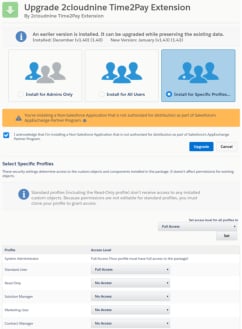
When you install a Managed Package, you need to select if the security is going to be applied to all Profiles, or you need to manually select which Profiles you will be applying the security to. This will only happen on the first install of the Package so make sure you select carefully and correctly.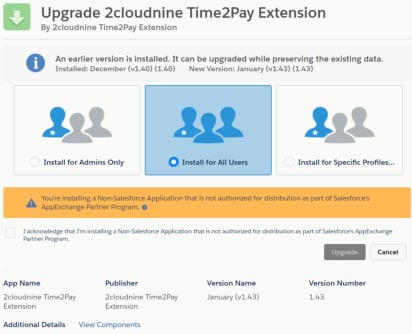
Utility Extension Package Upgrade and Flow Management
The Utility Extension Package is a Managed Package, meaning it is upgradeable. New Package releases, including updates or new Components, will be automatically installed. If you have created a new Flow definition based on one of the Utility Extension Package Flows, it will automatically be replaced by the new version included in the upgraded Package. To avoid this, we recommend saving any modified Flows as entirely new Flows. By doing so, your customisations will remain separate and unaffected by future upgrades to the Utility Extension Package.Installation and Configuration Checklist
Installation and Configuration Checklist
The following checklist summarises the tasks that are to be performed to install and configure the 2cloudnine Utilities. A higher level of detail on what is required can be found by following the link to each specific task. Each task should be completed in the sequence below to ensure seamless installation and configuration of the Packages.General Configuration
Before using the Utilities Extension Package, the following general configuration steps must be completed. The steps below are Compulsory, regardless of which specific features within the Package you plan to use. Each feature is also detailed in its own Administrator Guide, which must be followed in addition to this Configuration Guide if you intend to use that functionality. Failure to complete the steps from both Guides may result in errors during use of the customised functionality.Apply Security
The Utilities Extension Package includes several Custom Fields on the Pay Transaction object. To ensure successful Payroll Processing, all Users who access the Pay Batch must have access to these Custom Fields. To simplify security, the Package includes a Permission Set Group called ‘2cloudnine Utilities Payroll User’, which grants the required Permissions to Payroll Users. To assign the Permission Set Group: Go to Setup - Permission Set Groups .- Select the 2cloudnine Utilities Payroll User Permission Set Group.
- Select the button Manage Assignments .
- Select the button Add Assignments .
- Search for and select each User to assign the Permission Set to and click Next .
- Select the Assign button.
1. ATO Kilometres
The ATO Kilometres Custom process enables Payroll Users the ability to automatically adjust Kilometre Allowance Pay Transactions to meet the ATO’s Taxable and Non-Taxable thresholds. The process is run after creating a Pay Batch, and calculates both the Payee’s YTD Kilometres and the correct Pay Code of the Kilometre Allowance. Based upon a combination of the Payee’s YTD Aggregate and a defined ATO base rate, Pay Transactions are unchanged, adjusted, or split to ensure they are correctly allocated between Taxable and Non-taxable Pay Codes. Adjusted Pay Transactions can then be finalised within their Pay Batch and sent with the correct Pay Codes to the ATO via STP Lodgements. The following configuration steps are required to utilise the ATO Kilometre feature within the Utilities Package. Apply Security The ATO Kilometre Adjustments process feature includes several custom Components that require User access to function correctly. To provide this required access, the package includes a Permission Set that should be assigned to Users who should use this function. To assign the ATO Kilometres Permission Set: Go to Setup - Permission Sets - 2cloudnine ATO Kilometre Permission Set - Manage Assignments- Select the button Add Assignments .
- Search for and select each User to assign the Permission Set to and click Next .
- Select the Assign button.
2. Create Employee Specific Rate Calculator (Batch Class)
This Batch Job can be scheduled to allow Employee-Specific Rate Calculators to be created in bulk from applicable Assignments, removing the need for Custom alternatives, which can add additional performance and maintenance overheads. Apply Security The Create Employee Specific Rate Calculator Batch Class includes several Custom Components that require User access to function correctly. To provide this access, the Package includes a Permission Set called 2cloudnine Rate Calc Creation that grants access to all necessary components. To assign the 2cloudnine Rate Calc Creation Permission Set: Go to Setup - Permission Sets - 2cloudnine Rate Calc Creation Permission Set - Manage Assignments- Select the button Add Assignments .
- Search for and select each User to assign the Permission Set to and click Next .
- Select the Assign button.
Important Notes(Permission Set)You must at a minimum, assign the Permission Set to the User who will schedule the Batch Class, or
the job will not process successfully.
Update Page Layout
The Create Employee Specific Rate Calculator Batch Class includes a Custom Field that should be added to the Page Layout for Temp Assignments to utilise the Rate Calculator. Go to Setup - Object Manager - Assignment - Page Layouts > Page Layout Assignments- Select the Page Layout assigned to the Temp Record Type.
- Add the following Field to the Page Layout:
- Create Rate Calculator
- Select Save .
- Repeat for any other Page Layouts assigned to the Temp Record Type.
3. Customisable Community Components
The Customisable Community Components enhance the flexibility of both Employee and Approver Community Components, offering greater customisation options.Community Configuration
The Customisable Community Components are of an enhanced design to replace the Standard 2cloudnine Components within your Community Experience. To use these Components, make sure your Communities are properly configured according to the relevant Configuration Guides:Employee Community Configuration
- Follow the instructions in the 2cloudnine Payroll Suite Configuration Guide to set up the Employee Community Experience.
Approver Community Configuration
- For Guest User Approvers, refer to the 2cloudnine Utilities - Guest User Approval Guide for the specific Configuration steps.
Employee Permission Set
In order to access the Customisable Components within the EmployeeCommunity, all Employee Community Users must be assigned the 2cloudnine Employee Community Utility Permission Set . To assign the 2cloudnine Employee Community Utility Permission Set: Go to Setup - Permission Sets - 2cloudnine Employee Community Utility Permission Set - ManageAssignments
- Select the button Add Assignments .
- Search for and select each User to assign the Permission Set to and click Next .
- Select the Assign button.
Important Notes(Permission Sets)Most Customers automate the application of Community Permission Sets either via the ‘Time2Pay
Portal Permission Sets’ Custom Settings or their own custom automation. It is recommended to
include the 2cloudnine Packaged Employee and Approver Permission Sets in this process.
Approver Permission Set
To access the Customisable Components within the Approver Community Experience, all Approvers must be assigned the 2cloudnine Approver User Utility Permission Set . To assign the 2cloudnine Approver User Utility Permission Set: Go to Setup - Permission Sets - 2cloudnine Approver User Utility Permission Set - Manage Assignments- Select the button Add Assignments .
- Search for and select each User to assign the Permission Set to and click Next .
- Select the Assign button.
Important Notes(Approver Permission Set)Any Customer Orgs using ‘Guest User Approval’ functionality can skip the Approver Permission Set,
because the ‘2cloudnine Approver Guest User Utility Permission Set’ applied to the Guest User already
contains the required permissions to access these Components.
Update Page Layouts
The Customisable Community Components include the ability to capture Time for Allowances (Timesheet Items). If using this functionality, the following updates must be applied to the relevant Page Layouts:Payee Allowance Record
Go to Setup > Object Manager > Payee Allowance Record > Page Layouts- Select the Time2Pay Payee Timesheet Allowance Template Group Page Layout.
- Add the following Fields to the Page Layout:
- Enable Time Entry in Community
- Community Time Entry Required
- Click Save .
- Repeat for Time2Pay Payee Timesheet Allowance Page Layout.
Timesheet Item
Go to Setup > Object Manager > Timesheet Item> Page Layouts- Select the TC9ET Timesheet Item Layout Page Layout.
- Add the following Fields to the Page Layout:
- Start Time
- End Time
- Click Save .
4. Employee Payroll Onboarding
The Employee Payroll Onboarding consists of four User-friendly Screen Flows accessible within your Salesforce Employee Community. These Flows enable Payees to complete and manage Payroll information, including their Tax File Number (TFN) Declaration, Company Information, Superannuation Choice, and Payment Details. Designed to streamline the onboarding process, these Flows guide Employees through each step, ensuring accuracy and compliance, eliminating the need for Payroll to manually create the required records. This approach improves efficiency and also enhances the Employee experience by simplifying access to critical payroll information. The following configuration is required to utilise the Employee Payroll Onboarding functionality within the Utilities Package. Apply Security Any Employee Community User who accesses the 2c9 Utilities - Employee Payroll Onboarding Screen Flows must be assigned the ‘2cloudnine Employee Community Utility Permission Set’. To assign the 2cloudnine Employee Community Utility Permission Set: Go to Setup > Permission Set- Select the 2cloudnine Employee Community Utility Permission Set Permission Set.
- Select Manage Assignments and then Add Assignments .
- Search for and select each User to assign the Permission Set to and click Next .
- Select the Assign button.
5. PO Management
PO Management offers Customers a versatile solution for managing their Purchase Orders, Milestone Billing, and Statements of Work. Pay Transactions that are processed by PO Management will be allocated to a Purchase Order based upon rules defined on the related Purchase Order and Purchase Order Junctions. PO Management facilitates comprehensive PO Allocation, enabling the allocation of values, Effective Periods, Depletion Rules, and the specific types of Pay Transactions to apply the Purchase Order to. Apply Security PO Management includes a number of Custom Components that require User access for successful processing. To provide this access, the Package includes a Permission Set called 2cloudnine PO Management that grants access to all necessary Components. To assign the PO Management Permission Set: Go to Setup > Permissions Sets > 2cloudnine PO Management Permission Set > Manage Assignments- Select Add Assignments .
- Search for and select each User to assign the Permission Set to and click Next .
- Select Assign .
Assignment
Go to Setup > Object Manager > Assignment > Page Layouts- Select the Time2Pay Assignment - Temp Page Layout.
- Add the following Fields to the Page Layout:
- Requires Purchase Order
- Purchase Order Number
- Add the following Related List to the Page Layout:
- Purchase Order Junctions
- Click Save .
Pay Transaction
Go to Setup > Object Manager > Pay Transaction > Page Layouts > Page Layout Assignment- Select the page layout assigned to the Record Type of Payment .
- Add the following Fields to the Page Layout:
- Purchase Order Number
- Process PO Allocation
- PO Allocation Notes
- Click Save .
- Repeat for all other page layouts applied to Record Types of Allowances and Expenses .
Pay Code
Go to Setup > Object Manager > Pay Code > Page Layouts- Select the page layout assigned to the Record Type of Payment .
- Add the following Field to the Page Layout:
- PO Allocation Type
- Click Save .
- Repeat for all other page layouts applied to Record Types of Allowances and Expenses .
Project Code
Go to Setup > Object Manager > Pay Transaction > Page Layouts- Select the Assignment Project Code Layout Page Layout.
- Add the following Field to the Page Layout:
- Purchase Order
- Click Save .
Invoice Settings
Go to Setup > Object Manager > Invoice Settings > Page Layouts ●- Select the Time2Pay Invoice Setting - Payroll Items Page Layout.
- Add the following Field to the Page Layout:
- Include PO in Invoice Grouping
- Click Save .
6. Reminder Notifications
Reminder Notifications automate the sending of Reminder Approval Emails for Timesheets, Expense Claims, and Leave Events, to both Employees and Approvers.Required Guest Approver Site (Conditionally Compulsory)
Reminder Notifications can be used for both Authenticated Approvers and Guest User Approvers. However, when using Guest User Approvers, you must configure both the Guest User Approval Site (refer to the 2c9 Utilities - Guest User Approval Guide) and the Timesheet Email Approvals - Utilities Admin Guide. If these are not configured, the default Reminder emails will contain invalid links. Apply Security The Reminder Notifications feature includes several Custom Components that require User access to function correctly. To provide this access, the Package includes a Permission Set called ‘2cloudnine Notification Reminders’ that grants access to all necessary Components. To assign the 2cloudnine Timesheet Adjustments Permission Set: Go to Setup - Permission Sets - 2cloudnine Reminder Notifications Permission Set - Manage Assignments- Select Add Assignments .
- Search for and select each User to assign the Permission Set to and click Next .
- Select the Assign button.
- Select the Page Layout assigned to the Temp Record Type.
- Add a new section to the Page Layout called Reminder Notifications .
- Add the following fields to this section:
- Reminder Notification Method
- Send Employee Timesheet Reminders
- Send Timesheet Reminders To
- Send Expense Claim Reminders To
- Send Leave Reminders To
- Select Save .
- Repeat for all remaining Page Layouts of Assignments.
7. Timesheet Email Approvals
Timesheet Email Approvals offers a solution for Approvers to review a summary of Timesheets Pending Approval directly within an email. This feature allows Approvers to Approve or Reject Timesheets without needing to log in to the Community, streamlining the Approval process significantly. The feature is further enhanced with pre-designed Email Templates, Customisable Settings to control specific behaviours, and the ability to automate the Scheduling of emails. These additions make Timesheet Email Approvals an alternative to the traditional login-based Approval method.Required Guest Approver Site
The ‘Timesheet Email Approvals’ functionality only works with a Guest User Approver Site. To utilise this functionality, you must first configure the Guest User Approver Community as per the 2c9 - Guest User Approval Guide. Apply Security To send Timesheet Notifications, Expense Claim Notifications or Leave Notifications, and for the Guest User to approve Timesheets via Email, they must have the 2cloudnine Timesheet Email Approver Guest User Permission Set assigned to them. To assign the Permission Sets: Go to Setup - Sites - Click the Site Label used for Approver Community in the site label column > Public Access Settings - Assigned Users- Select the Guest User .
- Select Edit Assignments in the Permission Set Assignments related list.
- Select:
- Approver User Permission Set
- Approver User Permission Set Clone
- 2cloudnine Timesheet Email Approver Guest User
- 2cloudnine Approver Guest User Utility Permission Set Clone
- Select the Add > button.
- Select Save .
- Select OK in the additional pop-up warning message.
Update Approval Community
To ensure the Approvers are able to appropriately approve Timesheets directly from the Approval email, new pages on the Approver Community need to be created reflecting the new Components for Timesheet Approvals. It is important to note that there are two options available for Timesheet Email Approvals, and both options are recommended to be configured as they can be used interchangeably.- Single - Approvers will be sent a single email for each Submitted Timesheet and approve Timesheets individually.
- Consolidated - Approvers will be sent a consolidated email for all Submitted Timesheets and can approve Timesheets in bulk. IMPORTANT: The Component within the Builder will display an error message ‘this url and token is invalid’. This can be ignored when displayed within the Builder.
Single Timesheet Approval Page
To set up the new Approver page: Go to Setup - Digital Experiences - All Sites - Builder (for the Approver Community)- Click on the Gear icon at the top of the screen for the Pages drop-down and select + New Page .
- Select Standard Page .
- Select New Blank Page .
- Select Flexible Layout .
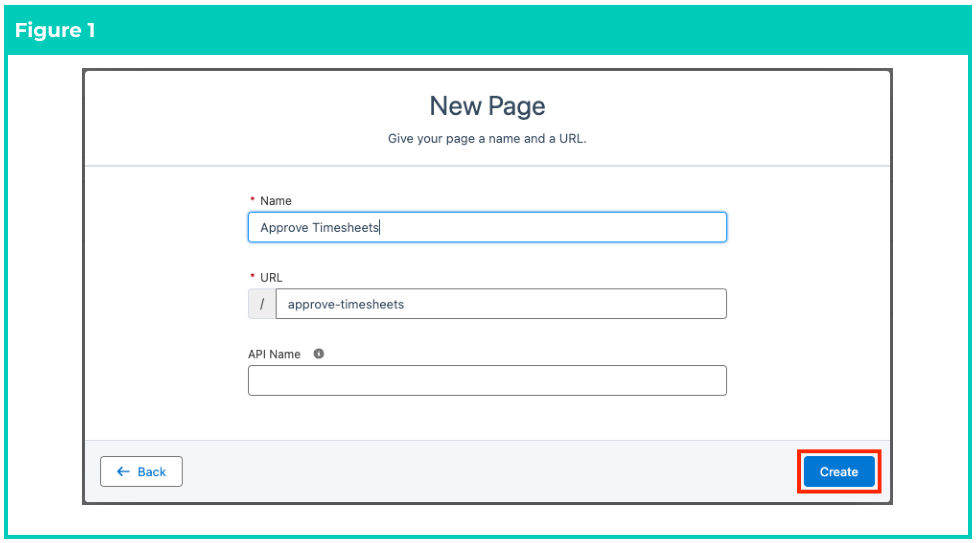
- Enter the page name Approve Timesheets and let the URL auto-complete whilst keeping the API Name blank (see Figure 1).
- Select the Create button.
- Select the Components button (lightning symbol)
- Search for the Timesheet Approval Verify LWC and drag it onto the page.
- Select Publish followed by Got It .
Consolidated Timesheet Approval Page
To configure the Consolidated Timesheet Approver Page: Go to Setup - Digital Experiences - All Sites - Builder (for the Approver Community)- Click on the Gear icon at the top of the screen for the Pages drop down and select + New Page .
- Select Standard Page and then New Blank Page .
- Select Flexible Layout .
- Enter the page name Consolidated Timesheet Approval and let the URL auto-complete whilst keeping the API Name blank.
- Select the Create button and then select the Components button (lightning symbol)
- Search for the Consolidated Timesheet Approval LWC and drag it onto the page.
- Select Publish followed by Got It .
8. Community Select Payee
Apply Security In order to run the ‘Community Select Payee’ Screen Flow, Users must have access to the following fields:- Contact > Primary Payee (Edit)
- Payee > Primary Records (Edit)
- Payee > Payee & Payment Entity (Read)
Community Sharing Settings
Employees updating their Primary Payee record using the ‘Community Select Payee’ Flow need access to a number of records via Community Sharing Settings. Please refer to the Configuration Guide to 2cloudnine Payroll Suite and search for the text ‘Enable Community Sharing Set’. Please ensure you configure the Community Sharing Sets exactly as outlined in the guide to ensure you do not receive any errors.9. Timesheet Adjustments
Apply Security Timesheet Adjustments includes a number of Custom Components which all require User access to be processed successfully. When deploying and configuring Timesheet Adjustments, one of the following options must be used to apply all the required access to end Users.Timesheet Adjustment Permission Set
A Permission Set ‘Timesheet Adjustments’ is included in the deployment Components and contains access to all the required Components. To assign the Timesheet Adjustments Permission Set: Go to Setup - Permission Sets - Timesheet Adjustments Permission Set - Manage Assignments- Select the Add Assignments button.
- Search and select each User to assign the Permission Set to and click Next .
- Select the Assign button.
Deploy with Required Profiles
IMPORTANT: If Timesheet Adjustments is being deployed from an Org where all Permissions have already been applied to a Profile, ensure that Profile is also selected during deployment of the Custom Components. Update Page Layouts Timesheet Adjustments includes fields that should be made available on Page Layouts for ease of viewing data related to the Timesheet Adjustment process. The following objects and Page Layouts should be updated to include the following actions.Timesheet
Go to Setup > Object Manager > Timesheet > Page Layouts- Select the Time2Pay Assignment - Temp Page Layout.
- Add the following Fields to the Page Layout:
- Scheduled Job Processed
- Reversed Count
- TS Adjustment Approval Status
- Click Save .
- Select the Time2Pay Pay Transaction - Payment Page Layout.
- Add the following Fields to the Page Layout:
- Reversed From Timesheet
- Original Pay Transaction
- Is Reversal
- OriginalTSEID
- Click Save .
- Repeat for Time2Pay Pay Transaction - Expense Page Layout.