

Purpose
The purpose of this Administrator Guide is to provide information about the Utilities package Reminder Notifications. The content in this guide is optional, and may be utilised during implementation, or after a Project has gone live. The intended audience for this document is System Administrators.Overview
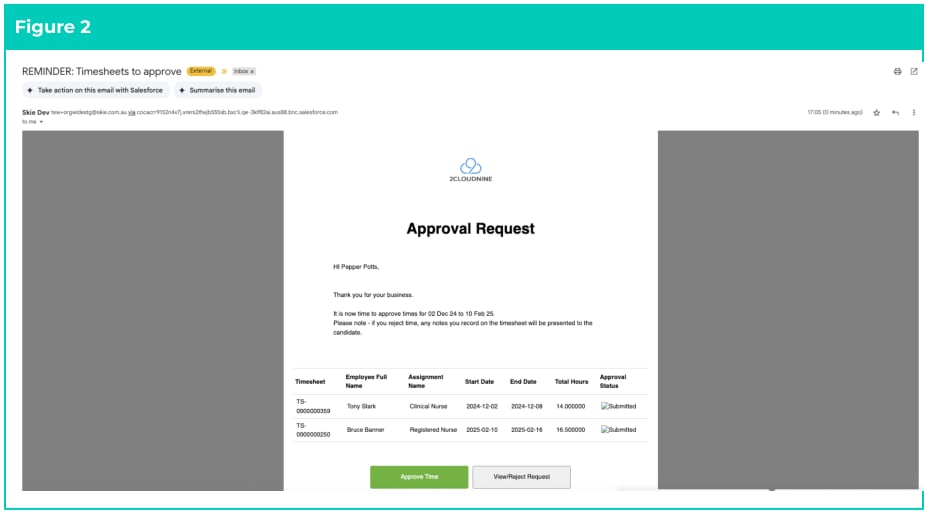
Reminder Notifications automate the sending of Reminder Approval Emails for Timesheets, Expense Claims, and Leave Events, to both Employees and Approvers. This feature uses flexible and customisable logic that allows System Administrators to define when and to whom Reminders are sent. It supports Custom Email Templates, consolidated Approval Notifications (so Approvers receive a single summary of pending items), and the ability to approve directly from the email- streamlining the Approval process.
Assignment Reminder Settings
To determine if Reminder Notifications should be sent, to whom, and how, there are fields on the Assignment record to define this. Reminder Notification Method The Reminder Notification Method picklist determines the type of Approver Reminder that will be sent for Timesheets, Expense Claims, and Leave Events related to the Assignment. If the Single option is selected, a Reminder will be sent for each record related to that Assignment. For Timesheets, as this is a single Timesheet, the Email Template is able to provide more granular Timesheet-related data, such as a daily breakdown. These records will not be considered for other Assignments that have the Consolidated sending option. Refer to Figure 1 for an example of a single Email Template.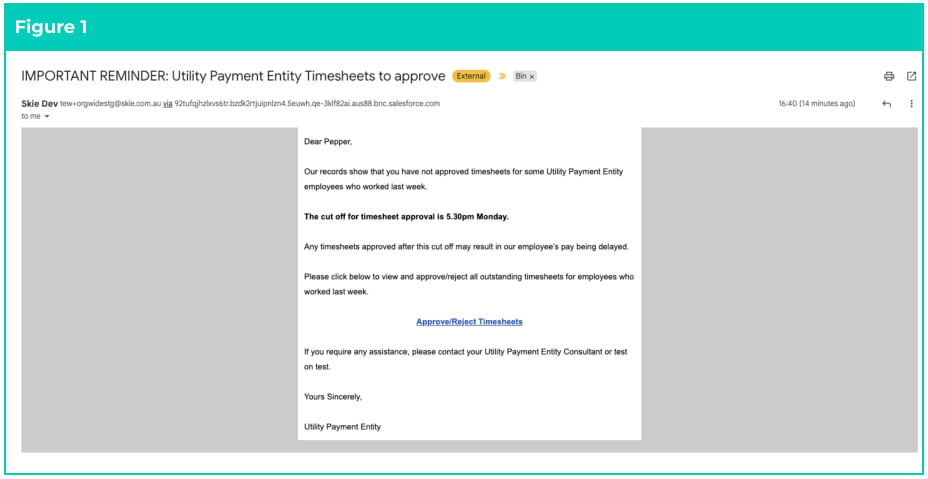
- Send Timesheet Reminders To
- Send Expense Claim Reminders To
- Send Leave Reminders To
- Notify Primary Approver - Reminder will be sent to the Timesheet > Assignment > Timesheet Approver only.
- Notify Alternative Approver - Reminder will be sent to the Timesheet > Assignment > Alternative Timesheet Approver only.
- Notify Primary and Alternative Approver - Reminder will be sent to the Timesheet > Assignment > Timesheet Approver and the Timesheet > Assignment > Alternative Timesheet Approver.
ExampleA Contact is a ‘Timesheet Approver’ on 10 Assignments.
On 9 of the Assignments, the ‘Reminder Notification Method’ is set to ‘Consolidated’, whilst on one of
the Assignments, they request reminders to be sent individually to pay more attention to this specific
Employee.On Monday, the Scheduled Job runs and sends 2 reminders to the Approver.
The first contains all Submitted Timesheets from the 9 Assignments with a summary of those
Timesheet hours, including the option to approve them in bulk.A second email is sent containing only the Timesheet from the Assignment, with Reminder
Notification Method set to Consolidated, and provides a detailed breakdown of hours worked,
providing the approver with clear segmentation between the types.
Flagging Records for Reminders
As outlined in the Configuration Guide to 2cloudnine Utilities, the flagging of Timesheets, Expense Claims and Leave records utilises a custom checkbox formula field for each respective record. This provides customers with a greater level of flexibility in determining when reminders are sent to both Employees and Approvers. Whilst this document provides a default baseline recommendation, this formula can be updated to meet varying needs.Sending Reminders
Once the Assignment has been configured to send Reminders, and the records meet the criteria to send Reminders (see above), the Scheduled Job will automatically send emails to Employees and Approvers on the defined intervals of the batch job. The Contact’s email address for notifications will be determined based on the following picklist fields:- Timesheet Notification Email
- Expense Claim Notification Email
- Leave Notification Email
Once these fields are updated, the checkbox on the respective record will be unchecked, meaning
another reminder will not be sent the same day.
Approving Records
Once reminder notifications have been sent, record approval depends on your Site configuration. For Guest Approvers, once the email approval is configured, they can approve directly by selecting the ‘Approve’ button within the email, or select ‘View/Reject Request’ to be redirected to the Guest Approver Site. For Authenticated Approvers, you must configure the Custom Setting as detailed in the Utilities Configuration Guide with the Authenticated Approver Site. Enabling this will update the email buttons to direct Approvers to the Authenticated User Site, where they can log in and approve Submitted records.Exclude from Reminders
Whilst reminder notifications are a great way to ensure records are submitted and approved prior to payroll processing deadlines, there are scenarios where reminders may need to be disabled for specific Contacts, Timesheets, Expense Claims, or Leave. Exclude Contacts (Employee and Approvers) Some Contacts may need to be removed from receiving Reminders, for example, if they are going on leave. You will find the following fields located on the Contact record:- Timesheet Reminder Notification Opt Out
- Exp Claim Reminder Notification Opt Out
- Leave Reminder Notification Opt Out
- Exclude From Employee Reminder List
- Exclude From Primary Approver Remin List
- Exclude From Alternative Appr Remin List
Create Custom Settings
The Reminder Notification process utilises a Custom Setting for determining the configuration of Notification Reminders. To populate the Custom Settings: Go to Setup - Custom Settings - 2c9 - Utility Notifications - Manage- Select the New button.
- Click Manage in the Header and update as per the list below.
- Click Save .
- Sender from Email
- The Org wide email address you want the emails to be sent from.
- Go to Setup - Organization-Wide Addresses and copy the ‘Email’ from the email and paste into this field.
- TS Employee Reminder Notification Indic.
- Enter the API name of the Employee TS Reminder formula field.
- If using the default Employee TS reminder, enter tc9_util__Employee_TS_Reminder__c . If using custom logic, enter the field created in the previous section Create Custom Fields.
- TS Employee Reminder Notification Body
- Enter the API name of the Timesheet email template that will be sent to the employee.
- If using the default reminder Template enter
- TS Approver Notification Indicator
- Enter the API name of the Approver TS Reminder formula field.
- If using the default Approver TS reminder enter tc9_util__Approver_TS_Reminder__c . If using custom logic, enter the field created in the previous section Create Custom Fields.
- TS Approver Notification Cons Body
- Enter the API name of the consolidated Timesheet email template that will be sent to the approver.
- If using the default reminder Template enter
- TS Approver Notification Sgl Body
- Enter the API name of the single Timesheet email template that will be sent to approvers.
- If using the default reminder Template enter Single_Timesheet_Approver_Reminder .
- Expense Approver Notification Indicator
- Enter the API name of the Approver Expense Claim Reminder formula field.
- If using the default Approver Expense Claim reminder enter tc9_util__Approver_Expense_Reminder__c . If using custom logic, enter the field created in the previous section Create Custom Fields.
- Expense Approver Notification Cons Body
- Enter the API name of the consolidated Expense Claim email Template that will be sent to the approver.
- If using the default reminder Template enter Consolidated_Expense_Approver_Reminder .
- Expense Approver Notification Sgl Body
- Enter the API name of the single Expense Claim email Template that will be sent to the approvers.
- If using the default reminder Template enter Single_Expense_Approver_Reminder
- Leave Approver Notification Indicator
- Enter the API name of the Approver Leave Reminder formula field.
- If using the default Approver Leave reminder enter tc9_util__Approver_Leave_Reminder__c . If using custom logic, enter the field created in the previous section Create Custom Fields.
- Leave Approver Notification Cons Body
- Enter the API name of the consolidated Leave email template that will be sent to the Approver.
- If using the default reminder template enter Consolidated_Leave_Approver_Reminder.
- Leave Approver Notification Sgl Body
- Enter the API name of the single Leave email Template that will be sent to the Approvers.
- If using the default reminder Template enter Single_Leave_Approver_Reminder .
- Authenticated Approver
- Selecting this option will require all Approvers to log in with their credentials. Links to the Guest Use Site will be removed from the default email templates.
- Authenticated Approver Site URL
- If the Authenticated Approver is TRUE, enter the full URL of the secure site where Approvers log in. This link will be used in all email notifications.
Important Notes(Single Method)If using the Single method, the default Reminder Email Templates are not Record-Specific by default.
We recommend updating these Templates to include Record-Specific details, or alternatively, create
your own Custom Email Templates by providing their API names.
Schedule Batch Job
IMPORTANT : Before scheduling the batch, please review all Assignments and ensure the following:- Inactive Assignments are not configured to send Reminder Emails.
- For any active Assignments that will send Reminder Emails, make sure any older Timesheets with a Status of ‘New’ that you do not want to include, are updated to ‘Exclude from Reminder Lists’.
- Only a single Batch Job is required
- Reminder Email Notifications will be sent daily.
- Timing is not specific like the fixed Day & Time method (see below). This is important for Orgs that have different payroll departments processing Payrolls on different days.
- Copy the block of script to be run.
- Select Setup > Developer Console .
- Debug > Open Execute Anonymous Window .
- Delete or comment out any code that is in the window.
- Paste in the copied script from below.
- Click the Execute button.
- Enter required details and select SkieNotificationReminderSchedule Apex Class (see Figure 3).
- Select Save .
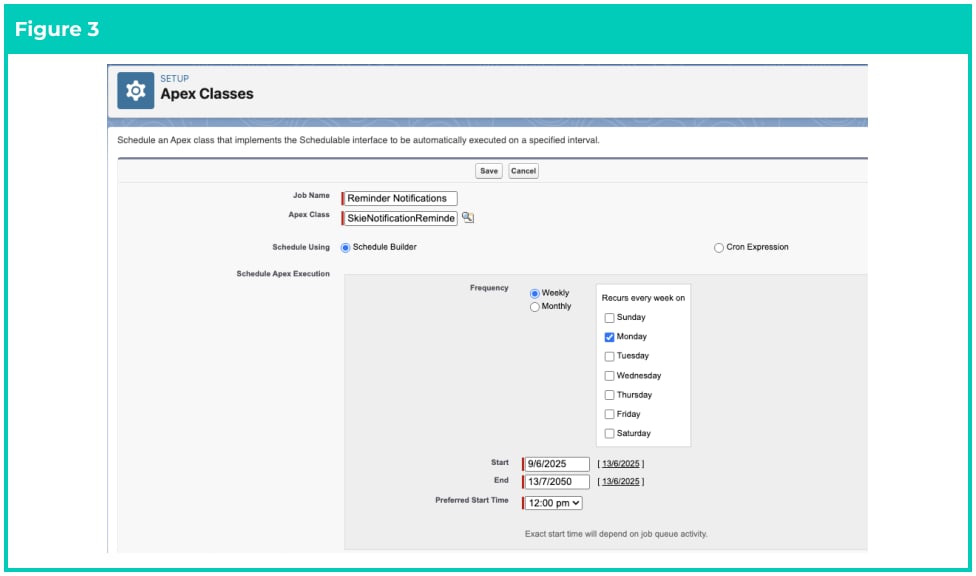
ExampleThe job is scheduled for 12:00 PM each day, and the default time zone is (GMT+10:00) Australian Eastern
Standard Time. When the batch job runs, contacts in Sydney receive the reminder at 12:00 PM local
time, while contacts in Perth (GMT+8:00) receive the same reminder at 10:00 AM local time.
Update Email Templates (Optional)
To give Customers more control over their Reminder Emails, the Reminder Notification functionality supports Custom Labels that allow the email body content to be customised. The table below lists all available Email Templates along with the corresponding Custom Label names used to modify their content.
To update the body of an email using Custom Labels:
Go to Setup - Custom Labels
- Select the Custom Label you wish to update (see table above).
- Select the Edit button
- Update the value section with the new body.
- Select Save .
- Repeat for any email Templates you need updated.
Important Notes(Single Method)There are currently no Custom Labels available to update the subject of the email. You can however
directly modify the subject within the Visualforce Email Template itself.
Create Custom Fields (Optional)
To provide flexibility in setting reminder logic for Employees and Approvers, System Admins can use Custom Formula Fields instead of the provided default logic. These Custom Fields can define when a Timesheet, Expense Claim, or Payee Leave Event will send a Reminder Email. To utilise this custom logic for Reminders, you can create a Boolean Type of Custom Formula Field and define the required logic. If TRUE and defined in the Custom Setting (see step below), this will then send the Reminder against the Timesheet, Expense Claim, or Payee Leave Event. The following outlines the required Custom Fields on each record, along with a recommended default formula that can be tailored to individual needs. By default, the 2cloudnine Utilities Package includes the following fields for triggering Reminder Notifications:- Field: Employee TS Reminder
- Object: Timesheet
- Details: This formula field sends a Reminder if the Timesheet is still a Status of New, its End Date is in the past, not excluded from Reminders, the Employee hasn’t opted out, and no Reminder has been sent Today.
- Field: Approver TS Reminder
- Object: Timesheet
- Details: This formula field sends a Reminder to the Primary and/or Alternative Approver if the Timesheet is Submitted, not excluded from Reminders, and a Reminder not already sent Today, based on the Configured Notification Preference.
- Field: Approver Expense Reminder
- Object: Expense Claim
- Details: This formula field sends a Reminder to the Primary and/or Alternative Approver if the Expense Claim is Submitted, not excluded from Reminders, and a Reminder not already sent Today, based on the Configured Notification Preference.
- Field: Approver Leave Reminder
- Object: Payee Leave Event
- Details: This formula field sends a Reminder to the Primary and/or Alternative Approver if the Payee Leave Event is Submitted, not excluded from Reminders, and a Reminder not already sent Today, based on the Configured Notification Preference.