

Purpose
The purpose of this Administrator Guide is to provide information about Utilities packaged Customisable Community Components. The content in this guide is optional and may be utilised during implementation or after a project has gone live. The intended audience for this document is System Administrators.Overview
The Customisable Community Components provide greater flexibility for customising the Employee Timesheet and Approver Community Components. By leveraging these components within the Utilities Package, customers can display data not currently available in the standard 2cloudnine Product. The functionality of Time Entry for Allowances is only supported for Guest User Approvers. If using Authenticated Approvers and the standard 2cloudnine Approver Portal, this feature will not be available. Key Features- Employee Community
- Displays a fully customisable table of Timesheets, where you control the columns shown.
- Selecting a Timesheet passes the record.Id to a Timesheet detail page, allowing you to trigger Custom Flows related to the selected record.
- Enable time capture for Allowances (Timesheet Items)
- Approver Community
- Dynamically displays columns and related data for Timesheets, Expenses, and Leave Events using Custom Field Sets.
- Allows different columns to be displayed based on the Status.
Employee Functionality
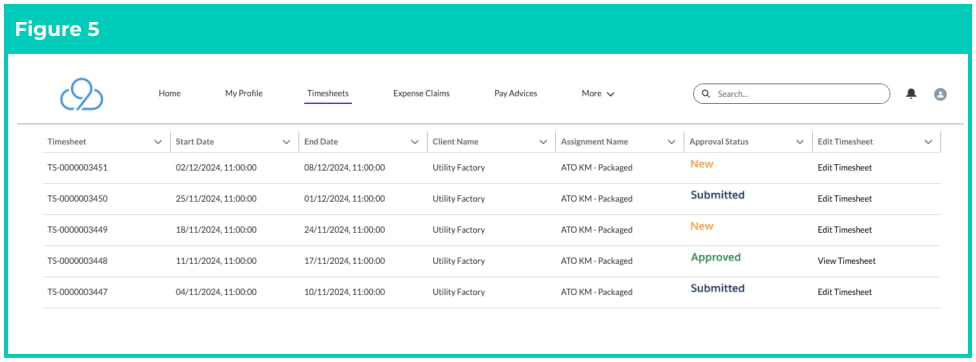
Skie Employee Timesheet Data Table Within the Employee Community, the Skie Employee Timesheet Data Table provides a powerful way to display a list of Timesheets, while allowing you to define the columns and related data shown to Employees. For instance, the ability to view Custom Timesheets or related data that is currently inaccessible without this Component. Employees can select the Edit Timesheet link to open the Timesheet on its own page. When this happens, the Timesheet ID from the table is passed into the record page, enabling the use of custom functionality such as Screen Flows. This enables possibilities for interacting with Timesheets and related records, offering customisation that is otherwise not possible. The Skie Employee Timesheets Dynamic Component retains all the core functionality of the standard Employee Community Timesheets Component, ensuring uninterrupted operation for existing Employee Timesheets processes. In addition, the Skie Employee Timesheets Dynamic Component introduces the ability to capture Start Time and End Time Entry against Allowances (Timesheet Items). While the standard Component only supports entering a Quantity, this feature allows recording time for items that are not linked to a specific Timesheet Entry. A common use case is an On-Call Allowance, which is not entered as a Timesheet Entry, but may still require Start and End Times for reporting or automation purposes.Important Notes(relates to Page 1)Time Entry for Allowances has no impact on Timesheet Interpretation. It is used solely for reporting or
custom automation. The processing of the Allowance continues to be based on the entered quantity.
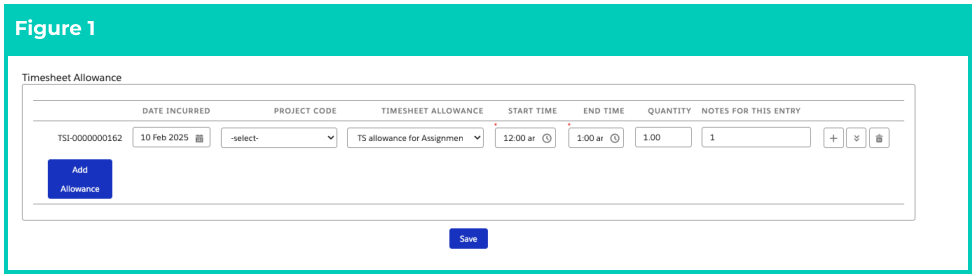
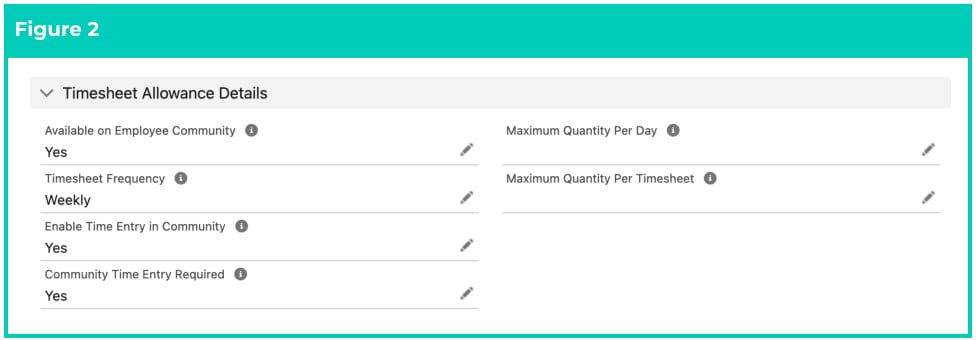
- If set to ‘No’ or left blank, the Start Time and End Time fields will be disabled.
- If set to ‘Yes’, the fields will be enabled and any times entered will be saved to the corresponding fields on the Timesheet Item record.
Approver Functionality
The Approver functionality allows tailored data to be displayed within the Timesheets, Expense Claims, and Leave tabs. By using Field Sets and defining these within Custom Settings, you can dynamically control the columns and related data displayed, with granular adjustments capable, based on record status. This flexibility enables Custom Fields and related data to be displayed directly within the Approver Components, just as it does for Employee Timesheets. In addition, if Time Entry for Allowances is enabled in the Employee Community, the Start Time and End Time fields will also be displayed in the Approver Community, ensuring Approvers have full visibility of all Times entered by Employees. Update Custom Settings (Optional) The ‘Customisable Community Components’ Utilises Custom Setting for defining the Field Sets which can be used to display different columns on the Approver Component. For example, including Custom Fields from the Timesheet object that can become visible to the Approver. To define these Custom Settings: Go to Setup - Custom Settings - 2c9 - Approver Portal - Manage- Select the New button at the top of the screen (if not already created).
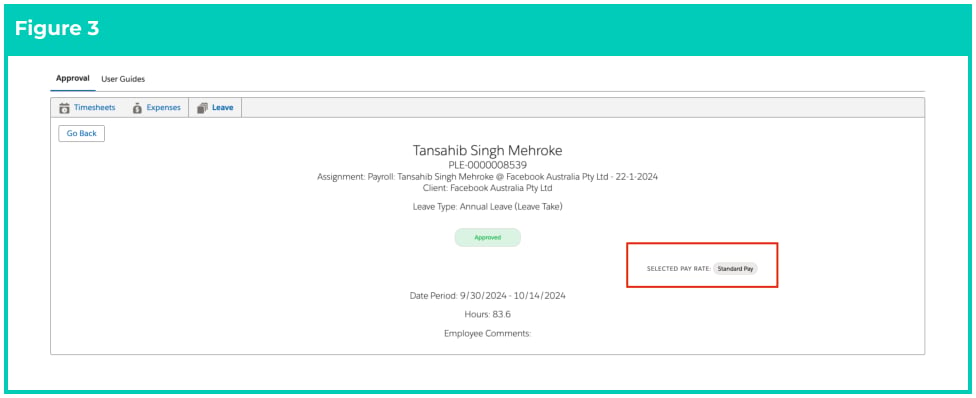
- Populate the relevant Fields (see list below and see Figure 3).
- Select Save .
- Approved Timesheet Column Fieldset
- Defines the Field Set for displaying columns when the Timesheet Status = Approved.
- Existing Field Set ‘Approved Timesheet Column’ on the Timesheet object is available within the Package.
- Submitted Timesheet Column Fieldset
- Defines the Field Set for displaying columns when the Timesheet Status = Submitted.
- Existing Field Set Submitted Timesheet Column’ on the Timesheet object is available within the Package.
- Rejected Timesheet Column Fieldset
- Defines the Field Set for displaying columns when the Timesheet Status = Rejected.
- Existing Field Set Rejected Timesheet Column’ on the Timesheet object is available within the Package.
- Submitted Expense Column Fieldset
- Defines the Field Set for displaying columns when the Expense Claim Status = Submitted.
- Existing Field Set ‘Submitted Expense Column’ on the Expense Claim object is available within the Package.
- Approve Expense Column Fieldset
- Defines the Field Set for displaying columns when the Expense Claim Status = Approved.
- Existing Field Set ‘Approved Expense Column’ on the Expense Claim object is available within the Package.
- Rejected Expense Column Fieldset
- Defines the Field Set for displaying columns when the Expense Claim Status = Rejected.
- Existing Field Set ‘Rejected Expense Column’ on the Expense Claim object is available within the Package.
- Approved Leave Column Fieldset
- Defines the Field Set for displaying columns when Payee Leave Event Status = Approved.
- Existing Field Set ‘Approved Leave Column’ on the Payee Leave Event object is available within the Package.
- Submit Leave Column Fieldset
- Defines the Field Set for displaying columns when Payee Leave Event Status = Submitted.
- Existing Field Set ‘Submitted Leave Column’ on the Payee Leave Event object is available within the Package.
- Reject Leave Column Fieldset
- Defines the Field Set for displaying columns when Payee Leave Event Status = Rejected.
- Existing Field Set ‘Rejected Leave Column’ on the Payee Leave Event object is available within the Package.
- Approver Action Error Text
- Configurable Text to display a message where an error is encountered during the Approver Action process
- Display Selected Pay Rate
- Controls visibility of the ‘Selected Pay Rate’ field within the Leave Approver Component.
Update Communities
The ‘Customisable Community Components’ provide an alternative to the standard 2cloudnine Packaged Employee Timesheet and Approver Components. Employee Community The Customisable Community Components feature consists of two main Components:- Customisable Timesheet Table:
- A replacement for the standard Timesheet Component, this table displays all relevant Timesheets in a customisable format tailored to User needs.
- New Timesheet Object Page:
- A dedicated page designed to accept the record.id from the Timesheet table (described in Key Features section above), enabling Users to view and manage individual Timesheet records seamlessly.
- Select the Timesheets page (Page that contains the Timesheet Component)
- Delete the Emp Comm Timesheets Component from the page.
- Select the Components button
- Search for the Skie Employee Timesheet Data Table Component and drag onto the page.
- Select the Component and update the relevant fields as per the Timesheet Components fields Table below (refer Figure 4)
- Select Publish .
- Label: Column Field
- Details: Defines the table columns by entering the Timesheet object field API names, separated by commas.
- Example: Name, tc9_et__Start_Date__c, tc9_et__End_Date__c, tc9_et__Client_Name__c, tc9_et__Assignment_Name__c, tc9_et__Approval_Status_Colour__c, tc9_util__Edit_Timesheet__c
- Label: Column Field Rich Text
- Details: Applies rich text to any fields from the ‘Column field’. For example any formula fields that reference URL’s or images must be included.
- Example: tc9_et__Approval_Status_Colour__c, tc9_util__Edit_Timesheet__c
- Label: Column Cell Attribute
- Details: Can be used to apply CSS styling to the table. A default field on the Timesheet labelled tc9_util__CSS__c can be used to apply a baseline style.
- Example: {“tc9_et__Approval_Status__c”:{ “class”:{ “fieldName”:“tc9_util__CSS__c”} } }
- Label: Filter Timesheet StartDate
- Details: Used to remove all Timesheets prior to the defined date.
- Example: 01/01/2025
- Label: Filter View in Portal
- Details: Checkbox to filter the Timesheet records displayed in the table. This should always be set to TRUE unless there is a specific requirement to only show future Timesheets.
- Example: If TRUE the table will show the current period and all past Timesheets. If FALSE the table will only show future Timesheets.

Important Notes(Figure 4)The ‘Column Field’ on the Component is required to use the ‘Skie Employee Timesheet Data Table’
Component. It must contain, at a minimum, the Name and tc9_util__Edit_Timesheet__c fields. In
addition the tc9_util__Edit_Timesheet__c must be included in the ‘Column Field Rich Text’.
- Select the Pages Cog and select New Page
- Select Objects Page
- Search for and select the Timesheet (tc9_et__Timesheet__c) object.
- Select Create and then Create again on the next prompt.
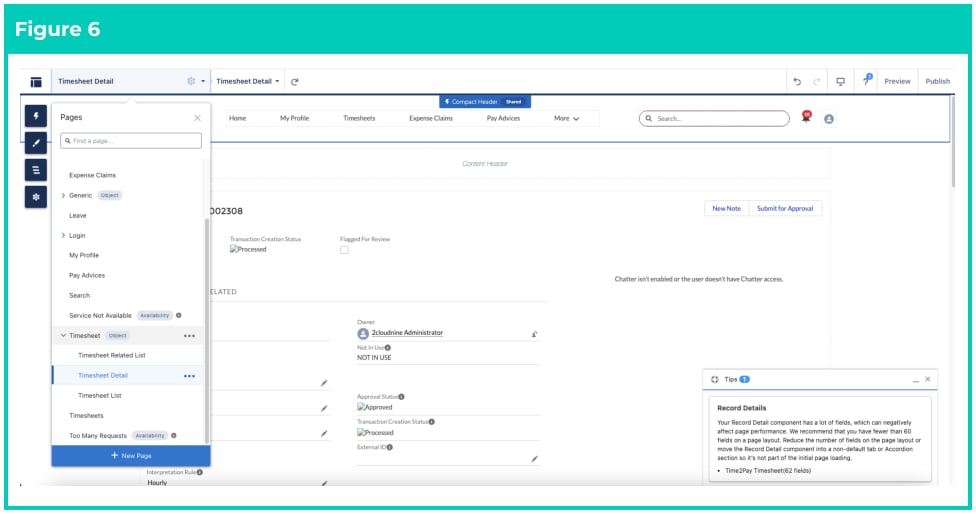
- Select the Pages Cog again, and you will now see a Timesheets object which can be expanded to show 3 additional pages (see Figure 6)
- Select the Timesheet Detail page.
- Delete the Record Banner and Record Information Tabs Components.
- Select the Components button
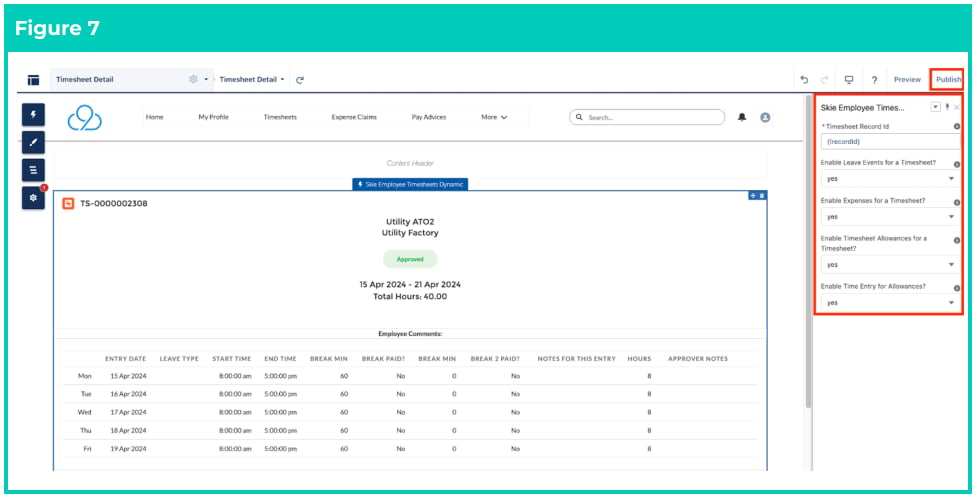
- Find the Skie Employee Timesheets Dynamic Component and drag it onto the page.
- Select the Skie Employee Timesheets Dynamic Component on the page to open the input screen.
- In the Timesheet Record Id input field, enter {!recordId} .
- Select Yes/No for enabling Payee Leave Events, Expenses, Allowances & Time Entry for Allowances (see Figure 7).
- Select Publish .
- Select the page containing the ‘Approval Portal’ Component. This Component will be different based upon using a shared Employee/Approver Community (Authenticated) or separate Communities (Guest Approvers).
- Delete the Approval Portal component from the page.
- Select the Components button
- Search for the Skie Approver Portal Dynamic Component if using Authenticated Approvers, or Skie Guest Approval Portal Component if using Guest Approvers.
- Drag the Components onto the page, then select Publish.