

Purpose
The purpose of this quick reference guide is to step through the process of completing Timesheets as a Payroll User. The intended audience for this document are Payroll Users.Steps
Complete a Timesheet
The Timesheet Manager is used to populate Timesheet Entries to reflect hours associated with a specific period of time, facilitating the creation of Pay Transactions for a Temp Assignment. The Timesheet record holds Timesheet Entries, and possibly also Expenses, Leave Events, Allowances, Pay Transactions and Approval details. Complete a Timesheet record as a Payroll User by following the steps below:- Go to the Assignment record.
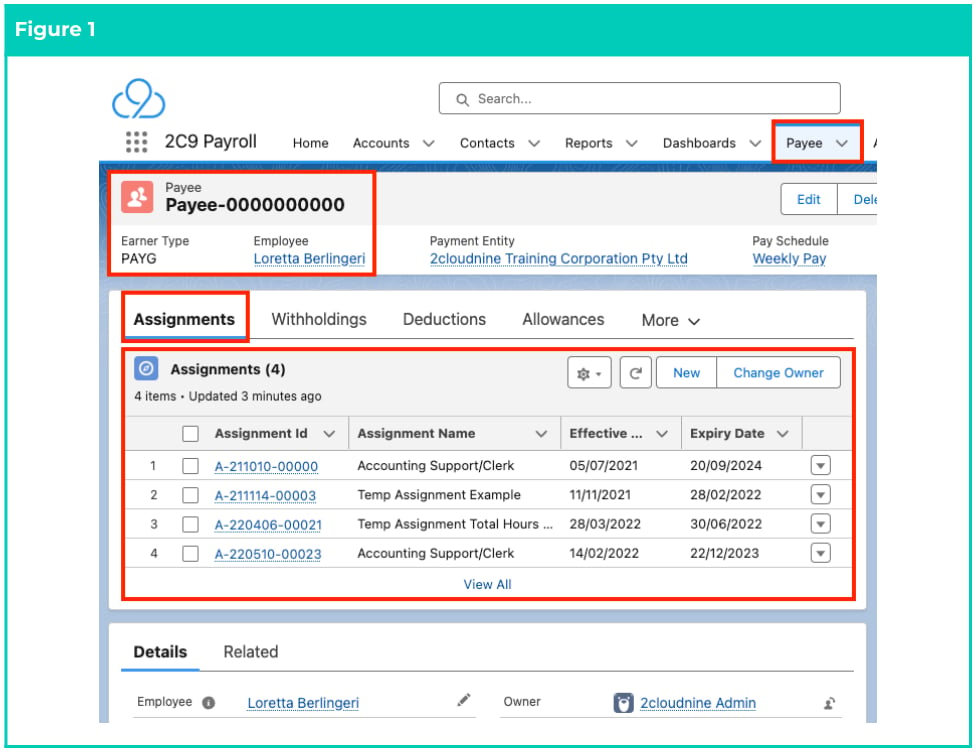
- To review the Assignment records related to an Employee, navigate to the associated Payee record.
- Select the appropriate Assignment record from the related list on the Payee record (see Figure 1).
-
Navigate to the related Timesheet record by following this step in the sequence given below:
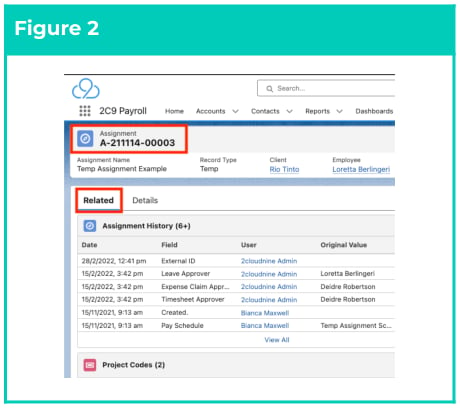
- From the Assignment record, select the Related tab (see Figure 2).
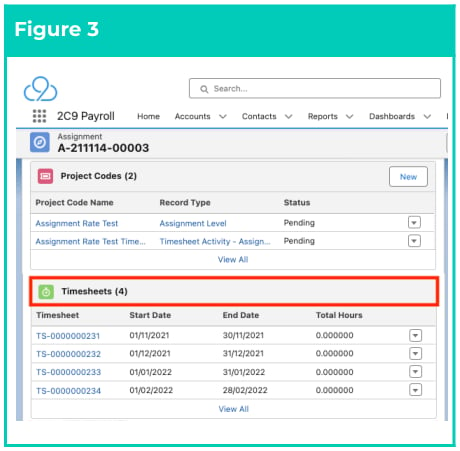
- Scroll to the Timesheets Related List (see Figure 3).
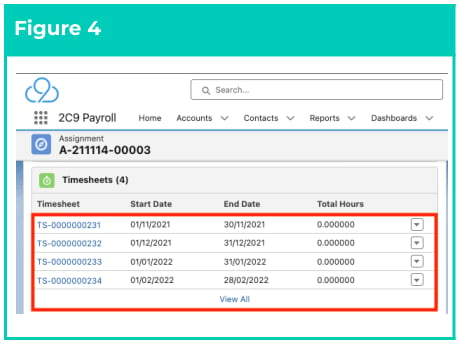
- Select the appropriate TS- reference number to open the Timesheet and launch the Timesheet Manager (see Figure 4).
- Review the selected Timesheet within the Timesheet Manager (see Figure 5).
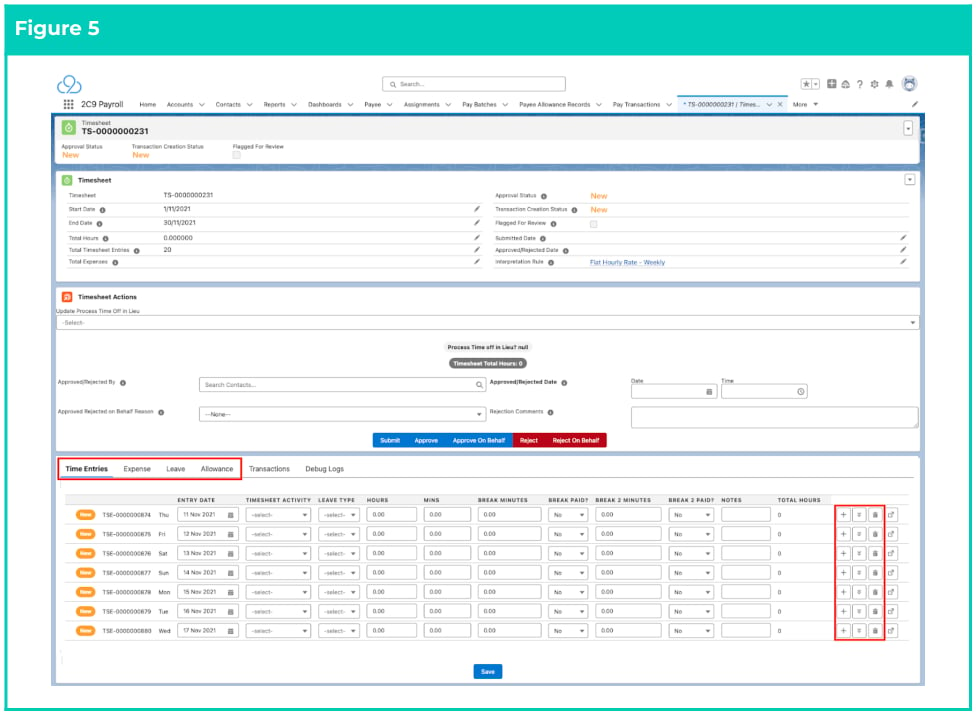
Some options displayed within the Timesheet Manager are only available once at least one line of
Timesheet Entry data has been saved. To use the buttons highlighted above, update Total Hour
values, or review Timesheet Items via Leave, Expense and Allowance tabs, please review steps 3 -
12 to populate the necessary Timesheet data.
-
To complete Timesheet Entries, follow this step in the sequence given below:
- Identify the Timesheet Entries within the Timesheet Manager Time Entries tab section (see Figure 6).
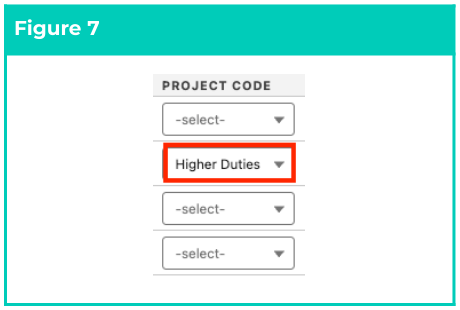
- To associate a Project Code from the related Assignment with a Timesheet Entry, select from the available picklist options in the Project Code field (see Figure 7).
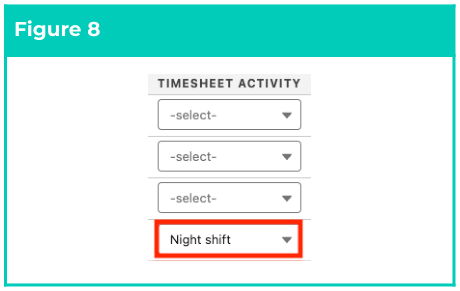
- To associate a Timesheet Activity from the related Assignment with a Timesheet Entry, select from the available picklist options in the Timesheet Activity field (see Figure 8).
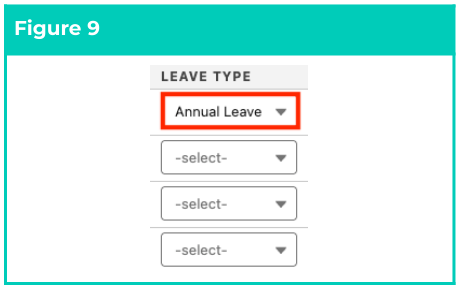
- If Payee Leave Rules are available for the related Payee, populate any Payee Leave Events applicable for Timesheet Entries by selecting from the available picklist options in the Leave Type field (see Figure 9).
-
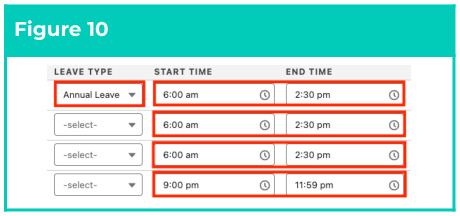
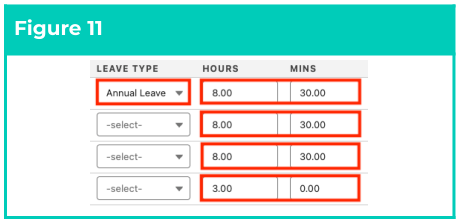
To record time, use the available fields to enter hours:
- For Start/End Times, populate the Start Time and End Time fields (see Figure 10). OR
- For Total Hours, populate the Hours and Mins fields (see Figure 11).
-
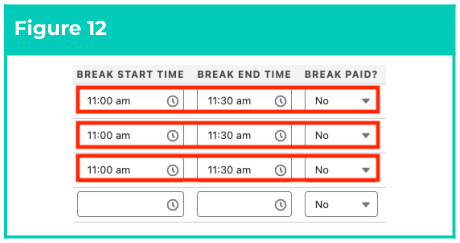
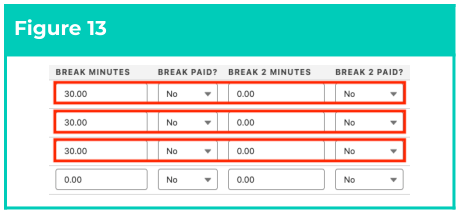
Use the following fields to define Breaks:
- For Start/End Times, populate the Break Start Time and Break End Time fields (see Figure 12). OR
- For Total Hours, populate the Break Minutes fields using whole numbers (see Figure 13).
- To define whether each Break should be paid, select from the available picklist options in the Break Paid field (see Figures 12 - 13).

When completing Leave Entries, any Breaks normally occurring across the period of Leave MUST be
populated as usual.
- Once you are satisfied with the Timesheet Entries, click on the Save button (see Figure 14).

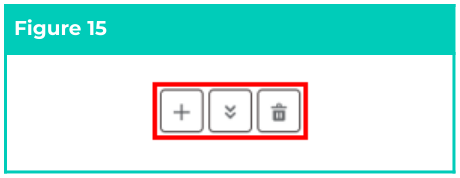
- To alter saved Timesheet Entry lines, use the following UI buttons (see Figure 15):
- Click the plus icon to add additional Timesheet Entry lines.
- To copy all values from a Timesheet Entry to lower rows, click the downward arrow icon.
- To delete a Timesheet Entry row, select the trash can icon.
You MUST Save Timesheet Entries before proceeding further. Changes made past this point will
cause all unsaved Entries to be erased.
- To add Expenses to the Timesheet, follow this step in the sequence given (see Figure 16):
- Navigate to the Expense Tab and click the Add Expense button.
- Define the date the Expense was incurred by populating the Date Incurred field manually, or by using the calendar selection tool.
- Provide a short description for the Expense by populating the Description field.
- Record the total amount of the Expense by populating the Total Inc. Tax field.
- To detail tax separately from the total of the Expense:
- Select the Taxable checkbox field.
- Record the amount of Tax included in the Expense by populating the Tax field.
- Record the amount of the Expense excluding Tax by populating the Total Ex Tax field.
- Relate a Pay Code to the Expense by selecting from the available picklist options in the Pay Code field.
- Repeat step 7 until all Expenses related to the Timesheet have been populated.
- Once all Expenses have been added, click on the Save button (see Figure 16).

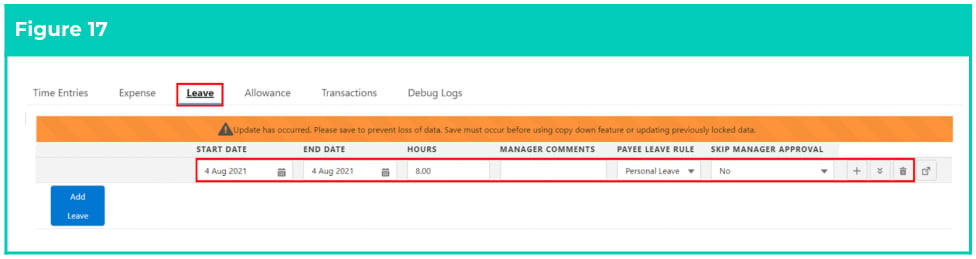
- To review any Leave entries related to the Timesheet, navigate to the Leave tab (see Figure 17).
- To bypass Manager Approval for a Leave Entry, select Yes from the available picklist options in the Skip Manager Approval field.
The creation of Pay Transactions will not commence until Timesheets are in an Approved status.
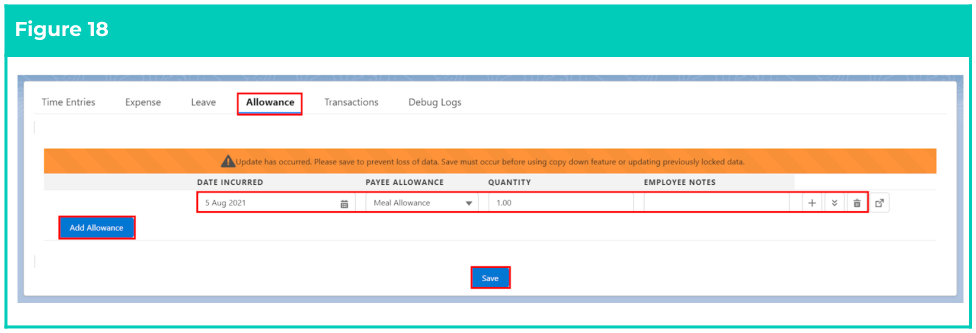
- To add a Timesheet Allowance to the Timesheet (see Figure 18):
- Navigate to the Allowance tab and click on the Add Allowance button.
- Define the payable date for the Allowance by populating the Date Incurred field, either manually or by using the calendar selection tool.
- Define the Allowance to be paid by selecting from the available picklist options in the Payee Allowance field.
- Define the units to be paid for the Date Incurred of this Allowance by populating the Quantity field.
- Record any notes or comments for the Allowance Entry by populating the Employee Notes field.
- Repeat Step 11 for all required Allowances related to the Timesheet.
- Once complete, click on the Save button.
The Leave tab must NEVER be used to enter new Leave Events. Leave MUST be entered via Timesheet Entries to be considered during Timesheet Interpretation.
Submit/Approve and Process a Timesheet record
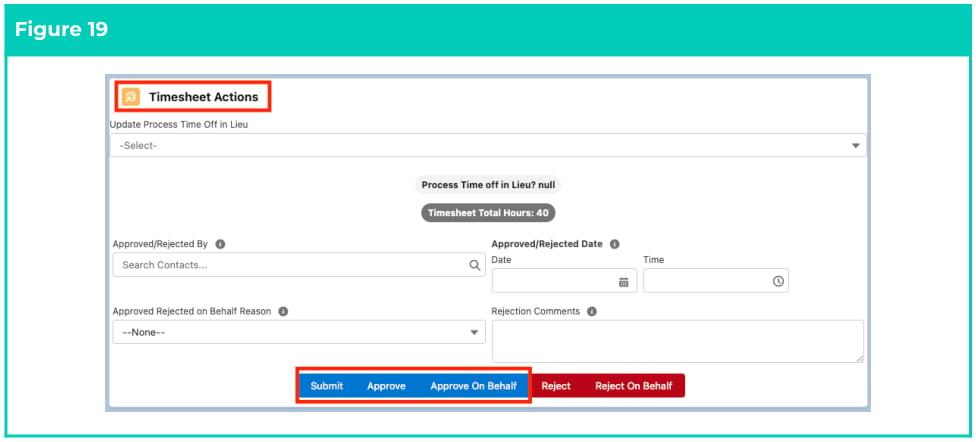
Once all Timesheet Entries, Expenses and Allowances have been saved, the Timesheet is ready to be submitted for approval. Timesheets must be approved by a Timesheet Approver or Payroll User before they may be processed for Pay Transaction creation. Submit, Approve and initiate Timesheet processing by following the below steps:- Identify the Timesheet Actions section within the Timesheet Manager page (see Figure 19).
- If Time In Lieu is enabled for the related Payee:
- Determine whether Overtime hours contribute to Leave balances by selecting from the available picklist options in the Update Process Time Off in Lieu? field.
- Submit the Timesheet for approval by clicking on the Submit button.
- To approve the Timesheet as an Approver:
- Enter the Contact approving the Timesheet in the Approved/Rejected by field
- Enter the date and time of the approval in the Approved/Rejected Date fields
- Click on the Approve button.
- To approve the Timesheet on behalf of another Approver:
- Populate the Approved Rejected on Behalf Reason field using the picklist options available.
- Click on the Approve On Behalf button.
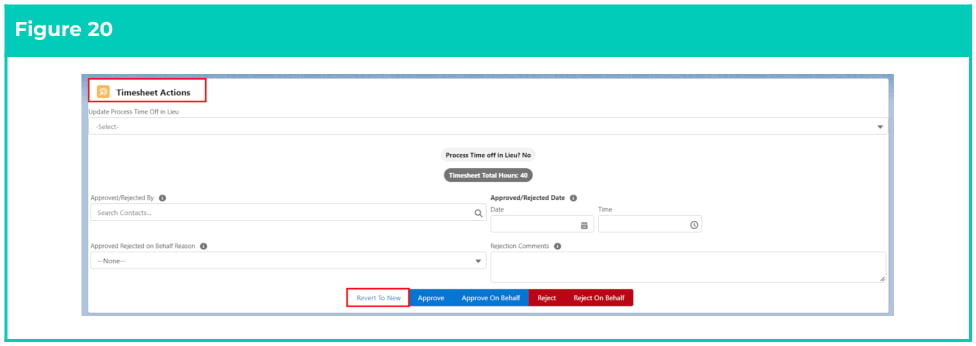
- To make changes to a Submitted, Rejected or Approved Timesheet (see Figure 20):
- Open the Submitted/Rejected Timesheet.
- Navigate to Timesheet Actions.
- Click the Revert To New button.
- Make the necessary changes to the Timesheet and select Save.
- Repeat steps 15 - 18 to Approve the Timesheet for Payroll processing.
- To initiate Payroll processing for an Approved Timesheet (see Figure 21):
- To manually initiate Interpretation and Pay Transaction creation for this Timesheet alone, select the Process Transactions button. OR
- Allow the next Schedule Job to automatically initiate Interpretation and Pay Transaction creation for all Timesheets with an Approved status.

Timesheets with a Processed Status may only be edited via the Revert to New function prior to being Invoiced or included in a Pay Batch. After this time, no changes can be made to any Timesheets.
Field Descriptions
Field Name Description Approval Status The Approval Status of the Timesheet. Approved/Rejected by The Approver who approved/rejected the Timesheet. Approved Rejected on Behalf Reason When Timesheets are Approved/Rejected on Behalf of the Approver, this field records the reason why. The following default options are available for selection, however these may be customised according to your requirements:- Could not contact Approver or Alternate Approver
- No hours or expense records
- Auto Approved Approved/Rejected Date The last Date/Time the Timesheet was Approved or Rejected. End Date Indicates the End Date of the Timesheet. Flagged For Review When selected, identifies the Timesheet as flagged for a Payroll User’s review, and facilitates reporting via standard Reports. Interpretation Rule Defines the Interpretation Rule that will be used in the processing of Timesheets into Pay Transactions. Process Time Off in Lieu When Yes is selected, indicates that interpretation should generate Time Off in Lieu credits rather than Overtime Pay Transactions for entitled Overtime. Project Code When populated, indicates that a Project Code is related to the Timesheet Entry, providing the ability for different Pay Rates (and potentially Invoice Rates) to be applied. Related Split Over Month Specifies a Timesheet that includes related Entries, if the Split Timesheets Over Months functionality has been applied. Rejection Comments When Timesheers have an Approval Status of Rejected, this field defines the reason given by the Approver for the rejection. Start Date Indicates the start date of the Timesheet. Start Day Indicates the start day of the Timesheet. Submitted Date Automatically populates the Date/Time the Timesheet was Submitted. Timesheet Activity When populated, indicates that the Timesheet Entry relates to an activity outside the scope of normal work. This enables Interpretation to apply different conditions, including Pay Rates (and potentially Invoice Rates) when assessing the Timesheet Entry. Total Hours Indicates the total number of hours for the Timesheet by summarising the hours entered across all related Timesheet Entries. Total Timesheet Entries The total number of Timesheet Entries related to the Timesheet. Total Expenses The total number of Expenses related to the Timesheet. Timesheet Split Over Months Automatically selected when related Timesheets are split into multiple records by the Split Timesheets Over Months functionality on the original Timesheet Calendar. Total Timesheet Allowances The total number of Timesheet Allowances related to the Timesheet. Transaction Creation Status Updated automatically to indicate the Timesheet’s current stage within the Pay Transaction creation process:
- New: Timesheet has not been Approved
- Ready: Timesheet is Approved, and is ready to be Processed
- Processed: Timesheet has Pay Transactions created
- Failed: The process to create Pay Transactions failed, Users should check Debug Logs