

Purpose
The purpose of this quick reference guide is to step through the process of populating CSV Templates with the necessary information to enable data to be imported for Standard Timesheet Entries using the Integrated Import Tool. The intended audience for this document are System Administrators / Standard Users.Steps
Populate CSV Templates
The CSV Templates provided for the Integrated Import Tool detail the necessary fields and formatting for imported data to be aligned with, to ensure successful validation and import. Once data has been formatted in line with the CSV Template, it may be uploaded directly to the Imported Records object in readiness for validation and import. The Standard Timesheet Entry CSV Template includes fields to import data related to Paid Breaks and Employee Comments, whereas the Enhanced Timesheet Entry CSV Template has been customised to exclude this data from being imported. A sample of the formatting used for this template can be viewed below (see Figure 1):
-
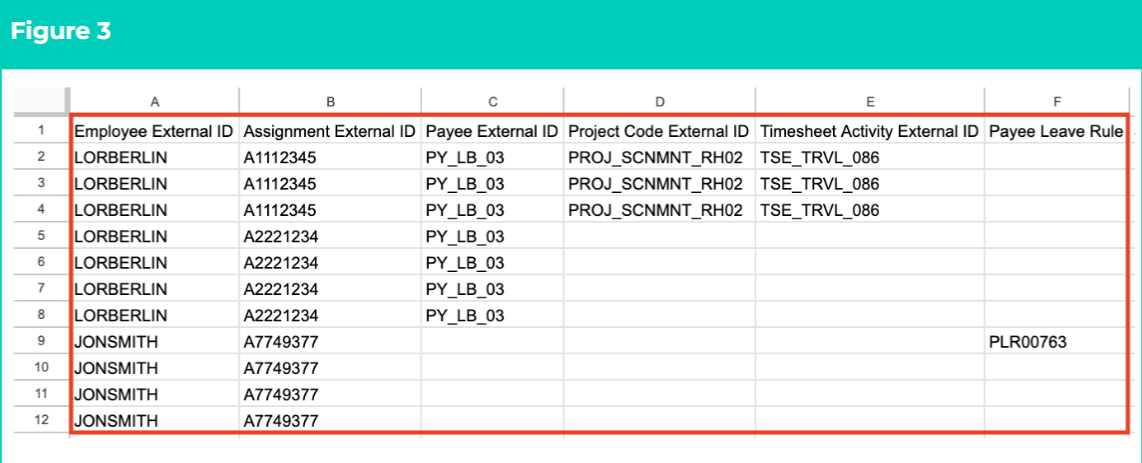
Identify each 2cloudnine record to be related with Timesheet data by using the value found in the External Id (it) field (Figure 2) to populate the cells displayed on the following page (Figure 3):
- The Employee External ID field must be populated in Column A using the value from the External ID field of the related 2cloudnine Employee record.
- The Assignment External ID field must be populated in Column B using the value from the External ID field of the related 2cloudnine Assignment record.

- If multiple Payee records are associated with the related Employee Contact, populate Column C with the value of the External Id (it) field for the related Payee .
- To include Project Codes, populate Column D with the External ID (it) of the related Project Code record.
- To include a Timesheet Activity, populate Column E for using the value of the External Id (it) field for the related Timesheet Activity Project Code .
- If the Timesheet Entry relates to Leave, populate the Payee Leave Rule field in Column F with the name of the related Payee Leave Rule the leave relates to.
Important Notes(Import Formatting and leading zeros)The External Id field used by the Integrated Import Tool must not be confused with other External ID fields. The correct External ID field can be identified by its API name: External_Id_it__c External ID (it).If this field is not displayed on the Page Layout by default, please contact your Salesforce Administrator for assistance.When populating Timesheet Entry data, the records referenced on the CSV must match those populated on the related Assignment record, and Time entered must align with the format of the Timesheet Calendar populated on the Assignment.When entering Dates, the format dd/mm/yyyy must be used.Please be aware of any auto-formatting that removes leading zeros from the entered data, as import will fail if the data entered does not exactly match the data as it exists in 2cloudnine Payroll.
- Specify the date of each Timesheet Entry by populating Columns G and H with the respective Start Date and End Date values (see Figure 4).
-
Record Time and/or Breaks by populating the following cells according to the format of the Timesheet Calendar related to the Assignment:
-
For Total Time Entries:
- Enter Time by populating Columns I and J with the respective Start Time and End Time values.
- Enter Breaks by populating Columns M and N with the respective Break 1 Start Time and Break 1 End Time values.
- To record an additional Break, populate Columns O and P with the respective Break 1 Start Time and Break 1 End Time values.
-
For Start/End Time Entries:
- Enter Time by populating Columns K and L with the respective Total Time (in hours) and Total Time(in mins) values.
- Enter Breaks by populating Column Q with the Break 1 Total value.
- To record an additional Break, populate Column R with the Break 2 Total value.
-
For Total Time Entries:

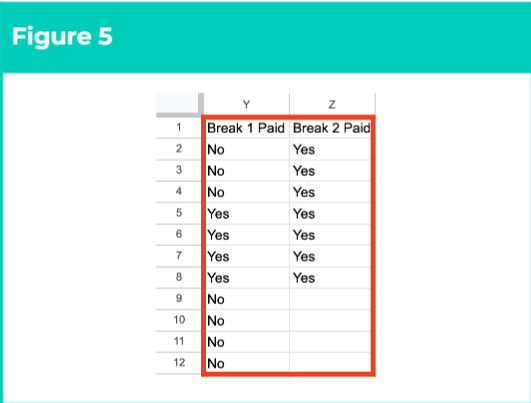
- Populate Columns Y and Z with either a Yes or No value, to indicate whether Breaks should be paid (see Figure 5).
Important Notes(24 hour format and Breaks as minutes)When entering Time, use 24-hour format for Start/End Time Entries (i.e. 8:00 for 8am. 15:30 for3:30pm), and whole numbers for Total Time Entries (i.e. 10 for 10 hours, 45 for 45 minutes).Break 1 Total and Break 2 Total fields should be entered as the total amount of minutes attributed to the Break.
-
Populate the remaining data as follows (see Figure 6):
- To record whether adjustments have been made to the Timesheet Entry, populate Column S with either a 1 (for Yes) or 0 (for No) value.
- To record any notes from the Approver for the Timesheet Entry, populate Column W.
- To record any notes from the Employee for the Timesheet Entry, populate Column X.

Important Notes(Format requirements)The Submitted Date field will be automatically populated with the date of processing, overwriting any data populated for these fields.Approved/Rejected By and Approved/Rejected Date fields will be automatically populated with the name of the Timesheet Approver for the related Assignment and the Date of successful Import. These values will overwrite any data populated for these fields.When importing Timesheet data, Allowance Timesheet Items must always be imported BEFORE related Timesheet Entries.