

Purpose
The purpose of this quick reference guide is to step through the process of creating Leave Cash Outs as Payroll Users. The intended audience for this document are standard users.Steps
Request for Leave Cash Out
To create a new Leave Cash Out record, follow these steps:- Go to the Payee record.
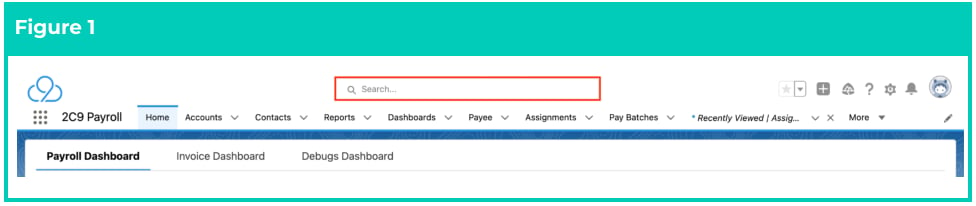
- To identify a Payee record from an Employee record, enter the Employee name into the Global Search. (See Figure 1)
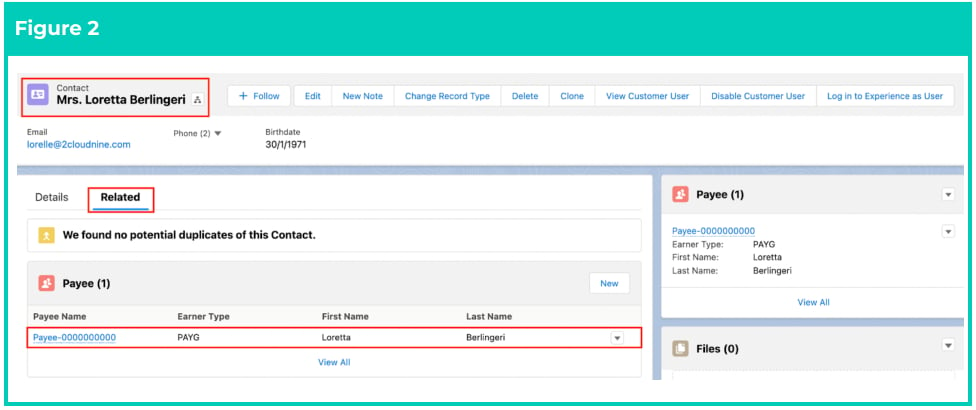
- Select the Employee record from the suggestions provided. (See Figure 2)
- Open the Related tab.
- Identify the Payee record(s).
- Select the Payee record.
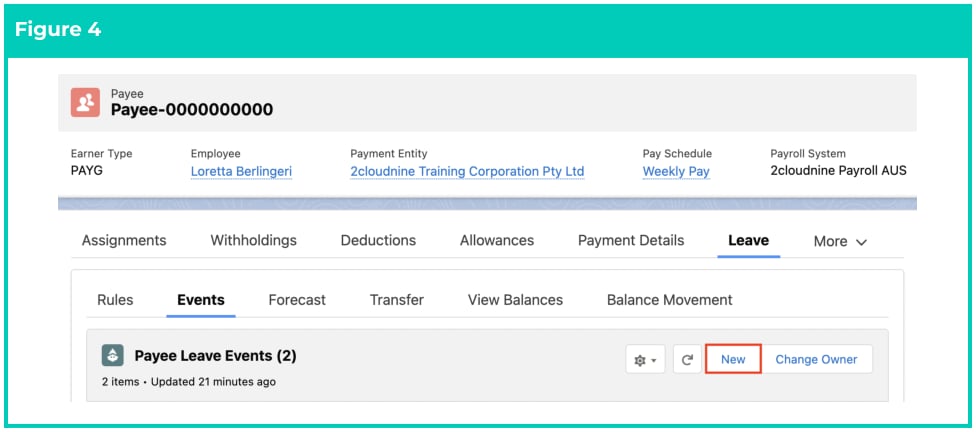
- Within the Payee record, navigate to the Leave tab. (See Figure 3)
- Click on the Events sub-tab.

- Click on the New button. (See Figure 4)
- Select Leave Cash Out record type and click on the Next button. (See Figure 5)

- Follow this step in the sequence given below:
-
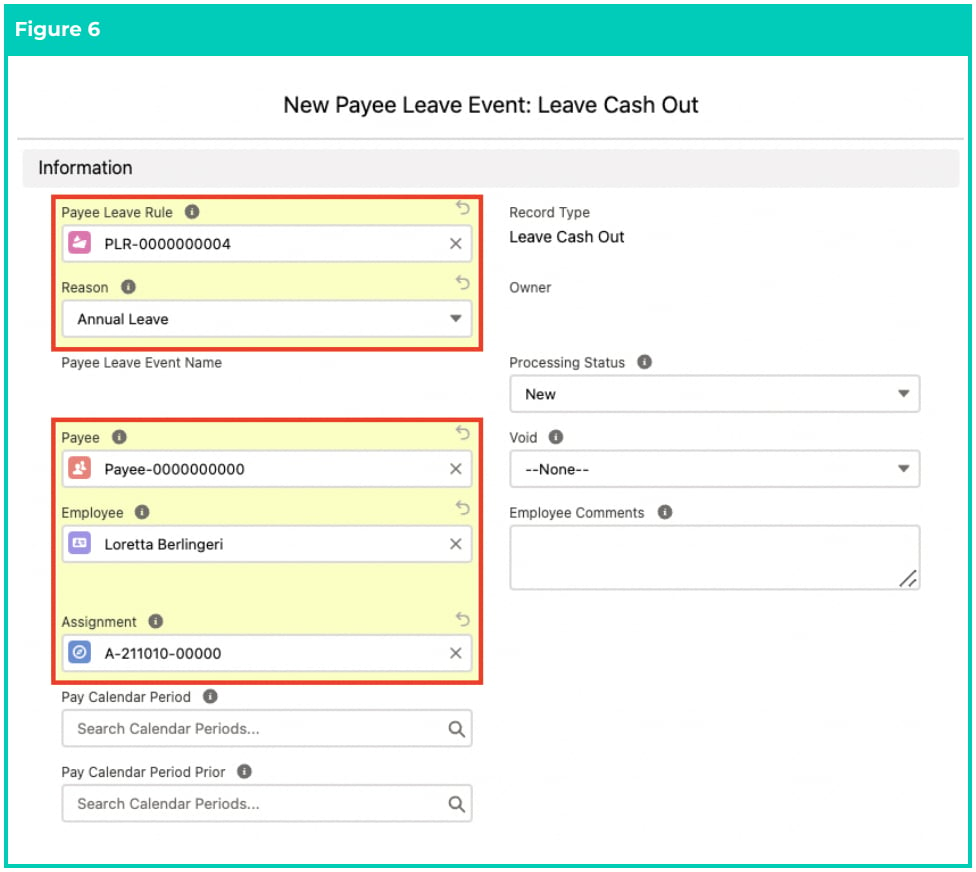
Populate the following required fields to provide the base details of the Leave Cash Out
record: (See Figure 6)
- Payee Leave Rule
- Reason
- Payee
- Employee
- Assignment
-
Populate the following optional fields as needed: (See Figure 6)
- To record additional comments provided by the Employee, populate the field Employee Comments.
- If this is a new Leave Event, the Void field should be populated as No, or it can be left blank. If it is populated with Yes, it would be ignored from Pay Batch Processing. ‘Yes’ should only be selected on Fully Processed Leave Events that are to be reversed in a future Pay Batch.
-
Populate the following required fields to provide the base details of the Leave Cash Out
record: (See Figure 6)
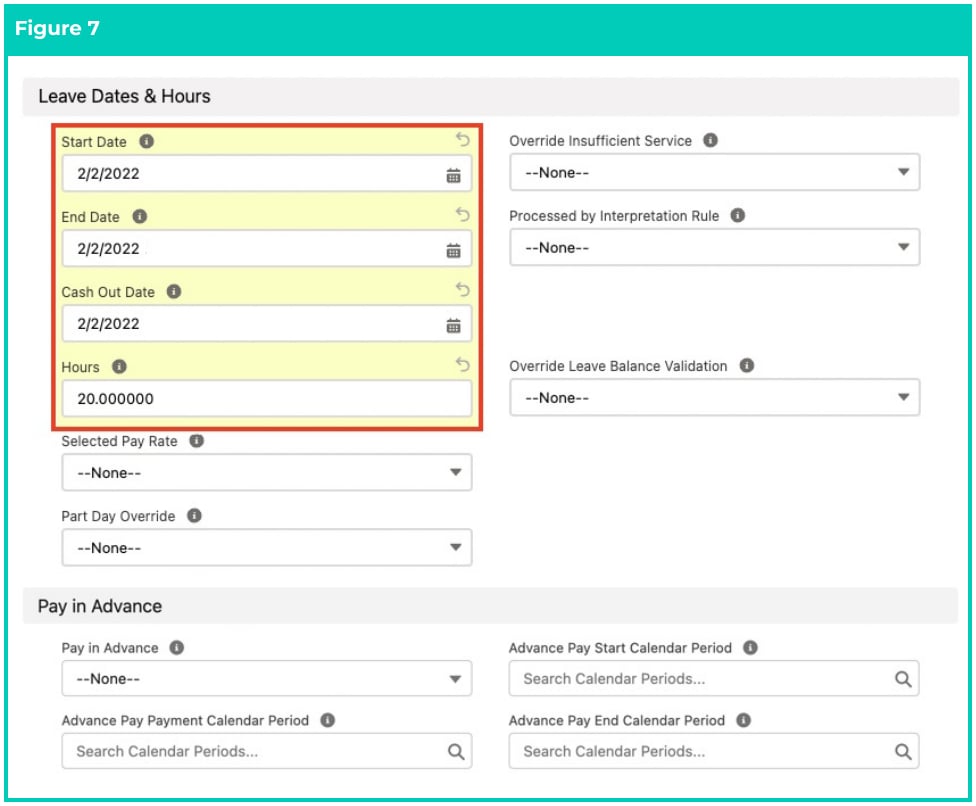
- Populate the following required fields to provide the base details of the Leave Cash Out record. (See Figure 7)
- Cash Out Date
- Hours
-
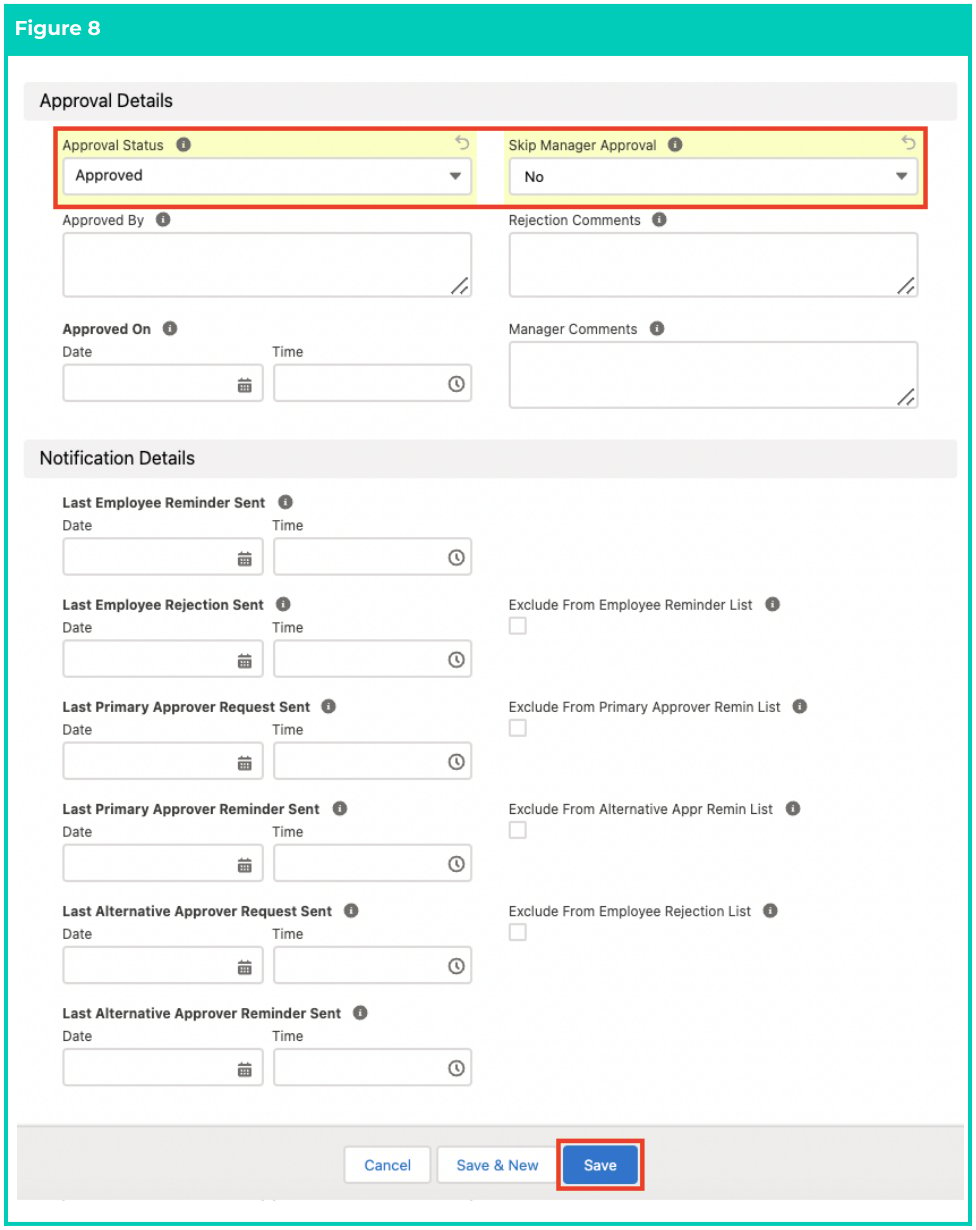
Populate the following required fields to provide the base details of the Leave Cash Out record: (See Figure 8)
- Approval Status - If the Approval Status is:
- Submitted - it’s awaiting the Leave Approver to approve.
- Approved - it’s ready for Pay Batch processing.
- New - saved as draft, nothing further occurs.
- Recalled - returned to Payee for editing and resubmission.
- Rejected - rejected for approval, Payee can delete, or edit and resubmit.
- Skip Manager Approval
- Approval Status - If the Approval Status is:
-
Populate the following optional fields as needed: (See Figure 8)
- To provide details of the Leave approval or rejection for an already approved or rejected request, populate the fields Approved By, Approved On, Rejection Comments and Manager Comments as required. If this has been created via the Employee and Approver Community, these fields will be automatically populated.
-
The following fields do not need to be populated for this record: (See Figures 6, 7 and 8)
- They do not have an impact during record creation, or they are not required for this
record type:
- Selected Pay Rate, Pay Calendar Period Prior, Pay in Advance, Advanced Pay Start Calendar Period, Advanced Pay Payment Calendar Period, Advanced Pay End Calendar Period, and Part Day Override.
- The following are automated fields:
- Start Date, End Date, Processing Status, Pay Calendar Period, Processed By Interpretation Rule, Last Employee Reminder Sent, Last Employee Rejection Sent, Last Primary Approver Request Sent, Last Primary Approver Reminder Sent, Last Alternative Approver Request Sent and Last Alternative Approver Reminder Sent.
- They do not have an impact during record creation, or they are not required for this
record type:
- Click on the Save button.
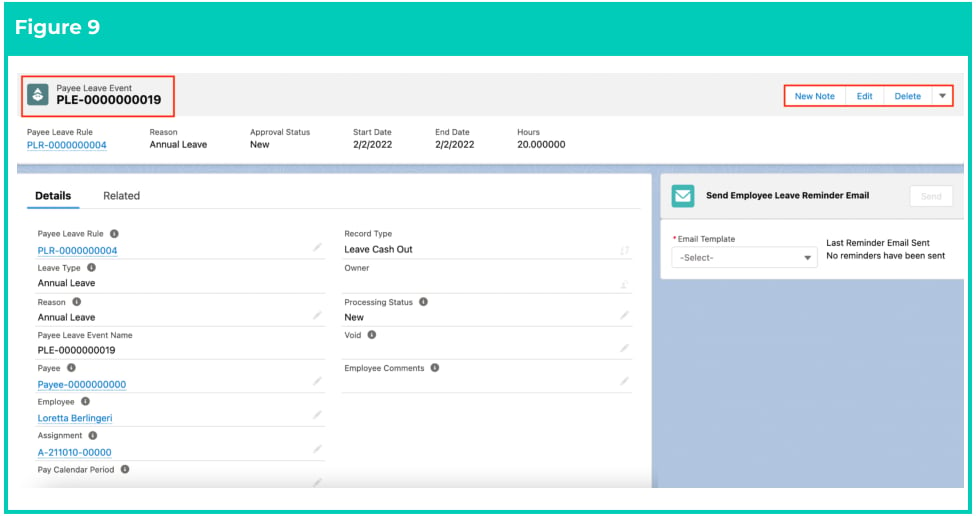
- A new Leave Cash Out record has been created. (See Figure 9)
Payee Leave Event records CAN NOT be deleted if they have related records or are
used in other records. Deleting records is not recommended unless absolutely
essential.
In these instances, users should select the option to VOID a leave event (the field below Processing Status).
- To modify an existing Payee Leave Event record, open the required record and select the Edit button available on the top right side of the page. You can also double click in any of the fields that need editing or just click on the pencil icon that appears within fields when you move your cursor over the field.
- When complete, click on the Save button.
Process a Leave Cash Out record
A Leave Cash Out record is picked up for Pay Batch processing when:- Processing Status is New.
- Approval Status is Approved.
- Cash Out Date falls within the range of the Pay Batch Calendar Period(s) being processed in the Pay Batch.
- Status of the record is updated to Fully Processed.
- The Pay Calendar Period field is populated as per the Pay Calendar Period relating to the Payee Pay Batch it is processed in.
- A Payment Pay Transaction is created.
Cancelling processed Leave Cash Out Events
This functionality details how to cancel a Leave Cash Out Event that has been previously processed in a Pay Batch. This will not work if the Leave Cash Out Event has the field Processed by Interpretation Rule marked as Yes. If that field is blank or No, follow the steps below:- Open the Payee record, click on the Leave tab and click on the Events sub-tab under the Leave tab. (See Figure 10)

- Click on View All. (See Figure 11)
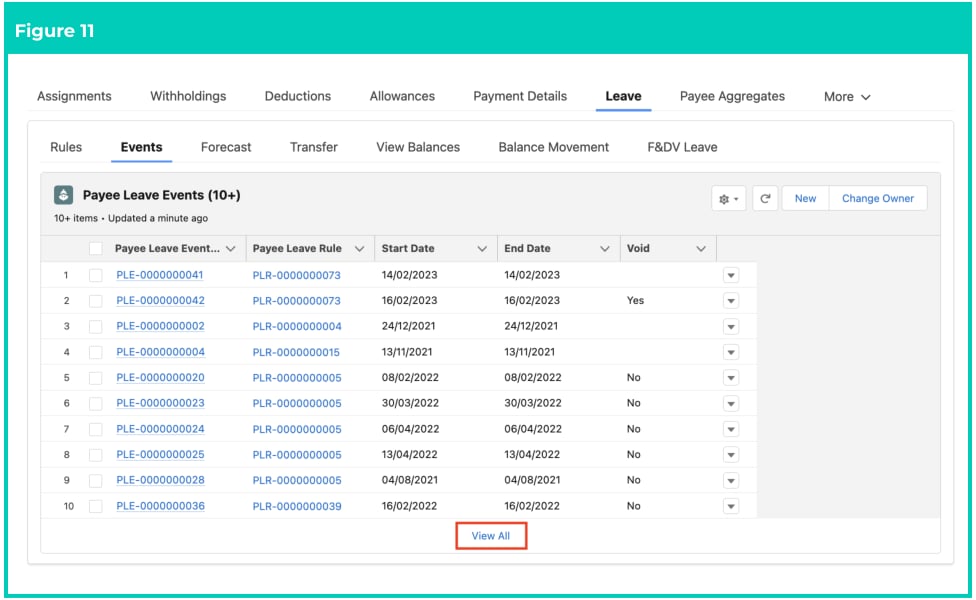
- Select the Payee Leave Event that needs to be cancelled. You will be able to select it based on the Start Date, End Date and Leave Type. (See Figure 12)

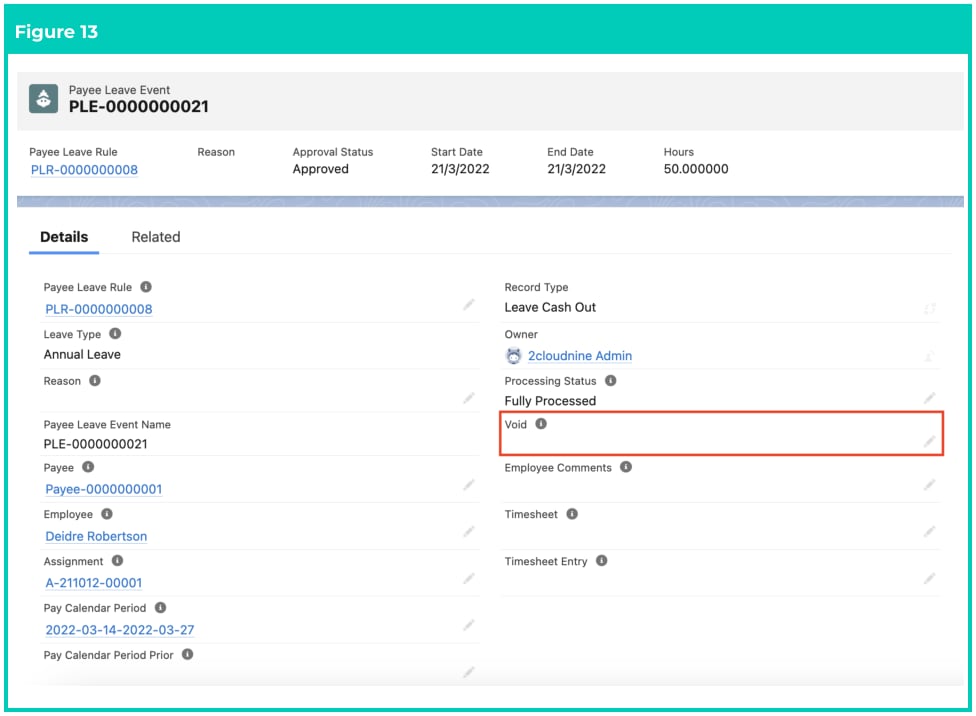
- Within the Payee Leave Event record, click the pencil icon located on the right hand side of the Void field. (See Figure 13)
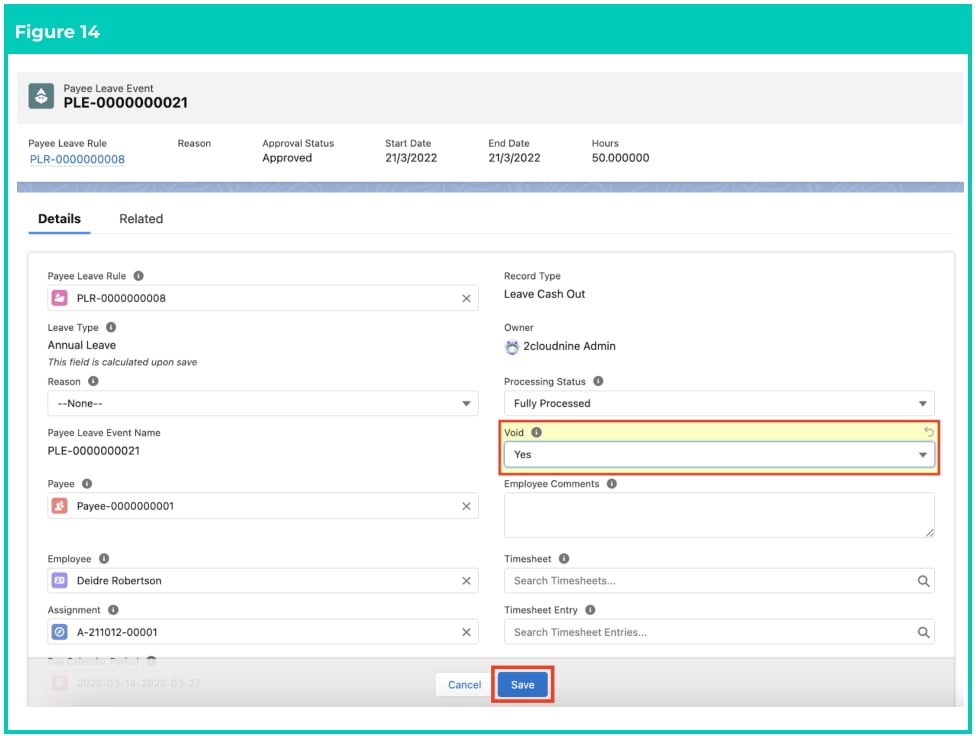
- On the field Void, change the picklist value to Yes. (See Figure 14)
- Click on the Save button.
- The voided Payee Leave Event will be processed in the next Pay Batch.