

Purpose
The purpose of this quick reference guide is to step through the process of importing Timesheet or Pay Transaction data into a new Import record using the Integrated Import Tool. The intended audience for this document are System Administrators / Standard Users.Steps
Create Imported Record
The new Integrated Import Tool utilises Imported Records as a junction record between uploaded data and the related imported records. This enables users to import data by uploading, validating and processing directly on the Imported Records Object. Timesheets, Allowance Timesheet Items and Pay Transaction records may all be imported using this process. To create a new Imported Record using the Integrated Import Tool, the following steps should be completed:- Click on the App Launcher icon (see Figure 1).

- Go to the Imported Records object by using the Search function (see Figure 2).

- Click on the New button (see Figure 3)

- Select Timesheet, Allowance or Pay Transaction from the available record types, and click on the Next button (see Figure 4).

When importing Timesheet data, any Allowance Timesheet Items must be imported using the Allowance record type BEFORE importing Timesheet Entries.
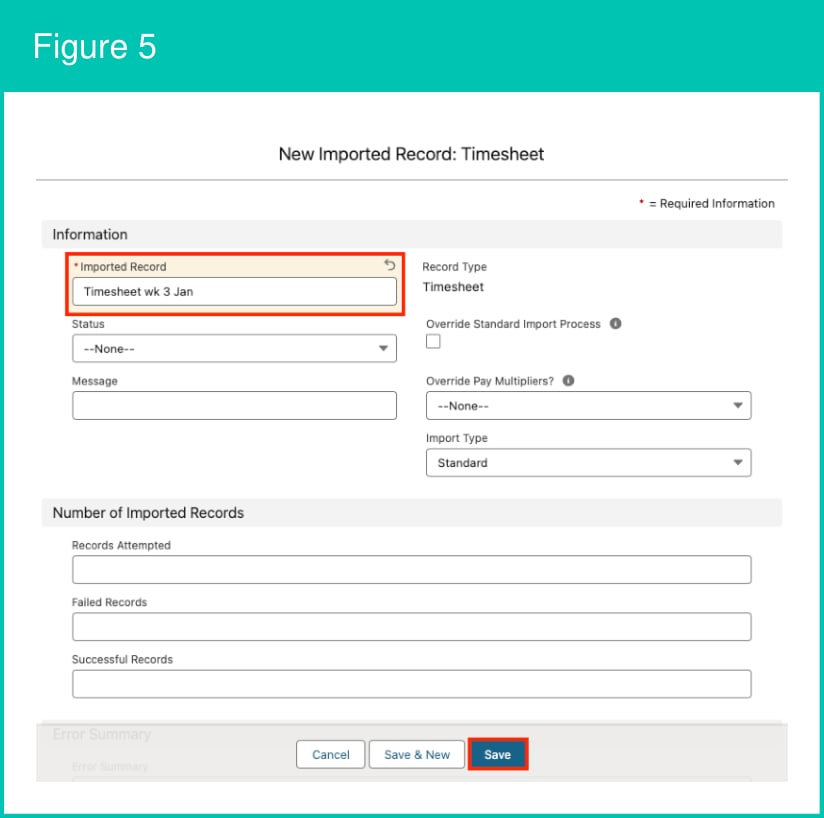
- Populate the following fields (see Figure 5):
- Populate only the Imported Record field with a unique identifier for the data import file.
- If the data to be imported has NOT been formatted using a Standard CSV Template, please populate the Import Type picklist field with the corresponding value (eg. Enhanced if using the Enhanced Timesheet Entries CSV Template).
- If the Pay Transaction record type was selected at step 4, and Pay Multipliers related to the data to be imported should be overridden to 1, populate the Override Pay Multipliers field.
- Click on the Save button (see Figure 5).
Uploaded Data for Import
Once the Imported Record has been created, the data that needs to be imported must be manually uploaded to the record, to enable validation and processing. To upload data for processing using the Integrated Import Tool, the following steps should be completed:- Follow the instructions detailed in QRG Integrated Import Tool - Populate CSV Files to prepare your data for upload and import.
-
From the new Record page (created in steps 1-5), complete the following steps to upload files:
-
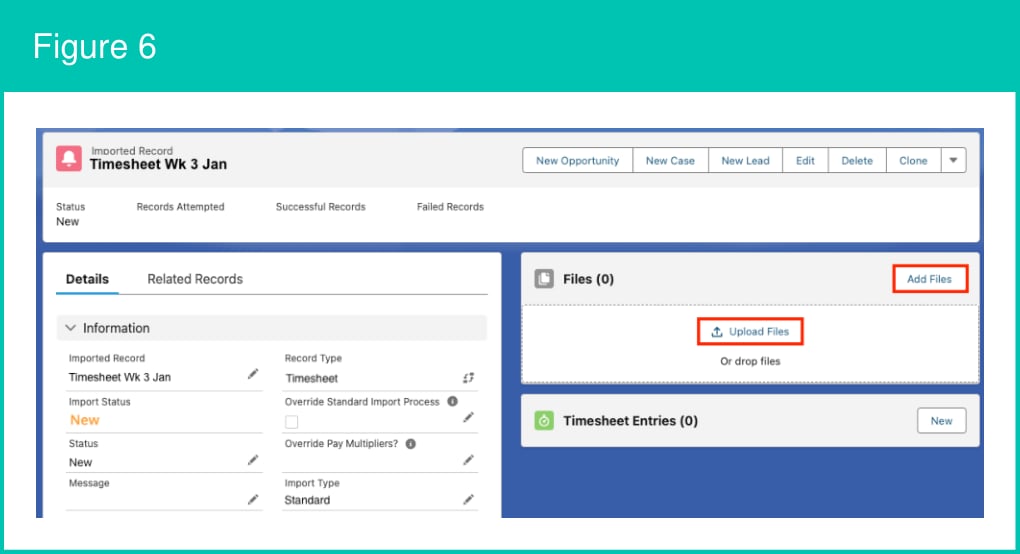
Click on the Add Files or Upload Files buttons to select files (see Figure 6).
-
Navigate to the data file to be uploaded, select the file and click on the Open button to begin the upload (see Figure 7).
 All data uploaded for import must be formatted in line with the CSV Templates provided, and according to the instructions detailed in QRG Integrated Import Tool - Populate CSV Files.Imported Records will allow multiple files to be uploaded, however the Integrated Import Tool will only process data from ONE uploaded file. Please do not upload more than one CSV file for each Imported Record.
 -
Wait for the progress bar in the Upload Files window to complete, then click on the Done button (see Figure 8).

-
Click on the Add Files or Upload Files buttons to select files (see Figure 6).
Validate and Import Uploaded Data
After creating a new Imported Record and uploading the file containing the data for import, the record must be manually edited to trigger validation and record creation for the imported data. Follow the below steps to import the uploaded data:- Click on the Edit button to modify the record (see Figure 9).

- Populate the following fields to trigger validation and import of data for the uploaded file (see Figure 10):
- Select the Override Standard Import Process checkbox field.
- In the Status field, select Ready To Be Processed from the available picklist values.
- Click on the Save button (see Figure 10).
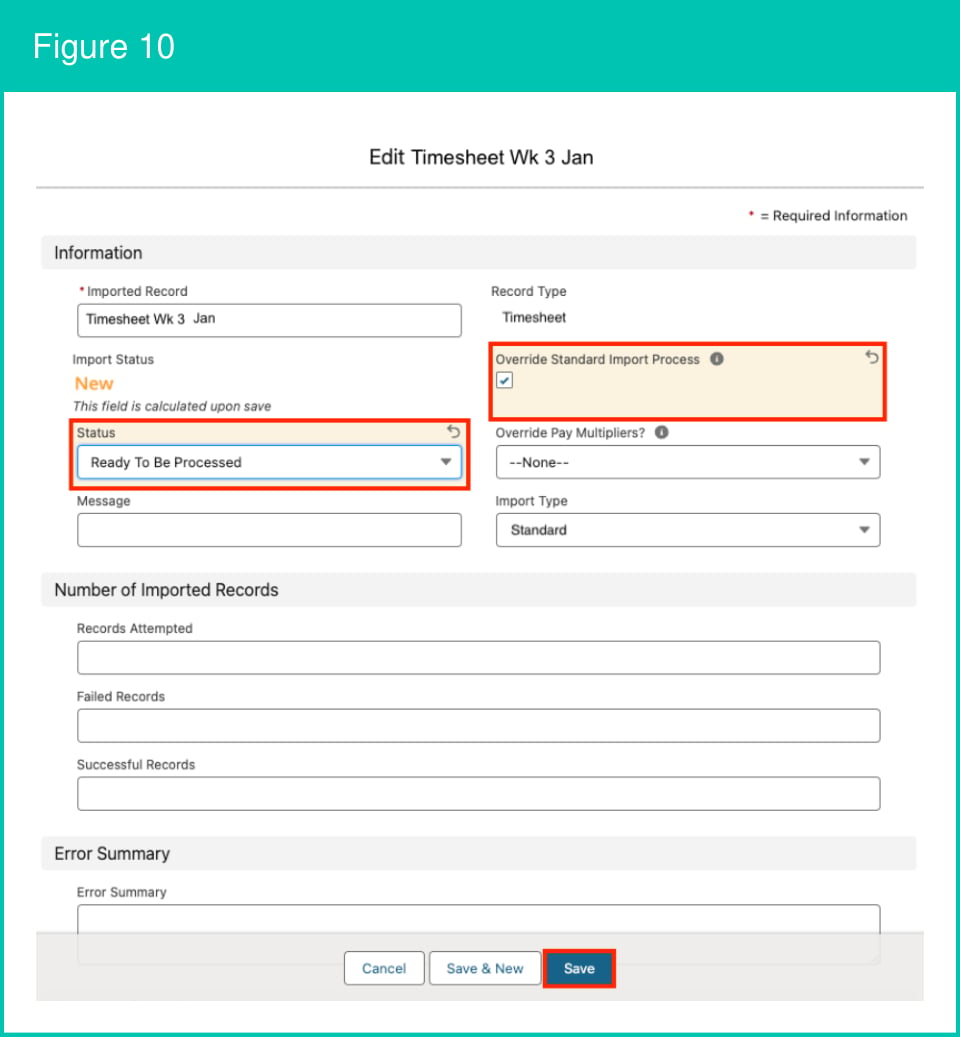
The Status field must NOT be updated to Ready To Be Processed unless the Override Standard Import Process checkbox is marked True. Failing to select this checkbox before updating the Status of the record will result in processing errors.
Review Import Status
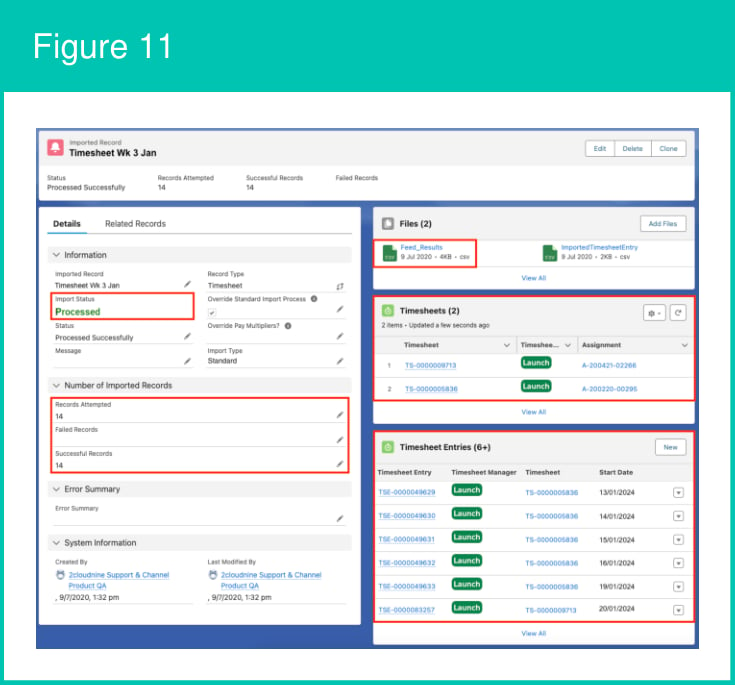
Once the Status of the Imported Record has been updated and saved, the Integrated Import Tool will begin to validate the data contained within the uploaded file. If data validation is successful, the Integrated Import Tool will create the data from the import file. If data validation is not successful, data from within the import file will not be created and will need to be manually amended before attempting validation again. To determine whether data validation was successful, the following steps should be completed:- Review the Import Status field of the Imported Record (see Figure 11).
- A Failed status indicates that data validation was not successful.
- A Processed status indicates that data validation was successful and records have been imported.
- Review the new CSV file that was automatically attached to the Imported Record upon completion of the validation attempt (see Figure 11).
- If successful, the CSV will be named Success Records ([number of records]).csv, and will contain a new Results column that may contain additional information regarding the successful validation and import of source data.
- If failed, the CSV will be named Failed Records ([number of records]).csv.
- Review the Related Records of the Imported Record (see Figure 11).
- If validation was successful, the new records created during data import will be listed in the related lists here.
- Review the Number of Imported Records (see Figure 11).
- The number populated in the Records Attempted and Successful Records fields should be equal.
- Make note of the warnings displayed in the Message and Error Summary fields (see Figure 12).
- Open the attached Failed Records CSV file (see Figure 12).

-
Review the message populated in the Status & Error/Warning or Result fields for each line of data.
-
Status & Error/Warning fields will always be displayed in the first two columns of the CSV (see Figure 13).

-
Result fields will always be displayed in the last column of the CSV (see Figure 14).

-
Status & Error/Warning fields will always be displayed in the first two columns of the CSV (see Figure 13).
-
Correct the data as detailed in the attached Failed file by following the below steps:
-
To open and modify the CSV file:
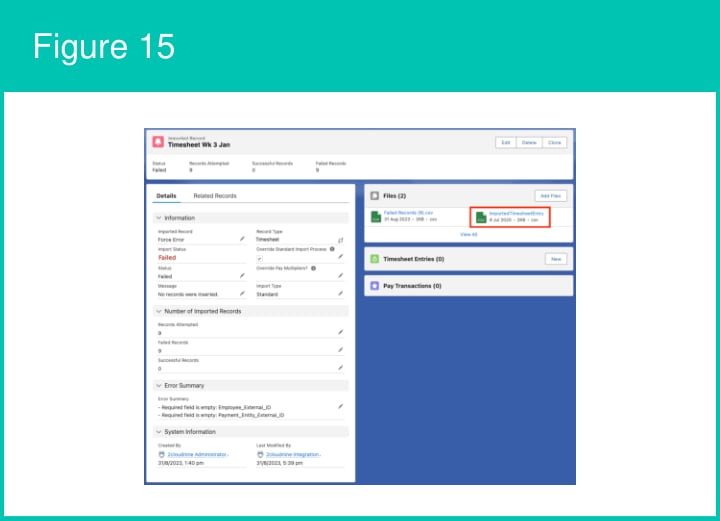
- From the related Files records, click on the uploaded CSV file (see Figure 15).
- Click on the Download button (see Figure 16).
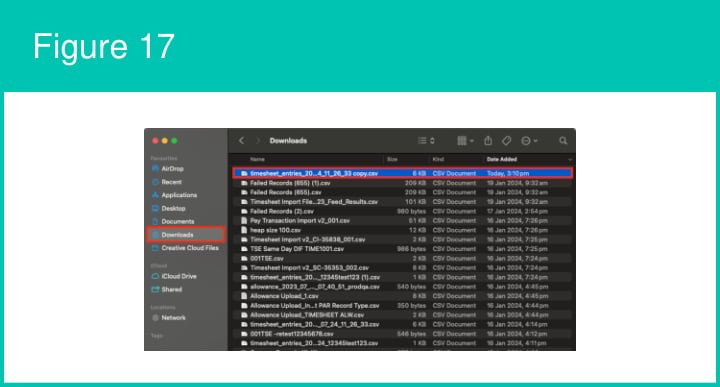
- Open the downloaded CSV file (see Figure 17).
- Amend the data according to the corrections needed.

-
To open and modify the CSV file:
-
Replace the existing uploaded CSV data file with the corrected CSV file by following the below steps:
-
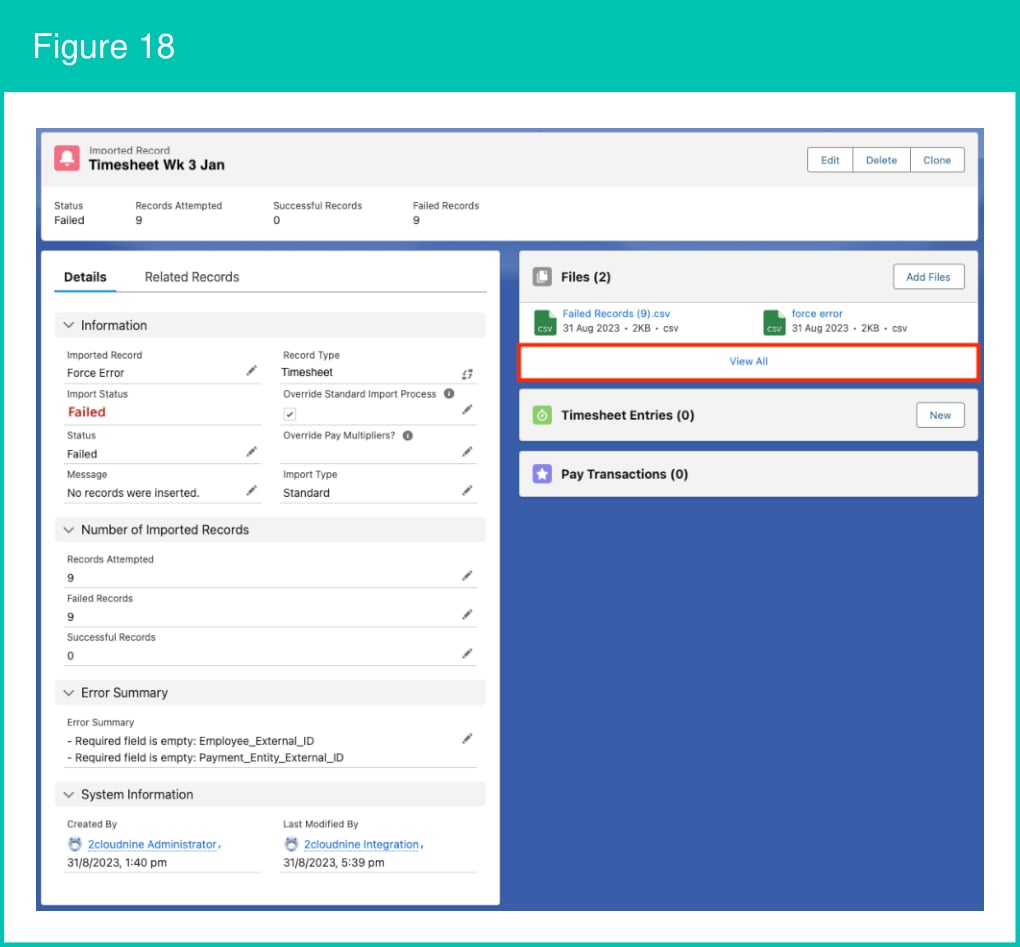
Click on the View All button beneath the related Files records (see Figure 18).
-
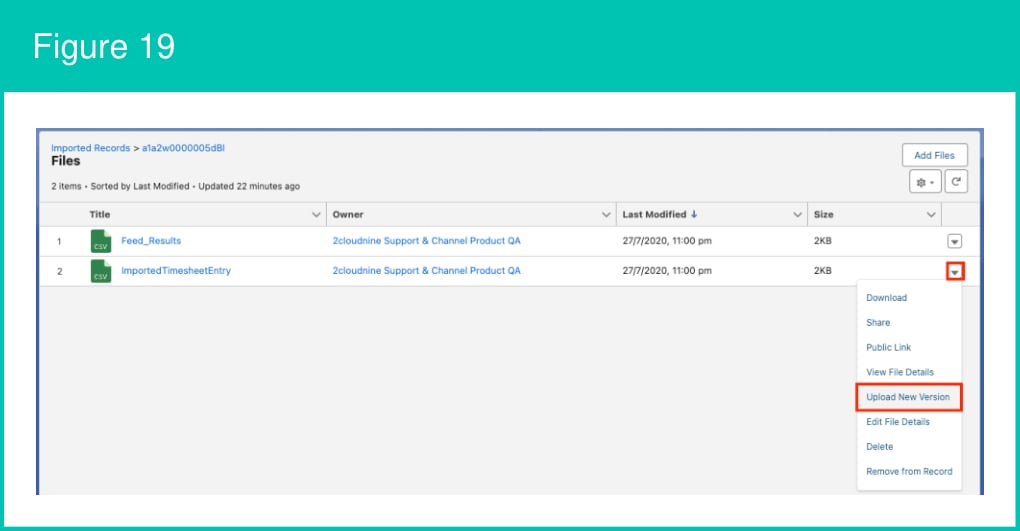
Click on the button and select Upload New Version to upload and overwrite the original CSV data file with the new CSV data file (see Figure 19).
-
Click on the View All button beneath the related Files records (see Figure 18).
- Return to steps 8-14, and re-attempt validation and processing for the corrected data.
Field Descriptions
Error Summary provides a summary of errors encountered during either data validation or data import. Failed Records details the number of imported records that were not successfully processed.- The Integrated Import Tool does not support partial data import:
- If any errors are encountered during data validation, data import will not occur and all records will be marked as failed.
- If errors are encountered during data import, any newly created records will be deleted, and updated records will revert to their original values. The number of records that failed to import will be marked as failed, and records that were able to be imported will be marked as successful.
- Timesheet Standard or Enhanced
- Allowance Standard or Enhanced
- Pay Transaction Standard